Vue组件化开发(二)
Vue之传递数据
父组件把数据传递给子组件
可以通过props属性,来将父组件的数据传递给子组件,传递数据的三个步骤:
step 1:在父组件中调用子组件,在组名处,使用给标签属性赋值的方式往下传递数据
<template>
<div id="father">
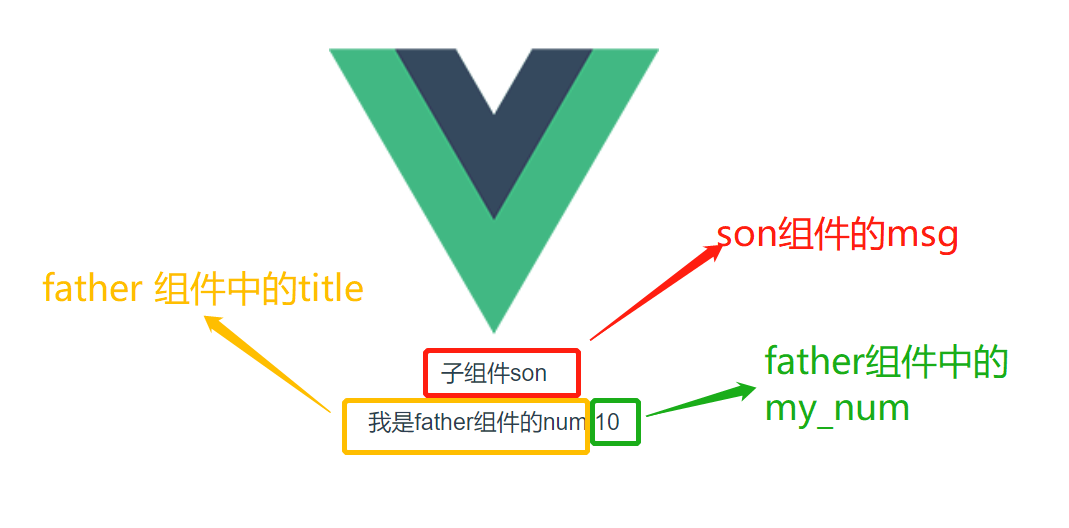
<son :mynum="father_num" title="我是father组件的num"></son>
</div>
</template>
# 上面表示父组件father在调用子组件son子组件的时候,一共传递了两个参数
如果传递的数据是一个变量,那么属性值前面需要加上':',如:mynum="father_num";
如果传递的数据是普通字符串,则不需要加上':';
step 2:子组件son在接受父组件father传递过来的数据时,需要在vm对象中,通过props属性来接收他们
<template>
  <div id="son">
    <p>{{msg}}</p>
    <p>{{title}}:{{my_num}}</p>
  </div>
</template>

<script>
  export default {
    name: "son",
    props: ['my_num', 'title'],
    data() {
      return {
        son_num: 50,
        msg:'子组件son'
      }
    }
  }
</script>
总结:
(1)传递的数据分为动态数据和静态数据,所谓静态数据指的是普通的数据,所谓动态数据指的是变量,传递动态数据的时候,子组件的组名内属性需要在前面加上“:”;
(2)父组件中修改了数据,子组件中的数据也会发生相应的变化,而子组件中修改了数据,是不会影响到父组件中的数据。

上述(2)中,讨论的数据是父组件传递给子组件的数据。这种现象,在开发的过程中,被称为单向数据流。
子组件把数据传递给父组件
step 1:在子组件中,通过this.$emit()来调用父组件中定义好的事件
// 子组件传递数据给父组件[事件的方式进行传递]:
watch:{
	son_num(){
		// this.$emit("父元素的自定义事件","要传递的数据");
		// 通过this.$emit()方法,子组件可以把数据传递给父组件
    	this.$emit('recv_son_num',this.son_num,'来自son.vue的数据')
    }
}
step 2: 父组件中声明一个和子组件中this.$emit("自定义事件名称")对应的事件属性
<template>
  <div id="father">
    <son :my_num="father_num" title="我是father组件的num" @recv_son_num="get_num"></son>
    <p>{{recv_son_num}}</p>
  </div>
</template>
step 3: 在父组件中,声明一个自定义方法,在事件被调用时执行
methods: {
    get_num: function (v1, v2) {
        this.recv_son_num = v1;
        console.log(v2, this.recv_son_num)
    }
}
在组件中使用axios来获取数据
step 1: 在cmd终端下载axios
npm install axios
step 2: 在main.js文件中,导入axios并把axios对象 挂载到vue属性中多为一个子对象,这样我们才能在组件中使用。
// The Vue build version to load with the `import` command
// (runtime-only or standalone) has been set in webpack.base.conf with an alias.
import Vue from 'vue'
import App from './App' // 这里表示从别的目录下导入 单文件组件
import axios from 'axios'; // 从node_modules目录中导入包
Vue.config.productionTip = false

Vue.prototype.$axios = axios; // 把对象挂载vue中

/* eslint-disable no-new */
new Vue({
  el: '#app',
  components: { App },
  template: '<App/>'
});
step 3: 在组件中使用axios获取数据
<script>
  export default {
    name: "Weather",
    data() {
      return {
        is_show: false,
        city: '',
        yesterday: {
          date: '',
          high: '',
          low: '',
          fengxiang: '',
          fengli: '',
          type: '',
        },
        weather_list: [],
        error_msg: '',
      }
    },
    methods: {
      get_weather: function () {
        this.is_show = true;
        this.$ajax.get("http://wthrcdn.etouch.cn/weather_mini", {
          params: {city: this.city}
        }).then(response => {
          this.weather_list = response.data.data.forecast;
          var fengxiang = response.data.data.yesterday.fx;
          var fengli = response.data.data.yesterday.fl;
          this.yesterday = response.data.data.yesterday;
          this.yesterday.fengxiang = fengxiang;
          this.yesterday.fengli = fengli;
          this.weather_list.splice(0, 0, this.yesterday);
        }).catch(error => {
          console.log('http请求失败');
          this.error_msg = 'http请求失败(未知城市)'
        })
      },
      re_set: function () {
        this.city = '';
        this.is_show = false;
      }
    },
    filters: {
      format(city) {
        return city + '近一星期的天气情况'
      }
    }
  }
</script>
从本质上来说,我们还是使用的原来的axios,因此会受到同源策略的影响