一、背景
一般大公司都比较重视企业文化,和学习氛围,这不我们的团队也是如此,每个人每月微信分享必须超过5篇内容,一个是提高自己的阅读量,另外还可以把有用的资源分享给其他人。开始记录的一段时间还算比较顺利,可是当大家的分享内容一多的时候,总是发生记漏的情况,后来我就萌生了一个想法,可不可以让程序来记录分享数据,这样就不会发生错误了。正好这一段时间刚好在学习python,那就拿这个案例来练练手,网上搜索了一些资料,发现我的需求果然可以用程序来实现,那么还等什么直接开干吧
二、效果展示
1、自动回复

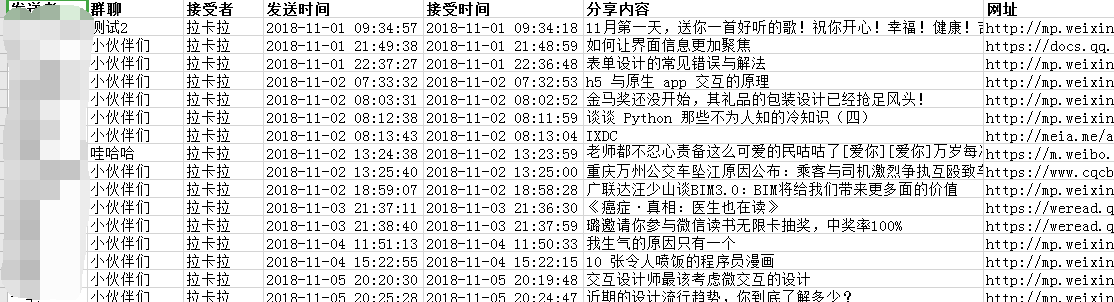
2、生成的excel效果展示
三、wxpy
wxpy
1、wxpy安装比较简单,直接使用pip命令行安装即可:pip install wxpy
2、wxpy的帮助文档还是比较详细的,网上大多数的文章都是简单的使用了下这个库,没有详细的解释,如果有时间,建议最好自己过一遍帮助文档
3、使用起来也是相当简单
3.1先导入wxpy模块
1 from wxpy import *
3.2构造一个机器人对象(机器人对象可构造多个)
1 bot = Bot()
3.3发送消息给文件助手
1 bot.file_helper.send('你好')
3.4发送消息给好友
1 friend = bot.friends().search('朝十晚八')[0]
2 friend.send('你好')
3.5自动回复指定好友消息
 1 @bot.register([Friend])
 2 def auto_monitor_friend_all(msg):
 3     with cond :
 4         if msg.text.startswith(orderHeader) and msg.sender.name in destusers :
 5             print(u'收到一条好友指令消息:', msg.text)
 6             __dealwith_order(msg)
 7         else :
 8             print(u'收到一条好友消息', msg)
 9             if msg.type == PICTURE :
10                 image_cache = image_cache_path + '/' + msg.file_name
11                 msg.get_file(image_cache)
12             tuling.do_reply(msg)
上述自动回复消息使用了图灵机器人,使用时需要自己去这儿申请一个图灵账号,然后创建一个图灵机器人,得到机器人的apikey,然后构造一个Tuling对象,使用该对象进程回复消息
1 tuling = Tuling(api_key='3d131c218dd44aa88def35ac37b5c9ab')
3.6自动添加好友
1 # 注册好友请求类消息
2 @bot.register(msg_types = FRIENDS)
3 def auto_accept_friends(msg):
4     with cond :
5         # 接受好友 (msg.card 为该请求的用户对象)
6         new_friend = bot.accept_friend(msg.card)
7         new_friend.send(u'图灵接受了你的好友请求,我们可以开始聊天了')
3.7添加后台定时消息
wxpy构造的机器人对象属于web方式连接,如果长时间没有消息,可能会掉线,因此我们开启一个后台线程,隔一段时间发送消息给自己。
 1 def restartTimer() :
 2     global t
 3     if t.is_alive() :
 4         t.stop()
 5
 6     t = Timer.Timer(deamonMsg, timerInterval)
 7     t.setDaemon(True)
 8     t.start()
 9
10 def deamonMsg() :
11     with cond :
12         msgCount = datetime.datetime.now().strftime('%Y-%m-%d %H:%M:%S')
13         print(u'发送消息给文件夹助手,保持连接活跃。消息内容:', msgCount)
14         bot.file_helper.send(msgCount)
上述代码中cond为线程同步条件变量,当使用bot对象发送消息时,需要对bot对象进行保护。
3.8处理消息指令,主要用于控制定时器


 1 def __dealwith_order(msg) :
 2     orderstr = msg.text.lower()#不区分大小写
 3     orderstr = orderstr[len(orderHeader):]
 4     if orderstr == "1" :
 5         bot.registered.enable(auto_accept_friends)
 6         msg.reply('自动接收好友请求已开启')
 7     elif orderstr == "2" :
 8         bot.registered.disable(auto_accept_friends)
 9         msg.reply('自动接收好友请求已关闭')
10     elif orderstr == "3" :
11         if t.is_alive() :
12             if t.is_pause() :
13                 msg.reply('后台线程已挂起')
14             else :
15                 msg.reply('后台线程运行正常')
16         else :
17             msg.reply('后台线程已退出')
18     elif orderstr == "4" :
19         t.resume()
20         msg.reply('后台线程已恢复')
21     elif orderstr == "5" :
22         t.pause()
23         msg.reply('后台线程已挂起')
24     elif orderstr == "6" :
25         restartTimer()
26         msg.reply('后台线程已重启')
27     elif orderstr.startswith("7 ") :
28         global timerInterval
29         timerInterval = int(orderstr[2:].strip())
30         restartTimer()
31         msg.reply('后台线程刷新间隔已修改:{0}'.format(timerInterval))
32     else :
33         msg.reply('指令:order+序号
1、开启自动接收好友请求
2、关闭自动接收好友请求
3、查看后台线程是否活跃
4、恢复后台线程
5、挂起后台线程
6、重新启动后台线程
')
四、读写excel
1、使用pip命令安装openpyxl:pip install openpyxl
2、使用openpyxl.load_workbook加载excel文件,如果文件不存在则使用openpyxl.Workbook()构造工作簿,操作完成后使用工作簿save接口保存文件
1 if os.path.exists(fileName) :
2     wbk = openpyxl.load_workbook(fileName)
3     names = wbk.sheetnames
4 else :
5     wbk = openpyxl.Workbook()
6     sheet = wbk.active
7     sheet.title = 'all'
8     names.append('all')
9     FixedSheetWidth(sheet)
3、修改列宽度和内容
 1 headList = ['发送者', '群聊', '接受者', '发送时间', '接受时间','分享内容', '网址']
 2
 3 def GetCellKey(r, c) :
 4     cell =  chr(ord('A') + c - 1) + str(r)
 5     return cell
 6
 7 def FixedSheetWidth(sheet) :
 8     for i in range(0, len(cwidth)):
 9         sheet.column_dimensions[chr(ord('A') + i)].width = cwidth[i]
10
11 def WriteSheetTitle(sheet) :
12     i = 1
13     for svalue in headList:
14         sheet[GetCellKey(1, i)] = svalue
15         sheet[GetCellKey(1, i)].font = openpyxl.styles.Font(bold = True)
16         i = i + 1
4、添加行数据
 1 def WriteSheetRow(wbk, sheet, rowValueList, rowIndex, isBold):
 2     i = 1
 3     for svalue in rowValueList :
 4         if isBold :
 5             sheet[GetCellKey(rowIndex, i)] = svalue
 6             sheet[GetCellKey(rowIndex, i)].font = openpyxl.styles.Font(bold = True)
 7         else:
 8             sheet[GetCellKey(rowIndex, i)] = svalue
 9         i = i + 1
10
11     #写入单独已用户名为标签的sheet
12     name = rowValueList[0]
13     subsheet = None
14     if name not in names :
15         subsheet = wbk.create_sheet(name)
16         WriteSheetTitle(subsheet)
17         FixedSheetWidth(subsheet)
18         names.append(name)
19     else :
20         subsheet = wbk[name]
21
22     j = 1
23     rowIndex = subsheet.max_row + 1
24     for svalue in rowValueList:
25         if isBold :
26             subsheet[GetCellKey(rowIndex, j)] = svalue
27         else:
28             subsheet[GetCellKey(rowIndex, j)] = svalue
29         j = j + 1
5、备份用于查看的文件
1 #备份文件
2 file2see = os.path.join(os.getcwd(), generateFileName(''))
3 if not os.path.exists(file2see) :
4     shutil.copyfile(fileName, file2see)
5 else :
6     if os.access(file2see, os.W_OK) :
7         shutil.copyfile(fileName, file2see)
五、定时器
定时器主要用于后台定时发送消息给机器人自己,保持自己在线状态
定时器对象使用python的线程对象thread.Thread作为父类,并添加了pause、is_pause、resume和stop接口,使定时器控制起来更方便
 1 # -*- coding: UTF-8 -*-
 2
 3 import time
 4 import threading
 5
 6 class Timer(threading.Thread):
 7     def __init__(self, fun, seconds):
 8         self.__runTime = seconds
 9         self.__runfun = fun
10         self.__elapsed = 0.0 #流失的时间
11         self.__flag = threading.Event()     # 用于暂停线程的标识
12         self.__flag.set()       # 设置为True
13         self.__running = threading.Event()      # 用于停止线程的标识
14         self.__running.set()      # 将running设置为True
15         threading.Thread.__init__(self)
16         print("initialize Timer completed!")
17
18     def run(self):
19         while self.__running.isSet():
20             self.__flag.wait()      # 为True时立即返回, 为False时阻塞直到内部的标识位为True后返回
21             time.sleep(0.1) #100ms检测一次退出状态
22             self.__elapsed = self.__elapsed + 0.1
23             if self.__elapsed > self.__runTime :
24                 self.__elapsed = 0.0
25                 self.__runfun()
26
27     def pause(self):
28         self.__flag.clear()     # 设置为False, 让线程阻塞
29
30     def is_pause(self) :
31         return  self.__flag.isSet() == False
32
33     def resume(self):
34         self.__flag.set()    # 设置为True, 让线程停止阻塞
35
36     def stop(self):
37         self.__flag.set()       # 将线程从暂停状态恢复, 如何已经暂停的话
38         self.__running.clear()        # 设置为False
39         self.__elapsed = 0.0
六、demo下载
需要全部代码的到csdn直接下载:自动聊天机器人-存储好友分享消息