环境
环境准备
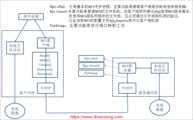
| 主机名 | wanip | lanip | 角色 |
|---|---|---|---|
| web01 | 10.0.0.7 | 172.16.1.7 | 客户端 |
| web02 | 10.0.0. | 172.16.1. | 客户端 |
| nfs | 10.0.0. | 172.16.1. | 服务端 |
服务端安装配置
| nfs共享参数 | 参数作用 |
|---|---|
| rw | 读写权限 |
| ro | 只读权限 |
| root_squash | 当NFS客户端以root管理员访问时,映射为NFS服务器的匿名用户(不常用) ,root用户映射后还是普通用户 |
| no_root_squash | 当NFS客户端以root管理员访问时,映射为NFS服务器的root管理员(不常用),root用户映射后还是root用户 |
| all_squash | 无论NFS客户端使用什么账户访问,均映射为NFS服务器的匿名用户(常用),任何用户映射后还是普通用户(该用户可以在配置文件中自定义) |
| no_all_squash | 无论NFS客户端使用什么账户访问,都不进行压缩(废物) |
| sync | 同时将数据写入到内存与硬盘中,保证不丢失数据 |
| async | 优先将数据保存到内存,然后再写入硬盘;这样效率更高,但可能会丢失数据 |
| anonuid | 配置all_squash使用,指定NFS的用户UID,必须存在在系统 创建 |
| anongid | 配置all_squash使用,指定NFS的用户UID,必须存在在系统 创建 |
# centons6
[root@web01 ~]# yum install -y nfs-utils rpcbind

# centons7
[root@web01 ~]# yum install -y nfs-utils
rpcbind
[root@web01 ~]# yum provides portmap
Loaded plugins: fastestmirror
Loading mirror speeds from cached hostfile
rpcbind-0.2.0-49.el7.x86_64 : Universal Addresses to RPC Program Number Mapper
[root@web01 ~]# rpm -q rpcbind
rpcbind-0.2.0-49.el7.x86_64
[root@web01 ~]# rpm -ql rpcbind
/etc/sysconfig/rpcbind				#rpcbind的配置文件
/usr/lib/systemd/system/rpcbind.service		#systemctl
/usr/lib/systemd/system/rpcbind.socket
/usr/lib/tmpfiles.d/rpcbind.conf
/usr/sbin/rpcbind					#TAB 相对路径
/usr/sbin/rpcinfo
/var/lib/rpcbind
[root@web01 ~]# rpm -qc rpcbind
/etc/sysconfig/rpcbind
[root@web01 ~]# netstat -lntup|grep rpcbind
tcp        0      0 0.0.0.0:111             0.0.0.0:*               LISTEN      577/rpcbind
rpcbind服务停止命令 service portmap stop  #
[root@nfs ~]# systemctl start rpcbind
[root@nfs ~]# systemctl enable rpcbind
----------------------------------------#rpcbind 相当于nfs服务端和客户端的中介
服务端
[root@backup ~]# yum provides showmount
Loaded plugins: fastestmirror
Loading mirror speeds from cached hostfile
1:nfs-utils-1.3.0-0.66.el7.x86_64 : NFS utilities and supporting clients and
1.#下载nfs
[root@nfs ~]# yum -y install nfs-utils
[root@web01 ~]# rpm -q nfs-utils
nfs-utils-1.3.0-0.66.el7.x86_64
[root@web01 ~]# rpm -qc nfs-utils
/etc/nfs.conf
/etc/nfsmount.conf
[root@web01 ~]# rpm -ql nfs-utils
/etc/exports.d
/sbin/mount.nfs
/var/lib/nfs
/var/lib/nfs/etab #查看配置文件的详细内容,可以检查配置文件是否生效(看了这个就不用重启了)
[root@web01 ~]# ll /etc/exports #nfs配置文件
-rw-r--r--. 1 root root 0 Jun 7 2013 /etc/exports
2.#编辑nfs配置文件
[root@nfs ~]# vim /etc/exports
/date 172.16.1.0/24(rw,sync,all_squash,anonuid=666,anongid=666)
IP或网段(1-254之间的主机位都可以挂载到 nfs服务端 )(共享目录后面不能有空格)
(rw是read write ro是raed only)(必须是英文,),一个nfs服务可以设置多个共享目录
[root@web01 ~]# which showmount
/usr/sbin/showmount
3.#根据配置文件,创建出来配置文件中指定的系统用户
[root@nfs ~]# groupadd www -g 666
[root@nfs ~]# useradd www -u 666 -g 666 -s /sbin/nologin -M #用户名可以随便(统一)
[root@nfs ~]# mkdir /date
[root@nfs ~]# chown www.www /date #不授权nfs的匿名用户无法访问
4.#设置nfs开机自启动,减少排错的可能性
[root@web01 ~]# systemctl start rpcbind nfs #先启动rpcbind,再启动nfs
[root@nfs ~]# systemctl start rpcbind nfs-server
[root@web01 ~]# systemctl start rpcbind nfs-utils.service
[root@nfs ~]# systemctl restart rpcbind nfs
[root@nfs ~]# systemctl enable rpcbind nfs-server
5.#查看rpcbind nfs是否启动
[root@nfs ~]# ps -ef|grep rpcbind
rpc 567 1 0 14:32 ? 00:00:00 /sbin/rpcbind -w
root 1845 1120 0 19:55 pts/0 00:00:00 grep --color=auto rpcbind
[root@nfs ~]# ps -ef|grep nfs
root 895 2 0 14:20 ? 00:00:00 [nfsd]
[root@nfs ~]# netstat -lntup|grep nfs-tools #nfs是一个不使用端口的网络服务
## 客户端下载apache
#nfs客户端下载http,并且模拟企业环境
1.#下载,查询相关目录
[root@web01 ~]# yum install -y httpd php
#httpd 就是apach类似于nginx(使浏览器连接本地的站点目录) php 自动解析代码

[root@web01 ~]# rpm -ql httpd
/etc/httpd
/etc/httpd/conf
/etc/httpd/conf/httpd.conf  #配置文件,先cd再vim,可以修改httpd的匿名用户(打工的)
/etc/httpd/conf.d  	 #目录
/etc/sysconfig/httpd
/var/www
/var/www/html		#http的站点目录
[root@web01 ~]# rpm -qc httpd
/etc/sysconfig/httpd
/etc/logrotate.d/httpd

[root@web01 ~]# rpm -q php
php-5.4.16-48.el7.x86_64
[root@web01 ~]# rpm -qc php
/etc/httpd/conf.d/php.conf
[root@web01 ~]# rpm -ql php
/etc/httpd/conf.d/php.conf
/var/lib/php/session

[root@web01 /var/www/html]# tailf /var/log/httpd/access_log  #httpd的正确输出日志
[root@web01 ~]# which httpd		#可以在任意目录TAB 和 用相对路径执行
/usr/sbin/httpd
[root@web01 ~]# which php
/usr/bin/php
[root@web01 ~]# ll /etc/systemd/system/multi-user.target.wants/  #可以看到是否开机自启
[root@web01 /var/www/html]# cat /etc/passwd  #可以看到sync,mail,ftp,sshd,rpc,nfsnobody,ntp,apach 都是系统自动创建的用户

2.#把http的匿名用户改为www(统一匿名用户)
[root@web01 ~]# vim /etc/httpd/conf/httpd.conf 66	#不统一权限无法从浏览器上传文件(因为会造成匿名用户冲突)
 66 User www
 67 Group www

#修改http(apache)的站点目录为www(http配置文件中指定的是哪个匿名用户,就改成哪个)
[root@web01 /var/www/html]# chown -R www. /var/www/html
#改站点目录的原因是http这个服务是用apache这个系统用户使用的,httpd服务的站点目录默认是root,apache用户对这个目录权限是5,没有写权限

3..#启动服务,设置开机自启
[root@web01 /var/www/html]# systemctl start httpd
[root@web01 /var/www/html]# systemctl enable httpd
[root@web01 /var/www/html]# netstat -lntup |grep httpd
[root@web01 ~]# netstat -lntup|grep httpd
tcp6       0      0 :::80                   :::*                    LISTEN      2311/httpd
[root@web01 /var/www/html]# ps -ef|grep httpd
root       8785      1  0 07:58 ?        00:00:00 /usr/sbin/httpd -DFOREGROUND
www     8786   8785  0 07:58 ?        00:00:00 /usr/sbin/httpd -DFOREGROUND

4.#上传做好的数据包
[root@web01 /var/www/html]# rz
[root@web01 /var/www/html]# unzip kaoshi.zip

6.#浏览器访问
http://10.0.0.7/2020-04-30/00_01.txt  #类似于nginx,可以通过浏览器访问本地的http站点目录
nfs客户端(web01 web02)的挂载
1.下载nfs
[root@web01 ~]# yum instally -y nfs-utils

2.启动nfs,并设置开机自启
[root@web02 ~]# systemctl start nfs
[root@web02 ~]# systemctl enable nfs

3.nfs客户端查看 nfs服务端可以挂载的目录
[root@web01 ~]# showmount -e 10.0.0.31	 #下载了nfs-utils就可以使用showmount命令挂载
Export list for 10.0.0.31:
/date   172.16.1.0/24

4.nfs客户端某个**普通目录** 挂载 nfs服务端的某个共享目录
[root@web01 ~]# mkdir /syy
[root@web01 ~]# mount -t nfs 172.16.1.31:/date /syy
[root@web01 ~]# df -h
Filesystem         Size  Used Avail Use% Mounted on
/dev/sda3           19G  1.6G   17G   9% /
/dev/sda1          497M  124M  374M  25% /boot
tmpfs               98M     0   98M   0% /run/user/0
172.16.1.31:/date   19G  1.6G   17G   9% /syy
#客户端nfs挂载nfs服务端之后,客户端/syy就相当于一块显示屏,可以看到挂载的nfs服务端目录下的目录或文件(看不到自己目录下的了,umount后可以看到),
同时可以认为 nfs客户端/syy目录下的目录或文件mv到了nfs服务端/date目录下,但是通过nfs客户端可以操作(cp rm)
这里df -h 看到的磁盘大小是nfs服务端/date目录所挂载的 /目录的大小
取消挂载后,在nfs客户端创建的目录在nfs服务端/date目录下

[root@web01 ~]# ll -d /syy   #nfs客户端/syy目录 的属主属组变成了,和nfs服务端保持一致(这是在nfs服务端中指定的匿名用户导致的)
drwxr-xr-x 2 www www 4096 May  8 23:04 /syy

5.卸载 已经挂载的nfs客户端目录/syy
[root@web01 ~]# umount /syy		#不能在/syy目录下面取消/syy的挂载(先出去),nfs客户端重启服务会导致挂载端口,nfs服务端重启,会导致挂载全部断开
[root@web01 ~]# df -h
/dev/sda3        19G  1.6G   17G   9% /
/dev/sda1       497M  124M  374M  25% /boot
tmpfs            98M     0   98M   0% /run/user/0

6.挂载nfs客户端http的 **站点目录**
[root@web01 /var/www/html]# mount -t nfs 172.16.1.31:/date /var/www/html/
[root@web01 /var/www/html]# ll
-rw-r--r-- 1 www www 38772 Apr 27  2018 bg.jpg
-rw-r--r-- 1 www www  2633 May  4  2018 index.html
-rw-r--r-- 1 www www    52 May 10  2018 info.php
-rw-r--r-- 1 www www 26927 May  8 12:46 kaoshi.zip
-rw-r--r-- 1 www www  1119 May  6  2018 upload_file.php

[root@web01 /var/www/html]# cd
[root@web01 ~]# cd -
/var/www/html
[root@web01 /var/www/html]# ll
1.#httpd原来站点目录下的文件被隐藏,该网站不能被访问了(只要取消挂载就可以看到了,也就是说nfs客户端挂载的目录如果不是空目录,那么原来的文件就会被隐藏,不能被使用,这是mount挂载的特性)
2.也不要在nfs客户端要挂载的目录下挂载该目录(会存在显示错误的问题),不要在该目录下卸载该目录
total 0
-rw-r--r-- 1 www www 0 May  9 16:25 123
-rw-r--r-- 1 www www 0 May  9 16:47 kk
drwxr-xr-x 2 www www 6 May  9 16:28 ll

#nfs客户端重新挂载,挂载之后的缺点就是不能使用rz上传文件了
重新挂载之后,通过cp,mv把网址恢复
不管是nfs客户端还是服务端,挂载之后都对/date目录有操作权(rw)
[root@web01 ~]# umount /var/www/html
[root@web01 ~]# mv /var/www/html/kaoshi.zip .
[root@web01 ~]# rm -rf /var/www/html/*
[root@web01 ~]# mount -t nfs 172.16.1.31:/date /var/www/html/
[root@web01 /var/www/html]# cp /root/kaoshi.zip .
[root@web01 /var/www/html]# unzip kaoshi.zip
nfs中不建议开机挂载
#编辑fstab文件
[root@nfs-client ~]# vim /etc/fstab
172.16.1.31:/data /nfsdir nfs defaults 0 0

#验证fstab是否写正确
[root@nfs-client ~]# mount -a
减少nfs客户端挂载之后的权限,增加集体的安全性
#通过mount -o指定挂载参数,禁止使用suid,exec,增加安全性能
[root@nfs-client ~]# mount -t nfs -o nosuid,noexec,nodev 172.16.1.31:/data /mnt
watch
实时监控本地的目录或文件
watch -d ls -l
watch -d ls -l /date
NFS总结
服务端
1.#下载nfs
[root@nfs ~]# yum -y install nfs-utils

2.#编辑nfs配置文件
[root@nfs ~]# vim /etc/exports
/date 172.16.1.0/24(rw,sync,all_squash,anonuid=666,anongid=666)

3.#根据配置文件,创建出来配置文件中指定的系统用户
[root@nfs ~]# groupadd www -g 666
[root@nfs ~]# useradd www -u 666 -g 666 -s /sbin/nologin -M
[root@nfs ~]# mkdir /date
[root@nfs ~]# chown www.www /date

4.#设置nfs开机自启动,减少排错的可能性(选做)
[root@web01 ~]#  systemctl start  rpcbind nfs
[root@nfs ~]# systemctl start rpcbind nfs-server
[root@web01 ~]# systemctl start rpcbind nfs-utils.service
[root@nfs ~]# systemctl enable rpcbind nfs-server

5.#查看rpcbind nfs是否启动(选做)
[root@nfs ~]# ps -ef|grep rpcbind
[root@nfs ~]# ps -ef|grep nfs
[root@nfs ~]# netstat -lntup|grep nfs-tools
nfs客户端下载http(apashe)和php,并且模拟企业环境
1.#下载,查询相关目录
[root@web01 ~]# yum install -y httpd php

2.#把http的匿名用户改为www(统一匿名用户)
[root@web01 ~]# vim /etc/httpd/conf/httpd.conf 66
 66 User www
 67 Group www

[root@web01 ~]# groupadd www -g 666
[root@web01 ~]# useradd www -u 666 -g 666 -s /sbin/nologin -M

[root@web01 /var/www/html]# chown -R www. /var/www/html

3.#启动服务,设置开机自启
[root@web01 /var/www/html]# systemctl start httpd
[root@web01 /var/www/html]# systemctl enable httpd
[root@web01 /var/www/html]# netstat -lntup |grep httpd
[root@web01 ~]# netstat -lntup|grep httpd
[root@web01 /var/www/html]# ps -ef|grep httpd

4.#上传做好的数据包(这一步可以不做)
[root@web01 /var/www/html]# rz -E
[root@web01 /var/www/html]# unzip kaoshi.zip

6.#浏览器访问(这一步可以不做)
http://10.0.0.7/2020-04-30/00_01.txt
7.#保证每台服务器的时间同步
ntpdate time1.aliyun.com
nfs客户端(web01 web02)的挂载
1.下载nfs
[root@web01 ~]# yum instally nfs-utils

2.启动nfs,并设置开机自启
[root@web02 ~]# systemctl start nfs
[root@web02 ~]# systemctl enable nfs

3.nfs客户端查看 nfs服务端可以挂载的目录
[root@web01 ~]# showmount -e 10.0.0.31

4.nfs客户端某个**普通目录** 挂载 nfs服务端的某个共享目录
[root@web01 ~]# mkdir -p /var/www/html/upload
[root@web01 ~]# chown -R www.www /var/www/html/upload

[root@web01 ~]# mount -t nfs 172.16.1.31:/date /var/www/html/upload

[root@web01 /var/www/html]# cp /root/kaoshi.zip .
[root@web01 /var/www/html]# unzip kaoshi.zip

5.修改代码,固定用户上传文件的目录(以下选做)
[root@web01 html]# vim /var/www/html/upload_file.php
$wen="/var/www/html/upload";

6.重启httpd
[root@web01 html]# systemctl restart httpd

7.挂载
[root@web01 ~]# mount -t nfs 172.16.1.31:/user_upload /var/www/html/upload

8.检查挂载
[root@web01 ~]# df -h
NFS+inotify(NFS服务端)
[root@backup ~]# vim rsync-inotify.sh
#!/bin/bash
export RSYNC_PASSWORD=123
jiankong_dir='/date'
rsync_user='bck'
rsync_mkuai='backupmk'

[ -d $jiankong_dir ]||mkdir -p $jiankong_dir
/usr/bin/inotifywait  -mrq  --format '%Xe  %w  %f' -e create,modify,delete,attrib,close_write $jiankong_dir | while read line;do
rsync -az --delete $jiankong_dir/ ${rsync_user}@10.0.0.41::${rsync_mkuai}
done &

[root@backup ~]# sh rsync-inotify.sh