本文主要记录 CoreApi 的多环境配置以及如何消费在consul中注册的Api 服务
1、创建三个CoreApi
我们在项目中创建三个站点分别为 UserServices “用户服务”,OrderServices “订单服务” 以及 StorehouseServices “库房服务”
-
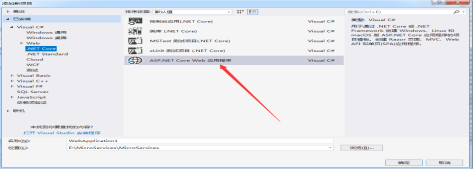
、打开VS2017 创建Core Web 应用程序
2、选择项目模板
注意:在选择项目模板的时候有一个支持Https 的选项不使用可以去掉
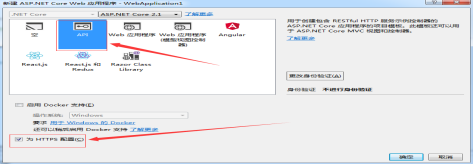
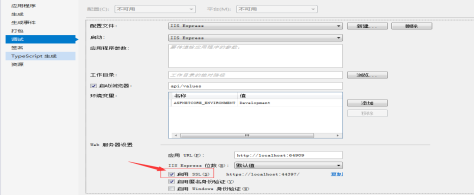
忘记去掉了也没问题在项目属性调试中也可以去掉 如下图:
3、在创建CoreApi的时候尽量不使用项目模板进行创建因为默认会使用MVC的引擎可以使用空模板进行创建,自行搭建。
2、对CoreApi进行环境的配置
1、CoreApi的几种环境:开发(Development)占存(Staging)生产(Production)
项目创建后我们在项目启动文件中有两种环境启动设置如下图
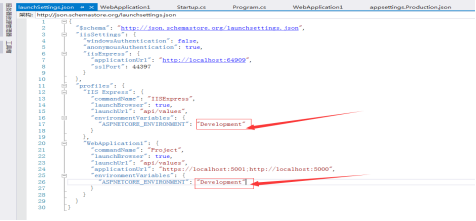
我们可以看到不论是使用IIS启动还是 命令启动时都默认使用开发环境变量“”Development“”。
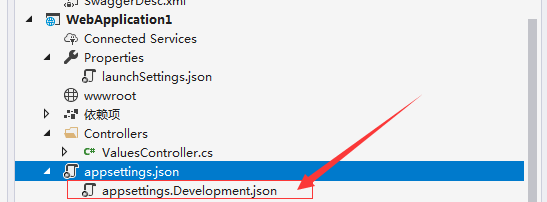
在项目创建完成后默认有一个Json的配置文件,我们打开后可以看到一个默认的名为 appsettings.Development.json 的配置文件 如图所示
也就是说项目创建完成后不论使用哪种环境运行都是同一个环境变量“Development” 同样也代表这不论哪种环境运行默认使用的同一份配置文件
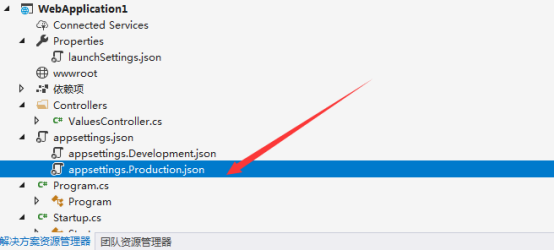
2、新增Production(生产)环境配置文件
2.1、如图所示:
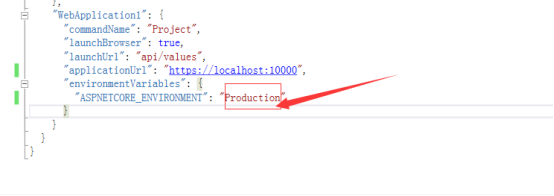
2.2、更改launchSettings.json 中的环境变量的配置信息 如下
3、运行结果 三种运行方式
3.1、首先使用IIS运行 默认走开发者配置
3.2、在当前目录 下使用dotnet run 运行

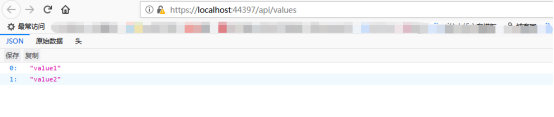
我们可以看到配置已经生效了
(3):在项目的生成bin 目录下使用 dotnet WebApplication1.dll 运行 结果
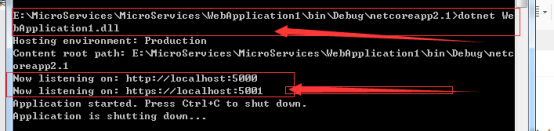
可以看到这个时候怎么的配置失效了因为命令行是托管在Kestrel上运行的默认使用的端口就是 5000/5001 这个时候我们需要在增加一个配置来更改默认
配置如下步骤:
在项目新增的配置文件appsettings.Production.json中 添加 如下
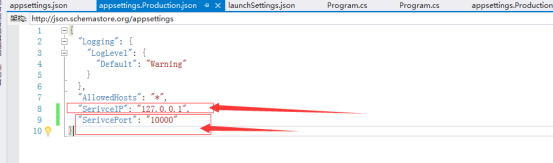
配置 127.0.0.1:代表着localhost 在下面使用的时候需要进行一下转换所以用127.0.0.1 具体配置如下
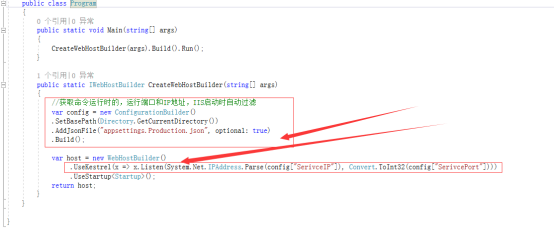
在项目Program 中这样去使用
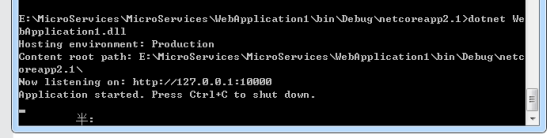
这里不会影响我们的其他运行方式因为运行的环境不同:运行结果如下
4、根据不同的运行环境读取使用不同的配置文件
上面的有的步骤只是更改了项目启动时的IP端口信息,下面我们配置在项目运行时根据不同的运行环境去读取不同的配置文件
在Startup 文件写入如下代码


 private IHostingEnvironment env;
        /// <summary>
        ///
        /// </summary>
        /// <param name="environment"></param>
        public Startup(IHostingEnvironment environment)
        {
            env = environment;
            if (env.IsDevelopment())
            {
                var config = new ConfigurationBuilder()
                 .SetBasePath(System.IO.Directory.GetCurrentDirectory())
                .AddJsonFile("appsettings.Development.json", true, true) //.AddJsonFile("appsettings.json", true, true) //
                 .AddEnvironmentVariables()
                 .Build();
                Configuration = config;
            }
            //生产环境Production运行 命令运行读取的配置信息
            if (env.IsProduction())
            {
                var config = new ConfigurationBuilder()
                 .SetBasePath(System.IO.Directory.GetCurrentDirectory())
                 .AddJsonFile("appsettings.Production.json", true, true)
                 .AddEnvironmentVariables()
                 .Build();
                Configuration = config;
            };
        }
5、项目启动后把服务注册到Consul中
代码如下
  public void Configure(IApplicationBuilder app, IApplicationLifetime applicationLifetime)
        {
            if (env.IsDevelopment())
            {
                app.UseDeveloperExceptionPage();
            }

            app.UseMvc();

            //ServiceID复制
            ConsulServicesID = Configuration["ServicesName"]+ Guid.NewGuid();
            using (var client = new ConsulClient(ConsulConfig))
            {
                //注册服务到 Consul
                client.Agent.ServiceRegister(new AgentServiceRegistration()
                {
                    ID = ConsulServicesID,//服务编号,不能重复,用 Guid 最简单
                    Name = Configuration["ServicesName"],//服务的名字
                    Address = Configuration["SerivceIP"],//我的 ip 地址(可以被其他应用访问的地址,本地测试可以用127.0.0.1,机房环境中一定要写自己的内网 ip 地址)
                    Port = Convert.ToInt32(Configuration["SerivcePort"]),//我的端口
                    Check = new AgentServiceCheck
                    {
                        DeregisterCriticalServiceAfter = TimeSpan.FromSeconds(5),//服务停止多久后反注册
                        Interval = TimeSpan.FromSeconds(10),//健康检查时间间隔,或者称为心跳间隔
                        HTTP = $"{Configuration["HealthUrl"]}/api/Health",//健康检查地址
                        Timeout = TimeSpan.FromSeconds(5)
                    }
                }).Wait();//Consult 客户端的所有方法几乎都是异步方法,但是都没按照规范加上Async 后缀,所以容易误导。记得调用后要 Wait()或者 await

            }
            //程序正常退出的时候从 Consul 注销服务
            //要通过方法参数注入 IApplicationLifetime
            applicationLifetime.ApplicationStopped.Register(() =>
            {
                using (var client = new ConsulClient(ConsulConfig))
                {
                    //ServiceDeregister异步方法增加 Wait 等待完成
                    client.Agent.ServiceDeregister(ConsulServicesID).Wait();
                }
            });
        }
6、项目中我使用了Swagger 具体配置
Swagger 配置博客 https://www.cnblogs.com/szlblog/p/8068311.html
3、消费consul中的CoreApi的服务
1、创建项目
使用什么样的客户端都行,控制台,MVC,WebFrom 都行
2、具体代码
这个代码只是用来引路,可以根据自己的喜好去进行封装
代码如下:
 #region //查看所有consul中被注册的服务
            //查看所有consul中被注册的服务
            using (var consulClient = new ConsulClient(c => { c.Address = new Uri("http://127.0.0.1:8500"); c.Datacenter = "dc1"; }))
            {

                var services = consulClient.Agent.Services().Result.Response;
                //var ss = services.Values.Where(s => s.Service.Equals("UserServices", StringComparison.OrdinalIgnoreCase));//忽略大小写
                foreach (var service in services.Values)
                {
                    Console.WriteLine($"id={service.ID},name={service.Service},ip={service.Address},port={service.Port}");
                }
            }
            #endregion
            #region 客户端负载均衡
            //客户端负载均衡
            using (var consulClient = new ConsulClient(c => c.Address = new Uri("http://127.0.0.1:8500")))
            {
                var services = consulClient.Agent.Services().Result.Response.Values
                .Where(s => s.Service.Equals("UserServices", StringComparison.OrdinalIgnoreCase));
                if (!services.Any())
                {
                    Console.WriteLine("找不到服务的实例");
                }
                else
                {
                    // services.ElementAt(1);//如果环境中有多台服务器注册服务时我们可以使用随机数的方式,使用下标进行随机抽取一台服务进行使用
                    //集群中也可以轮训,当服务器性能差不多的时候可以轮着来
                    var service = services.ElementAt(Environment.TickCount % services.Count());
                    Console.WriteLine($"{service.Address}:{service.Port}");
                }

            }
            #endregion

            #region 调用服务方法     UserServices/api/Values
            using (var consulClient = new ConsulClient(c => { c.Address = new Uri("http://127.0.0.1:8500"); c.Datacenter = "dc1"; }))
            {
                var AllServicesInfor = consulClient.Agent.Services().Result.Response;
                //获取第一个实例 把UserServices转换为在Consul中注册的路径 然后进行访问
                var UserServices = AllServicesInfor.Values.Where(s => s.Service.Equals("UserServices", StringComparison.OrdinalIgnoreCase)).First();//忽略大小写
                using (System.Net.Http.HttpClient http = new HttpClient())
                {
                    using (var HttpContent = new StringContent("", System.Text.Encoding.UTF8, "application/json"))
                    {
                        var ss = http.PostAsync($"http://{UserServices.Address}:{UserServices.Port}/api/Values", HttpContent);
                        string sss = ss.Result.RequestMessage.ToString();
                    }
                }
            }
            #endregion
项目链接
链接:https://pan.baidu.com/s/1V0YcX1kFJg752icNICTuQQ 密码:1s47
有不足之处 希望大家指出相互学习,
本文原创:转载请注明出处 谢谢!