快捷导航菜单
1、对象的深拷贝(一级属性拷贝和多级属性嵌套拷贝)
ES6的Object.assign函数,和{...xxx}扩展运算符能够实现浅拷贝。JSON.parse(JSON.stringify(xxx))能够实现深拷贝,但是针对要拷贝的属性值如果是函数、时间、undefined、正则表达式以及对象的原型属性和方法都无能为力。因此深拷贝需要自定义函数:
function deepClone(sourceObj){
    if (sourceObj instanceof RegExp) return new RegExp(sourceObj); //正则类型
    if (sourceObj instanceof Date) return new Date(sourceObj);    //时间类型
    if (sourceObj === null || typeof sourceObj !== 'object'){ //基础类型
        return sourceObj;
    }

    //其他引用类型数据, 找出当前数据类型的构造函数,new一个当前类型的空对象
    var obj = new sourceObj.constructor();
    for (var key in sourceObj){
        //属于自己的属性才递归深拷贝
        if (sourceObj.hasOwnProperty(key)){
            obj[key] = deepClone(sourceObj[key]);
        }
    }
    return obj;
}
测试代码:
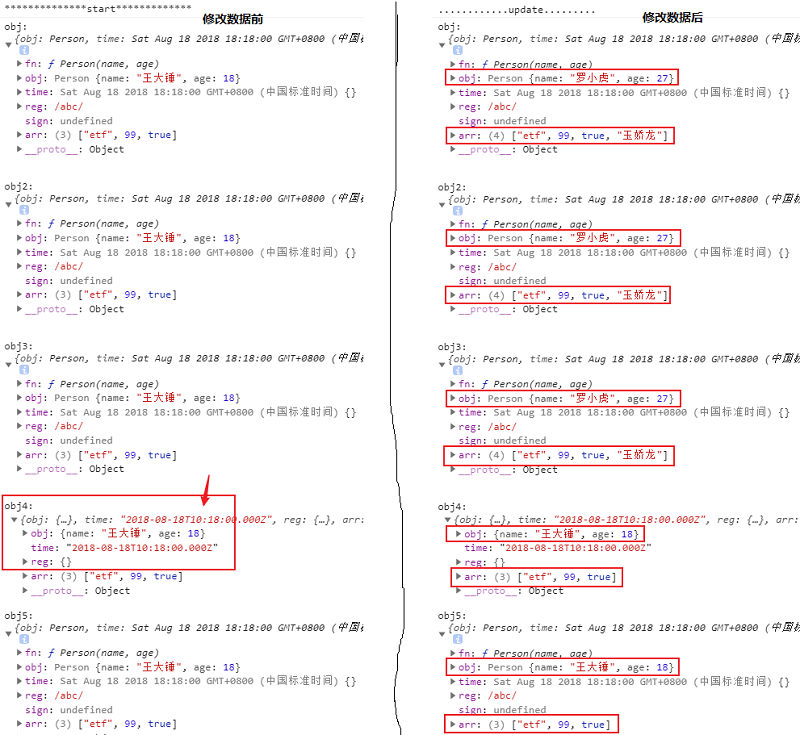
//测试
function Person(name, age){
    this.name = name;
    this.age = age;
}
Person.prototype.myInfo = function(){
    console.log("my name is ", this.name, ", age is ", this.age);
}

var obj = {
    fn: Person,    //函数
    obj: new Person("王大锤", 18),  //对象
    time: new Date("2018-08-18 18:18"),  //时间
    reg: new RegExp('abc'),    //正则
    sign: undefined,
    arr: ['etf', 99, true]
}
var obj2 = Object.assign({}, obj); //浅拷贝(ES6的Object.assign函数)
var obj3 = {...obj};               //浅拷贝(ES6扩展运算符)
//JSON.stringify深拷贝所有层级属性,但是针对属性值为函数,正则表达式,时间,undefined, 原型对象的方法和属性无能为力
var obj4 = JSON.parse(JSON.stringify(obj));
var obj5 = deepClone(obj);

console.log("
**************start*************")
console.log("obj: ", obj, "

obj2: ", obj2, "

obj3: ", obj3, "

obj4:
", obj4, "

obj5: ", obj5);


obj.obj.name = '罗小虎', obj.obj.age = 27;
obj.arr.push("玉娇龙");
console.log("............update.........")
console.log("obj: ", obj, "

obj2: ", obj2, "

obj3: ", obj3, "

obj4:
", obj4, "

obj5: ", obj5);
测试结果截图对比一下,发现使用JSON.stringify深拷贝的对象,属性值为函数和undefined的属性直接过滤不见了,然后正则表达式变成了空对象{}, 时间变成了字符串等:
2、网络图片转成base64, 在线图片或文件点击下载(隐藏链接)


<div>
            <div onclick="clickMeDownload()">点我下载</div>

            <script type="text/javascript">
                /**
                 * 根据远程图片转成base64数据 (远程图片和当前页面不是同一域名时,需要进行web服务器配置,使其可以跨域下载)
                 * @param url      图片链接
                 * @param callback 回调函数
                 */
                function getBase64ByImgUrl(url, callback){
                    let canvas = document.createElement('canvas'),
                        ctx = canvas.getContext('2d'),
                        img = new Image;
                    img.crossOrigin = 'Anonymous';
                    img.onload = function(){
                        canvas.height = img.height;
                        canvas.width = img.width;
                        ctx.drawImage(img,0,0);

                        //获取base64数据
                        let base64 = canvas.toDataURL('image/png');
                        //回调
                        if (callback){
                            callback(base64);
                        }
                        canvas = null;
                    }
                    img.src = url;
                }

                /**
                 * 把base64转成文件流
                 * @param base64     base64数据
                 * @param filename   自定义文件的名字
                 */
                function getFileByBase64(base64, filename){

                    let arr = base64.split(','), mime = arr[0].match(/:(.*?);/)[1],
                        bstr = atob(arr[1]), n = bstr.length, u8arr = new Uint8Array(n);

                    while(n--){
                        u8arr[n] = bstr.charCodeAt(n);
                    }

                    return new File([u8arr], filename, {type:mime});
                }


                /**
                 * 测试例子:点击下载,隐藏下载链接
                 */
                function clickMeDownload(){

                    let imgUrl = 'https://img2018.cnblogs.com/blog/454511/201811/454511-20181114115022054-611805083.png';

                    getBase64ByImgUrl(imgUrl, function(base64){
                        console.log(base64);

                        //创建a标签, 设置a标签的href属性和download属性
                        var aEle = document.createElement('a');
                        aEle.setAttribute('href', base64);
                        aEle.setAttribute('download', 'temp.png');
                        aEle.style.display = 'none'; //隐藏a标签
                        document.body.appendChild(aEle);  //将a标签添加到body里
                        aEle.click();    //触发a标签点击事件

                        document.body.removeChild(aEle);  //下载图片后,移除a标签

                    });
                }
            </script>
        </div>
3、常用CSS样式记录
3.1 给定标签宽高,内容超出限制宽高后,以省略点展示,示例:
<div class="text-box">宽度500px, 高度50px,超出高度后后缀...展示。这俩人是现今世上,手段最高明的摸金校尉,都有万夫不挡之勇,神鬼莫测之机,兼有云长之忠,翼德之猛,子龙之勇,孔明之智,那面古镜一定就是他们从云南掏出来的。</div>
/* 6、超出限制宽高后省略点展示
            多行后显示省略点,只应用于-webkit内核; 移动端浏览器基本都是WebKit内核的,所以该样式适用于移动端
        */
        .text-box{
            margin-top: 20px; width: 500px; height: 50px; border:1px dashed #999; color: #999; line-height: 25px;
            overflow: hidden; text-overflow: ellipsis; display: -webkit-box;
            -webkit-line-clamp: 2; /* 这个是设置最多展示几行 */
            -webkit-box-orient: vertical; word-break:break-all;
        }

3.2 一个标签,配合before和after属性,设置出外圆边框,内三角形图标
<span class="video-icon"></span>
/* 5、视屏图标icon */
        .video-icon { display: inline-block; width: 30px; height: 30px; border: 2px solid blue; border-radius: 30px; position: relative; cursor: pointer; }
        .video-icon:after {
            position: absolute; left: 12px; top: 7px; content: '';
            border-width:8px 0 8px 10px; border-style:solid;
            border-color:transparent transparent transparent blue;
        }

3.3 单选切换:两个按钮,只能选中一个,左边按钮的左边和右边按钮的右边圆角
<div class="grade_box"><div class="grade_first grade_sel">一级分类</div><div class="grade_second">二级分类</div></div>
        <script type="text/javascript">
            var gradeList = (document.getElementsByClassName('grade_box')[0]).children;

            for (var i = 0; i < gradeList.length; i++){
                var obj = gradeList[i];

                obj.setAttribute('index', i);

                obj.onclick = function(){
                    var index = this.getAttribute('index');

                    console.log(this);

                    if (index == 0){
                        gradeList[0].className = 'grade_first grade_sel';
                        gradeList[1].className = 'grade_second';
                    }
                    else{
                        gradeList[0].className = 'grade_first';
                        gradeList[1].className = 'grade_second grade_sel';
                    }
                }
            }
        </script>
.grade_box { width: 300px; height: 40px; }
        .grade_box div {
            display: inline-block; height: 100%; width: 50%; line-height: 40px; text-align: center; background-color: #f4f4f4; color: #ff7800; border: 1px solid #ff7800; box-sizing: border-box; cursor: pointer;
        }
        .grade_box .grade_sel { background-color: #ff7800; color: #fff; }
        .grade_box .grade_first { border-top-left-radius: 40px; border-bottom-left-radius: 40px; }
        .grade_box .grade_second { border-top-right-radius: 40px; border-bottom-right-radius: 40px; }

3.4 按钮背景颜色渐变
<div class="bg_change_btn">4、按钮背景颜色渐变</div>
.bg_change_btn{
            width: 200px; height: 50px; line-height: 50px; border-radius: 50px; margin-top: 30px; text-align: center;
            background-image: linear-gradient(-45deg, orange 0%, yellow 100%), linear-gradient( green, black); cursor: pointer;
        }

4、JS中某些数字加减乘除会出现多位小数点现象,精度丢失
举例:
console.log("0.1+0.2 = ", 0.1+0.2);   //0.1+0.2 =  0.30000000000000004
console.log("0.1+0.7 = ", 0.1+0.7);   //0.1+0.7 =  0.7999999999999999
console.log("0.2+0.7 = ", 0.2+0.7)    //0.2+0.7 =  0.8999999999999999
console.log("1.1+0.3 = ", 1.1+0.3)    //1.1+0.3 =  1.4000000000000001

console.log("1.7-0.1 = ", 1.7-1.1);   //1.7-0.1 =  0.5999999999999999
console.log("1.7-1.2 = ", 1.7-1.3);   //1.7-1.2 =  0.3999999999999999
console.log("1.7-1.4 = ", 1.7-1.4);   //1.7-1.4 =  0.30000000000000004

console.log("1.10*100 =", 1.10*100);  //1.10*100 = 110.00000000000001
console.log("1.11*100 =", 1.11*100);  //1.11*100 = 111.00000000000001
console.log("1.12*100 =", 1.12*100);  //1.12*100 = 112.00000000000001
console.log("1.13*100 =", 1.13*100);  //1.13*100 = 112.99999999999999
console.log("1.14*100 =", 1.14*100);  //1.14*100 = 113.99999999999999
console.log("1.15*100 =", 1.15*100);  //1.15*100 = 114.99999999999999
console.log("1.16*100 =", 1.16*100);  //1.16*100 = 115.99999999999999

console.log("0.7/0.1 = ", 0.7/0.1);   //0.7/0.1 =  6.999999999999999
console.log("0.6/0.1 = ", 0.6/0.1);   //0.6/0.1 =  5.999999999999999
解决方式1,使用Math.round函数处理,假设数字变量名为num, 格式为:Math.round(num*100) / 100:
console.log("0.1+0.2 = ", Math.round((0.1+0.2)*100)/100);   //0.1+0.2 =  0.3
console.log("0.1+0.7 = ", Math.round((0.1+0.7)*100)/100);   //0.1+0.7 =  0.8
console.log("0.2+0.7 = ", Math.round((0.2+0.7)*100)/100)    //0.2+0.7 =  0.9
console.log("1.1+0.3 = ", Math.round((1.1+0.3)*100)/100)    //1.1+0.3 =  1.4

console.log("1.7-0.1 = ", Math.round((1.7-0.1)*100)/100);   //1.7-0.1 =  1.6
console.log("1.7-1.2 = ", Math.round((1.7-1.2)*100)/100);   //1.7-1.2 =  0.5
console.log("1.7-1.4 = ", Math.round((1.7-1.4)*100)/100);   //1.7-1.4 =  0.3

console.log("1.10*100 =", Math.round((1.10*100)*100)/100);  //1.10*100 = 110
console.log("1.11*100 =", Math.round((1.11*100)*100)/100);  //1.11*100 = 111
console.log("1.12*100 =", Math.round((1.12*100)*100)/100);  //1.12*100 = 112
console.log("1.13*100 =", Math.round((1.13*100)*100)/100);  //1.13*100 = 113
console.log("1.14*100 =", Math.round((1.14*100)*100)/100);  //1.14*100 = 114
console.log("1.15*100 =", Math.round((1.15*100)*100)/100);  //1.15*100 = 115
console.log("1.16*100 =", Math.round((1.16*100)*100)/100);  //1.16*100 = 116

console.log("0.7/0.1 = ", Math.round((0.7/0.1)*100)/100);   //0.7/0.1 =  7
console.log("0.6/0.1 = ", Math.round((0.6/0.1)*100)/100);   //0.6/0.1 =  6
解决方式2:使用parseInt函数,假设数字变量名为num, 格式为:parseInt(num*100 + 0.1)/100
console.log("0.1+0.2 = ", parseInt((0.1+0.2)*100+0.1)/100);   //0.1+0.2 =  0.3
console.log("0.1+0.7 = ", parseInt((0.1+0.7)*100+0.1)/100);   //0.1+0.7 =  0.8
console.log("0.2+0.7 = ", parseInt((0.2+0.7)*100+0.1)/100)    //0.2+0.7 =  0.9
console.log("1.1+0.3 = ", parseInt((1.1+0.3)*100+0.1)/100)    //1.1+0.3 =  1.4

console.log("1.7-0.1 = ", parseInt((1.7-0.1)*100+0.1)/100);   //1.7-0.1 =  1.6
console.log("1.7-1.2 = ", parseInt((1.7-1.2)*100+0.1)/100);   //1.7-1.2 =  0.5
console.log("1.7-1.4 = ", parseInt((1.7-1.4)*100+0.1)/100);   //1.7-1.4 =  0.3

console.log("1.10*100 =", parseInt((1.10*100)*100+0.1)/100);  //1.10*100 = 110
console.log("1.11*100 =", parseInt((1.11*100)*100+0.1)/100);  //1.11*100 = 111
console.log("1.12*100 =", parseInt((1.12*100)*100+0.1)/100);  //1.12*100 = 112
console.log("1.13*100 =", parseInt((1.13*100)*100+0.1)/100);  //1.13*100 = 113
console.log("1.14*100 =", parseInt((1.14*100)*100+0.1)/100);  //1.14*100 = 114
console.log("1.15*100 =", parseInt((1.15*100)*100+0.1)/100);  //1.15*100 = 115
console.log("1.16*100 =", parseInt((1.16*100)*100+0.1)/100);  //1.16*100 = 116

console.log("0.7/0.1 = ", parseInt((0.7/0.1)*100+0.1)/100);   //0.7/0.1 =  7
console.log("0.6/0.1 = ", parseInt((0.6/0.1)*100+0.1)/100);   //0.6/0.1 =  6
5、call、apply和bind使用方法
call、apply、bind的存在都是为了可以改变函数运行时的“上下文”,也就是函数的this对象指向。使用格式为:
- call使用格式:函数.call(上下文, 参数1, 参数2, ...) == fn.call(obj, arg1, arg2, ....)
- apply使用格式(参数写在数组里):函数.apply(上下文, [参数1, 参数2, ...]) == fn.apply(obj, [arg1, arg2, ...])
- bind使用格式:函数.bind(上下文, 参数1, 参数2, ...)() == 函数.bind(上下文)(参数1, 参数2, ...) == 函数.bind(上下文, 参数1)(参数2, ...)
说明:这三个方法的第一个参数都是this要指向的对象,第二个及后面的参数就是要调用函数的参数。call和apply是立即调用,而bind方法会创建一个新函数(称为绑定函数),所以bind方法使用时还需要再调用一下。下面看一些例子:
var obj = {
    name: "王大锤",
    sayName: function(){
        console.log("我是" + this.name);
    }
}
var obj2 = { name: "罗小虎" }

obj.sayName();            //我是王大锤
obj.sayName.call(obj2);   //我是罗小虎
obj.sayName.apply(obj2);  //我是罗小虎
obj.sayName.bind(obj2)(); //我是罗小虎
var obj = {
    name: "王大锤",
    sayName: function(age, sex){
        console.log("我是" + this.name + ", 年龄" + age + ", 性别" + sex);
    }
}
var obj2 = { name: "玉娇龙" }

obj.sayName(27, "男");              //我是王大锤, 年龄27, 性别男
obj.sayName.call(obj2, 18, "女");   //我是玉娇龙, 年龄18, 性别女
obj.sayName.apply(obj2, [19, "女"]); //我是玉娇龙, 年龄19, 性别女
obj.sayName.bind(obj2)(20, "女");   //我是玉娇龙, 年龄20, 性别女
obj.sayName.bind(obj2, 21)("女");   //我是玉娇龙, 年龄21, 性别女
obj.sayName.bind(obj2, 22, "女")(); ////我是玉娇龙, 年龄22, 性别女
将伪数组转成数组,Object对象本来没有slice函数,但是Array有。然后可以通过call、apply、bind将Array的slice函数指向Object对象,让Object对象可以调用slice函数:
//将伪数组转成数组
var obj = { 0:99, 1: '王大锤', 2:true, 3: 0.27, 4: 'hello', length: 5 }
console.log( Array.prototype.slice.call(obj) );       //[99, "王大锤", true, 0.27, "hello"]
console.log( Array.prototype.slice.call(obj, 1, 3) ); //["王大锤", true]
console.log( Array.prototype.slice.apply(obj) );      //[99, "王大锤", true, 0.27, "hello"]
console.log( Array.prototype.slice.apply(obj, [0, 2]) ); //[99, "王大锤"]
console.log( Array.prototype.slice.bind(obj)() );       //[99, "王大锤", true, 0.27, "hello"]
console.log( Array.prototype.slice.bind(obj)(0, 3) );  //[99, "王大锤", true]
//获取数组中的最大值和最小值
console.log( Math.max.call(null, 11, 99, 22, 33) );   //99
console.log( Math.min.call(null, 11, 99, 22, 33) );   //11
console.log( Math.max.apply(null, [11, 99, 22, 33]) ); //99
console.log( Math.min.apply(null, [11, 99, 22, 33]) ); //11
console.log( Math.max.bind(null)(11, 99, 22, 33) );   //99
console.log( Math.min.bind(null)(11, 99, 22, 33) );   //11
6、定义类和继承的标准实现方式
6.1 定义类的方式有多种:工厂方式、构造函数方式、原型方式、混合的构造函数+原型方式、动态原型方法。目前使用最广泛的是混合的构造函数+原型方式。此外,动态原型方法也很留行,在功能上与混合的构造函数+原型方式等价。
混合的构造函数+原型方式(即用构造函数定义对象的所有非函数属性,用原型方式定义对象的函数属性(即方法))示例代码:
function Car(sColor,iDoors,iMpg) {
  this.color = sColor;
  this.doors = iDoors;
  this.mpg = iMpg;
  this.drivers = new Array("Mike","John");
}

Car.prototype.showColor = function() {
  alert(this.color);
};

var oCar1 = new Car("red",4,23);
var oCar2 = new Car("blue",3,25);

oCar1.drivers.push("Bill");

alert(oCar1.drivers);    //Mike,John,Bill
alert(oCar2.drivers);    //Mike,John
动态原型方法的基本想法和混合的构造函数+原型方式相同,即在构造函数内定义非函数属性,而函数属性则利用原型属性定义。示例代码:
function Car(sColor,iDoors,iMpg) {
  this.color = sColor;
  this.doors = iDoors;
  this.mpg = iMpg;
  this.drivers = new Array("Mike","John");

  if (typeof Car._initialized == "undefined") {
    Car.prototype.showColor = function() {
      alert(this.color);
    };

    Car._initialized = true;
  }
}
应用示例:
JavaScript的字符串是不可变的,即它们的值不能改变,请考虑下面的代码:
var str = "hello ";
str += "world";
实际上,这段代码在幕后执行的步骤如下:
- 创建存储 "hello" 的字符串。
- 创建存储 "world" 的字符串。
- 创建存储连接结果的字符串。
- 把str的当前内容复制到结果中。
- 把 "world" 复制到结果中。
- 更新str,使它指向结果。
每次完成字符串都会执行步骤2到6,使用这种操作非常消耗资源。如果重复这一过程几百次,甚至几千次,就会造成性能问题。解决办法使用Array对象存储字符串,然后用join()方法(参数是空字符串)创建最后的字符串,示例代码:
function StringBuffer () {
  this._strings_ = new Array();
}

StringBuffer.prototype.append = function(str) {
  this._strings_.push(str);
};

StringBuffer.prototype.toString = function() {
  return this._strings_.join("");
};

//测试演示
var buffer = new StringBuffer ();
buffer.append("hello ");
buffer.append("world");

console.log( buffer.toString() ); //hello world
6.2 JavaScript的继承机制实现也有多种方式:对象冒充、call//apply方法、原型链、混合方式。最好的方式是使用混合方式,我们知道创建类的最好方式是用构造函数定义属性,用原型定义方法。这种方式同样适用于继承机制,用对象冒充继承构造函数的属性,用原型链继承prototype对象的方法,示例代码:
function ClassA(sColor) {
    this.color = sColor;
}

ClassA.prototype.sayColor = function () {
    alert(this.color);
};

function ClassB(sColor, sName) {
    ClassA.call(this, sColor);
    this.name = sName;
}

ClassB.prototype = new ClassA();
ClassB.prototype.constructor = ClassB; //修正ClassB原型的构造函数
ClassB.prototype.sayName = function () { alert(this.name); }; //新增一个属于ClassB独有的方法
6.3 ES6新增加的创建类和继承的写法:
class ClassA{
    constructor(sColor){
        this.color = sColor;
    }

    sayColor(){
        console.log('color is ', this.color);
    }
}

//继承
class ClassB extends ClassA{
    constructor(sColor, sName){
        super(sColor); //调用父级
        this.name = sName;
    }

    //属于ClassB的方法
    sayName(){
        console.log(this.name, ' color is ', this.color);
    }
}