一、设置环境:
请初始化您的考试虚拟机 server0.example.com,将系统的 root 账号密码设置为 123456 。
配置您的虚拟机系统使用下述静态网络配置:
* Hostname:server0.example.com
* IP address:172.25.0.11
* Netmask:255.255.255.0
* Gateway:172.25.0.254
* Name server:172.25.254.254
解题:
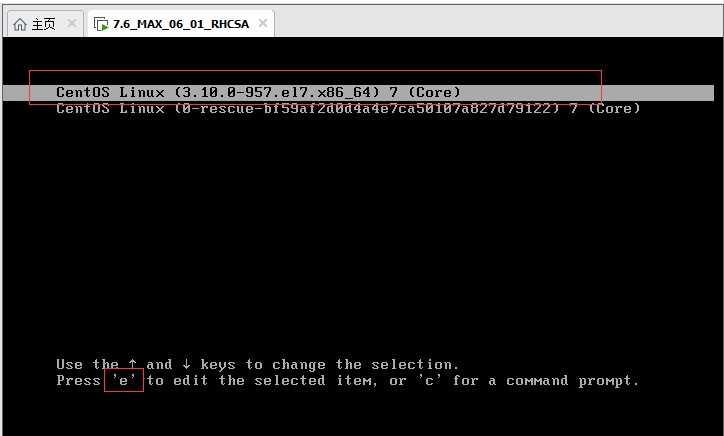
1.1.修改密码
按“e”进入编辑模式
在utf-8后面添加空格 rd.break
Ctrl + x执行
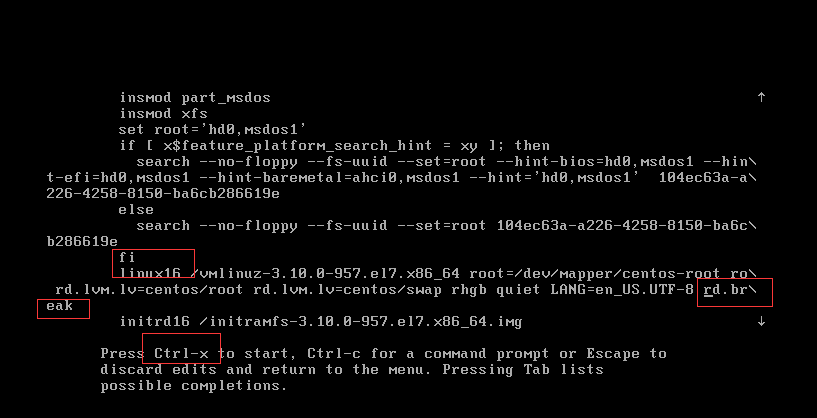
以读写权限重新挂载硬盘上的真实系统根目录:
mount -o remount,rw / /sysroot
切换至真实系统根目录:
chroot /sysroot
按要求修改root密码:
echo 123456 | passwd --stdin root
重新打标:
touch /.autorelabel
退出真实系统:
exit
退出系统重新引导:
exit
以新密码登录系统

1.2.设置主机名
[root@server0 ~]# hostnamectl set-hostname server0.example.com
[root@server0 ~]# bash
[root@server0 ~]# hostname
server0.example.com
[root@server0 ~]#
1.3.设置网络
[root@server0 ~]# nmcli connection modify eth0 ipv4.addresses "172.25.0.11/24 172.25.0.254"  ipv4.dns "172.25.254.254" connection.autoconnect yes ipv4.method manual
[root@server0 ~]# nmcli connection reload
[root@server0 ~]# service network restart
Restarting network (via systemctl):                        [  OK  ]
[root@server0 ~]# cat /etc/sysconfig/network-scripts/ifcfg-eth0
DEVICE=eth0
BOOTPROTO=none
ONBOOT=yes
TYPE=Ethernet
USERCTL=yes
IPV6INIT=no
NAME=eth0
PERSISTENT_DHCLIENT=1
IPADDR0=172.25.0.11
PREFIX0=24
GATEWAY0=172.25.0.254
DNS1=172.25.254.254
DOMAIN=server0.example.com
DEFROUTE=yes
IPV4_FAILURE_FATAL=no
UUID=5fb06bd0-0bb0-7ffb-45f1-d6edd65f3e03
[root@server0 ~]#
二、设置SELinux
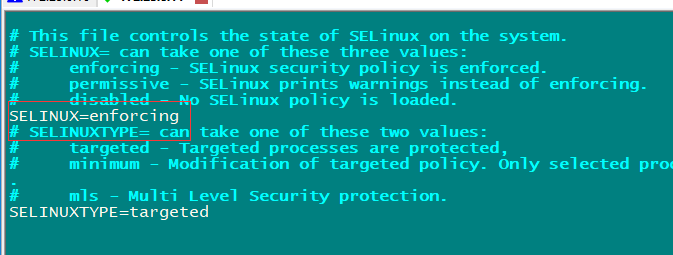
请保证系统 SELinux 运行在 Enforcing 状态,要求系统重启仍然生效
解题:
[root@server0 ~]# setenforce 1
[root@server0 ~]# getenforce
Enforcing
[root@server0 ~]#
[root@server0 ~]# vim /etc/selinux/config
[root@server0 ~]# reboot
三、配置yum源
配置你的本地默认 YUM 仓库指向 http://classroom.example.com/content/rhel7.0/x86_64/dvd
解题:
[root@server0 ~]# yum-config-manager --help | grep add
    --downloaddir=DLDIR
    --add-repo=ADDREPO  add (and enable) the repo from the specified file or
[root@server0 ~]# yum-config-manager --add-repo="http://classroom.example.com/content/rhel7.0/x86_64/dvd/"
Loaded plugins: langpacks
adding repo from: http://classroom.example.com/content/rhel7.0/x86_64/dvd/

[classroom.example.com_content_rhel7.0_x86_64_dvd_]
name=added from: http://classroom.example.com/content/rhel7.0/x86_64/dvd/
baseurl=http://classroom.example.com/content/rhel7.0/x86_64/dvd/
enabled=1


[root@server0 ~]# echo "gpgcheck=0">>/etc/yum.repos.d/classroom.example.com_content_rhel7.0_x86_64_dvd_.repo
[root@server0 ~]# yum clean all
Loaded plugins: langpacks
Cleaning repos: classroom.example.com_content_rhel7.0_x86_64_dvd_ rhel_dvd
Cleaning up everything
[root@server0 ~]# yum makecache
Loaded plugins: langpacks
classroom.example.com_content_rhel7.0_x86_64_dvd_                                  | 4.1 kB  00:00:00
rhel_dvd                                                                           | 4.1 kB  00:00:00
(1/9): classroom.example.com_content_rhel7.0_x86_64_dvd_/group_gz                  | 134 kB  00:00:00
(2/9): classroom.example.com_content_rhel7.0_x86_64_dvd_/primary_db                | 3.4 MB  00:00:00
(3/9): classroom.example.com_content_rhel7.0_x86_64_dvd_/other_db                  | 1.3 MB  00:00:00
(4/9): classroom.example.com_content_rhel7.0_x86_64_dvd_/productid                 | 1.6 kB  00:00:00
(5/9): classroom.example.com_content_rhel7.0_x86_64_dvd_/filelists_db              | 3.0 MB  00:00:00
(6/9): rhel_dvd/group_gz                                                           | 134 kB  00:00:00
(7/9): rhel_dvd/primary_db                                                         | 3.4 MB  00:00:00
(8/9): rhel_dvd/other_db                                                           | 1.3 MB  00:00:00
(9/9): rhel_dvd/filelists_db                                                       | 3.0 MB  00:00:00
Metadata Cache Created
[root@server0 ~]# yum repolist
Loaded plugins: langpacks
repo id                                           repo name                                         status
classroom.example.com_content_rhel7.0_x86_64_dvd_ added from: http://classroom.example.com/content/ 4,305
rhel_dvd                                          Remote classroom copy of dvd                      4,305
repolist: 8,610
[root@server0 ~]#
四、调整逻辑卷
1. 新建一个逻辑卷,名字为lv0 ,其属于 vg0 卷组,该逻辑卷由 16 个 LE 组成。卷组 vg0 的单个 PE 大小为 16 MiB。将新创建的逻辑卷格式化为 xfs 文件系统,在系统启动时,该逻辑卷会被自动挂载到 /mnt/lvm 目录下。
2. 将逻辑卷 lv0 和其文件系统大小调整到 384 MiB。要确保文件系统中的内容保持完整。请注意:分区大小很少能够完全符合要求的大小,所以大小在 352 MiB 和 416 MiB 之间都是可以接受的。
解题:
4.1.划分1G的LVM
[root@server0 ~]# fdisk /dev/vdb
Welcome to fdisk (util-linux 2.23.2).

Changes will remain in memory only, until you decide to write them.
Be careful before using the write command.

Device does not contain a recognized partition table
Building a new DOS disklabel with disk identifier 0x095042ab.

Command (m for help): p

Disk /dev/vdb: 10.7 GB, 10737418240 bytes, 20971520 sectors
Units = sectors of 1 * 512 = 512 bytes
Sector size (logical/physical): 512 bytes / 512 bytes
I/O size (minimum/optimal): 512 bytes / 512 bytes
Disk label type: dos
Disk identifier: 0x095042ab

   Device Boot      Start         End      Blocks   Id  System

Command (m for help): n
Partition type:
   p   primary (0 primary, 0 extended, 4 free)
   e   extended
Select (default p): e
Partition number (1-4, default 1):
First sector (2048-20971519, default 2048):
Using default value 2048
Last sector, +sectors or +size{K,M,G} (2048-20971519, default 20971519): +1G
Partition 1 of type Extended and of size 1 GiB is set

Command (m for help): n
Partition type:
   p   primary (0 primary, 1 extended, 3 free)
   l   logical (numbered from 5)
Select (default p): l
Adding logical partition 5
First sector (4096-2099199, default 4096):
Using default value 4096
Last sector, +sectors or +size{K,M,G} (4096-2099199, default 2099199):
Using default value 2099199
Partition 5 of type Linux and of size 1023 MiB is set

Command (m for help): t
Partition number (1,5, default 5): 5
Hex code (type L to list all codes): 8e
Changed type of partition 'Linux' to 'Linux LVM'

Command (m for help): w
The partition table has been altered!

Calling ioctl() to re-read partition table.
Syncing disks.
[root@server0 ~]# partprobe
[root@server0 ~]#
4.2.按要求添加逻辑卷
[root@server0 ~]# pvcreate /dev/vdb5
  Physical volume "/dev/vdb5" successfully created
[root@server0 ~]# vgcreate --help | grep size
        [-s|--physicalextentsize PhysicalExtentSize[bBsSkKmMgGtTpPeE]]
[root@server0 ~]# vgcreate vg0 -s 16M /dev/vdb5
  Volume group "vg0" successfully created
[root@server0 ~]# vgdisplay
  --- Volume group ---
  VG Name               vg0
  System ID
  Format                lvm2
  Metadata Areas        1
  Metadata Sequence No  1
  VG Access             read/write
  VG Status             resizable
  MAX LV                0
  Cur LV                0
  Open LV               0
  Max PV                0
  Cur PV                1
  Act PV                1
  VG Size               1008.00 MiB
  PE Size               16.00 MiB
  Total PE              63
  Alloc PE / Size       0 / 0
  Free  PE / Size       63 / 1008.00 MiB
  VG UUID               jvZd9h-nV9v-ankV-skjP-btgB-vF8R-W67IRT

[root@server0 ~]# lvcreate -n lv0 -l 16 vg0
  Logical volume "lv0" created
[root@server0 ~]# lvdisplay
  --- Logical volume ---
  LV Path                /dev/vg0/lv0
  LV Name                lv0
  VG Name                vg0
  LV UUID                n8oBJF-9caQ-COg8-2peS-pWTz-mQDj-rXHUKL
  LV Write Access        read/write
  LV Creation host, time server0.example.com, 2019-12-03 21:47:56 +0800
  LV Status              available
  # open                 0
  LV Size                256.00 MiB
  Current LE             16
  Segments               1
  Allocation             inherit
  Read ahead sectors     auto
  - currently set to     8192
  Block device           252:0

[root@server0 ~]# mkfs.xfs /dev/vg0/lv0
meta-data=/dev/vg0/lv0           isize=256    agcount=4, agsize=16384 blks
         =                       sectsz=512   attr=2, projid32bit=1
         =                       crc=0
data     =                       bsize=4096   blocks=65536, imaxpct=25
         =                       sunit=0      swidth=0 blks
naming   =version 2              bsize=4096   ascii-ci=0 ftype=0
log      =internal log           bsize=4096   blocks=853, version=2
         =                       sectsz=512   sunit=0 blks, lazy-count=1
realtime =none                   extsz=4096   blocks=0, rtextents=0
[root@server0 ~]#
4.3.设置自动挂载
[root@server0 ~]# mkdir -p /mnt/lvm
[root@server0 ~]# blkid
/dev/vda1: UUID="9bf6b9f7-92ad-441b-848e-0257cbb883d1" TYPE="xfs"
/dev/vdb5: UUID="KydhrK-3Nar-ktHy-b6Gq-skNj-sIQu-MgWCmm" TYPE="LVM2_member"
/dev/mapper/vg0-lv0: UUID="11ddc813-2a94-46f7-a7de-e735eb8bfe8c" TYPE="xfs"
[root@server0 ~]# echo "UUID="11ddc813-2a94-46f7-a7de-e735eb8bfe8c" /mnt/lvm xfs defaults 0 0">>/etc/fstab
[root@server0 ~]# mount -av
/                        : ignored
mount: /mnt/lvm does not contain SELinux labels.
       You just mounted an file system that supports labels which does not
       contain labels, onto an SELinux box. It is likely that confined
       applications will generate AVC messages and not be allowed access to
       this file system.  For more details see restorecon(8) and mount(8).
/mnt/lvm                 : successfully mounted
[root@server0 ~]# df -lh | grep lv0
/dev/mapper/vg0-lv0  253M   13M  240M   6% /mnt/lvm
[root@server0 ~]#
4.4.扩容
[root@server0 ~]# lvextend -L 384M /dev/vg0/lv0
  Extending logical volume lv0 to 384.00 MiB
  Logical volume lv0 successfully resized
[root@server0 ~]# xfs_growfs /dev/vg0/lv0
meta-data=/dev/mapper/vg0-lv0    isize=256    agcount=4, agsize=16384 blks
         =                       sectsz=512   attr=2, projid32bit=1
         =                       crc=0
data     =                       bsize=4096   blocks=65536, imaxpct=25
         =                       sunit=0      swidth=0 blks
naming   =version 2              bsize=4096   ascii-ci=0 ftype=0
log      =internal               bsize=4096   blocks=853, version=2
         =                       sectsz=512   sunit=0 blks, lazy-count=1
realtime =none                   extsz=4096   blocks=0, rtextents=0
data blocks changed from 65536 to 98304
[root@server0 ~]# df -lh | grep lv0
/dev/mapper/vg0-lv0  381M   14M  368M   4% /mnt/lvm
[root@server0 ~]#
五、按照以下要求创建用户、组
• 新建一个名为adminuser的组,id为40000
• 新建一个natasha的用户,并将adminuser作为其附属组
• 新建一个harry用户,并将adminuser作为其附属组
• 新建一个sarah的用户,其不属于adminuser组,在系统送没有任何可交互的shell
• natasha、harry、和sarah三个用户的密码均设为rehat
解题:
[root@server0 ~]# groupadd --help | grep id
  -g, --gid GID                 use GID for the new group
  -K, --key KEY=VALUE           override /etc/login.defs defaults
[root@server0 ~]# groupadd -g 40000 adminuser
[root@server0 ~]# cat /etc/group | grep 4000
adminuser:x:40000:
[root@server0 ~]# useradd --help | grep group
  -g, --gid GROUP               name or ID of the primary group of the new
  -G, --groups GROUPS           list of supplementary groups of the new
  -N, --no-user-group           do not create a group with the same name as
  -U, --user-group              create a group with the same name as the user
[root@server0 ~]# useradd -G adminuser natasha
[root@server0 ~]# useradd -G adminuser harry
[root@server0 ~]# useradd --help | grep shell
  -s, --shell SHELL             login shell of the new account
[root@server0 ~]# useradd -s /sbin/nologin sarah
[root@server0 ~]# cat /etc/passwd | grep sarah
sarah:x:1003:1003::/home/sarah:/sbin/nologin
[root@server0 ~]# echo rehat | passwd --stdin natasha
Changing password for user natasha.
passwd: all authentication tokens updated successfully.
[root@server0 ~]# echo rehat | passwd --stdin harry
Changing password for user harry.
passwd: all authentication tokens updated successfully.
[root@server0 ~]# echo rehat | passwd --stdin sarah
Changing password for user sarah.
passwd: all authentication tokens updated successfully.
[root@server0 ~]#
六、配置文件权限
• 该文件的所属组为root
• 该文件的所属人为root
• 该文件对任何人均没有执行权限
• 用户natasha对该文件有读和写权限
• 用户harry对该文件既不能读也不能写
• 所有用户(包括当前用户和未来创建的用户)对该文件都有读的权限
解题:
[root@server0 ~]# cp -a  /etc/fstab /var/tmp/
[root@server0 ~]# chown root:root /var/tmp/fstab
[root@server0 ~]# chmod a-x /var/tmp/fstab
[root@server0 ~]# setfacl -Rm u:natasha:rw,u:harry:-- /var/tmp/fstab
[root@server0 ~]# chmod a+r /var/tmp/fstab
[root@server0 ~]# getfacl /var/tmp/fstab
getfacl: Removing leading '/' from absolute path names
# file: var/tmp/fstab
# owner: root
# group: root
user::rw-
user:natasha:rw-
user:harry:---
group::r--
mask::rw-
other::r--

[root@server0 ~]#
七、建立计划任务
• 对natasha用户建立计划任务,要求在本地时间的每天14:23执行 /bin/echo "rhcsa" 命令
[root@server0 ~]# crontab -e -u natasha
[root@server0 ~]# crontab -l -u natasha
#       mim     hour    day     month   week    command
         23      14      *       *       *       /bin/echo "rhcsa"

[root@server0 ~]#
八、创建共享目录
• /home/admins目录的所属组为adminuser
• 该目录对adminuser组的成员可读可写可执行,但是对其它用户没有任何权限,但是root不受限制
• 在/home/admins目录下创建的文件所属组自动被设置为adminuser
解题:
[root@server0 ~]# mkdir /home/admins
[root@server0 ~]# chgrp adminuser /home/admins/
[root@server0 ~]# chmod g=rwx,o=-- /home/admins/
[root@server0 ~]# chmod g+s /home/admins/
[root@server0 ~]# ls -ld /home/admins/
drwxrws---. 2 root adminuser 6 Dec  3 22:17 /home/admins/
[root@server0 ~]# getfacl /home/admins/
getfacl: Removing leading '/' from absolute path names
# file: home/admins/
# owner: root
# group: adminuser
# flags: -s-
user::rwx
group::rwx
other::---
[root@server0 ~]#
九、升级系统内核
• 当系统重新启动之后,升级的内核要作为默认的内核
• 原来的内核要被保留,并且仍然可以正常启动
• A 新内核的 RPM 包在http://classroom.example.com/content/rhel7.0/x86_64/errata/Packages
注意事项:使用连接的时候一定要在连接尾部添加“/”
解题:
[root@server0 ~]# curl -s http://classroom.example.com/content/rhel7.0/x86_64/errata/Packages/ | grep kernel <tr><td valign="top"><img src="/icons/unknown.gif" alt="[ ]"></td><td><a href="kernel-3.10.0-123.1.2.el7.x86_64.rpm">kernel-3.10.0-123.1...></a></td><td align="right">2014-06-11 04:34 </td><td align="right"> 29M</td><td> </td></tr> <tr><td valign="top"><img src="/icons/unknown.gif" alt="[ ]"></td><td><a href="kernel-doc-3.10.0-123.1.2.el7.noarch.rpm">kernel-doc-3.10.0-12..></a></td><td align="right">2014-06-11 04:35 </td><td align="right"> 12M</td><td> </td></tr> [root@server0 ~]# wget http://classroom.example.com/content/rhel7.0/x86_64/errata/Packages/kernel-3.10.0-123.1.2.el7.x86_64.rpm --2019-12-03 23:52:28-- http://classroom.example.com/content/rhel7.0/x86_64/errata/Packages/kernel-3.10.0-123.1.2.el7.x86_64.rpm Resolving classroom.example.com (classroom.example.com)... 172.25.254.254 Connecting to classroom.example.com (classroom.example.com)|172.25.254.254|:80... connected. HTTP request sent, awaiting response... 200 OK Length: 30266784 (29M) [application/x-rpm] Saving to: ‘kernel-3.10.0-123.1.2.el7.x86_64.rpm’ 100%[=================================================>] 30,266,784 82.1MB/s in 0.4s 2019-12-03 23:52:29 (82.1 MB/s) - ‘kernel-3.10.0-123.1.2.el7.x86_64.rpm’ saved [30266784/30266784] [root@server0 ~]# ls anaconda-ks.cfg Documents kernel-3.10.0-123.1.2.el7.x86_64.rpm Pictures Templates Desktop Downloads Music Public Videos [root@server0 ~]# chmod 755 kernel-3.10.0-123.1.2.el7.x86_64.rpm [root@server0 ~]# rpm -ivh kernel-3.10.0-123.1.2.el7.x86_64.rpm warning: kernel-3.10.0-123.1.2.el7.x86_64.rpm: Header V3 RSA/SHA256 Signature, key ID fd431d51: NOKEY Preparing... ################################# [100%] Updating / installing... 1:kernel-3.10.0-123.1.2.el7 ################################# [100%] [root@server0 ~]# grub2-editenv list saved_entry=Red Hat Enterprise Linux Server (3.10.0-123.1.2.el7.x86_64) 7.0 (Maipo) [root@server0 ~]# reboot
十、绑定外部验证
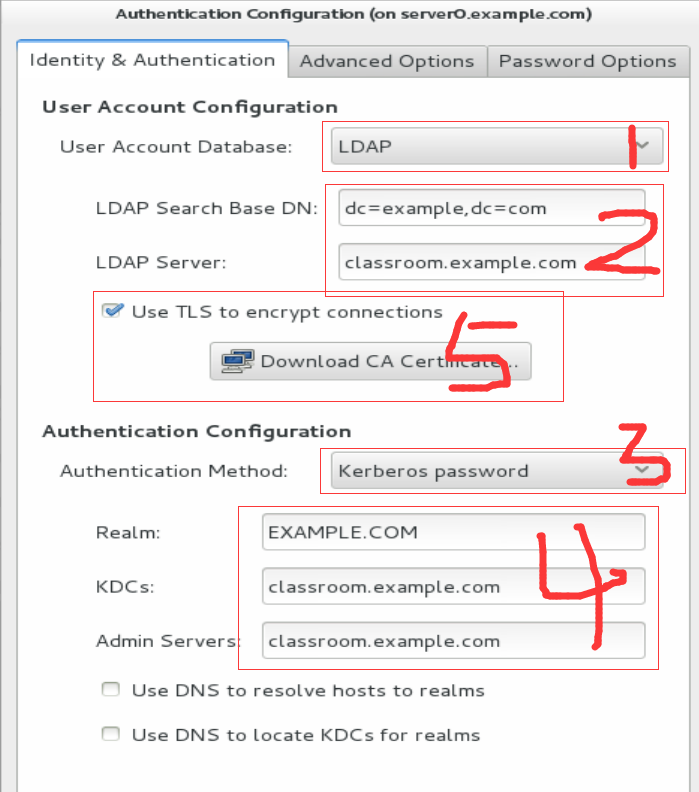
• 在 classroom.example.com 上已部署了一台 LDAP 认证服务器,按以下要求配置你的系统
• 加入到该 LDAP 服务中,并使用 Kerberos 认证用户密码
• 该 LDAP 认证服务的Base DN为:dc=example,dc=com .
• 该 LDAP 认证服务的LADP Server为 :classroom.example.com
• 该认证服务的 Kerbros Realm 为:EXAMPLE.COM
• 该认证服务的 Kerbros KDC为:classroom.example.com
• 该认证服务的 Kerbros Admin Server为:classroom.example.com
• 认证的会话连接需要被加密,证书的下载地址为 http://classroom.example.com/pub/example-ca.crt
解题:
10.1.安装必备软件
[root@server0 ~]# yum install authconfig-gtk sssd krb5-workstation -y
[root@server0 ~]# authconfig-gtk
10.2.配置LDAP
上面配置完成再进行(没有配置的话sssd服务无法启动):
[root@server0~]# systemctl enable sssd
[root@server0~]# systemctl restart sssd
[root@server0~]# systemctl status sssd
[root@server0~]# su ldapuser0
bash-4.2$
验证用户:ldapuser0
[root@server0 ~]# systemctl restart sssd
[root@server0 ~]# su ldapuser0
bash-4.2$ exit
exit
[root@server0 ~]# getent passwd ldapuser0
ldapuser0:*:1700:1700:LDAP Test User 0:/home/guests/ldapuser0:/bin/bash
[root@server0 ~]#
十一、配置autofs
- classroom.example.com 使用 NFS 共享了/home/guests 给你的系统。这个文件系统包含了预先设置好的用户 ldapuser0 的家目录;
- ldapuser0 的家目录是 classroom.example.com:/home/guests/ldapuser0 ;
- ldapuser0 的家目录应该自动挂载到本地的 /home/guests/ldapuser0 家目录必须对用户具有可写权限;
- ldapuser0 的密码是 'kerberos’
解题:
11.1.安装软件
[root@server0 ~]# yum install autofs -y
[root@server0 ~]# systemctl enable autofs.service
11.2.设置挂载
[root@server0 ~]# cp -a /etc/auto.misc /etc/auto.aa
[root@server0 ~]# echo "/home/guests /etc/auto.aa" >>/etc/auto.master
[root@server0 ~]# echo "*  -type=nfs,rw  classroom.example.com:/home/guests/&">>/etc/auto.aa
[root@server0 ~]# systemctl restart autofs.service
[root@server0 ~]# ssh ldapuser0@localhost
ldapuser0@localhost's password: (kerberos)
Last login: Wed Dec  4 00:50:57 2019 from localhost
[ldapuser0@server0 ~]$ cd /home/guests/
[ldapuser0@server0 guests]$ ls
ldapuser0
[ldapuser0@server0 guests]$
十二、配置NTP
配置你的系统时间与服务器 classroom.example.com 同步
解题:
12.1.如图

12.2.设置开机启动
[root@server0 ~]# systemctl enable chronyd
[root@server0 ~]# systemctl restart chronyd.service
[root@server0 ~]# chronyc sources -v
210 Number of sources = 1

  .-- Source mode  '^' = server, '=' = peer, '#' = local clock.
 / .- Source state '*' = current synced, '+' = combined , '-' = not combined,
| /   '?' = unreachable, 'x' = time may be in error, '~' = time too variable.
||                                                 .- xxxx [ yyyy ] +/- zzzz
||                                                /   xxxx = adjusted offset,
||         Log2(Polling interval) -.             |    yyyy = measured offset,
||                                              |    zzzz = estimated error.
||                                   |           |
MS Name/IP address         Stratum Poll Reach LastRx Last sample
===============================================================================
^* classroom.example.com         8   6    17    17   +796ns[  -21us] +/- 1176us
[root@server0 ~]#
十三、创建归档
• 创建一个名为 /root/sysconfig.tar.bz2的归档文件,其中包含了/etc/sysconfig目录中的内容。tar归档文件
必须使用bzip2进行压缩。
解题:
[root@server0 ~]# man tar | grep zip2
       -j, --bzip2
              filter the archive through bzip2
       -j, --bzip2
              filter the archive through bzip2
[root@server0 ~]# tar -jcf /root/sysconfg.tar.bz2  /etc/sysconfig/
十四、创建一个用户
- 用户id=3456 用户名:jay
- 密码为:glegunle
解题:
[root@server0 ~]# useradd -u 3456 jay
[root@server0 ~]# echo "glegunge"|passwd --stdin jay
Changing password for user jay.
passwd: all authentication tokens updated successfully.
[root@server0 ~]# id jay
uid=3456(jay) gid=3456(jay) groups=3456(jay)
[root@server0 ~]#
十五、添加swap分区
• swap分区的容量为512M
• 当您的系统启动时,swap分区可以自动挂载
• 不要移动或是修改其它已经存在于您的系统中的swap分区
解题:
[root@server0 ~]# fdisk /dev/vdb
Welcome to fdisk (util-linux 2.23.2).

Changes will remain in memory only, until you decide to write them.
Be careful before using the write command.


Command (m for help): n
Partition type:
   p   primary (0 primary, 1 extended, 3 free)
   l   logical (numbered from 5)
Select (default p): p
Partition number (2-4, default 2):
First sector (2099200-20971519, default 2099200):
Using default value 2099200
Last sector, +sectors or +size{K,M,G} (2099200-20971519, default 20971519): +512M
Partition 2 of type Linux and of size 512 MiB is set

Command (m for help): t
Partition number (1,2,5, default 5): 2
Hex code (type L to list all codes): 82
Changed type of partition 'Linux' to 'Linux swap / Solaris'

Command (m for help): w
The partition table has been altered!

Calling ioctl() to re-read partition table.

WARNING: Re-reading the partition table failed with error 16: Device or resource busy.
The kernel still uses the old table. The new table will be used at
the next reboot or after you run partprobe(8) or kpartx(8)
Syncing disks.
[root@server0 ~]# partprobe
[root@server0 ~]# mkswap /dev/vdb2
Setting up swapspace version 1, size = 524284 KiB
no label, UUID=b9a7e4a8-66f9-4de0-8d3e-f09a7844fa69
[root@server0 ~]# swapon -av /dev/vdb2
swapon /dev/vdb2
swapon: /dev/vdb2: found swap signature: version 1, page-size 4, same byte order
swapon: /dev/vdb2: pagesize=4096, swapsize=536870912, devsize=536870912
[root@server0 ~]# echo "UUID=b9a7e4a8-66f9-4de0-8d3e-f09a7844fa69 swap swap defults 0 0">>/etc/fstab
[root@server0 ~]# mount -av
/                        : ignored
/mnt/lvm                 : already mounted
swap                     : ignored
[root@server0 ~]# free -lh | grep Swap
Swap: 511M 0B 511M
[root@server0 ~]#
十六、查找文件
- 请把系统上拥有者为jay用户的所有文件,拷贝到/root/findfiles目录中
解题:
[root@server0 ~]# mkdir /root/findfiles -p
[root@server0 ~]# find / -user jay -exec cp -a {} /root/findfiles/ ;
find: ‘/proc/18294/task/18294/fd/6’: No such file or directory
find: ‘/proc/18294/task/18294/fdinfo/6’: No such file or directory
find: ‘/proc/18294/fd/6’: No such file or directory
find: ‘/proc/18294/fdinfo/6’: No such file or directory
find: ‘/home/guests/ldapuser0’: Permission denied
cp: cannot overwrite non-directory ‘/root/findfiles/jay’ with directory ‘/home/jay’
[root@server0 ~]# ls -l /root/findfiles/
total 8
drwxr-xr-x. 2 jay jay     6 Jan 27  2014 extensions
-rw-r--r--. 1 jay jay     4 Jul 11  2014 gnome-initial-setup-done
-rw-rw----. 1 jay mail    0 Dec  4 01:07 jay
-rw-r--r--. 1 jay jay  1443 Jul 11  2014 monitors.xml
drwxr-xr-x. 2 jay jay     6 Jan 27  2014 plugins
[root@server0 ~]#
十七、查找一个字符串
• 把/usr/share/dict/words文件中包含seismic字符串的行找到,并将这些行按照原始文件中的顺序存放到/root/wordlist中。
• /root/wordlist文件不能包含空行。
解题:
[root@server0 ~]# grep seismic /usr/share/dict/words | grep -v ^$ >/root/wordlist
https://www.cnblogs.com/tanshouke/p/12186366.html
注:原创帖,转载需注明出处
下一篇:RHCE考试:https://www.cnblogs.com/tanshouke/p/12187419.html