Introduction
The purpose of this article is to create a proof of concept to demonstrate the feasibility of ASP.NETWebAPI final release.
Update
- Modify code for Visual Studio 2012
- Replace Autofac with Castle Windsor for Dependency Injection
Prerequisite:
- AdventureWorksLT2008R2
- ASP.Net WebAPI
- Autofac for Dependency Injection Castle Windsor for DI
- Log4Net
- EntityFramework 4.1 Entity Framework 5
- jQuery Templates plugin (jquery-tmpl)
- Visual Studio Express 2012
Goals to achieve:
- Any user should be able to view products
- Product would be filtered by Categories
- User should be able to add products in cart
- Only registered user will be able to submit cart
- User should be able to register into system
- User will get confirmation Invoice after generating order in system.
Architecture for this POC
I am not following any specific Architecture Pattern, although while designing this POC, I try to followsome of the key design principles like:
Again I am repeating my word try to follow….. :). So, all comments/suggestions are more than welcome to discuss and I am always ready to adopt changes, or you can do it yourself by join @CodePlex. The initial Skeleton for this application is as per below diagram: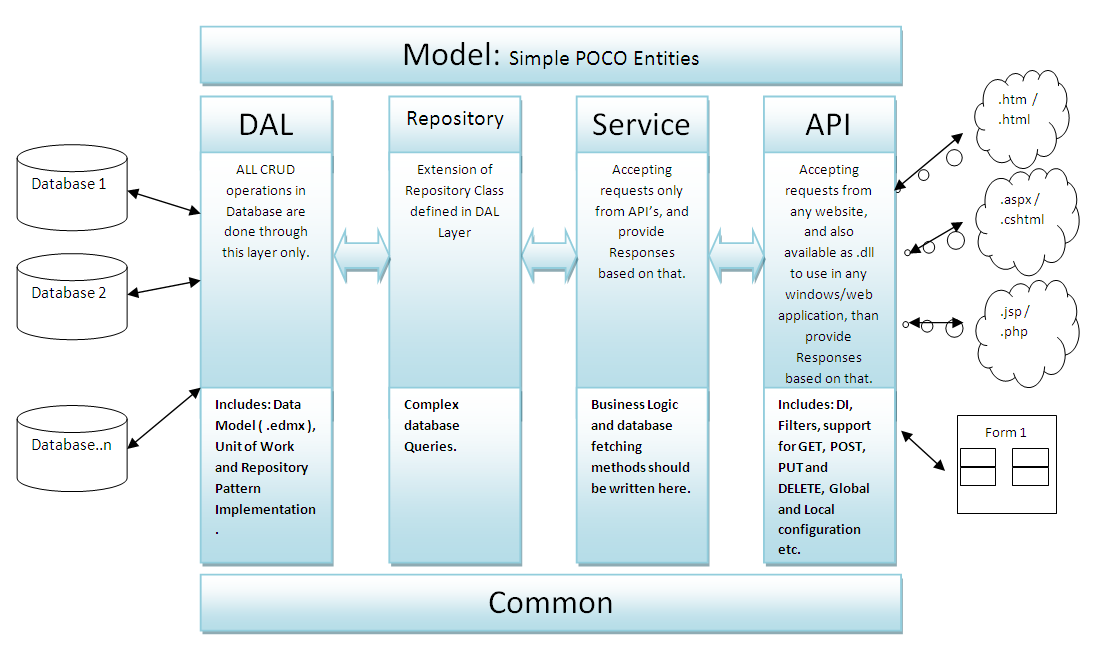
Step-by-Step
- Step 1: Create a basic Application Structure Layout
- Step 2: Create the Data Access Layer
- Step 3: Create the Service Layer
- Step 4: Create the API Layer
- Step 5: Integration of Dependency Injection using Castle Windsor
- Step 6: Add Views to solution
- Step 7: Unit test and resolve issues
- Step 8: Deploy application on IIS
- Step 9: Provide Cross Domain Support
Step 1: Create a basic Application StructureLayout
For more information on ASP.NET WebAPI, watch Videos and Tutorials here
Add a blank Solution named as Application
Add a new Project (Class Library) named as Application.DAL
Repeat above process and create four more Class Library projects named as –
- Application.Model
- Application.Repository
- Application.Common
- Application.Service
Next, add a new Project named as Application.API as ASP.Net MVC 4 Web Application. After click on OK, select template as Web API
This will add a full functional Web API template Application into our main solution.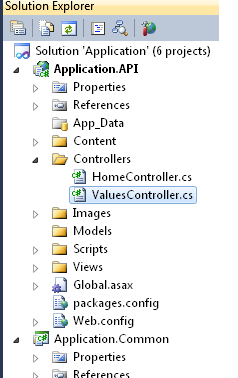
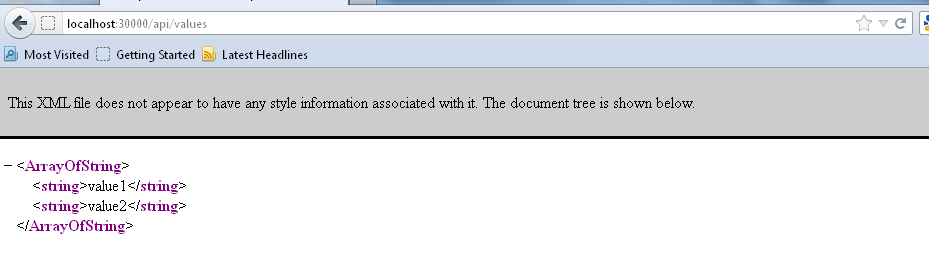
Right click on Application.API project in Solution Explorer and go to properties, than assign a port to be use by this service application ( In my case its 30000). Hit F5 and we are ready with a dummy data as below screen:
Step 2: Prepare Application.DAL, Application.Repository and Application.Model Layers
Check @MSDN for more information on Entity Framework
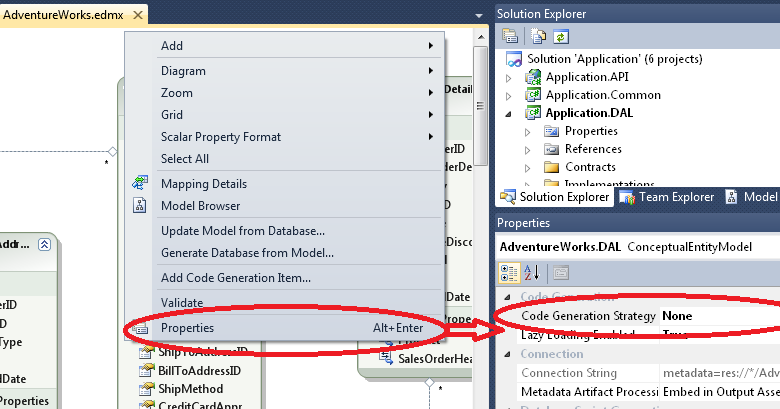
Add Entity Data Model to Application.DAL project. To do this select ADO.NET Entity Data Model from the Data Templates list, and name it as AdventureWorks.edmx
Choose “Generate from Database” and provide the connection string to read the database schema. This will add AdventureWorks.edmx into current project. Right click on the blank space in Entity Model surface and click on properties (or alternate press Alt +Enter on keyboard). Now set its Code Generation Strategy as None.
Now create POCO entities for AdventureWorks Data Model into Application.Model Solution. Check this article to do this job for you on MSDN to use T4 Templates and the Entity Framework
Then, create all required repositories under Application.Repositories.
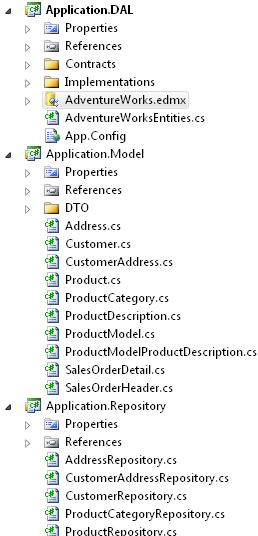
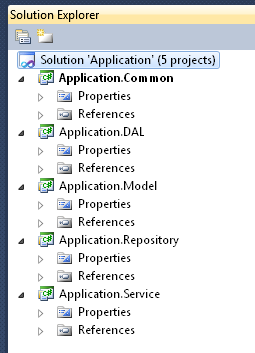
To build solution, add reference of Application.Model.dll to Application.DAL.dll andApplication.Repository.dll projects, and add reference of Application.DAL.dll toApplication.Repository.dll project. (See below picture for reference)
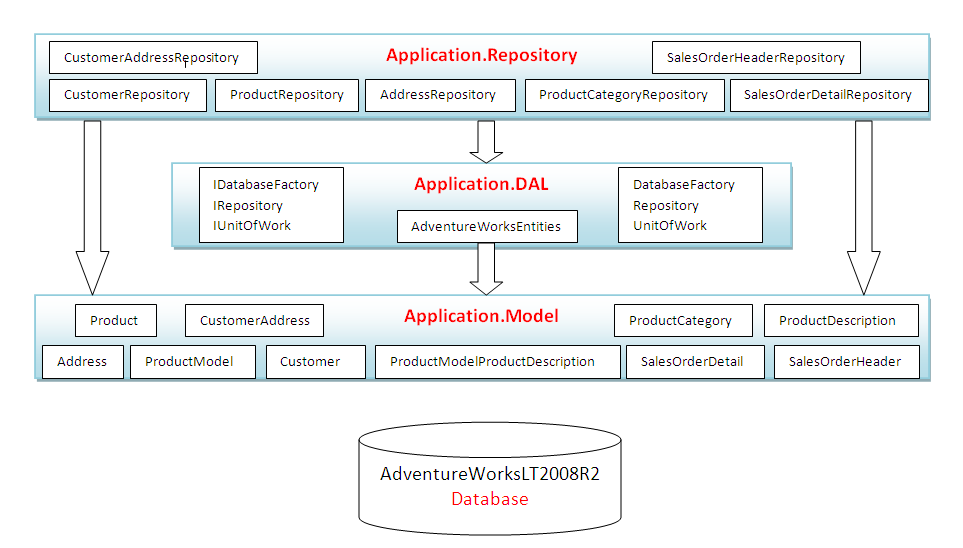
Before proceeding to next step (designing Application.Service and Application.API Layer), let us see what we have designed yet:
Step 3: Add files to Application.Service Layer
Before adding files to Service layer let us look at the Goals which we want to achieve.
- Any user should be able to view products
- Product would be filtered by Categories
- User should be able to add products in cart
- Only registered user will be able to submit cart
- User should be able to register into system
- User will get confirmation Invoice after generating order in system.
To achieve the above mention Goals, we need to add three service classes to Application.Service as per below image
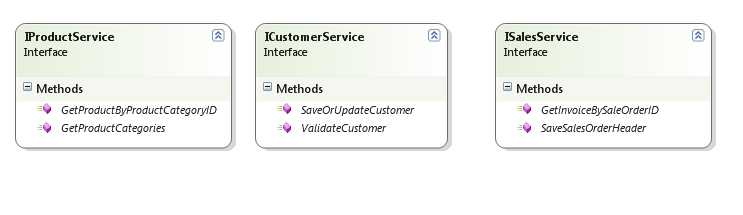
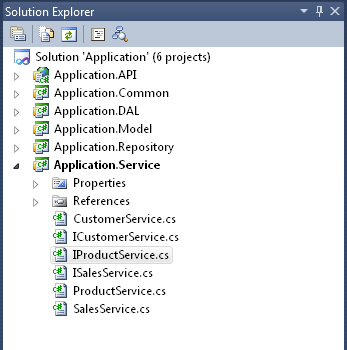
I am not going in deatils, as the implementation for each methods are clear and easy to understand.
Step 4: Add files to Application.API Layer
To make this Web API accessed from a broad range of clients like any browsers which use JavaScript or any windows/Mobile platform which supports .dll files, we need to add Controllers with base class asApiController. More details here
First, we remove the default controllers added by template (HomeController and ValuesController) and then add three new controllers as per below diagram:

Again, nothing special in the implementation of these methods, they all jst push the data to service layer.
Step 5: Integration of Dependency Injection with WebAPI using Castle Windsor
The implementation is very much straight forward and clear.
In Application.API Solution Explorer, right-click the References node and click Manage NuGet Packages

It will open the below screen.
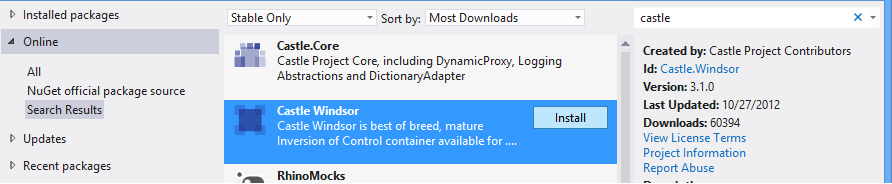
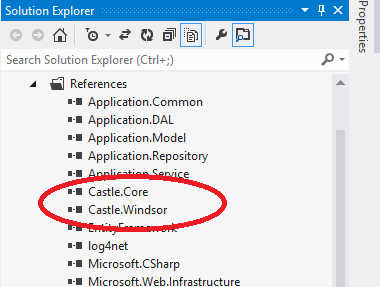
Click on install and it will add below two references in solution
Create an adopter for Castle Windsor as WindsorActivator to implement IHttpControllerActivator
    public class WindsorActivator : IHttpControllerActivator
    {
        private readonly IWindsorContainer container;

        public WindsorActivator(IWindsorContainer container)
        {
            this.container = container;
        }

        public IHttpController Create(
            HttpRequestMessage request,
            HttpControllerDescriptor controllerDescriptor,
            Type controllerType)
        {
            var controller =
                (IHttpController)this.container.Resolve(controllerType);

            request.RegisterForDispose(
                new Release(
                    () => this.container.Release(controller)));

            return controller;
        }

        private class Release : IDisposable
        {
            private readonly Action release;

            public Release(Action release)
            {
                this.release = release;
            }

            public void Dispose()
            {
                this.release();
            }
        }

    }
The installer uses the container parameter of the Install method to Register controllers using Windsor's Fluent Registration API.
Now we need to tell Castle Windsor to know about all dependencies for it to manage them. For that, we create a new class DependencyInstaller to implement IWindsorInstaller. The installer uses the container parameter of the Install() method to Register dependencies using Windsor's Fluent Registration API. As per below implementation every time we add any new class to Controller/Service/Repository in our application, it will be automatically registered, the only thing we need follow is naming convention, i.e. all Controller class should end with Controller similarly Service and Repository classes should end with Service and Repository.
        public void Install(IWindsorContainer container, IConfigurationStore store)
        {
            container.Register(
                        Component.For<ILogService>()
                            .ImplementedBy<LogService>()
                            .LifeStyle.PerWebRequest,

                        Component.For<IDatabaseFactory>()
                            .ImplementedBy<DatabaseFactory>()
                            .LifeStyle.PerWebRequest,

                        Component.For<IUnitOfWork>()
                            .ImplementedBy<UnitOfWork>()
                            .LifeStyle.PerWebRequest,

                        AllTypes.FromThisAssembly().BasedOn<IHttpController>().LifestyleTransient(),

                        AllTypes.FromAssemblyNamed("Application.Service")
                            .Where(type => type.Name.EndsWith("Service")).WithServiceAllInterfaces().LifestylePerWebRequest(),

                        AllTypes.FromAssemblyNamed("Application.Repository")
                            .Where(type => type.Name.EndsWith("Repository")).WithServiceAllInterfaces().LifestylePerWebRequest()
                        );
        }
    }
Next, in final step create and configure the Windsor container in Application's constructor inside Global.asax.cs, so that it will be automatically dispose when application exits.
    public class WebApiApplication : System.Web.HttpApplication
    {
        private readonly IWindsorContainer container;

        public WebApiApplication()
        {
            this.container =
                new WindsorContainer().Install(new DependencyInstaller());
        }

        public override void Dispose()
        {
            this.container.Dispose();
            base.Dispose();
        }


        protected void Application_Start()
        {
            AreaRegistration.RegisterAllAreas();

            WebApiConfig.Register(GlobalConfiguration.Configuration);
            FilterConfig.RegisterGlobalFilters(GlobalFilters.Filters);
            RouteConfig.RegisterRoutes(RouteTable.Routes);
            BundleConfig.RegisterBundles(BundleTable.Bundles);
            GlobalConfiguration.Configuration.Services.Replace(
                typeof(IHttpControllerActivator),
                new WindsorActivator(this.container));
        }
    }<logservice><ilogservice><unitofwork><iunitofwork><databasefactory><idatabasefactory>
            </idatabasefactory></databasefactory></iunitofwork></unitofwork></ilogservice></logservice>
Now we are ready to test our application. Hit F5 and check the browser with following url’s:
http://localhost:30000/api/products : will result all Product Categories

http://localhost:30000/api/products/2 : will result all Products with ProductcategoryID as 2

To check other methods, First we will add some Views in current solution.
Step 6: Add View to solution
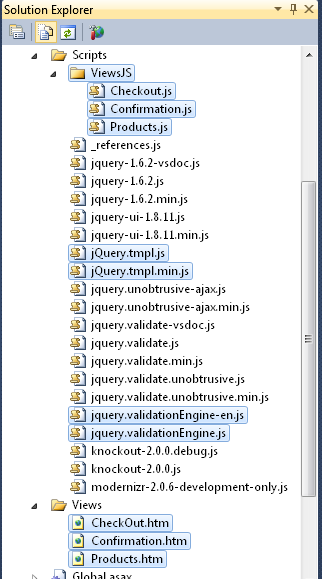
Delete all default files and folders from Views Folder, and add three Html and their supportive Javascript File as. For this POC we will use html files, and some jquery libraries like:
jquery.tmpl.js : to create template based screen, and
jquery.validationEngine.js : to validate form data
Now the structure will looks like below picture :
For details code in html and JS file please look into the code. In next step I am going to resolve problems.
Step 7: Resolve issues
Before run the application Right Click on Products.htm and click on Set As start Page. Now hit F5

It means, two WebAPI methods in ProductsController.cs are working perfectly. In JavaScript, on page load we are calling first method inside product.js as:
                    var productcategoriesAddress = "/api/products/";
                    $(function () {
                        $('#tblRight').hide();
                        $.getJSON(
                                productcategoriesAddress,
                                function (data) {
                                    var parents = jQuery.grep(data, function (a) { return a.ParentProductCategoryID == null });
                                    var childs = jQuery.grep(data, function (a) { return a.ParentProductCategoryID != null });
                                    $.each(parents,
                                        function (index, value) {
                                            var categorydata = [];
                                            var subCategory = '';
                                            var subChild = jQuery.grep(childs, function (a) { return a.ParentProductCategoryID == value.ProductCategoryID });
                                            $.each(subChild,
                                                function (index, item) {
                                                    var serviceURL = productcategoriesAddress + item.ProductCategoryID;
                                                    subCategory = subCategory + "  " + "<a href="%20+%20serviceURL%20+%20" class="menuButton">" + item.Name + "</a>";
                                                });
                                            categorydata.push({
                                                'ProductCategoryID': value.ProductCategoryID,
                                                'ParentCategory': value.Name,
                                                'ChildCategory': subCategory
                                            });
                                            $("#categoryTemplate").tmpl(categorydata).appendTo("#categories");
                                            $("#" + value.Name).html(subCategory);
                                        });

                                        GetProducts(1);
                                }
                            );
This call hits below method in ProductsController, and returns all Product Category to create the Upper Menu Part
                    public IQueryable<productcategory> GetProductCategories()
                    {
                        loggerService.Logger().Info("Calling with null parameter");
                        return _productservice.GetProductCategories().AsQueryable<productcategory>();
                    }
                </productcategory></productcategory>
In ProductService implementation is :
                    public IQueryable<productcategory> GetProductCategories()
                    {
                        loggerService.Logger().Info("Calling with null parameter");
                        return _productservice.GetProductCategories().AsQueryable<productcategory>();
                    }
                </productcategory></productcategory>
The second call is to fetch all products depends on selected category. In javascript
                      function GetProducts(ProductCategoryID) {
                        var serviceURL = productcategoriesAddress + ProductCategoryID;
                        $('#categories li h1').css('background', '#736F6E');
                        $('#mnu' + ProductCategoryID).css('background', '#357EC7');
                        $("#loader").show();
                        $.ajax({
                            type: "GET",
                            datatype: "json",
                            url: serviceURL,
                            context: this,
                            success: function (value) {
                                $("#productData").html("");
                                $("#productTemplate").tmpl(value).appendTo("#productData");
                                $("#loader").hide();
                            }
                        });
                        return false;
                    }
and in ProductsController it goes to
                    public IQueryable<product> GetProductByProductCategoryID(int id)
                    {
                        loggerService.Logger().Info("Calling with null parameter as : id : " + id);
                        return _productservice.GetProductByProductCategoryID(id).AsQueryable<product>();
                    }

                </product></product>
In ProductService implementation is :
                    public IQueryable<product> GetProductByProductCategoryID(int id)
                    {
                        loggerService.Logger().Info("Calling with null parameter as : id : " + id);
                        return _productservice.GetProductByProductCategoryID(id).AsQueryable<product>();
                    }
                </product></product>
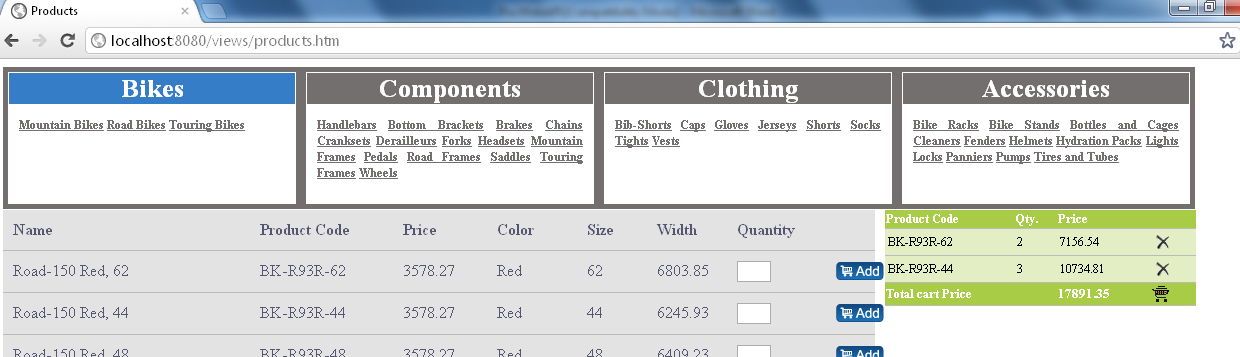
Next, let us try to add some products to Cart and Checkout cart
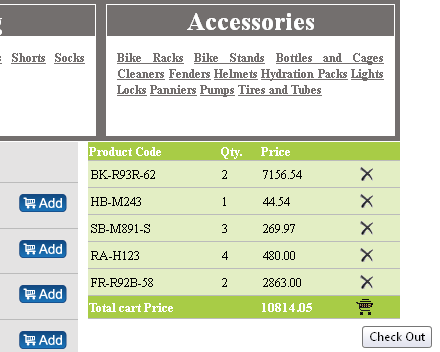
On clicking on checkout It redirect to Checkout.htm page and asking for either Login using existing CustomerID or Register for a new Customer.
Click on Register link to create a new Customer.
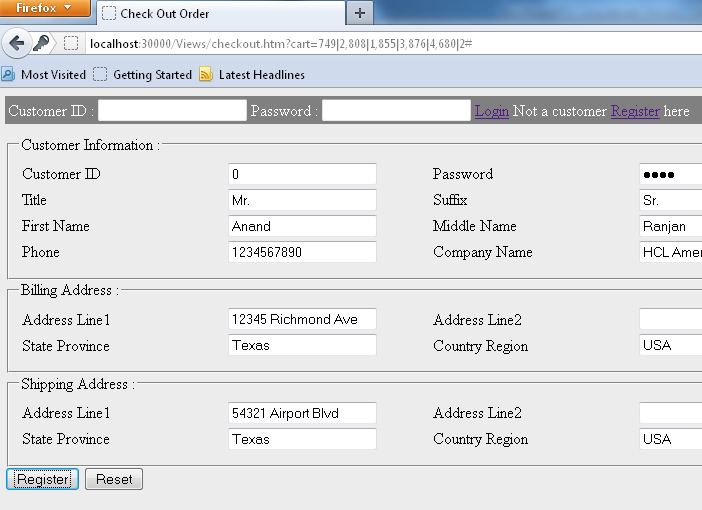
Submit form after clicking on Register button and see if Posting is working or not. Again its success!!!
Now we will try to update records for AddressLine2, and Update is also working fine!!!
In both scenario (Add or Update Customer) we are calling below method of CutomerControllers.cs
                     public int PostCustomer(CustomerDTO customer)
                    {
                        loggerService.Logger().Info("Calling with parameter as : customer: " + customer);
                        return _customerService.SaveOrUpdateCustomer(customer);
                    }
In CustomerService implementation is :
                    public int SaveOrUpdateCustomer(CustomerDTO customer)
                    {
                        string passwordSalt = CreateSalt(5);
                        string pasword = CreatePasswordHash(customer.Password, passwordSalt);
                        Customer objCustomer;

                        if (customer.CustomerID != 0)
                            objCustomer = _customerRepository.GetById(customer.CustomerID);
                        else
                            objCustomer = new Customer();

                        objCustomer.NameStyle = customer.NameStyle;
                        objCustomer.Title = customer.Title;
                        objCustomer.FirstName = customer.FirstName;
                        objCustomer.MiddleName = customer.MiddleName;
                        objCustomer.LastName = customer.LastName;
                        objCustomer.Suffix = customer.Suffix;
                        objCustomer.CompanyName = customer.CompanyName;
                        objCustomer.SalesPerson = customer.SalesPerson;
                        objCustomer.EmailAddress = customer.EmailAddress;
                        objCustomer.Phone = customer.Phone;
                        objCustomer.PasswordHash = pasword;
                        objCustomer.PasswordSalt = passwordSalt;
                        objCustomer.ModifiedDate = DateTime.Now;
                        objCustomer.rowguid = Guid.NewGuid();

                        if (customer.CustomerID != 0)
                            _customerRepository.Update(objCustomer);
                        else
                            _customerRepository.Add(objCustomer);

                        _unitOfWork.Commit();
                        SaveOrUpdateAddress(customer, objCustomer.CustomerID);
                        return objCustomer.CustomerID;
                    }
Next, click on Submit Order Button, to make previously selected products as an Order and receive Order Invoice.
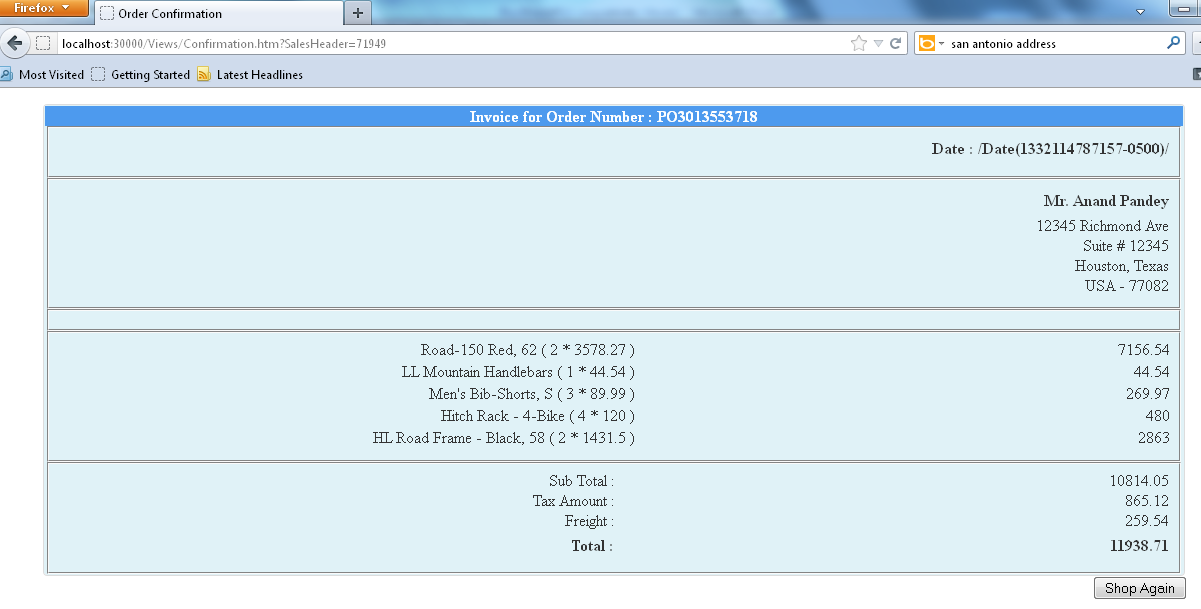
!!!Hurray!!! Order is created in system and invoice is generated with a new Purchase Order. But, wait we got one BUG
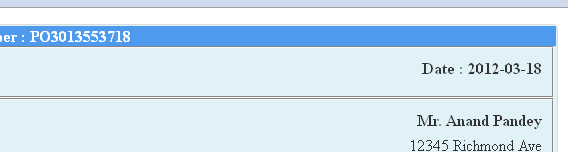
Issue 1. is fixed with the final release of Asp.Net WebAPI
Issue 1: we have an issue with Date Format.

According to, Scott Hanselman’s post this is a bug and will resolve in next release of ASP.Net WebAPI. This issue is resolved using solution provided in Henrik's Blog.
Issue 2: Another issue was, when I try to Checkout Cart using the last created Customer. The error was:
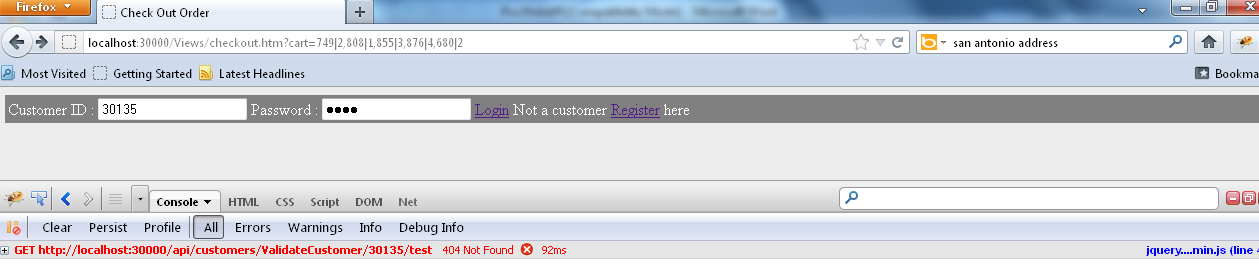
After looking this error, first thought comes that we missed the method in CustomersController.cs, but the method was already there. Further investigation make it clear, that, the reason behind this error was name of this method as ValidateCustomer():
                     public CustomerDTO ValidateCustomer(int id, string password)
                    {
                        loggerService.Logger().Info("Calling with parameter as : id and password: " + id + " and " + password);
                        return _customerService.ValidateCustomer(id, password);
                    }
In CustomerService implementation is :
                    public CustomerDTO ValidateCustomer(int id, string password)
                    {
                        Customer objCustomer = _customerRepository.GetById(id);
                        if (objCustomer == null)
                            return null;
                        string strPasswordHash = objCustomer.PasswordHash;
                        string strPasswordSalt = strPasswordHash.Substring(strPasswordHash.Length - 8);
                        string strPasword = CreatePasswordHash(password, strPasswordSalt);

                        if (strPasword.Equals(strPasswordHash))
                            return CreateCustomerDTO(objCustomer);
                        else
                            return null;
                    }
By default the route configuration of Asp.Net WebAPI follows RESTFUL conventions meaning that it will accept only the Get, Post, Put and Delete action names. So when we send a GET request to http://localhost:30000/api/customers/ValidateCustomer/30135/test we are basically calling the Get(int id) action and passing id=30135 which obviously crashes because we don’t have any method starting with Get which accept Id as parameter. To resolve this issue I need to add a new route definition in Global.asaxfile as:
                     routes.MapHttpRoute(
                           name: "ValidateCustomer",
                           routeTemplate: "api/{controller}/{action}/{id}/{password}",
                           defaults: new { action = "get" }
                       );
Adding this line done the magic and Login functinality start waorking…. :)
Step 8: Deploy on IIS
To deploy this API on IIS version 7.5, first, publish only Application.API solution to a Folder.
Next, open IIS Manager and create a new website and set path to Publish folder, and we are done with deployment.
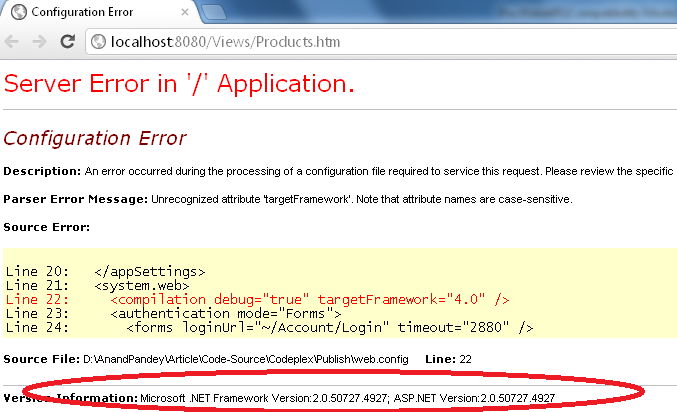
Now, check whether page is opening or not, in my case, initially I got below error, which is self-explanatory.
The error comes because this application is running on Asp.Net Framework Version 2.0. So, we need to change it to Asp.Net Framework Version 4.0:
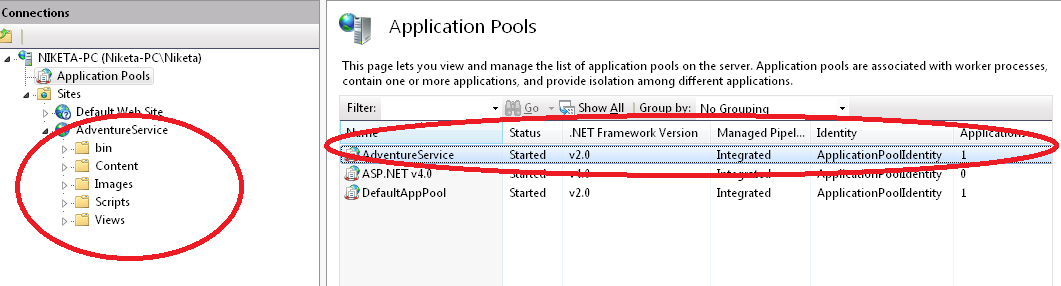
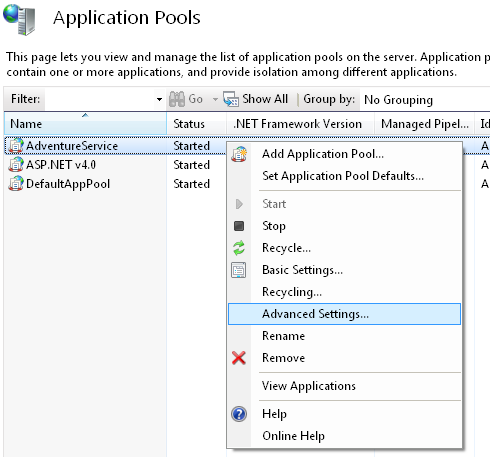
To change the Asp.Net Framework from 2.0 to 4.0, follow below steps.

That was not the only reason not to run application, because after made above change in Application pool next error was:
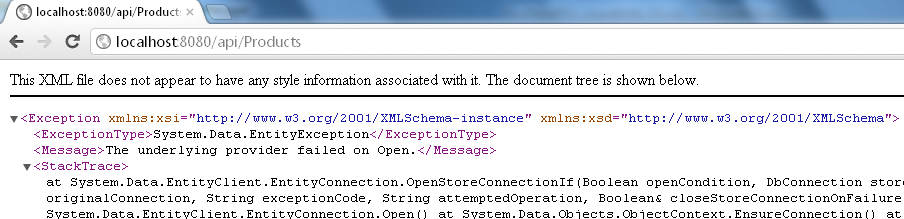
To resolve this error again go to Advance Settings of Application pool and change the identity to Local System from ApplicationPoolIdentity
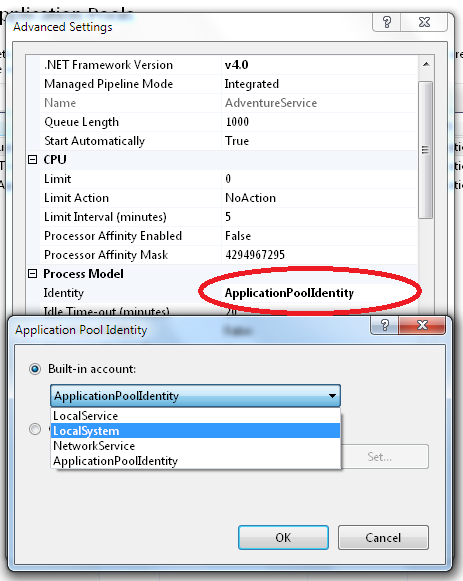
After modify the Application pool to use Local System, Application starts working on browser... :)
Note:Although IIS errors are depending on servers/Firewall/Network or system to system, so it is very difficult to assume that you will also get the same error as mine. Check these links which help me to resolve some of the IIS issues in my work environment.
- HTTP Error 500.19
- Could Not Load Type ‘System.ServiceModel.Activation.HttpModule’
- ASP.NET IIS Registration Tool
- ServiceModel Registration Tool
Step 9: Cross Domain Support
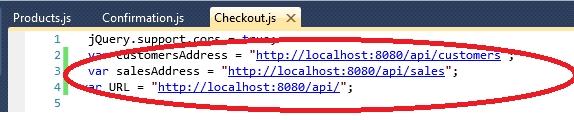
The idea behind the Cross Domain Support comes when I try to remove all HTML pages fromApplication.API solution and created a new Empty Web Application (Adventure.Website) which includes only .html, .Js and .css files along with images. The structure for this application is as per below image:

Point all URL address to deployed code on IIS, after build and run application, output was null.
To resolve this issue I would like to give my special thanks to Carlos’ blog on MSDN Implementing CORS support in ASP.NET Web APIs
Quote:“By default, a web page cannot make calls to services (APIs) on a domain other than the one where the page came from. This is a security measure against a group of cross-site forgery attacks in which browsing to a bad site could potentially use the browser cookies to get data from a good site which the user had previously logged on (think your bank). There are many situations, however, where getting data from different sites is a perfectly valid scenario, such as mash-up applications which need data from different sources.”
Code Setup
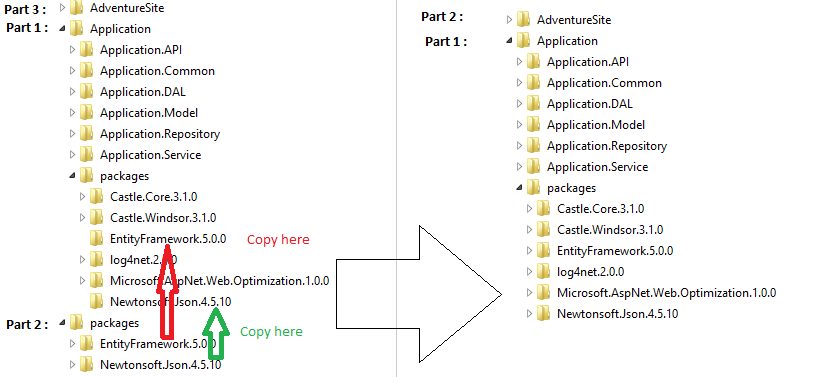
Due to size restriction I have attached code in three parts :
Part 1 : Application.Zip
Part 2 : Packages.Zip
Part 3 : AdventureSite.Zip
Part 1 and Part 3 are independent applications. Whereas, for Part 2 we need to copy its content inside the package folder of Application (Part 1). Please refer below image :
Conclusion
That's it !!! Hope you enjoy this article. I am not an expert, and also I have not followed the entire industry standard at the time of writing this article (time factor).
All comment/Vote are more than welcome…. :), whenever, I get time, will try to modify this solution. You can also join/contribute to this project on CodePlex.
Thank's for your time.
License
This article, along with any associated source code and files, is licensed under The Code Project Open License (CPOL)
About the Author

United States

http://www.codeproject.com/Articles/350488/A-simple-POC-using-ASP-NET-Web-API-Entity-Framewor