.Net Core3.0 WebApi 目录
之前一篇介绍过了Swagger,也可以参照这篇。
ASP.NET Core 3.0 WebApi中使用Swagger生成API文档简介
为什么使用Swagger
随着互联网技术的发展,现在的网站架构基本都由原来的后端渲染,变成了:前端渲染、后端分离的形态,而且前端技术和后端技术在各自的道路上越走越远。
前端和后端的唯一联系,变成了API接口;API文档变成了前后端开发人员联系的纽带,变得越来越重要,swagger就是一款让你更好的书写API文档的框架。
没有API文档工具之前,大家都是手写API文档的,在什么地方书写的都有,有在confluence上写的,有在对应的项目目录下readme.md上写的,每个公司都有每个公司的玩法,无所谓好坏。
书写API文档的工具有很多,但是能称之为“框架”的,估计也只有swagger了。
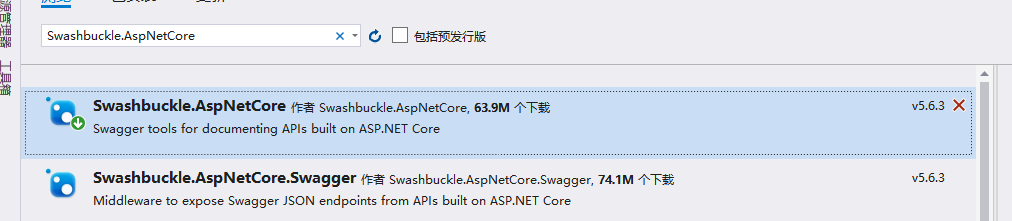
添加Swagger包
Nuget搜索Swashbuckle.AspNetCore
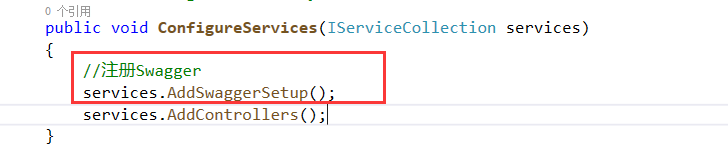
注册Swagger服务
打开Startup.cs类,编辑 ConfigureServices 类
public void ConfigureServices(IServiceCollection services)
{
    var ApiName = "Webapi.Core";

    services.AddSwaggerGen(c =>
    {
        c.SwaggerDoc("V1", new OpenApiInfo
        {
            // {ApiName} 定义成全局变量,方便修改
            Version = "V1",
            Title = $"{ApiName} 接口文档——Netcore 3.0",
            Description = $"{ApiName} HTTP API V1",

        });
        c.OrderActionsBy(o => o.RelativePath);
    });
    services.AddControllers();
}
光一个注册Swagger就这么多代码?如果我再注册其他的服务,岂不是让ConfigureServices有N行代码。。。。。。,虽然我们可以使用把代码放在#region和#endregion里,但是如果可以将每个服务的配置,都封装到一个方法里面,岂不美哉。如果我需要修改服务的配置代码,只需要到对应的方法里面去修改,而不是去ConfigureServices这个方法里面找到需要修改的服务再去修改,而ConfigureServices里只需要services.addxxx()就行了,代码简约美观直视。
原来还真有办法,新建SetUp文件夹,存放要注册的服务,我们新建一个静态类SwaggerSetUp.cs,新建静态方法AddSwaggerSetup,用来注册Swagger。
namespace WebApi.Core.Api.SetUp
{
    public static class SwaggerSetUp
    {
        public static void AddSwaggerSetup(this IServiceCollection services)
        {
            if (services == null) throw new ArgumentNullException(nameof(services));

            var ApiName = "Webapi.Core";

            services.AddSwaggerGen(c =>
            {
                c.SwaggerDoc("V1", new OpenApiInfo
                {
                    // {ApiName} 定义成全局变量,方便修改
                    Version = "V1",
                    Title = $"{ApiName} 接口文档——Netcore 3.0",
                    Description = $"{ApiName} HTTP API V1",

                });
                c.OrderActionsBy(o => o.RelativePath);
            });

        }
    }
}
其实就是给 IServiceCollection 增加了一个扩展方法,我们在使用的时候,就很简单了,扩展方法,相信大家都会使用的。
启动Swagger
编辑Configure方法
public void Configure(IApplicationBuilder app, IWebHostEnvironment env)
{
    if (env.IsDevelopment())
    {
        app.UseDeveloperExceptionPage();
    }

    app.UseSwagger();
    app.UseSwaggerUI(c =>
    {
        c.SwaggerEndpoint($"/swagger/V1/swagger.json", "WebApi.Core V1");

        //路径配置,设置为空,表示直接在根域名(localhost:8001)访问该文件,注意localhost:8001/swagger是访问不到的,去launchSettings.json把launchUrl去掉,如果你想换一个路径,直接写名字即可,比如直接写c.RoutePrefix = "doc";
        c.RoutePrefix = "";
//c.DocExpansion(Swashbuckle.AspNetCore.SwaggerUI.DocExpansion.None);
c.DefaultModelsExpandDepth(0);
//说明:
//1、DocExpansion设置为none可折叠所有方法
//2、DefaultModelsExpandDepth设置为-1 可不显示models
    });

    app.UseRouting();

    app.UseAuthorization();

    app.UseEndpoints(endpoints =>
    {
        //endpoints.MapControllers();
        endpoints.MapControllerRoute(
            name: "default",
            pattern: "{controller=Home}/{action=Index}/{id?}"
            );
    });
}
运行项目,就出来了,http://localhost:xxxx/index.html
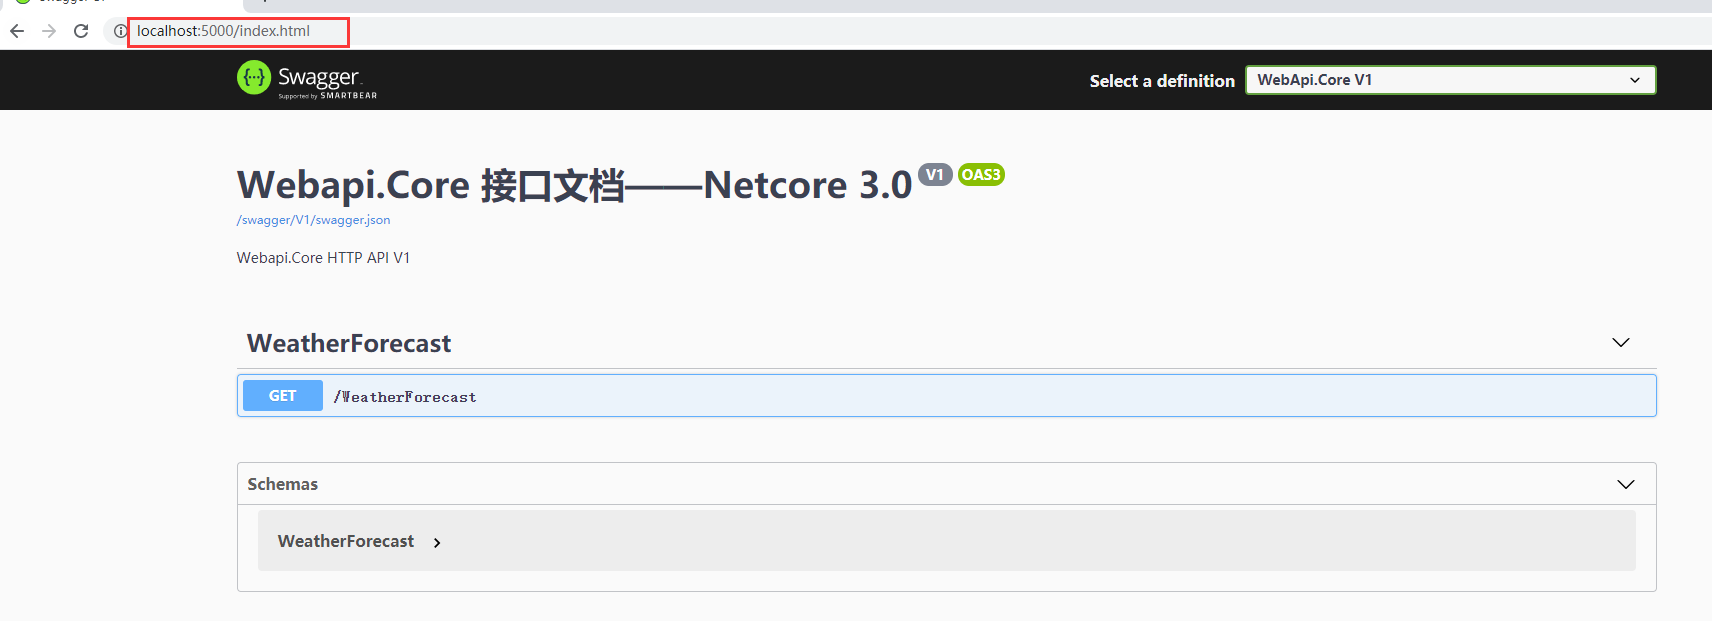
为什么只有天气的?我新建的User控制器呢?还有我辛苦编写的hello方法,都没有了。。
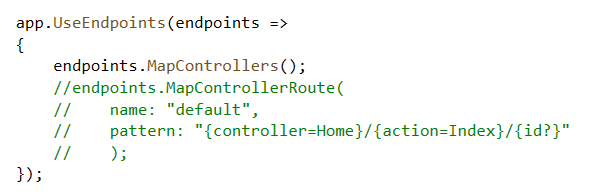
解决方法:将Startup.cs中Configure里的路由模版注释掉,改成endpoints.MapControllers();,增加BaseController.cs并继承ControllerBase,然后在BaseController设置路由模版,让Controller继承BaseController
/// <summary>
/// 自定义路由模版
/// </summary>
[Route("api/[controller]/[action]")]
[ApiController]
public class BaseController : ControllerBase
{
}
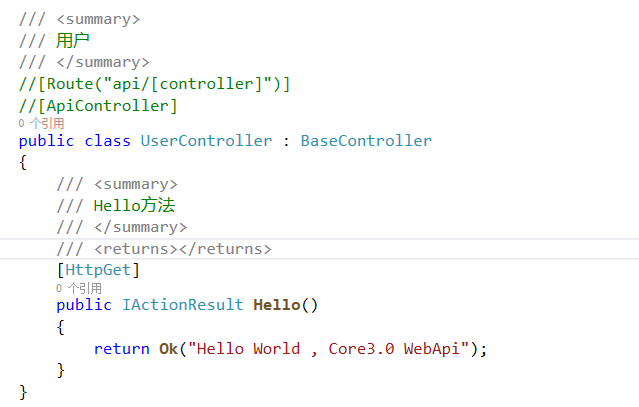
 /// <summary>
 /// 用户
 /// </summary>
 //[Route("api/[controller]")]
 //[ApiController]
 public class UserController : BaseController
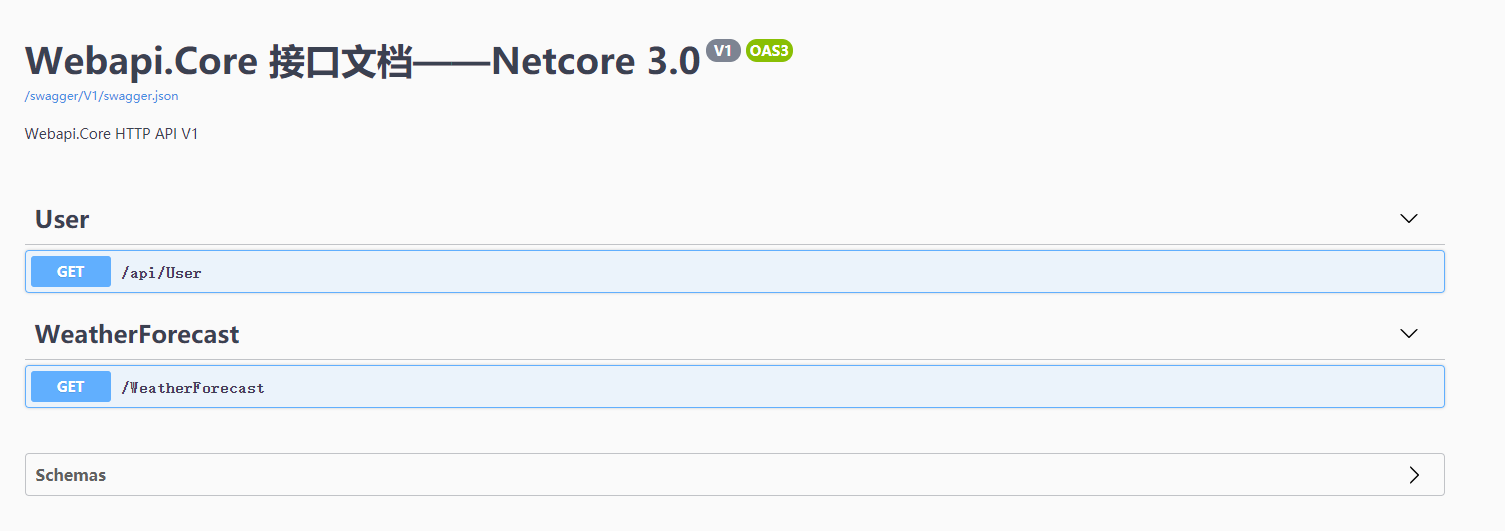
这样就出现了。可以尝试调试一下,亲测可行。
在上边的截图中,我们可以看到,已经生成了一个 api 列表,我们不仅可以清晰的看到项目中含有那些接口,还可以直接点击发送请求,类似 postman 那样,做接口调试,
但是现在有两个问题:
1、这个接口文档现在还不多,如果多了的话,每个接口对应的意义可能会混淆,
2、另外,这个接口文档,也是方便前端工程师查看的,目前这个这个样式,看起来是挺费解的。
添加接口注释
右键项目名称=>属性=>生成,勾选“输出”下面的“xml文档文件”,这里我用的是相对路径。
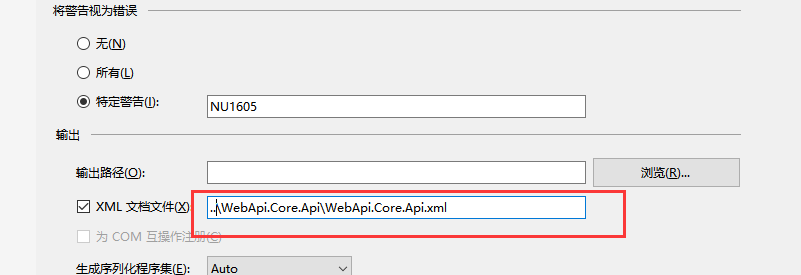
现在呢,配置好了xml文件,接下来需要让系统启动的时候,去读取这个文件了,重新编辑SwaggerSetUp.cs,修改AddSwaggerSetup函数,注意配置的参数 true:
public static class SwaggerSetUp
{
    public static void AddSwaggerSetup(this IServiceCollection services)
    {
        if (services == null) throw new ArgumentNullException(nameof(services));

        var ApiName = "Webapi.Core";

        services.AddSwaggerGen(c =>
        {
            c.SwaggerDoc("V1", new OpenApiInfo
            {
                // {ApiName} 定义成全局变量,方便修改
                Version = "V1",
                Title = $"{ApiName} 接口文档——Netcore 3.0",
                Description = $"{ApiName} HTTP API V1",

            });
            c.OrderActionsBy(o => o.RelativePath);
            // 获取xml注释文件的目录
            var xmlPath = Path.Combine(AppContext.BaseDirectory, "WebApi.Core.Api.xml");
            c.IncludeXmlComments(xmlPath, true);//默认的第二个参数是false,这个是controller的注释,记得修改
        });

    }
}
给我们的控制器都加上注释,运行项目,发现页面注释都加上了

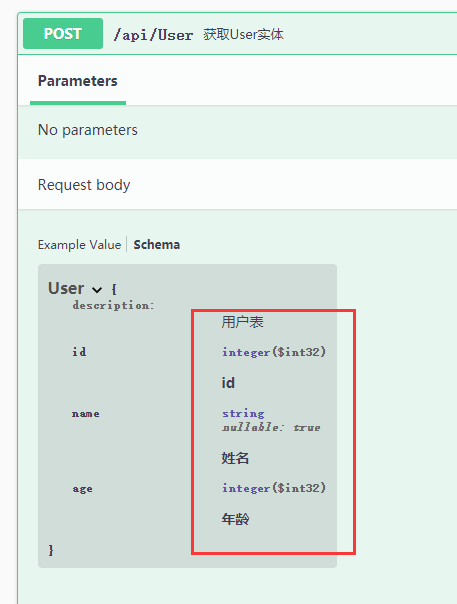
我们新建一个实体,看看,这些注释有没有加上去。
首先,在Entity新建一个类库,注意,是Core版本的类库。WebApi.Core.Models

新建实体类User
namespace WebApi.Core.Models
{
    /// <summary>
    /// 用户表
    /// </summary>
    public class User
    {
        /// <summary>
        /// id
        /// </summary>
        public int Id { get; set; }
        /// <summary>
        /// 姓名
        /// </summary>
        public string Name { get; set; }
        /// <summary>
        /// 年龄
        /// </summary>
        public int Age { get; set; }
    }
}
右键项目属性,生成 XML
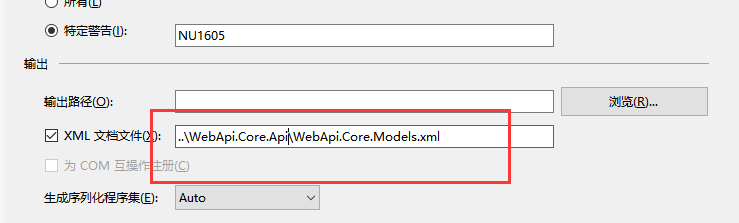
编辑SwaggerSetUp.cs,修改AddSwaggerSetup函数,添加以下代码
var xmlModelPath = Path.Combine(AppContext.BaseDirectory, "WebApi.Core.Models.xml");//这个就是Models层的xml文件名
c.IncludeXmlComments(xmlModelPath);
UserController新建一个Action

运行项目,发现实体类也有了注释
去掉警告
我们发现,代码中,有好多地方,会下滑的波浪线,而且生成项目会有一些警告,提示我们加注释。这个对于有点强迫症的人,是很难接受的。
下面我们就去掉警告。
右键项目 属性 -》 Errors and warnings 配置 1591:、
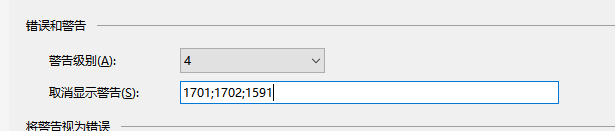
这样就OK了。
隐藏接口
如果不想显示某些接口,直接在controller 上,或者action 上,增加特性
[ApiExplorerSettings(IgnoreApi = true)]


【补充】
现在这些实体类的注释是有了,但是,项目中难免会用到枚举,这个时候,也需要将枚举的注释显示出来。
这里通过了反射程序集,获取所有枚举定义放入字典,然后通过OpenApiSchema.Key来查表找到对应的枚举类型,通过Microsoft.OpenApi.Any.OpenApiInteger.Value强转会枚举,再补写枚举对应的描述。
我们简单定义一个枚举:
 public enum ProjectTypeEnum
 {
     /// <summary>
     /// 枚举一
     /// </summary>
     [Description("枚举一")]
     Enum1=1,

     /// <summary>
     /// 枚举二
     /// </summary>
     [Description("枚举二")]
     Enum2 = 2,

     /// <summary>
     /// 枚举三
     /// </summary>
     [Description("枚举三")]
     Enum3 = 3
 }
我们需要一个filter,如下:
/// <summary>
/// Add enum value descriptions to Swagger
/// </summary>
public class EnumDocumentFilter : IDocumentFilter
{
    public void Apply(Microsoft.OpenApi.Models.OpenApiDocument swaggerDoc, DocumentFilterContext context)
    {
        Dictionary<string, Type> dict = GetAllEnum();

        foreach (var item in swaggerDoc.Components.Schemas)
        {
            var property = item.Value;
            var typeName = item.Key;
            Type itemType = null;
            if (property.Enum != null && property.Enum.Count > 0)
            {
                if (dict.ContainsKey(typeName))
                {
                    itemType = dict[typeName];
                }
                else
                {
                    itemType = null;
                }
                List<OpenApiInteger> list = new List<OpenApiInteger>();
                foreach (var val in property.Enum)
                {
                    list.Add((OpenApiInteger)val);
                }
                property.Description += DescribeEnum(itemType, list);
            }
        }
    }
    private static Dictionary<string, Type> GetAllEnum()
    {
        Assembly ass = Assembly.Load("WebApi.Core.Models");
        Type[] types = ass.GetTypes();
        Dictionary<string, Type> dict = new Dictionary<string, Type>();

        foreach (Type item in types)
        {
            if (item.IsEnum)
            {
                dict.Add(item.Name, item);
            }
        }
        return dict;
    }

    private static string DescribeEnum(Type type, List<OpenApiInteger> enums)
    {
        var enumDescriptions = new List<string>();
        foreach (var item in enums)
        {
            if (type == null) continue;
            var value = Enum.Parse(type, item.Value.ToString());
            var desc = GetDescription(type, value);

            if (string.IsNullOrEmpty(desc))
                enumDescriptions.Add($"{item.Value.ToString()}:{Enum.GetName(type, value)}; ");
            else
                enumDescriptions.Add($"{item.Value.ToString()}:{Enum.GetName(type, value)},{desc}; ");

        }
        return $"<br/>{Environment.NewLine}{string.Join("<br/>" + Environment.NewLine, enumDescriptions)}";
    }

    private static string GetDescription(Type t, object value)
    {
        foreach (MemberInfo mInfo in t.GetMembers())
        {
            if (mInfo.Name == t.GetEnumName(value))
            {
                foreach (Attribute attr in Attribute.GetCustomAttributes(mInfo))
                {
                    if (attr.GetType() == typeof(DescriptionAttribute))
                    {
                        return ((DescriptionAttribute)attr).Description;
                    }
                }
            }
        }
        return string.Empty;
    }
}
然后,在swagger注册的里面,使用这个filter:
 var xmlModelPath = Path.Combine(AppContext.BaseDirectory, "YX.APPApi.Models.xml");//这个就是Models层的xml文件名
 c.IncludeXmlComments(xmlModelPath);

 c.DocumentFilter<EnumDocumentFilter>();
运行一下,看看效果:

这样,枚举的的描述也就展示出来了。