nginx模块
ngx_http_charset_module(字符集)
# 语法格式
Syntax: charset charset | off;							# 语法提示
Default: charset off;								    # 默认字符集关闭
Context: http, server, location, if in location			  # 适用环境

# 1.操作演示
[root@web01 /yuming]# ll								# 默认站点目录存在中文
total 16
-rw-r--r-- 1 root root  5 May 18 11:36 111111.txt
-rw-r--r-- 1 root root  4 May 18  2020 123.txt
-rw-r--r-- 1 root root 13 May 18  2020 index
-rw-r--r-- 1 root root  5 May 18 11:36 汤采玉.txt

# 1.1 浏览器显示页面存在乱码(见图一)

# 1.2 对此操作修改配置文件
[root@web01 /etc/nginx/conf.d]# vim yuming.conf
server {
        listen 80;
        server_name www.tcy.com;
        charset utf-8,gbk;								# 添加此行信息即可
        root /yuming;
        index index.html;

}

# 1.3 浏览器显示页面正常 (见图二)
- 图一

- 图二

autoindex_exact_size(文件大小显示)
# autoindex常用参数
autoindex_exact_size off;
默认为on, 显示出文件的确切大小,单位是bytes。
修改为off,显示出文件的大概大小,单位是kB或者MB或者GB。

# 操作演示
1.修改配置文件
server {
        listen 80;
        server_name www.tcy.com;
        charset utf-8,gbk;

        location / {
        root /yuming;
        #index index.html;
        autoindex on;
        autoindex_exact_size off;						# 只需此项修改为off即可
        autoindex_localtime on;
        }

        location /download {
        alias /tmp/yyy;
        autoindex on;

        auth_basic           "renzheng";
        auth_basic_user_file /pass/download.pass;
        }
}
ngx_http_index_module(站点首页)
# 语法格式
Syntax: index file ...;										# 语法使用提示
Default: index index.html;									# 默认样式
Context: http, server, location								# 适用环境

# 操作演示
1.查看配置文件
server {
        listen 80;
        server_name www.tcy.com;
        charset utf-8,gbk;

        location / {
        root /yuming;
        index index.html;									# 修改站点首页为/yuming下的index.html
     }
}

2.查看修改后的结果(见图三)
- 图三

ngx_http_autoindex_module(自动首页)
# 语法格式
Syntax: autoindex on | off;							# 语法使用提示
Default: autoindex off;								# 默认关闭自动首页
Context: http, server, location						# 适用环境

# 操作演示
1. 修改配置文件
[root@web01 /etc/nginx/conf.d]# vim yuming.conf
server {
        listen 80;
        server_name www.tcy.com;
        charset utf-8,gbk;

        location / {
        root /yuming;
        #index index.html;							# 注释此行信息,不手动读取站点写index.html文件
        autoindex on;								# 自动读取,站点目录下内容以目录形式显示
        autoindex_exact_size off;
        autoindex_localtime on;

2.删除站点目录中index.html文件(如不进行删除会自动读取)
[root@web01 /yuming]# rm -rf index.html

3. 检测并且重启nginx服务
[root@web01 /yuming]# nginx -t
nginx: the configuration file /etc/nginx/nginx.conf syntax is ok
nginx: configuration file /etc/nginx/nginx.conf test is successful
[root@web01 /yuming]# systemctl reload nginx

4. 查看页面显示结果(见图四)
- 图四

autoindex_localtime (同步时间)
# autoindex_localtime ------- 自动同步服务器中的时间  注意:需要本地服务器开启时间同步

# 语法格式
Syntax: autoindex_localtime on | off;					# 语法提示
Default: autoindex_localtime off;						# 默认关闭自动同步时间功能
Context: http, server, location							# 适用环境

# 操作演示
1. 修改配置文件
server {
        listen 80;
        server_name www.tcy.com;
        charset utf-8,gbk;

        location / {
        root /yuming;
        autoindex on;
        autoindex_localtime on;							# on为开启时间同步功能

}
}

2. 对本地服务器进行时间同步
[root@web01 /etc/nginx/conf.d]# ntpdate time1.aliyun.com
18 May 15:42:54 ntpdate[7651]: adjust time server 203.107.6.88 offset 0.134676 sec

3. 在站点目录创建文件
[root@web01 /yuming]# echo time > time.txt

4. 查看当前时间
[root@web01 /yuming]# date
Mon May 18 15:44:03 CST 2020

5. 浏览器查看效果(见图五)
- 图五

ngx_http_stub_status_module(监控状态)
# 语法格式
Syntax: stub_status;
Default: —
Context: server, location

# 官方配置模板
location = /basic_status {
    stub_status;
}

# 操作演示
1.修改配置文件
[root@web01 /etc/nginx/conf.d]# vim yuming.conf
server {
        listen 80;
        server_name www.tcy.com;
        charset utf-8,gbk;

        location / {
        root /yuming;
        #index index.html;
        autoindex on;
        #autoindex_exact_size off;
        autoindex_localtime on;
        }

        location = /tcy {								# 浏览器访问多增加一个uri
           stub_status;									# 模块信息
        }
}

2. 检测配置文件并重启
[root@web01 /etc/nginx/conf.d]# nginx -t
nginx: the configuration file /etc/nginx/nginx.conf syntax is ok
nginx: configuration file /etc/nginx/nginx.conf test is successful
[root@web01 /etc/nginx/conf.d]# systemctl reload nginx

3. 浏览器查看结果 (见图六)

4. 浏览器显示结果解释
Active connections: 2 									# 活动连接数,两个用户连接
server accepts handled requests
# accepts 当前的总连接数TCP
# handled 成功的连接数TCP
# requests 总的http请求数
 11 11 8
  # 第一个11是总的客户端请求TCP连接数
  # 第二个11是服务端响应了客户端连接,所以为成功连接TCP数量
  # 第三位8是TCP建立成功后,客户端请求http的总数量
Reading: 0 Writing: 1 Waiting: 1

Reading             # 请求
Writing             # 响应
Waiting             # 等待的请求数,开启了keepalive

# 注意, 一次TCP的连接,可以发起多次http的请求, 如下参数可配置进行验证,所以当长连接开启,上面显示的第一个11和第二个11都是不进行变化的,只有http请求数发生变化。
keepalive_timeout  0;   # 类似于关闭长连接
keepalive_timeout  65;  # 65s没有活动则断开连接
- 图六

ngx_http_auth_basic_module(用户登录认证)
· 基于用户登陆认证 http_auth_basic_module

# 语法格式
Syntax: auth_basic string | off;							# 语法提示操作
Default: auth_basic off;								    # 默认关闭登录认证
Context: http, server, location, limit_except				  # 适用环境

# 官方格式
location / {
    auth_basic           "closed site";						# 提示信息,随便定义
    auth_basic_user_file conf/htpasswd;						# 指定认证用户密码文件路径
}

# 操作演示
1. 修改配置文件
server {
        listen 80;
        server_name www.tcy.com;
        charset utf-8,gbk;

        location / {
        root /yuming;
        #index index.html;
        autoindex on;
        #autoindex_exact_size off;
        autoindex_localtime on;
        }

        location /download {
        alias /tmp/yyy;
        autoindex on;

        auth_basic           "renzheng";						# 认证注释,随意
        auth_basic_user_file /pass/download.pass;			     # 指定认证文件路径
        }
}

2. 密码生成工具安装(htpasswd)
[root@web01 /etc/nginx/conf.d]# yum install -y httpd-tools

# htpasswd使用方式(去掉-c选项,即可在第一个用户之后添加第二个用户,依此类推。)
-c:创建一个加密文件;
-n:不更新加密文件,只将加密后的用户名密码显示在屏幕上;
-m:默认采用MD5算法对密码进行加密;
-d:采用CRYPT算法对密码进行加密;
-p:不对密码进行进行加密,即明文密码;
-s:采用SHA算法对密码进行加密;
-b:在命令行中一并输入用户名和密码而不是根据提示输入密码;
-D:删除指定的用户。

3. 生成用户名和密码到对应文件
[root@web01 /tmp/yyy]# mkdir /pass -p
[root@web01 /tmp/yyy]# htpasswd -b -c /pass/download.pass zls zls123   # 指定用户为zls密码zls123
Adding password for user zls


4. 检测配置文件并重启服务
[root@web01 /etc/nginx/conf.d]# nginx -t
nginx: the configuration file /etc/nginx/nginx.conf syntax is ok
nginx: configuration file /etc/nginx/nginx.conf test is successful
[root@web01 /etc/nginx/conf.d]# systemctl reload nginx

6. 浏览器访问检测(见图七)
- 图七
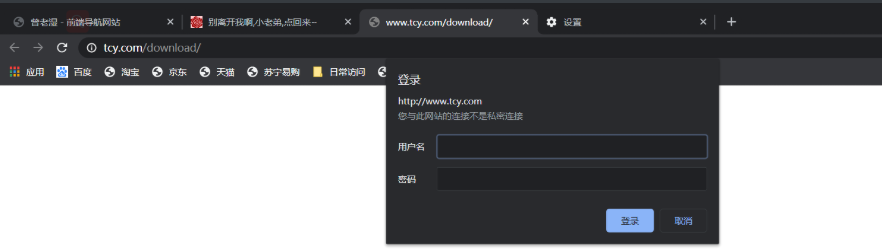
- 输入用户名密码

ngx_http_access_module(访问控制)
# ngx_http_access_module(针对ip进行限制访问)

# 语法规则
Syntax: allow address | CIDR | unix: | all;						# 语法告知
Default: — 													 # 默认设置
Context: http, server, location, limit_except					# 适用环境

# 官网示例配置(一定要将拒绝所有写最下方,规则匹配默认从上往下)
location / {
    deny  192.168.1.1;
    allow 192.168.1.0/24;
    allow 10.1.1.0/16;
    allow 2001:0db8::/32;
    deny  all;
}

# 操作演示
1. 修改配置文件(只允许10.0.0.0/24网段ip访问)
[root@web01 /etc/nginx/conf.d]# vim ym.conf
server {
    listen 80;
    server_name www.twg.com;
        location / {
                root /opt/;
                index index.html;
                deny 10.0.0.1;								# 拒绝此ip访问
                allow 10.0.0.0/24;							# 允许此网段访问
                deny all;									# 拒绝所有
        }
}

2. 检查语法,重载配置文件
[root@web01 /etc/nginx/conf.d]# nginx -t
nginx: the configuration file /etc/nginx/nginx.conf syntax is ok
nginx: configuration file /etc/nginx/nginx.conf test is successful
[root@web01 /etc/nginx/conf.d]# systemctl reload nginx

3. 浏览器访问结果显示
ip:10.0.0.1 访问(结果见图八)
ip:10.0.0.7 访问 (结果见图九)
- 图八

- 图九

nginx的location优先级匹配
- location语法优先级排序
| 匹配符 | 匹配规则 | 优先级 |
|---|---|---|
| = | 精确匹配 | 1 |
| ^~ | 以某个字符串开头 | 2 |
| ~ | 区分大小写的正则匹配 | 3 |
| ~* | 不区分大小写的正则匹配 | 4 |
| !~ | 区分大小写不匹配的正则 | 5 |
| !~* | 不区分大小写不匹配的正则 | 6 |
| / | 通用匹配,任何请求都会匹配到 | 7 |
- 网站配置优先级
# 1. 首先书写配置文件(具备优先级最高=号)
[root@web01 /etc/nginx/conf.d]# vim xianzhi.conf
server {
    listen 80;
    server_name www.aaa.com;
    location / {									# 优先级最低,所有请求都会进行匹配
        default_type text/html;
        return 200 "location /";
    }

    location =/ {									# 精确匹配 ,优先级最高,这访问/权限最大
        default_type text/html;
        return 200 "location =/";
    }

    location ~ / {									# 区分大小的匹配,匹配/aaa路径
        default_type text/html;
        return 200 "location ~/";
    }

 2. 查看测试结果 见图11,后将location=精确匹配注释后结果见图12


 -------------------------------------常用location项------------------------------------------
# 通用匹配,任何请求都会匹配到
location / {
    ...
}

# 严格区分大小写,匹配以.php结尾的都走这个location    (.为转义符)
location ~ .php$ {
    ...
}

# 严格区分大小写,匹配以.jsp结尾的都走这个location
location ~ .jsp$ {
    ...
}

# 不区分大小写匹配,只要用户访问.jpg,gif,png,js,css 都走这条location(.*为任意字符匹配多次)
location ~* .*.(jpg|gif|png|js|css)$ {
    ...
}

# 不区分大小写匹配
location ~* ".(sql|bak|tgz|tar.gz|.git)$" {
    ...
}
-
最开始访问结果(图11)

-
将配置文件中= 精确匹配注释结果(图12)

nginx访问限制模块
总结
# 针对连接频率和连接限速哪个限制比较好
http协议的连接与请求,首先HTTP是建立在TCP基础之上,在完成HTTP请求需要先建立TCP三次握手(称为TCP连接),在连接的基础上在完成HTTP的请求。

所以多个HTTP请求可以建立在一次TCP连接之上, 那么我们对请求的精度限制,当然比对一个连接的限制会更加的有效,因为同一时刻只允许一个TCP连接进入, 但是同一时刻多个HTTP请求可以通过一个TCP连接进入。所以针对HTTP的请求限制才是比较优的解决方案。
ngx_http_limit_conn_module
# ngx_http_limit_conn_module 连接频率限制
· 可设置仅允许多少用户进行连接,当超过此限制时,服务器将返回 错误 以回复请求

# 语法规则
Syntax:     limit_req_zone key zone=name:size rate=rate;	    # 语法 {http层定义}
Default: —													# 默认配置
Context: http												# 使用环境
Syntax:	limit_conn zone number;								 # 语法 {server层调用}
Default:	-											   # 默认配置
Context:	http,server,location						   # 使用环境

# 官方示例
http {
    limit_conn_zone $ binary_remote_addr zone = addr:10m;

    ...

    服务器{

        ...

        位置/ download / {
            limit_conn地址1;
        }

# 操作演示
1. 在nginx主配置文件中添加内容(也可写在子配置文件中,只要是处于http层即可)
[root@web01 /etc/nginx/conf.d]# cat ../nginx.conf

user  nginx;
worker_processes  1;

error_log  /var/log/nginx/error.log warn;
pid        /var/run/nginx.pid;


events {
    worker_connections  1024;
}


http {
    include       /etc/nginx/mime.types;
    default_type  application/octet-stream;

    log_format  main  '$remote_addr - $remote_user [$time_local] "$request" '
                      '$status $body_bytes_sent "$http_referer" '
                      '"$http_user_agent" "$http_x_forwarded_for"';

    access_log  /var/log/nginx/access.log  main;

    sendfile        on;
    #tcp_nopush     on;

    keepalive_timeout  65;

    #gzip  on;

    include /etc/nginx/conf.d/*.conf;
	limit_conn_zone $remote_addr zone=aaa_zone:10m;				# 只需书写此内容,定义单个连接数最大连接使用内存空间,这里定义10m,aaa_zone名为server调用名称
}
------------------------------------------------------------------------------------------------
[root@web01 /etc/nginx/conf.d]# cat xianzhi.conf
server {
	listen 80;
	server_name www.aaa.com;
	location / {
		root /aaa;
		index index.html;
	limit_conn aaa_zone 1;								# 调用http层定义名称,只允许一个连接
	}
}


2. 演示结果(因环境所处为同一个网段,结果无法实现,需用公网测试方可)
ngx_http_limit_req_module
# ngx_http_limit_req_module 连接速率限制

# 语法规则
# http层
Syntax:	limit_req_zone key zone=name:size rate=rate [sync];		# 语法规则
Default:	—												# 默认使用
Context:	http											# 使用环境
# server层
Syntax:	limit_req zone=name [burst=number] [nodelay | delay=number];		# 语法规则
Default:	—														   # 默认使用
Context:	http, server, location										# 适用环境

# 官方实例
http {
    limit_req_zone $ binary_remote_addr zone = one:10m rate = 1r / s;

    ...

    服务器{

        ...

        位置/ search / {
            limit_req区域=一个突发= 5;
        }

# 操作演示
1. 主配置文件修改(也可在子配置文件的http层定义)
[root@web01 /etc/nginx/conf.d]# vim ../nginx.conf

user  nginx;
worker_processes  1;

error_log  /var/log/nginx/error.log warn;
pid        /var/run/nginx.pid;


events {
    worker_connections  1024;
}


http {
    include       /etc/nginx/mime.types;
    default_type  application/octet-stream;

    log_format  main  '$remote_addr - $remote_user [$time_local] "$request"
'
                      '$status $body_bytes_sent "$http_referer" '
                      '"$http_user_agent" "$http_x_forwarded_for"';

    access_log  /var/log/nginx/access.log  main;

    sendfile        on;
    #tcp_nopush     on;

    keepalive_timeout  65;

    #gzip  on;

    include /etc/nginx/conf.d/*.conf;

 limit_req_zone $binary_remote_addr zone=req_zone:10m rate=1r/s;	# 此配置文件定义只需添加此行信息,意为http标签段定义请求限制, rate限制速率,限制单个ip一秒钟最多一个请求
}
----------------------------------------------------------------------------------------
[root@web01 /aaa]# vim /etc/nginx/conf.d/xianzhi.conf
server {
    listen 80;
    server_name www.aaa.com;
    location / {
        root /aaa;
        index index.html;
        limit_req zone=req_zone burst=3 nodelay;# 调用limit_req变量(http层),zone指定共享内存空间的名字(http),burst超过该配置的请求数,则返回503,nodelay延迟处理。
        limit_req_status 404;				# 自定义将默认505报错改为404
        error_page 404 /333_error.html;		 # 将报错页面修改为404的同时,自定义错误页面样式
         }
}

3. 将自定义页面图片上传图床工具,并且保存html格式,放入到站点目录下的错误页面中
[root@web01 /aaa]# vim 333_error.html
<a href="https://sm.ms/image/aDF4ptNPz9AETLs" target="_blank"><img src="http
s://i.loli.net/2020/05/19/aDF4ptNPz9AETLs.jpg" /></a>


2. 检测配置文件是否有误,并且重载配置文件
[root@web01 /etc/nginx/conf.d]# nginx -t
nginx: the configuration file /etc/nginx/nginx.conf syntax is ok
nginx: configuration file /etc/nginx/nginx.conf test is successful
[root@web01 /etc/nginx/conf.d]# systemctl reload nginx

3. 查看实验结果 (一秒内多次刷新结果,出现自定义404页面)(见图十)
- 图十(自定义图片及自定义状态码)
