1、Netty启动源码剖析
启动类:
public class NettyNioServer {
    public static void main(String[] args) throws Exception {
            /**
             *创建两个线程组bossGroup和workGroup,bossGroup负责处理请求连接,workGroup负责数据的处理
             *两个都是无线循环
             *调用可构造方法,默认的字线程数NioEventLoopGroup是实际cpu核数*2
             */
            EventLoopGroup bossGroup = new NioEventLoopGroup(1);
            EventLoopGroup workGroup = new NioEventLoopGroup();
        try{
            //创建启动器
            ServerBootstrap bootstrap = new ServerBootstrap();
            bootstrap.group(bossGroup,workGroup)//设置两个线程组
                    .channel(NioServerSocketChannel.class)//使用NioServerSocketChannel作为服务器的通道实现
                    .option(ChannelOption.SO_BACKLOG,128)//设置线程队列得到的连接数
                    .childOption(ChannelOption.SO_KEEPALIVE,true)//设置保持活动的连接状态
            .handler(new LoggingHandler(LogLevel.INFO)//加入日志
                    .childHandler(new ChannelInitializer<SocketChannel>() {//创建一个通道测试对象
                        //给pipeline设置处理器
                        @Override
                        protected void initChannel(SocketChannel ch) throws Exception {
                                ch.pipeline().addLast(new NettyHandelServer());//调用处理器
                        }
                    });
            //启动服务器并绑定端口,绑定端口并同步,创建一个ChannelFuture对象
            ChannelFuture channelFuture = bootstrap.bind(7777).sync();


            //加监听器
            channelFuture.addListener((future)->{
                if(channelFuture.isSuccess()){
                    System.out.println("服务器启动成功");
                }else{
                    System.out.println("服务器启动失败");
                }
            });
            //对关闭通道进行监听
            channelFuture.channel().closeFuture().sync();
        }catch (Exception e){
            e.printStackTrace();
        }finally {
        //关闭
            bossGroup.shutdownGracefully();
            workGroup.shutdownGracefully();
        }
    }

}
调用可构造方法,默认的字线程数NioEventLoopGroup是实际cpu核数*2
看源码:根据debug:我们默认的构造方法不传值,就是默认为0
  /**
     * Create a new instance using the default number of threads, the default {@link ThreadFactory} and
     * the {@link SelectorProvider} which is returned by {@link SelectorProvider#provider()}.
     */
    public NioEventLoopGroup() {
        this(0);
    }
我们继续看代码,可以看到这段代码:当nThreads == 0 时,会去获取DEFAULT_EVENT_LOOP_THREADS值,那么看看DEFAULT_EVENT_LOOP_THREADS的值
 /**
     * @see MultithreadEventExecutorGroup#MultithreadEventExecutorGroup(int, Executor, Object...)
     */
    protected MultithreadEventLoopGroup(int nThreads, Executor executor, Object... args) {
        super(nThreads == 0 ? DEFAULT_EVENT_LOOP_THREADS : nThreads, executor, args);
    }
DEFAULT_EVENT_LOOP_THREADS的值等于取值中的较大数,NettyRuntime.availableProcessors()获取系统的核数
  private static final int DEFAULT_EVENT_LOOP_THREADS;

    static {
        DEFAULT_EVENT_LOOP_THREADS = Math.max(1, SystemPropertyUtil.getInt(
                "io.netty.eventLoopThreads", NettyRuntime.availableProcessors() * 2));

        if (logger.isDebugEnabled()) {
            logger.debug("-Dio.netty.eventLoopThreads: {}", DEFAULT_EVENT_LOOP_THREADS);
        }
    }
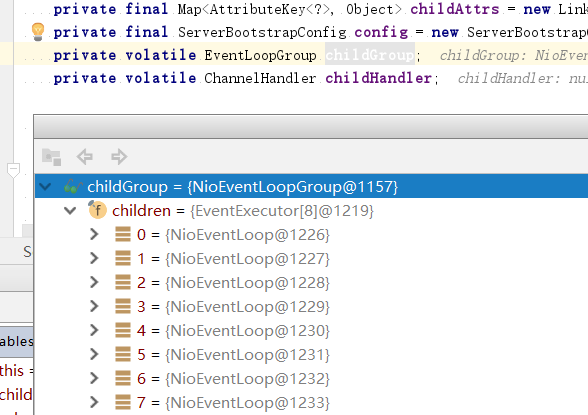
所以我这里workGroup的线程数是8。
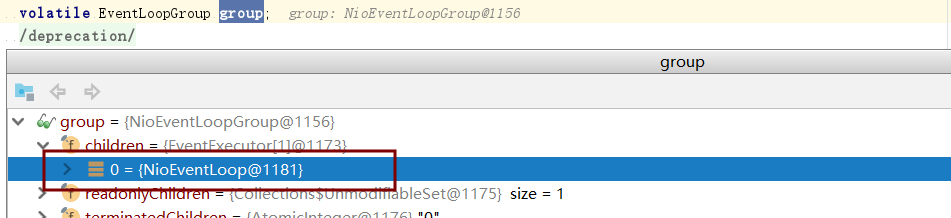
接下来继续debug,可以来到MultithreadEventExecutorGroup方法,这里创建NioEventLoopGroup对象

 /**
     * Create a new instance.
     *
     * @param nThreads          the number of threads that will be used by this instance  使用的线程数,默认为core *2
     * @param executor          the Executor to use, or {@code null} if the default should be used. 执行器:如果传入null,则采用Netty默认的线程工厂和默认的执行器ThreadPerTaskExecutor
     * @param chooserFactory    the {@link EventExecutorChooserFactory} to use.    单例new DefaultEventExecutorChooserFactory()
     * @param args              arguments which will passed to each {@link #newChild(Executor, Object...)} call  args在创建执行器的时候传入固定参数
     */
    protected MultithreadEventExecutorGroup(int nThreads, Executor executor,
                                            EventExecutorChooserFactory chooserFactory, Object... args) {
        if (nThreads <= 0) {
            throw new IllegalArgumentException(String.format("nThreads: %d (expected: > 0)", nThreads));
        }

        if (executor == null) {
            executor = new ThreadPerTaskExecutor(newDefaultThreadFactory());
        }
     //private final EventExecutor[] children;
     //创建执行器对象,workGroup的nthreads是8
      children = new EventExecutor[nThreads];

     //循环创建
        for (int i = 0; i < nThreads; i ++) {
            boolean success = false;
            try {
          //传入的执行器默认是ThreadPerTaskExecutor,进入newChild方法,会返回一个NioEventLoopGroup对象
          //创建指定的线程数的执行器组
                children[i] = newChild(executor, args);
                success = true;
            } catch (Exception e) {
                // TODO: Think about if this is a good exception type
                throw new IllegalStateException("failed to create a child event loop", e);
            } finally {
          //创建失败,关闭
                if (!success) {
                    for (int j = 0; j < i; j ++) {
                        children[j].shutdownGracefully();
                    }

                    for (int j = 0; j < i; j ++) {
                        EventExecutor e = children[j];
                        try {
                            while (!e.isTerminated()) {
                                e.awaitTermination(Integer.MAX_VALUE, TimeUnit.SECONDS);
                            }
                        } catch (InterruptedException interrupted) {
                            // Let the caller handle the interruption.
                            Thread.currentThread().interrupt();
                            break;
                        }
                    }
                }
            }
        }
     //创建选择器
        chooser = chooserFactory.newChooser(children);

        final FutureListener<Object> terminationListener = new FutureListener<Object>() {
            @Override
            public void operationComplete(Future<Object> future) throws Exception {
            //juc下的原子类方法,线程安全
                if (terminatedChildren.incrementAndGet() == children.length) {
                    terminationFuture.setSuccess(null);
                }
            }
        };
     //给每一个执行器添加监听器
        for (EventExecutor e: children) {
            e.terminationFuture().addListener(terminationListener);
        }

     //将NioEvnetLoopGroup加入链表中
        Set<EventExecutor> childrenSet = new LinkedHashSet<EventExecutor>(children.length);
        Collections.addAll(childrenSet, children);
        readonlyChildren = Collections.unmodifiableSet(childrenSet);
    }
children[i] = newChild(executor, args);这里返回一个NioEventLoopGroup对象:
 @Override
    protected EventLoop newChild(Executor executor, Object... args) throws Exception {
        return new NioEventLoop(this, executor, (SelectorProvider) args[0],
            ((SelectStrategyFactory) args[1]).newSelectStrategy(), (RejectedExecutionHandler) args[2]);
    }
接下来看bootstrap启动器:{@link Bootstrap} sub-class which allows easy bootstrap of {@link ServerChannel},用来启动ServerChannel
bootstrap.group()方法,传入两个NioEventGroup,父类交由本类的父类处理,子类该本类中处理
/**
     * Set the {@link EventLoopGroup} for the parent (acceptor) and the child (client). These
     * {@link EventLoopGroup}'s are used to handle all the events and IO for {@link ServerChannel} and
     * {@link Channel}'s.
     */
    public ServerBootstrap group(EventLoopGroup parentGroup, EventLoopGroup childGroup) {
    //上级父类处理
        super.group(parentGroup);
        if (childGroup == null) {
            throw new NullPointerException("childGroup");
        }
        if (this.childGroup != null) {
            throw new IllegalStateException("childGroup set already");
        }
     //childGroup是EventLoopGroup是用volatile关键字修饰的对象
    this.childGroup = childGroup; return this; }
channel()方法,这里返回一个ReflectiveChannelFactory,里面有一个Class对象 class io.netty.channel.socket.nio.NioServerSocketChannel,这时候还没有创建channel
在ReflectiveChannelFactory类中:有一个创建channel的方法,使用java反射进制,通过Class名调用newInstance()方法,那么NioserverSocket对象是什么时候创建的?
@Override
    public T newChannel() {
        try {
            return clazz.newInstance();
        } catch (Throwable t) {
            throw new ChannelException("Unable to create Channel from class " + clazz, t);
        }
    }
根据后面debug可知,是在绑定端口的时候bootstrap.bind(7777).sync();
 final ChannelFuture initAndRegister() {
        Channel channel = null;
        try {
       //创建对象并初始化
            channel = channelFactory.newChannel();
            init(channel);
        } catch (Throwable t) {
            if (channel != null) {
                // channel can be null if newChannel crashed (eg SocketException("too many open files"))
                channel.unsafe().closeForcibly();
            }
            // as the Channel is not registered yet we need to force the usage of the GlobalEventExecutor
            return new DefaultChannelPromise(channel, GlobalEventExecutor.INSTANCE).setFailure(t);
        }

        ChannelFuture regFuture = config().group().register(channel);
        if (regFuture.cause() != null) {
            if (channel.isRegistered()) {
                channel.close();
            } else {
                channel.unsafe().closeForcibly();
            }
        }

        // If we are here and the promise is not failed, it's one of the following cases:
        // 1) If we attempted registration from the event loop, the registration has been completed at this point.
        //    i.e. It's safe to attempt bind() or connect() now because the channel has been registered.
        // 2) If we attempted registration from the other thread, the registration request has been successfully
        //    added to the event loop's task queue for later execution.
        //    i.e. It's safe to attempt bind() or connect() now:
        //         because bind() or connect() will be executed *after* the scheduled registration task is executed
        //         because register(), bind(), and connect() are all bound to the same thread.

        return regFuture;
    }
option()和childIOption()方法:
 public <T> B option(ChannelOption<T> option, T value) {
        if (option == null) {
            throw new NullPointerException("option");
        }
        if (value == null) {
            synchronized (options) {
                options.remove(option);
            }
        } else {
            synchronized (options) {
                options.put(option, value);
            }
        }
        return (B) this;
    }
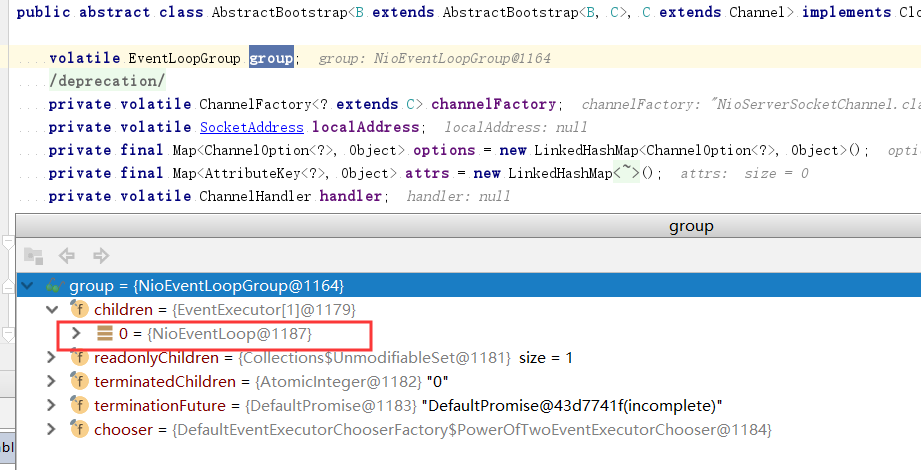
这个group其实是bossGroup对象,也就是option()方法是给bossGroup设置,那么childGroup应该就是给workGroup设置了,我们debug一下:
public <T> ServerBootstrap childOption(ChannelOption<T> childOption, T value) {
        if (childOption == null) {
            throw new NullPointerException("childOption");
        }
        if (value == null) {
            synchronized (childOptions) {
                childOptions.remove(childOption);
            }
        } else {
            synchronized (childOptions) {
                childOptions.put(childOption, value);
            }
        }
        return this;
    }
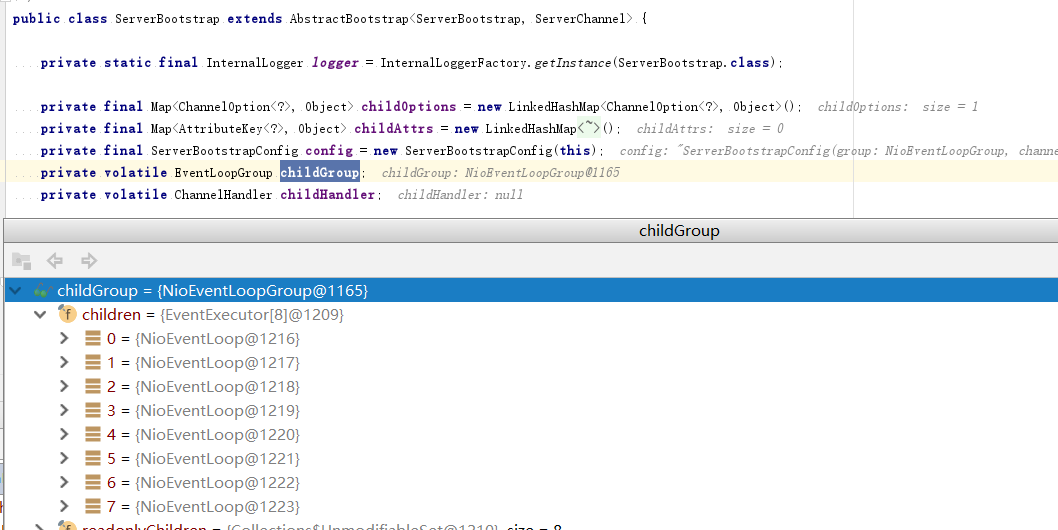
public class ServerBootstrap extends AbstractBootstrap<ServerBootstrap, ServerChannel> {

    private static final InternalLogger logger = InternalLoggerFactory.getInstance(ServerBootstrap.class);

    private final Map<ChannelOption<?>, Object> childOptions = new LinkedHashMap<ChannelOption<?>, Object>();
    private final Map<AttributeKey<?>, Object> childAttrs = new LinkedHashMap<AttributeKey<?>, Object>();
    private final ServerBootstrapConfig config = new ServerBootstrapConfig(this);
    private volatile EventLoopGroup childGroup;
    private volatile ChannelHandler childHandler;
看这里的group的具体对象的确是workGroup对象。
看上面的ServerBootStrapConfig对象的内容:

handler()和childHandler()方法:从上面的 option()和childIOption()方法可以猜到,这两个方法分别作用于bossGroup和workGroup。
handler():
childHandler:
config:

serverBootStrap基本点:
1)链式调用: group方法,将boss和worker传入,boss赋值给parentGroup属性,worker 赋值给childGroup属性
2) channel 方法传入NioServerSocketChannel class对象。会根据这个class 创建channel 对象。
3) option方法传入TCP参数,放在一个LinkedHashMap中。
4) handler 方法传入一个个handler 中,这个hanlder只专属于ServerSocketChannel 而不是SocketChannel
5)childHandler 传入一个hanlder ,这个handler 将会在每个客户端连接的时候调用。供SocketChannel 使用。
bootstrap.bind(7777),绑定端口,这里我们看看这里面做了些什么?
首先验证,validate()和判空
/**
     * Create a new {@link Channel} and bind it.
     */
    public ChannelFuture bind(SocketAddress localAddress) {
        validate();
        if (localAddress == null) {
            throw new NullPointerException("localAddress");
        }
        return doBind(localAddress);
    }
validate()方法也是验空:
 public B validate() {
        if (group == null) {
            throw new IllegalStateException("group not set");
        }
        if (channelFactory == null) {
            throw new IllegalStateException("channel or channelFactory not set");
        }
        return (B) this;
    }
接着继续调用doBind()方法,这里面有几个方法得注意:
 private ChannelFuture doBind(final SocketAddress localAddress) {
        final ChannelFuture regFuture = initAndRegister();
        final Channel channel = regFuture.channel();
        if (regFuture.cause() != null) {
            return regFuture;
        }

        if (regFuture.isDone()) {
            // At this point we know that the registration was complete and successful.
            ChannelPromise promise = channel.newPromise();
            doBind0(regFuture, channel, localAddress, promise);
            return promise;
        } else {
            // Registration future is almost always fulfilled already, but just in case it's not.
            final PendingRegistrationPromise promise = new PendingRegistrationPromise(channel);
            regFuture.addListener(new ChannelFutureListener() {
                @Override
                public void operationComplete(ChannelFuture future) throws Exception {
                    Throwable cause = future.cause();
                    if (cause != null) {
                        // Registration on the EventLoop failed so fail the ChannelPromise directly to not cause an
                        // IllegalStateException once we try to access the EventLoop of the Channel.
                        promise.setFailure(cause);
                    } else {
                        // Registration was successful, so set the correct executor to use.
                        // See https://github.com/netty/netty/issues/2586
                        promise.registered();

                        doBind0(regFuture, channel, localAddress, promise);
                    }
                }
            });
            return promise;
        }
    }
先是调用initAndRegister(),这里用来创建NioServerSocketChannel对象并初始化,前面说过是通过channelFactory.newChannel(),通过java反射技术实现。
 final ChannelFuture initAndRegister() {
        Channel channel = null;
        try {
            channel = channelFactory.newChannel();
            init(channel);
        } catch (Throwable t) {
            if (channel != null) {
                // channel can be null if newChannel crashed (eg SocketException("too many open files"))
                channel.unsafe().closeForcibly();
            }
            // as the Channel is not registered yet we need to force the usage of the GlobalEventExecutor
            return new DefaultChannelPromise(channel, GlobalEventExecutor.INSTANCE).setFailure(t);
        }

        ChannelFuture regFuture = config().group().register(channel);
        if (regFuture.cause() != null) {
            if (channel.isRegistered()) {
                channel.close();
            } else {
                channel.unsafe().closeForcibly();
            }
        }

        // If we are here and the promise is not failed, it's one of the following cases:
        // 1) If we attempted registration from the event loop, the registration has been completed at this point.
        //    i.e. It's safe to attempt bind() or connect() now because the channel has been registered.
        // 2) If we attempted registration from the other thread, the registration request has been successfully
        //    added to the event loop's task queue for later execution.
        //    i.e. It's safe to attempt bind() or connect() now:
        //         because bind() or connect() will be executed *after* the scheduled registration task is executed
        //         because register(), bind(), and connect() are all bound to the same thread.

        return regFuture;
    }
init()方法:这里面来初始化NioServerSocketChannel
(1)设置NioServerSocketChannel的TCP属性。
(2)由于LinkedHashMap 是非线程安全的,使用同步进行处理。
(3)对NioServerSocketChannel的ChannelPipeline 添加Channellnitializer 处理器。
(4)可以看出,init 的方法的核心作用在和ChannelPipeline 相关。
(5)从NioServerSocketChannel的初始化过程中,我们知道,pipeline 是一个双向链表,并
且,他本身就初始化了head和tail, 这里调用了他的addLast 方法,也就是将整个handler 插入到tail 的
前面,因为tail 永远会在后面,需要做一些系统的固定工作。
    @Override
    void init(Channel channel) throws Exception {
        final Map<ChannelOption<?>, Object> options = options0();
        synchronized (options) {
            setChannelOptions(channel, options, logger);
        }

        final Map<AttributeKey<?>, Object> attrs = attrs0();
        synchronized (attrs) {
            for (Entry<AttributeKey<?>, Object> e: attrs.entrySet()) {
                @SuppressWarnings("unchecked")
                AttributeKey<Object> key = (AttributeKey<Object>) e.getKey();
                channel.attr(key).set(e.getValue());
            }
        }

        ChannelPipeline p = channel.pipeline();

        final EventLoopGroup currentChildGroup = childGroup;
        final ChannelHandler currentChildHandler = childHandler;
        final Entry<ChannelOption<?>, Object>[] currentChildOptions;
        final Entry<AttributeKey<?>, Object>[] currentChildAttrs;

        synchronized (childOptions) {
            currentChildOptions = childOptions.entrySet().toArray(newOptionArray(childOptions.size()));
        }
        synchronized (childAttrs) {
            currentChildAttrs = childAttrs.entrySet().toArray(newAttrArray(childAttrs.size()));
        }

    //添加handler
        p.addLast(new ChannelInitializer<Channel>() {
            @Override
            public void initChannel(final Channel ch) throws Exception {
                final ChannelPipeline pipeline = ch.pipeline();
                ChannelHandler handler = config.handler();
                if (handler != null) {
                    pipeline.addLast(handler);
                }

                ch.eventLoop().execute(new Runnable() {
                    @Override
                    public void run() {
                        pipeline.addLast(new ServerBootstrapAcceptor(
                                ch, currentChildGroup, currentChildHandler, currentChildOptions, currentChildAttrs));
                    }
                });
            }
        });
    }
addLast会追踪到这里:我们知道pipeline 是一个双向链表,并且初始化了head和tail,这里调用addLast()方法,是在tail前面插入。
而tail会在尾部做一些系统的固定操作
 private void addLast0(AbstractChannelHandlerContext newCtx) {
        AbstractChannelHandlerContext prev = tail.prev;
        newCtx.prev = prev;
        newCtx.next = tail;
        prev.next = newCtx;
        tail.prev = newCtx;
    }
这里是将一个handler加入到链表尾部的前一个节点:
示意图:

在 doBind()中会去调用doBind0(regFuture, channel, localAddress, promise)方法,最终会调用NioServerSocketChannel中的doBind()方法
方法了。到此整个启动过程已经结束了,ok了
@Override
    protected void doBind(SocketAddress localAddress) throws Exception {
        if (PlatformDependent.javaVersion() >= 7) {
            javaChannel().bind(localAddress, config.getBacklog());
        } else {
            javaChannel().socket().bind(localAddress, config.getBacklog());
        }
    }
这是java nio中的底层方法,在nio中我们绑定网络端口是这样:
     //绑定网络端口
        serverSocketChannel.socket().bind(new InetSocketAddress(666));
在绑定网端口后,4.7回到bind方法(alt+v), 最后-一步: safeSetSuccess(promise), 告诉promise 任务成功了。其可以执行监听器的方法,
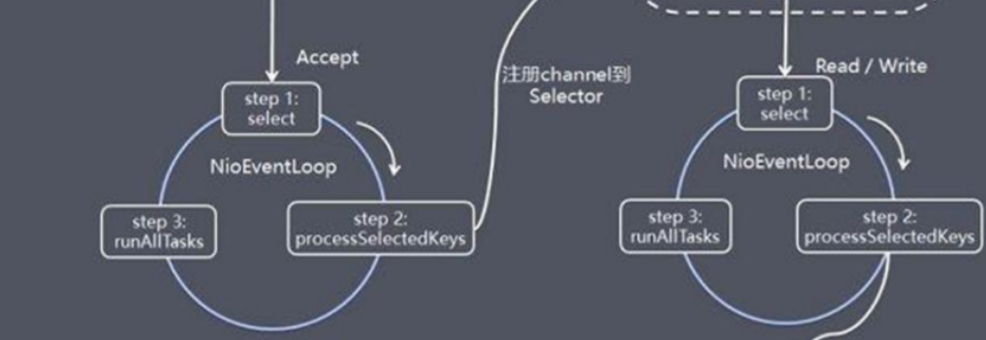
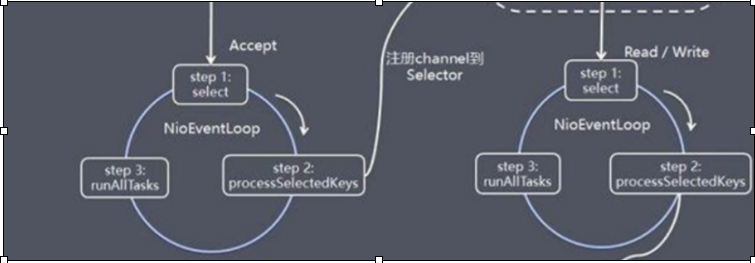
这时候启动已经成功,再继续debug,我们会进入NioEventLoop类的run()方法,这里面进行监听
 @Override
    protected void run() {
        for (;;) {
            try {
                switch (selectStrategy.calculateStrategy(selectNowSupplier, hasTasks())) {
                    case SelectStrategy.CONTINUE:
                        continue;
                    case SelectStrategy.SELECT:
                        select(wakenUp.getAndSet(false));

                        if (wakenUp.get()) {
                            selector.wakeup();
                        }
                    default:
                        // fallthrough
                }

                cancelledKeys = 0;
                needsToSelectAgain = false;
                final int ioRatio = this.ioRatio;
                if (ioRatio == 100) {
                    try {

                        processSelectedKeys();
                    } finally {
                        // Ensure we always run tasks.
                        runAllTasks();
                    }
                } else {
                    final long ioStartTime = System.nanoTime();
                    try {
                        processSelectedKeys();
                    } finally {
                        // Ensure we always run tasks.
                        final long ioTime = System.nanoTime() - ioStartTime;
                        runAllTasks(ioTime * (100 - ioRatio) / ioRatio);
                    }
                }
            } catch (Throwable t) {
                handleLoopException(t);
            }
            // Always handle shutdown even if the loop processing threw an exception.
            try {
                if (isShuttingDown()) {
                    closeAll();
                    if (confirmShutdown()) {
                        return;
                    }
                }
            } catch (Throwable t) {
                handleLoopException(t);
            }
        }
    }
在上次讲得关于Netty的线程模式中:这里面有一个循环的执行过程图解,是和上面的代码对应的。
Netty 启动过程小结:
1) 创建2个EventLoopGroup 线程池数组。数组默认大小CPU核数*2, 方便chooser选择线程池时提高性能

2) BootStrap 将boss 设置为group 属性,将worker 设置为childer 属性

3)通过bind 方法启动,内部重要方法为initAndRegister 和dobind 方法

4) initAndRegister 方法会反射创建NioServerSocketChannel 及其相关的NIO的对象,pipeline ,unsafe, 同时也为pipeline 初始了head 节点和tail 节点。

5)在register0方法成功以后调用在dobind 方法中调用doBind0 方法,该方法会调用NioServerSocketChannel

的doBind 方法对JDK的channel 和端口进行绑定,完成Netty 服务器的所有启动,并在NioEventLoop中开始监听连接事件

NioEventLooph中有三个重要的方法:select、processSelectedKey和runAllTasks方法。
2、Netty接受请求过程源码剖析
在上面服务器启动的时候我们知道在NioEventLoop中,会有一个事件循环监听事件的发生,我们debug启动服务端,
用浏览器连接服务器,debug到NioEventLoop中的processSelectedKey方法,这里是来监听事件
 private void processSelectedKey(SelectionKey k, AbstractNioChannel ch) {
        final AbstractNioChannel.NioUnsafe unsafe = ch.unsafe();
        if (!k.isValid()) {
            final EventLoop eventLoop;
            try {
                eventLoop = ch.eventLoop();
            } catch (Throwable ignored) {
                // If the channel implementation throws an exception because there is no event loop, we ignore this
                // because we are only trying to determine if ch is registered to this event loop and thus has authority
                // to close ch.
                return;
            }
            // Only close ch if ch is still registered to this EventLoop. ch could have deregistered from the event loop
            // and thus the SelectionKey could be cancelled as part of the deregistration process, but the channel is
            // still healthy and should not be closed.
            // See https://github.com/netty/netty/issues/5125
            if (eventLoop != this || eventLoop == null) {
                return;
            }
            // close the channel if the key is not valid anymore
            unsafe.close(unsafe.voidPromise());
            return;
        }

        try {
            int readyOps = k.readyOps();
            // We first need to call finishConnect() before try to trigger a read(...) or write(...) as otherwise
            // the NIO JDK channel implementation may throw a NotYetConnectedException.
            if ((readyOps & SelectionKey.OP_CONNECT) != 0) {
                // remove OP_CONNECT as otherwise Selector.select(..) will always return without blocking
                // See https://github.com/netty/netty/issues/924
                int ops = k.interestOps();
                ops &= ~SelectionKey.OP_CONNECT;
                k.interestOps(ops);

                unsafe.finishConnect();
            }

            // Process OP_WRITE first as we may be able to write some queued buffers and so free memory.
            if ((readyOps & SelectionKey.OP_WRITE) != 0) {
                // Call forceFlush which will also take care of clear the OP_WRITE once there is nothing left to write
                ch.unsafe().forceFlush();
            }

            // Also check for readOps of 0 to workaround possible JDK bug which may otherwise lead
            // to a spin loop
            if ((readyOps & (SelectionKey.OP_READ | SelectionKey.OP_ACCEPT)) != 0 || readyOps == 0) {
                unsafe.read();
            }
        } catch (CancelledKeyException ignored) {
            unsafe.close(unsafe.voidPromise());
        }
    }
再看unsafe.read()方法
 @Override
        public void read() {
            assert eventLoop().inEventLoop();
            final ChannelConfig config = config();
            final ChannelPipeline pipeline = pipeline();
            final RecvByteBufAllocator.Handle allocHandle = unsafe().recvBufAllocHandle();
            allocHandle.reset(config);

            boolean closed = false;
            Throwable exception = null;
            try {
                try {
                    do {
                        int localRead = doReadMessages(readBuf);
                        if (localRead == 0) {
                            break;
                        }
                        if (localRead < 0) {
                            closed = true;
                            break;
                        }

                        allocHandle.incMessagesRead(localRead);
                    } while (allocHandle.continueReading());
                } catch (Throwable t) {
                    exception = t;
                }

                int size = readBuf.size();
                for (int i = 0; i < size; i ++) {
                    readPending = false;
                    pipeline.fireChannelRead(readBuf.get(i));
                }
                readBuf.clear();
                allocHandle.readComplete();
                pipeline.fireChannelReadComplete();

                if (exception != null) {
                    closed = closeOnReadError(exception);

                    pipeline.fireExceptionCaught(exception);
                }

                if (closed) {
                    inputShutdown = true;
                    if (isOpen()) {
                        close(voidPromise());
                    }
                }
            } finally {
                // Check if there is a readPending which was not processed yet.
                // This could be for two reasons:
                // * The user called Channel.read() or ChannelHandlerContext.read() in channelRead(...) method
                // * The user called Channel.read() or ChannelHandlerContext.read() in channelReadComplete(...) method
                //
                // See https://github.com/netty/netty/issues/2254
                if (!readPending && !config.isAutoRead()) {
                    removeReadOp();
                }
            }
        }
    }
进入doReadMessages()方法
  @Override
    protected int doReadMessages(List<Object> buf) throws Exception {
        SocketChannel ch = SocketUtils.accept(javaChannel());

        try {
      if (ch != null) {
                buf.add(new NioSocketChannel(this, ch));
                return 1;
            }
        } catch (Throwable t) {
            logger.warn("Failed to create a new channel from an accepted socket.", t);

            try {
                ch.close();
            } catch (Throwable t2) {
                logger.warn("Failed to close a socket.", t2);
            }
        }

        return 0;
    }
在nio中,我们是通过serverSocketChannel产生新的socketChannel对象,获取tcp连接,在netty中通过SocketChannel ch = SocketUtils.accept(javaChannel());获得。
 //每次连接一个客户端都会产生新的SocketChannel
                    SocketChannel socketChannel = serverSocketChannel.accept();
buf.add(new NioSocketChannel(this, ch));获取到一个JDK的SocketChannel, 然后,使用NioSocketChannel 进行封装。最后添加到容器中,这样容器中就有了SocketChannel对象

再来看看unsafe.read()下的fireChannelRead()方法:
readBuf里面有一个实例对象NioSocketChannel
  int size = readBuf.size();
                for (int i = 0; i < size; i ++) {
                    readPending = false;
                    pipeline.fireChannelRead(readBuf.get(i));
                }
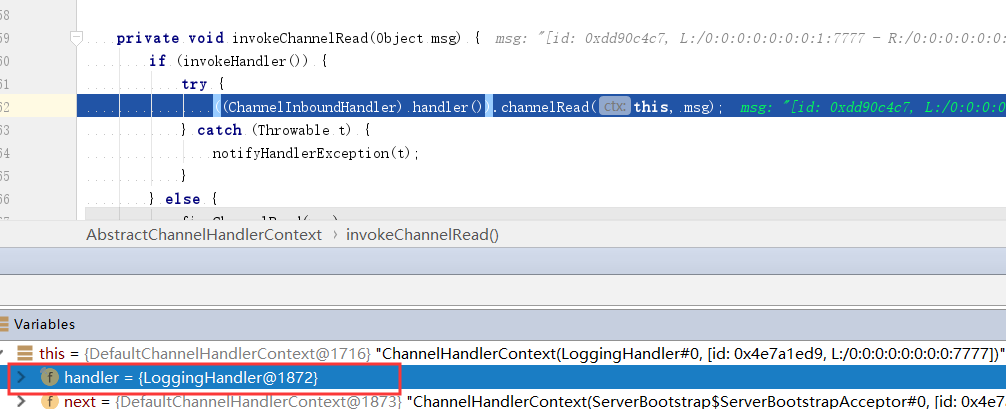
追踪fireChannelRead方法到invokeChannelRead()方法,这里有一个channelRead()方法。
private void invokeChannelRead(Object msg) {
        if (invokeHandler()) {
            try {
                ((ChannelInboundHandler) handler()).channelRead(this, msg);
            } catch (Throwable t) {
                notifyHandlerException(t);
            }
        } else {
            fireChannelRead(msg);
        }
    }
debug我们会发现会执行几次这个方法,这个时候的pipeline有四个handler:分别是Head, LoggingHandler, ServerBootstrapAcceptor, Tail。
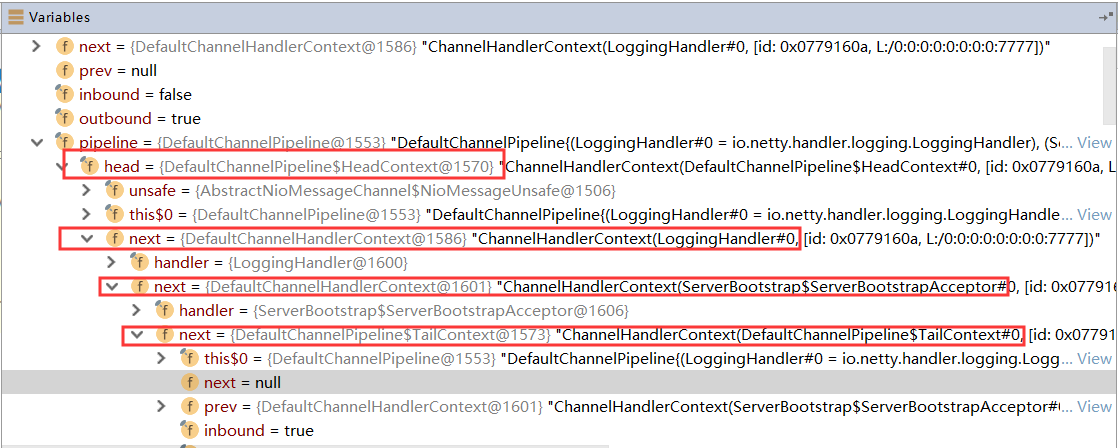
主要看ServerBootstrapAcceptor这个handler调用的channelRead()方法
@Override
        @SuppressWarnings("unchecked")
        public void channelRead(ChannelHandlerContext ctx, Object msg) {
            final Channel child = (Channel) msg;

            child.pipeline().addLast(childHandler);

            setChannelOptions(child, childOptions, logger);

            for (Entry<AttributeKey<?>, Object> e: childAttrs) {
                child.attr((AttributeKey<Object>) e.getKey()).set(e.getValue());
            }

            try {
          //将客户端连接注册到workGroup中,并添加监听器
                childGroup.register(child).addListener(new ChannelFutureListener() {
                    @Override
                    public void operationComplete(ChannelFuture future) throws Exception {
                        if (!future.isSuccess()) {
                            forceClose(child, future.cause());
                        }
                    }
                });
            } catch (Throwable t) {
                forceClose(child, t);
            }
        }
上述源码总结几点:
1) msg强转成Channel ,实际上就是NioSocketChannel 。
2)添加NioSocketChannel 的pipeline 的handler ,就是我们main方法里面设置的childHandler 方法里的
3)设置NioSocketChannel的各种属性。
4)将该NioSocketChannel注册到childGroup 中的一个EventLoop. 上, 并添加一个监听器。
5)这个childGroup就是我们main方法创建的数组workerGroup.
继续追register,这里的next方法会返回一个EventExecutor 执行器
 @Override
    public ChannelFuture register(Channel channel) {
        return next().register(channel);
    }
@Override
        public EventExecutor next() {
        //与运算,idx是一个原子类,线程安全
            return executors[idx.getAndIncrement() & executors.length - 1];
        }
最后追到AbstractNioChannel的doBeginRead方法:
 @Override
    protected void doBeginRead() throws Exception {
        // Channel.read() or ChannelHandlerContext.read() was called
      //获取对应的selectKey
        final SelectionKey selectionKey = this.selectionKey;
        if (!selectionKey.isValid()) {
            return;
        }

        readPending = true;

        final int interestOps = selectionKey.interestOps();
        if ((interestOps & readInterestOp) == 0) {
            selectionKey.interestOps(interestOps | readInterestOp);
        }
    }
netty接受请求流程小结:
总体流程:接受连接--->创建- -个新的NioSocketCh-n------_>注册到- -个worker EventLoop上----->注册selecot Read事件。

1)服务器轮询Accept 事件,获取事件后调用unsafe 的read 方法,这个unsafe 是ServerSocket 的内部类,该方法内部由2部分组成

2) doReadMessages 用于创建NioSocketChannel 对象,该对象包装JDK的Nio Channel客户端。该方法会像创建ServerSocketChanel类似创建相关的pipeline ,unsafe, config

3)随后执行执行pipeline.fireChannelRead 方法,并将自己绑定到一个chooser选择器选择的workerGroup 中的一个EventLoop。 并且注册一个0,表示注册成功,但并没有注册读(1) 事件
3、Pipeline Handler HandlerContext创建源码剖析
1. ChannelPipeline| ChannelHandler| ChannelHandlerContext 介绍
1.1 三者关系
1) 每当ServerSocket 创建一-个新的连接,就会创建一个Socket, 对应的就是目标客户端。
2)每一个新创建的Socket 都将会分配一个全新的ChannelPipeline
3)每一个ChannelPipeline 内部都含有多个ChannelHandlerContext
4)他们一起组成了双向链表,这些Context 用于包装我们调用addLast 方法时添加的ChannelHandler
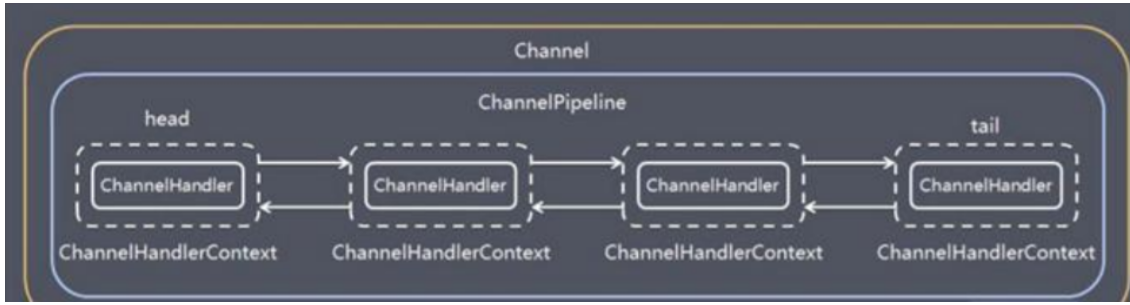
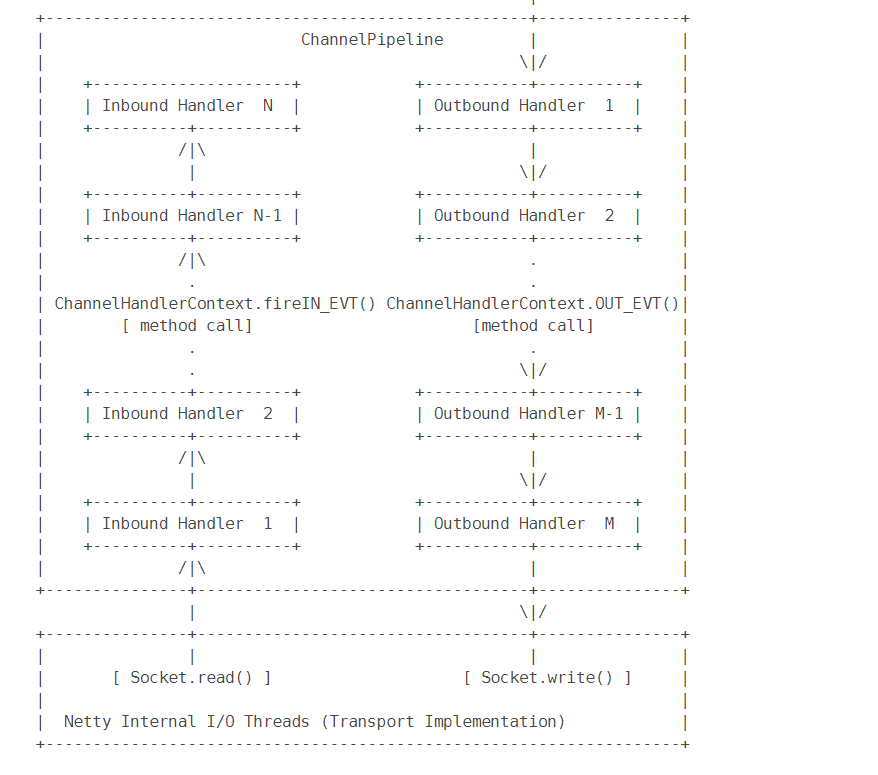
当一个请求进来的时候,会进入Socket对应的pipeline, 并经过pipeline 所有的handler, 就是设计模式中的过滤器模式。
ChannelPipeline:
接口继承关系:
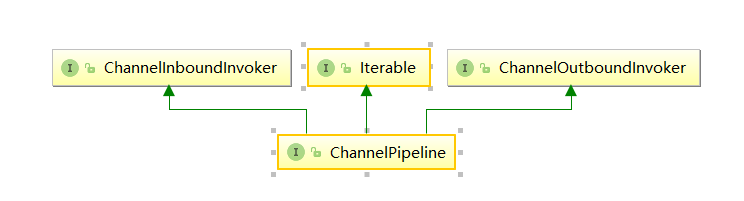
通过ChannelPipeline的接口继续关系和该接口的方法:我们可以知道
可以看到该接口继承了inBound, outBound, Iterable 接口,表示他可以调用数据出站的方法和入站的方法,同时
也能遍历内部的链表, 看看他的几个代表性的方法,基本上都是针对handler 链表的插入,追加,删除,替换操
作,类似是一个LinkedList。 同时,也能返回channel (也就是socket)
示意图:
常用方法:
public interface ChannelHandler {
//当把ChannelHandler 添加到pipeline 时被调用
void handlerAdded(ChannelHandlerContext ctx) throws Exception;
//当从pipeline 中移除时调用
void handlerRemoved(ChannelHandlerContext ctx) throws Exception;
//当处理过程中在pipeline 发生异常时调用
@Deprecated
void exceptionCaught(ChannelHandlerContext ctx, Throwable cause) throws Exception;
}
ChannelHandler:
ChannelHandler 的作用就是处理I0事件或拦截I0事件,并将其转发给下一个处理程序ChannelHandler.
Handler处理事件时分入站和出站的,两个方向的操作都是不同的,因此,Netty 定义了两个子接口继承
ChannelHandler:ChannelInboundHandler和ChannelOutboundHandler
ChannelInboundHandle接口方法:
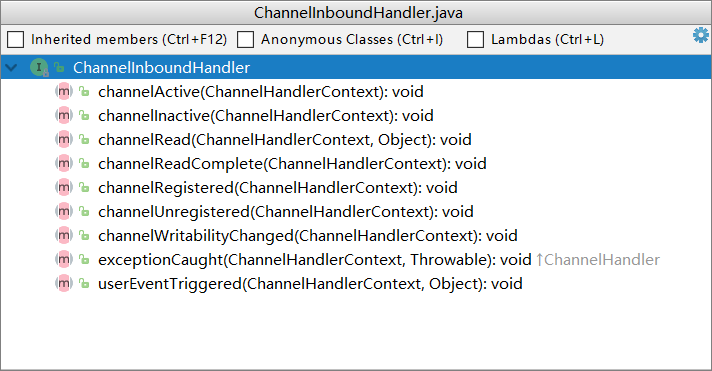
* channelActive用于当Channel 处于活动状态时被调用;
* channelRead 当从Channel 读取数据时被调用等等方法。
*我们一般需要重写一些方法,当发生关注的事件,需要在方法中实现我们的业务逻辑,因为当事件发生时,Netty会
回调对应的方法。
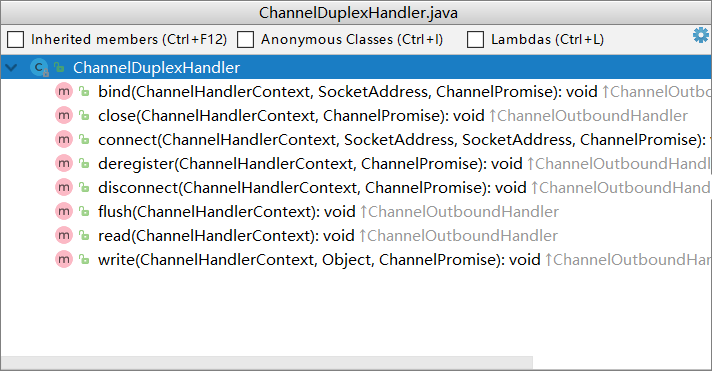
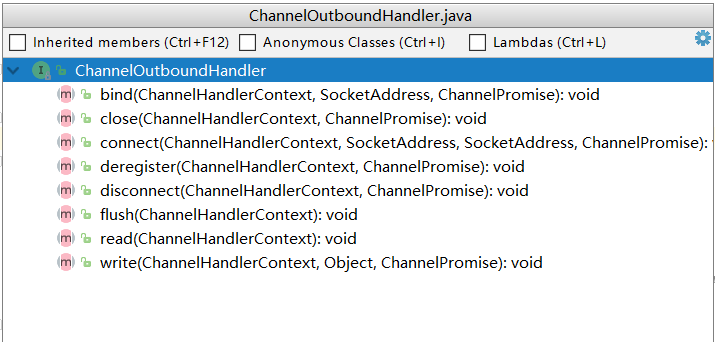
ChannelOutboundHandler接口方法:

* bind方法,当请求将Channel 绑定到本地地址时调用
* close方法,当请求关闭Channel 时调用等等
出站操作都是一些连接和写出数据类似的方法。
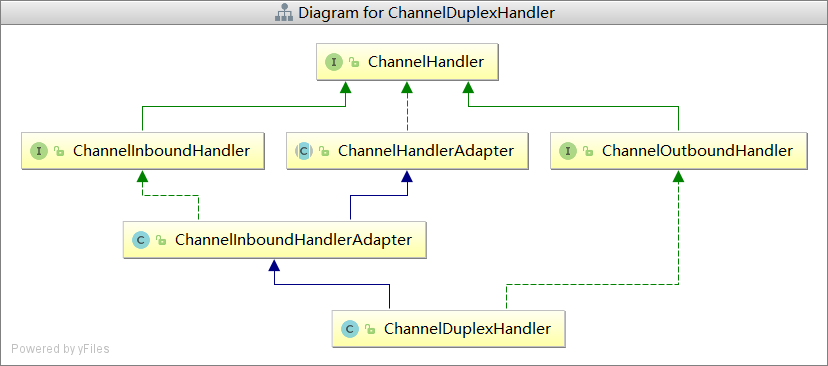
还有一个接口:ChannelDuplexHandler可以同时处理入站和出站的事件,不建议使用。
继承关系图:
方法:
ChannelHandlerContext :
继承关系图:

ChannelHandlerContext继承了出站方法调用接口和入站方法调用接口
ChannelInboundInvoker方法:
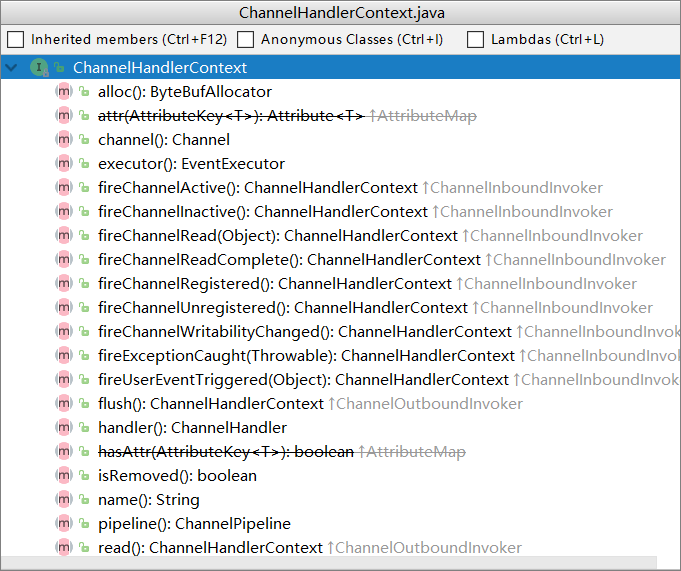
ChannelOutboundInvoker方法:

*这两个invoker就是针对入站或出站方法来的,就是在入站或出站handler 的外层再包装一层,达到在方法前
后拦截并做一些特定操作的目的
ChannelHandlerContext方法:
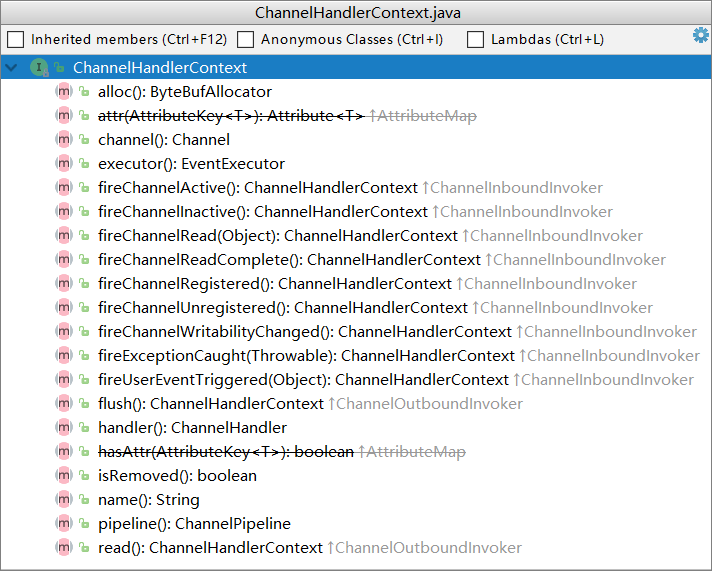
* ChannelHandlerContext 不仅仅时继承了他们两个的方法,同时也定义了一些自己的方法
这些方法能够获取Context. 上下文环境中对应的比如channel, executor, handler ,pipeline, 内存分配器,关
联的handler 是否被删除。
Context就是包装了handler 相关的一切,以方便Context 可以在pipeline 方便的操作handler
ChannelPipeline| ChannelHandler| ChannelHandlerContext 创建过程:
Socket 创建的时候创建pipeline在SocketChannel的抽象父类AbstractChannel的构造方法中
protected AbstractChannel(Channel parent) {
        this.parent = parent;
        id = newId();
        unsafe = newUnsafe();
        pipeline = newChannelPipeline();
    }
调用newChannelPipeline()方法,然后追踪到DefaultChannelPipeline()方法:
protected DefaultChannelPipeline(Channel channel) {
        this.channel = ObjectUtil.checkNotNull(channel, "channel");
        succeededFuture = new SucceededChannelFuture(channel, null);
        voidPromise =  new VoidChannelPromise(channel, true);

        tail = new TailContext(this);
        head = new HeadContext(this);

        head.next = tail;
        tail.prev = head;
    }
1》将channel 赋值给channel字段,用于pipeline 操作channel。
2》创建一个future 和promise, 用于异步回调使用。
3》创建一个inbound 的tailContext, 创建一个既是inbound 类型又是outbound 类型的headContext.
4》最后,将两个Context 互相连接,形成双向链表。
5) tailContext和HeadContext 非常的重要,所有pipeline 中的事件都会流经他们,
TailContext:是DefaultChannelPipeline的内部类
final class TailContext extends AbstractChannelHandlerContext implements ChannelInboundHandler {
HeadContext:是DefaultChannelPipeline的内部类,它实现了ChannelOutboundHandler, ChannelInboundHandler,所以可以处理出站和入站的事件。
 final class HeadContext extends AbstractChannelHandlerContext
            implements ChannelOutboundHandler, ChannelInboundHandler {
Context的创建:
debug定位到DefaultChannelPipeline的addLast()方法:
@Override
    public final ChannelPipeline addLast(EventExecutorGroup group, String name, ChannelHandler handler) {
        final AbstractChannelHandlerContext newCtx;
        synchronized (this) {
            checkMultiplicity(handler);
        //创建一个context
            newCtx = newContext(group, filterName(name, handler), handler);

            addLast0(newCtx);

            // If the registered is false it means that the channel was not registered on an eventloop yet.
            // In this case we add the context to the pipeline and add a task that will call
            // ChannelHandler.handlerAdded(...) once the channel is registered.
            if (!registered) {
                newCtx.setAddPending();
                callHandlerCallbackLater(newCtx, true);
                return this;
            }

            EventExecutor executor = newCtx.executor();
            if (!executor.inEventLoop()) {
                newCtx.setAddPending();
                executor.execute(new Runnable() {
                    @Override
                    public void run() {
                        callHandlerAdded0(newCtx);
                    }
                });
                return this;
            }
        }
        callHandlerAdded0(newCtx);
        return this;
    }
说明:
1) pipeline 添加handler, 参数是线程池,name 是null,handler 是我们或者系统传入的handler。Netty 为了防止
多个线程导致安全问题,同步了这段代码,步骤如下:
2)检查这 个handler 实例是否是共享的,如果不是,并且已经被别的pipeline 使用了,则抛出异常。
3)调用newContext(group, filterName(name, handler), handler)方法,创建-一个Context。 从这里可以看出来了,
每次添加一个handler 都会创建-一个关联Context.
4)调用addLast方法,将Context 追加到链表中。
5)如果这个通道还没有注册到selecor. 上,就将这个Context添加到这个pipeline 的待办任务中。当注册好了以
后,就会调用callHandlerAdded0 方法(默认是什么都不做,用户可以实现这个方法)。
6)到这里,针对三对象创建过程,了解的差不多了,和最初说的一样,每当创建ChannelSocket 的时候都会创建
一个绑定的pipeline,一对一的关系,创建pipeline 的时候也会创建tail 节点和head 节点,形成最初的链表。tail
是入站inbound 类型的handler, head 既是inbound 也是outbound 类型的handler。 在调用pipeline 的addLast
方法的时候,会根据给定的handler 创建一个Context, 然后,将这个Context 插入到链表的尾端(tail 前面)。
到此就OK了
ChannelPipeline| ChannelHandler| ChannelHandlerContext 创建过程小结:
1)每当创建ChannelSocket的时候都会创建一个绑定的pipeline,一对--的关系,创建pipeline的时候也会创建
tail节点和head节点,形成最初的链表。
2)在调用pipeline 的addLast 方法的时候,会根据给定的handler 创建-一个 Context, 然后,将这个Context 插
入到链表的尾端(tail 前面)。
3) Context 包装handler, 多个Context 在pipeline 中形成了双向链表
4)入站方向叫 inbound, 由head 节点开始,出站方法叫outbound ,由tail 节点开始
4、channelPipelne调度handler的源码剖析:
当一个请求进来的时候channelPipeline如何调用handler?在前面我们知道服务器启动的时候会事件循环一直监听着
客户端的请求,最终会调用NioEventLoop中的processSelectedKey方法,部分源码:
  int readyOps = k.readyOps();
            // We first need to call finishConnect() before try to trigger a read(...) or write(...) as otherwise
            // the NIO JDK channel implementation may throw a NotYetConnectedException.
            if ((readyOps & SelectionKey.OP_CONNECT) != 0) {
                // remove OP_CONNECT as otherwise Selector.select(..) will always return without blocking
                // See https://github.com/netty/netty/issues/924
                int ops = k.interestOps();
                ops &= ~SelectionKey.OP_CONNECT;
                k.interestOps(ops);

                unsafe.finishConnect();
            }

            // Process OP_WRITE first as we may be able to write some queued buffers and so free memory.
            if ((readyOps & SelectionKey.OP_WRITE) != 0) {
                // Call forceFlush which will also take care of clear the OP_WRITE once there is nothing left to write
                ch.unsafe().forceFlush();
            }

            // Also check for readOps of 0 to workaround possible JDK bug which may otherwise lead
            // to a spin loop
            if ((readyOps & (SelectionKey.OP_READ | SelectionKey.OP_ACCEPT)) != 0 || readyOps == 0) {
                unsafe.read();
            }
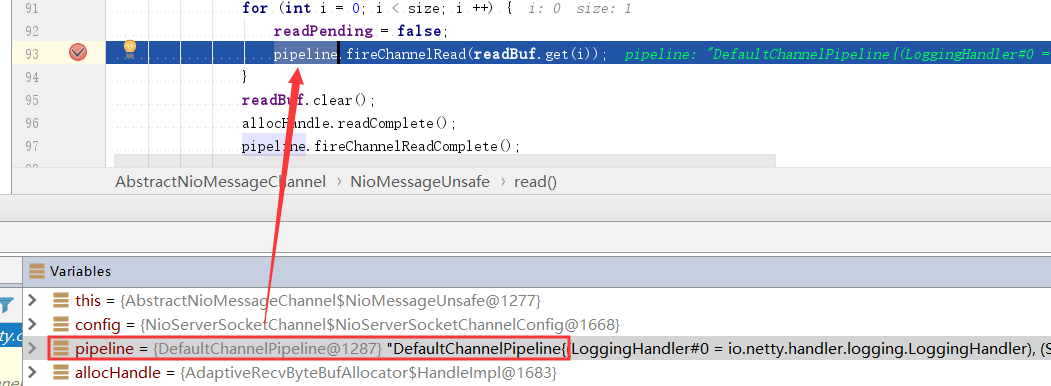
unsafe.read();会去调用AbstractNioMessageChannel的read方法:
  int size = readBuf.size();
                for (int i = 0; i < size; i ++) {
                    readPending = false;
                    pipeline.fireChannelRead(readBuf.get(i));
                }
这里的pipeLine实际上是DefaultChannelPipeline
DefaultChannelPipeline有很多和inbound相对应的方法:
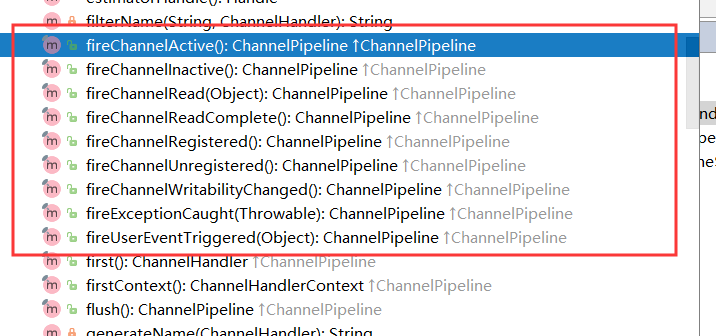
ChannelInboundHandler: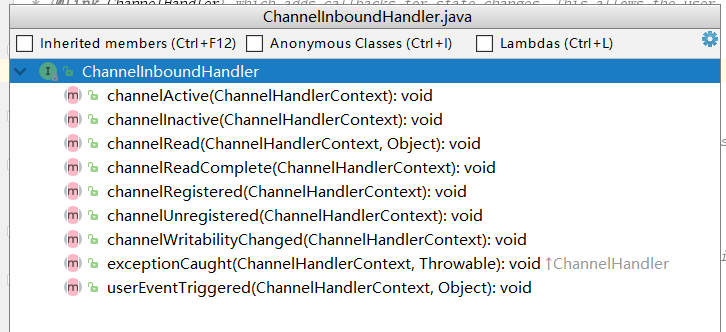
pipeline.fireChannelRead()方法会去调用AbstractChannelHandlerContext的invokeChannelRead(),先获取执行器,判断,再去执行invokeChannelRead()
static void invokeChannelRead(final AbstractChannelHandlerContext next, Object msg) {
        final Object m = next.pipeline.touch(ObjectUtil.checkNotNull(msg, "msg"), next);
        EventExecutor executor = next.executor();
        if (executor.inEventLoop()) {
            next.invokeChannelRead(m);
        } else {
            executor.execute(new Runnable() {
                @Override
                public void run() {
                    next.invokeChannelRead(m);
                }
            });
        }
    }
next.invokeChannelRead(m);这里会调用真正的handler的channelRead()方法
private void invokeChannelRead(Object msg) {
        if (invokeHandler()) {
            try {
                ((ChannelInboundHandler) handler()).channelRead(this, msg);
            } catch (Throwable t) {
                notifyHandlerException(t);
            }
        } else {
            fireChannelRead(msg);
        }
    }
例如我这里的handler是LoggingHandler:
说明:
可以看出来,这些方法都是inbound 的方法,也就是入站事件,调用静态方法传入的也是inbound 的类型head
handler。 这些静态方法则会调用head 的ChannelInboundInvoker 接口的方法,再然后调用handler 的真正方
法
DefaultChannelPipeline有很多和Outbound相对应的方法:
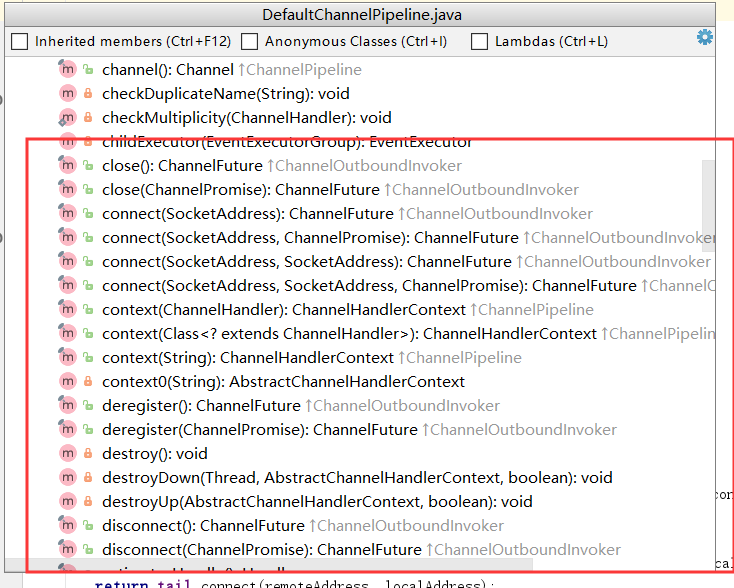
ChannelOutboundHandler:
说明:
1)这些都是出站的实现,但是调用的是outbound 类型的tail handler来进行处理,因为这些都是outbound 事
2)出站是tail 开始,入站从head 开始。因为出站是从内部向外面写,从tail开始,能够让前面的handler 进
行处理,防止handler 被遗漏,比如编码。反之,入站当然是从head 往内部输入,让后面的handler 能够处理这
些输入的数据。比如解码。因此虽然head 也实现了outbound 接口,但不是从head 开始执行出站任务
调度示意图:
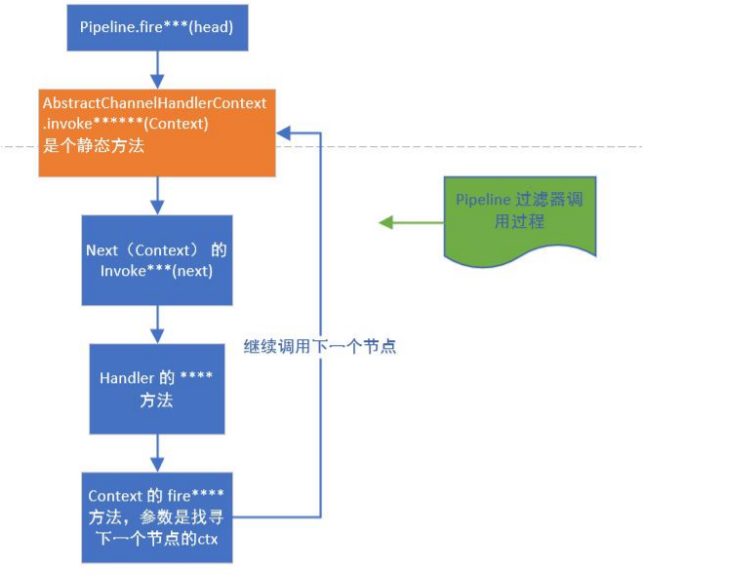
这里面一个循环调度
说明:
1) pipeline 首先会调用Context 的静态方法fireXXX, 并传入Context
2)然后,静态方法调用Context 的invoker 方法,而invoker 方法内部会调用该Context 所包含的
Handler的真正的XXX方法,调用结束后,如果还需要继续向后传递,就调用Context 的fireXXX2 方法,循环
往复。
源码演示:
 static void invokeChannelRead(final AbstractChannelHandlerContext next, Object msg) {
        final Object m = next.pipeline.touch(ObjectUtil.checkNotNull(msg, "msg"), next);
        EventExecutor executor = next.executor();
        if (executor.inEventLoop()) {
            next.invokeChannelRead(m);
        } else {
            executor.execute(new Runnable() {
                @Override
                public void run() {
                    next.invokeChannelRead(m);
                }
            });
        }
    }
↓
 private void invokeChannelRead(Object msg) {
        if (invokeHandler()) {
            try {
                ((ChannelInboundHandler) handler()).channelRead(this, msg);
            } catch (Throwable t) {
                notifyHandlerException(t);
            }
        } else {
            fireChannelRead(msg);
        }
    }
↓
@Override
        public void channelRead(ChannelHandlerContext ctx, Object msg) throws Exception {
            ctx.fireChannelRead(msg);
        }
↓
@Override
    public ChannelHandlerContext fireChannelRead(final Object msg) {
        invokeChannelRead(findContextInbound(), msg);
        return this;
    }
↓
  private AbstractChannelHandlerContext findContextInbound() {
        AbstractChannelHandlerContext ctx = this;
        do {
            ctx = ctx.next;
        } while (!ctx.inbound);
        return ctx;
    }
↓
 static void invokeChannelRead(final AbstractChannelHandlerContext next, Object msg) {
        final Object m = next.pipeline.touch(ObjectUtil.checkNotNull(msg, "msg"), next);
        EventExecutor executor = next.executor();
        if (executor.inEventLoop()) {
            next.invokeChannelRead(m);
        } else {
            executor.execute(new Runnable() {
                @Override
                public void run() {
                    next.invokeChannelRead(m);
                }
            });
        }
    }
→
channelPipelne调度handler调度小结:
1) Context 包装handler, 多个Context 在pipeline 中形成了双向链表,入站方向叫inbound, 由head节点开始,出站方法叫outbound ,由tail 节点开始。

2)而节点中间的传递通过AbstractChannelHandlerContext 类内部的fire 系列方法,找到当前节点的下一个节点不断的循环传播。是一个过滤器形式完成对handler的调度
5、Netty心跳源码剖析:
心跳机制heartbeat,通过心跳检查对方是否有效,这是RPC框架中是必不可少的功能。下面我们分析下Netty 内部源码实现
Netty提供了IdleStateHandler ,ReadTimeoutHandler, WriteTimeoutHandler 三个Handler检测连接的有效性,重点分析IdleStateHandler 。
| IdleStateHandler |
当连接的空闲时间(读或者写)太长时,将会触发一个IdleStateEvent事件。然后,你可以通 过你的ChannellnboundHandler中重写userEventTrigged方法来处理该事件。 |
| ReadTimeoutHandler |
如果在指定的事件没有发生读事件,就会抛出这个异常,并自动关闭这个连接。你可以在 exceptionCaught方法中处理这个异常。 |
| WriteTimeoutHandler |
当一个写操作不能在一定的时间内完成时 ,抛出此异常,并关闭连接。你同样可以在 |
3) ReadTimeout 事件和WriteTimeout事件都会自动关闭连接,而且,属于异常处理,所以,这里只是介绍以下,我们重点看IdleStateHandler。
IdleStateHandler:
4个属性:
private final boolean observeOutput; //是否考虑出站时较慢的情况。默认值是false
private final long readerldleTimeNanos,//读事件空闲时间,0则禁用事件
private final long writerldleTimeNanos;//写事件空闲时间,0则禁用事件
private final long alldle TimeNanos;//读或写空闲时间,0则禁用事件
初始化:
private void initialize(ChannelHandlerContext ctx) {
        // Avoid the case where destroy() is called before scheduling timeouts.
        // See: https://github.com/netty/netty/issues/143
        switch (state) {
        case 1:
        case 2:
            return;
        }

        state = 1;
        initOutputChanged(ctx);

        lastReadTime = lastWriteTime = ticksInNanos();
        if (readerIdleTimeNanos > 0) {
            readerIdleTimeout = schedule(ctx, new ReaderIdleTimeoutTask(ctx),
                    readerIdleTimeNanos, TimeUnit.NANOSECONDS);
        }
        if (writerIdleTimeNanos > 0) {
            writerIdleTimeout = schedule(ctx, new WriterIdleTimeoutTask(ctx),
                    writerIdleTimeNanos, TimeUnit.NANOSECONDS);
        }
        if (allIdleTimeNanos > 0) {
            allIdleTimeout = schedule(ctx, new AllIdleTimeoutTask(ctx),
                    allIdleTimeNanos, TimeUnit.NANOSECONDS);
        }
    }
只要给定的参数大于0,就创建一个定时任务,单位纳秒,每个事件都创建。同时,将state 状态设置为1,防止重复初始化。
调用initOutputChanged 方法,初始化“ 监控出站数据属性”。
IdleStateHandler有3个定时任务内部类,

这3个定时任务对应读,写,读或者写事件。他们共有一个父类(AbstractIdleTask)。
这个父类提供了一个模板方法
private abstract static class AbstractIdleTask implements Runnable {

        private final ChannelHandlerContext ctx;

        AbstractIdleTask(ChannelHandlerContext ctx) {
            this.ctx = ctx;
        }

        @Override
        public void run() {
            if (!ctx.channel().isOpen()) {
                return;
            }

            run(ctx);
        }

        protected abstract void run(ChannelHandlerContext ctx);
    }
说明通道关闭了,就不再执行方法,否则就执行子类的run方法。
demo:服务端NettyHeartBeat


public class NettyHeartBeat {
    public static void main(String[] args) {

        EventLoopGroup bossGroup = new NioEventLoopGroup(1);
        EventLoopGroup workGroup =  new NioEventLoopGroup();

        ServerBootstrap serverBootstrap = new ServerBootstrap();

        serverBootstrap.group(bossGroup,workGroup)
                .channel(NioServerSocketChannel.class)
                .childOption(ChannelOption.SO_BACKLOG,128)
                .option(ChannelOption.SO_KEEPALIVE,true)
                //日志打印
                .handler(new LoggingHandler(LogLevel.INFO))
                .childHandler(new ChannelInitializer<SocketChannel>() {
                    @Override
                    protected void initChannel(SocketChannel ch) throws Exception {
                        ChannelPipeline channelPipeline = ch.pipeline();
                        /**
                         * 加入-一个netty提供IdleStateHandler说明.
                         * 1. IdleStateHandler是netty提供的处理空闲状态的处理器
                         * 2. long readerIdleTime:表示多长时间没有读,就会发送-一个心跳检测包检测是否连接
                         * 3. long writerIdleTime:表示多长时间没有写,就会发送- -个心跳检测包检测是否连接
                         * 4. long alldleTimne:表示多长时间没有读写,就会发送一个心跳检测包检测是否连接
                         *
                         * triggers an {@link IdleStateEvent} when a {@link Channel} has not performed
                         * * read, write, or both operation for a while.
                         * 当IdleStateEvent 触发后,就会传递给管道的下一个handler去处理
                         * 通过调用(触发)下一个handler的userEventTiggered(所以我们需要在自定义的handler中重写该方法) ,
                         * 在该方法中去处理IdleStateEvent(空闲,写空闲,读写空闲)
                         */
                        channelPipeline.addLast(new IdleStateHandler(3,5,7, TimeUnit.SECONDS));
                        //空闲检测加入自定义的handler
                        channelPipeline.addLast(new MyheartbeatHandler());
                    }
                });
        try {
            ChannelFuture channelFuture = serverBootstrap.bind(7777).sync();
            channelFuture.addListener((ch)->{
                if(ch.isSuccess()){
                    System.out.println("服务器启动成功");
                }else{
                    System.out.println("服务器启动失败");
                }
            });
            channelFuture.channel().closeFuture().sync();
        } catch (InterruptedException e) {
            e.printStackTrace();
        }finally {
            bossGroup.shutdownGracefully();
            workGroup.shutdownGracefully();
        }
    }
}
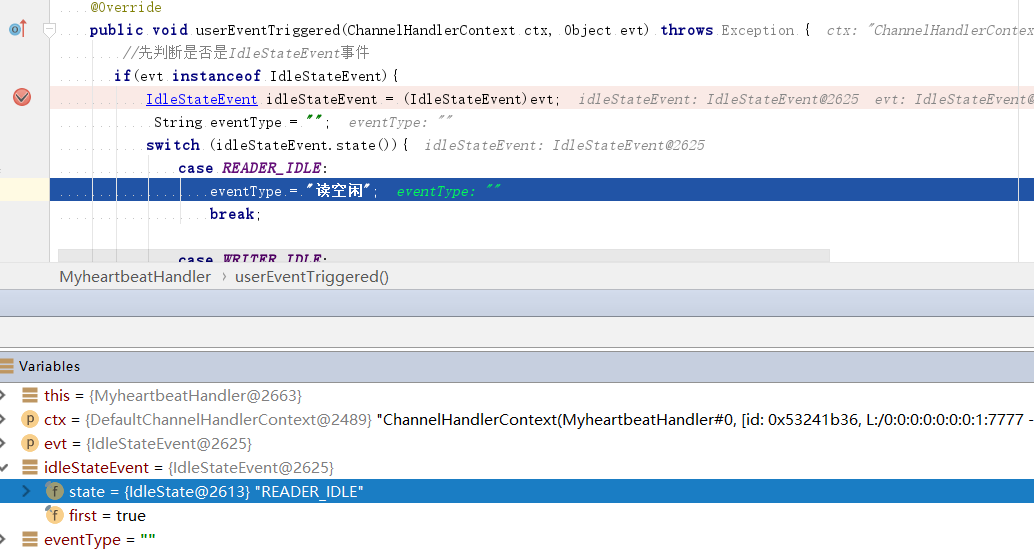
handler:MyheartbeatHandler
public class MyheartbeatHandler extends ChannelInboundHandlerAdapter {

    /**
     *
     * @param ctx 上下文
     * @param evt 触发的事件
     * @throws Exception
     */
    @Override
    public void userEventTriggered(ChannelHandlerContext ctx, Object evt) throws Exception {
        //先判断是否是IdleStateEvent事件
       if(evt instanceof IdleStateEvent){
           IdleStateEvent idleStateEvent = (IdleStateEvent)evt;
            String eventType = "";
           switch (idleStateEvent.state()){
               case READER_IDLE:
                   eventType = "读空闲";
                   break;

               case WRITER_IDLE:
                   eventType = "写空闲";
                   break;

               case ALL_IDLE:
                   eventType = "读写都空闲";
                   break;
           }
           System.out.println("连接状态。。。"+eventType);
       }
    }
}
读事件的run方法(即ReaderldleTimeoutTask的run方法)
 private final class ReaderIdleTimeoutTask extends AbstractIdleTask {

        ReaderIdleTimeoutTask(ChannelHandlerContext ctx) {
            super(ctx);
        }

        @Override
        protected void run(ChannelHandlerContext ctx) {
        //用户传入的时间
            long nextDelay = readerIdleTimeNanos;
            if (!reading) {
          //计算时间
                nextDelay -= ticksInNanos() - lastReadTime;
            }
         //小于0,就执行读超时的任务
            if (nextDelay <= 0) {
                // Reader is idle - set a new timeout and notify the callback.
            //用于取消任务的promise
                readerIdleTimeout = schedule(ctx, this, readerIdleTimeNanos, TimeUnit.NANOSECONDS);

                boolean first = firstReaderIdleEvent;
                firstReaderIdleEvent = false;

                try {
            //提交任务
                    IdleStateEvent event = newIdleStateEvent(IdleState.READER_IDLE, first);
            //触发我们定义的handler user
                    channelIdle(ctx, event);
                } catch (Throwable t) {
                    ctx.fireExceptionCaught(t);
                }
            } else {
                // Read occurred before the timeout - set a new timeout with shorter delay.
                readerIdleTimeout = schedule(ctx, this, nextDelay, TimeUnit.NANOSECONDS);
            }
        }
    }
如果超时了将会触发我们自定义发的userEventTriggered()方法
说明:
1)得到用户设置的超时时间。
2)如果读取操作结束了(执行了channelReadComplete 方法设置), 就用当前时间减去给定时间和最后一次读(执操作的时间行了channelReadComplete 方法设置),
如果小于0,就触发事件。反之,继续放入队列。间隔时间是新的计算时间。
3)触发的逻辑是:首先将任务再次放到队列,时间是刚开始设置的时间,返回一个promise 对象,用于做取消操作。然后,设置first 属性为false,
表示,下一次读取不再是第一一次了,这个属性在channelRead方法会被改成true。
4)创建一个IdleStateEvent 类型的写事件对象,将此对象传递给用户的UserEventTriggered 方法。完成触发事件的操作
5)总的来说,每次读取操作都会记录-一个时间,定时任务时间到了,会计算当前时间和最后-次读的时间
的间隔,如果间隔超过了设置的时间,就触发UserEventTriggered 方法。
WriterldleTimeoutTask和AllIdleTimeoutTask和上面的流程基本一致,后两者添加
判断是否出站慢数据的操作
 if (hasOutputChanged(ctx, first)) {
                        return;
                    }
心跳机制小结:
1) IdleStateHandler 可以实现心跳功能,当服务器和客户端没有任何读写交互时,并超过了给定的时间,则会
触发用户handler的userEventTriggered 方法。用户可以在这个方法中尝试向对方发送信息,如果发送失败,则关
闭连接。
2) IdleStateHandler 的实现基于EventLoop 的定时任务,每次读写都会记录-个值,在定时任务运行的时候,
通过计算当前时间和设置时间和上次事件发生时间的结果,来判断是否空闲。
3)内部有3个定时任务,分别对应读事件,写事件,读写事件。通常用户监听读写事件就足够了。
4)同时,IdleStateHandler内部也考虑了一些极端情况:客户端接收缓慢,-.次接收数据的速度超过了设置的
空闲时间。Netty通过构造方法中的observeOutput属性来决定是否对出站缓冲区的情况进行判断。
5)如果出站缓慢, Netty 不认为这是空闲,也就不触发空闲事件。但第-次无论如何也是要触发的。因为第一
次无法判断是出站缓慢还是空闲。当然,出站缓慢的话,可能造成OOM , OOM比空闲的问题更大。
6)所以,当你的应用出现了内存溢出,0OM之类,并且写空闲极少发生(使用了observeOutput 为true) ,
那么就需要注意是不是数据出站速度过慢。
7)还有一个注意的地方:就是ReadTimeoutHandler ,它继承自IdleStateHandler, 当触发读空闲事件的时候,
就触发ctx.fireExceptionCaught 方法,并传入-个ReadTimeoutException,然后关闭Socket。
8)而WriteTimeoutHandler 的实现不是基于IdleStateHandler 的,他的原理是,当调用write 方法的时候,会
创建-一个定时任务,任务内容是根据传入的p
promise的完成情况来判断是否超出了写的时间。当定时任务根据指
定时间开始运行,发现promise 的isDone 方法返回false, 表明还没有写完,说明超时了,则抛出异常。当write
方法完成后,会打断定时任务。
6、Netty中的EventLoop的源码剖析:
首先看看NioEventLoop的关系继承图:
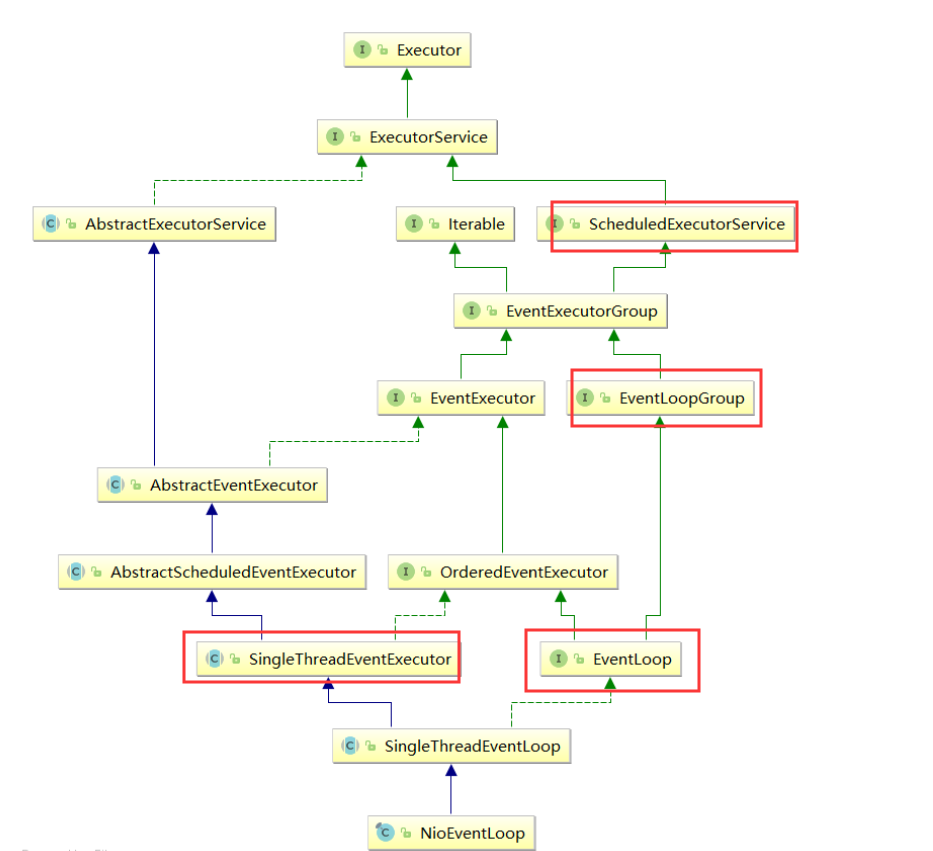
说明:
1) ScheduledExecutorService 接口表示是一个定时任务接口,EventLoop 可以接受定时任务。
2) EventLoop 接口: Netty 接口文档说明该接口作用:一旦Channel 注册了,就处理该Channel对应的所有I/O 操作。
3) SingleThreadEventExecutor 表示这是-一个单个线程的线程池
4) EventLoop是一个单例的线程池,里面含有一个死循环的线程不断的做着3件事情:监听端口,处理端口
事件,处理队列事件。每个EventLoop 都可以绑定多个Channel, 而每个Channel 始终只能由一一个EventLoop 来
处理
根据前面的debug,我们知道EventLoop的监听循环事件,是在serverBootstrap.bind()的进行的操作·,可以追踪到
AbstractBootstrap中的initAndRegister()方法
ChannelFuture regFuture = config().group().register(channel);
继承追踪到AbstractChannel中的register()方法
 eventLoop.execute(new Runnable() {
                        @Override
                        public void run() {
                            register0(promise);
                        }
                    });
继承追踪到SingleThreadEventExecutor的execute()方法:
 public void execute(Runnable task) {
        if (task == null) {
            throw new NullPointerException("task");
        }
        boolean inEventLoop = inEventLoop();
        if (inEventLoop) {
            addTask(task);
        } else {
        //启动线程
            startThread();
         //任务添加
            addTask(task);
            if (isShutdown() && removeTask(task)) {
            //拒绝,抛出异常
                  reject();
            }
        }

        if (!addTaskWakesUp && wakesUpForTask(task)) {
        //尝试唤醒selector
            wakeup(inEventLoop);
        }
    }
1)首先判断该EventLoop的线程是否是当前线程,如果是,直接添加到任务队列中去,如果不是,则尝试
启动线程(但由于线程是单个的,因此只能启动一次),随后再将任务添加到队列中去。
2)如果线程已经停止,并且删除任务失败,则执行拒绝策略,默认是抛出异常。
3)如果addTaskWakesUp 是false, 并且任务不是NonWakeupRunnable 类型的,就尝试唤醒selector。 这
个时候,阻塞在selecor 的线程就会立即返回
继续追踪 startThread()
  private void startThread() {
      //先判断是否已经启动
        if (state == ST_NOT_STARTED) {
            if (STATE_UPDATER.compareAndSet(this, ST_NOT_STARTED, ST_STARTED)) {
                doStartThread();
            }
        }
    }
该方法首先判断是否启动过了,保证EventLoop只有一个线程,如果没有启动过,则尝试使用cas算法将state 状
态改为ST_ STARTED,也就是已启动。然后调用doStartThread 方法。如果失败,则进行回滚
doStartThread()
private void doStartThread() { assert thread == null; executor.execute(new Runnable() { @Override public void run() { thread = Thread.currentThread();
//判断是否打断 if (interrupted) { thread.interrupt(); } boolean success = false;
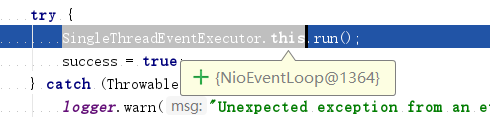
//更新时间 updateLastExecutionTime(); try {
//执行真正的run方法 SingleThreadEventExecutor.this.run(); success = true; } catch (Throwable t) { logger.warn("Unexpected exception from an event executor: ", t); } finally {
//修改状态 for (;;) { int oldState = state; if (oldState >= ST_SHUTTING_DOWN || STATE_UPDATER.compareAndSet( SingleThreadEventExecutor.this, oldState, ST_SHUTTING_DOWN)) { break; } } // Check if confirmShutdown() was called at the end of the loop. if (success && gracefulShutdownStartTime == 0) { logger.error("Buggy " + EventExecutor.class.getSimpleName() + " implementation; " + SingleThreadEventExecutor.class.getSimpleName() + ".confirmShutdown() must be called " + "before run() implementation terminates."); } try { // Run all remaining tasks and shutdown hooks. for (;;) { if (confirmShutdown()) { break; } } } finally { try { cleanup(); } finally { STATE_UPDATER.set(SingleThreadEventExecutor.this, ST_TERMINATED); threadLock.release(); if (!taskQueue.isEmpty()) { logger.warn( "An event executor terminated with " + "non-empty task queue (" + taskQueue.size() + ')'); } terminationFuture.setSuccess(null); } } } } }); }
1)首先调用executor 的execute 方法,这个executor 就是在创建Event LoopGroup 的时候创建的
2)任务中,首先判断线程中断状态,然后设置最后一次的执行时间。
3)执行当前NioEventLoop 的run 方法,注意:这个方法是个死循环,是整个EventLoop 的核心
4)在finally 块中,使用CAS不断修改state 状态,改成ST_ SHUTTING_ DOWN。也就是当线程Loop结
束的时候。关闭线程。最后还要死循环确认是否关闭,否则不会break。 然后,执行cleanup 操作,更新状
态为
5) ST _TERMINATED,并释放当前线程锁。如果任务队列不是空,则打印队列中还有多少个未完成的任务。
并回调terminationFuture 方法。
追踪SingleThreadEventExecutor.this.run();这里实际上是去执行NioEventLoop中的方法:
NioEventLoop中的run()方法:这是最核心的部分
    @Override
    protected void run() {
        for (;;) {
            try {
                switch (selectStrategy.calculateStrategy(selectNowSupplier, hasTasks())) {
                    case SelectStrategy.CONTINUE:
                        continue;
                    case SelectStrategy.SELECT:
                        select(wakenUp.getAndSet(false));
                        if (wakenUp.get()) {
                            selector.wakeup();
                        }
                    default:
                        // fallthrough
                }

                cancelledKeys = 0;
                needsToSelectAgain = false;
                final int ioRatio = this.ioRatio;
                if (ioRatio == 100) {
                    try {
                        processSelectedKeys();
                    } finally {
                        // Ensure we always run tasks.
                        runAllTasks();
                    }
                } else {
                    final long ioStartTime = System.nanoTime();
                    try {
                        processSelectedKeys();
                    } finally {
                        // Ensure we always run tasks.
                        final long ioTime = System.nanoTime() - ioStartTime;
                        runAllTasks(ioTime * (100 - ioRatio) / ioRatio);
                    }
                }
            } catch (Throwable t) {
                handleLoopException(t);
            }
            // Always handle shutdown even if the loop processing threw an exception.
            try {
                if (isShuttingDown()) {
                    closeAll();
                    if (confirmShutdown()) {
                        return;
                    }
                }
            } catch (Throwable t) {
                handleLoopException(t);
            }
        }
    }
run方法做了三件事:
1》select 获取对应的事件,如连接、读、写事件。
2》processSelectedKeys处理事件。
3》runAllTasks执行队列中的任务。
继续追踪select()方法
 private void select(boolean oldWakenUp) throws IOException {
        Selector selector = this.selector;
        try {
            int selectCnt = 0;
            long currentTimeNanos = System.nanoTime();
            long selectDeadLineNanos = currentTimeNanos + delayNanos(currentTimeNanos);
            for (;;) {
                long timeoutMillis = (selectDeadLineNanos - currentTimeNanos + 500000L) / 1000000L;
                if (timeoutMillis <= 0) {
                    if (selectCnt == 0) {
                        selector.selectNow();
                        selectCnt = 1;
                    }
                    break;
                }

                // If a task was submitted when wakenUp value was true, the task didn't get a chance to call
                // Selector#wakeup. So we need to check task queue again before executing select operation.
                // If we don't, the task might be pended until select operation was timed out.
                // It might be pended until idle timeout if IdleStateHandler existed in pipeline.
                if (hasTasks() && wakenUp.compareAndSet(false, true)) {
                    selector.selectNow();
                    selectCnt = 1;
                    break;
                }

                int selectedKeys = selector.select(timeoutMillis);
                selectCnt ++;
// 如果1秒后返回,有返回值II select 被用户唤醒|| 任务队列有任务II 有定时任务即将被
执行;则跳出循环
                if (selectedKeys != 0 || oldWakenUp || wakenUp.get() || hasTasks() || hasScheduledTasks()) {
                    // - Selected something,
                    // - waken up by user, or
                    // - the task queue has a pending task.
                    // - a scheduled task is ready for processing
                    break;
                }
                if (Thread.interrupted()) {
                    // Thread was interrupted so reset selected keys and break so we not run into a busy loop.
                    // As this is most likely a bug in the handler of the user or it's client library we will
                    // also log it.
                    //
                    // See https://github.com/netty/netty/issues/2426
                    if (logger.isDebugEnabled()) {
                        logger.debug("Selector.select() returned prematurely because " +
                                "Thread.currentThread().interrupt() was called. Use " +
                                "NioEventLoop.shutdownGracefully() to shutdown the NioEventLoop.");
                    }
                    selectCnt = 1;
                    break;
                }

                long time = System.nanoTime();
                if (time - TimeUnit.MILLISECONDS.toNanos(timeoutMillis) >= currentTimeNanos) {
                    // timeoutMillis elapsed without anything selected.
                    selectCnt = 1;
                } else if (SELECTOR_AUTO_REBUILD_THRESHOLD > 0 &&
                        selectCnt >= SELECTOR_AUTO_REBUILD_THRESHOLD) {
                    // The selector returned prematurely many times in a row.
                    // Rebuild the selector to work around the problem.
                    logger.warn(
                            "Selector.select() returned prematurely {} times in a row; rebuilding Selector {}.",
                            selectCnt, selector);

                    rebuildSelector();
                    selector = this.selector;

                    // Select again to populate selectedKeys.
                    selector.selectNow();
                    selectCnt = 1;
                    break;
                }

                currentTimeNanos = time;
            }

            if (selectCnt > MIN_PREMATURE_SELECTOR_RETURNS) {
                if (logger.isDebugEnabled()) {
                    logger.debug("Selector.select() returned prematurely {} times in a row for Selector {}.",
                            selectCnt - 1, selector);
                }
            }
        } catch (CancelledKeyException e) {
            if (logger.isDebugEnabled()) {
                logger.debug(CancelledKeyException.class.getSimpleName() + " raised by a Selector {} - JDK bug?",
                        selector, e);
            }
            // Harmless exception - log anyway
        }
    }
说明:
调用selector 的select 方法,默认阻塞一秒钟, 如果有定时任务,则在定时任务剩余时间的基础上在加.上0.5
秒进行阻塞。当执行execute 方法的时候,也就是添加任务的时候,唤醒selecor, 防止selecotr 阻塞时间过长
再回头继续追踪addTask()方法:
/**
     * Add a task to the task queue, or throws a {@link RejectedExecutionException} if this instance was shutdown
     * before.
     */
    protected void addTask(Runnable task) {
        if (task == null) {
            throw new NullPointerException("task");
        }
        if (!offerTask(task)) {
            reject(task);
        }
    }

    final boolean offerTask(Runnable task) {
     if (isShutdown()) {
            reject();
        }
        return taskQueue.offer(task);
    }
EventLoop小结:
每次执行ececute 方法都是向队列中添加任务。当第一次添加时就启动线程,执行run 方法,而run 方法
是整个EventLoop的核心,就像EventLoop 的名字-样,Loop Loop,不停的Loop,Loop做什么呢?做3件
事情。
●调用 selector 的select 方法,默认阻塞一秒钟,如果有定时任务,则在定时任务剩余时间的基础上在加上0.5
秒进行阻塞。当执行execute 方法的时候,也就是添加任务的时候,唤醒selecor, 防止selecotr 阻塞时间过
长。
●当selector 返回的时候,回调用processSelectedKeys 方法对selectKey 进行处理。
●当procesSelectedKeys 方法执行结束后,则按照ioRatio 的比例执行runAllTasks 方法,默认是I0任务时间
和非IO任务时间是相同的,你也可以根据你的应用特点进行调优。比如非I0任务比较多,那么你就将
ioRatio调小一点,这样非I0任务就能执行的长-一点。防止队列积攒过多的任务。
7、handler中加入线程池和Context中添加线程池的源码剖析
在我们前面的demo中,handler里面,我们是这样的处理业务
@Override
    public void channelRead(ChannelHandlerContext ctx, Object msg) throws Exception {
       ctx.channel().eventLoop().execute(new Runnable() {
           @Override
           public void run() {
               try{
                   Thread.sleep(5000);
                   System.out.println("当前线程:"+Thread.currentThread().getName());
                   ctx.writeAndFlush(Unpooled.copiedBuffer("hello 任务1",CharsetUtil.UTF_8));
                   System.out.println("当前任务队列。。"+ctx.channel().hashCode());
               }catch (Exception e){
                   e.printStackTrace();
               }
           }
       });
        System.out.println("当前线程2:"+Thread.currentThread().getName());
根据打印结果我们知道,这里执行的线程都是同一个线程,这样如果是要执行具有复杂的业务,这样难免会造成阻塞。
当前线程2:nioEventLoopGroup-3-1
当前线程:nioEventLoopGroup-3-1
1) 在Netty 中做耗时的,不可预料的操作,比如数据库,网络请求,会严重影响Netty 对Socket 的处理速度。
2)而解决方法就是将耗时任务添加到异步线程池中。但就添加线程池这步操作来讲,可以有2种方式,而且这2
种方式实现的区别也蛮大的。
3)处理耗时业务的第一种 方式----andler中加入线程池
4)处理耗时业务的第二种方式----Context中添加线程池
第一种方法handler加入线程池
修改前面的handler的代码:
public class NettyHandelServer2 extends ChannelInboundHandlerAdapter {
        //创建线程池
      static EventExecutorGroup eventExecutorGroup = new DefaultEventExecutorGroup(16);
    /**
     * @param ctx 上下文对象,含有管道pipeline,通道channel,地址
     * @param msg 就是客户端发送的数据默认Object
     * @throws Exception
     */
    @Override
    public void channelRead(ChannelHandlerContext ctx, Object msg) throws Exception {
        System.out.println("当前线程1 ...  " + Thread.currentThread().getName());
        eventExecutorGroup.submit(new Callable<Object>() {
            @Override
            public Object call() throws Exception {
                try {
                    Thread.sleep(10*1000);
                    System.out.println("当前线程2 call ...  " + Thread.currentThread().getName());
                    ctx.writeAndFlush(Unpooled.copiedBuffer("hello 任务2",CharsetUtil.UTF_8));
                } catch (InterruptedException e) {
                    e.printStackTrace();
                }
                return null;
            }
        });
        System.out.println("读取数据结束。。。。。。。");
    }
}
打印结果:
当前线程1 ... nioEventLoopGroup-3-1
读取数据结束。。。。。。。
10秒后。。。
当前线程3 call ... defaultEventExecutorGroup-4-2
当前线程2 call ... defaultEventExecutorGroup-4-1
可以知道,将任务提交到线程池中的操作将不会再是一个线程去执行,而是有多个线程去执行,这样就不会阻塞io线程。
我们来debug,来看看源码:
ctx.writeAndFlush(Unpooled.copiedBuffer("hello 任务2",CharsetUtil.UTF_8));
根据追踪会执行到这里
 private void write(Object msg, boolean flush, ChannelPromise promise) {
        AbstractChannelHandlerContext next = findContextOutbound();
        final Object m = pipeline.touch(msg, next);
        EventExecutor executor = next.executor();
        //先判断是否是当前线程
        if (executor.inEventLoop()) {
            if (flush) {
                next.invokeWriteAndFlush(m, promise);
            } else {
                next.invokeWrite(m, promise);
            }
        } else {
            AbstractWriteTask task;
        //否则就将当前工作封装成任务到队列中
            if (flush) {
              //包装成任务
                task = WriteAndFlushTask.newInstance(next, m, promise);
            }  else {
                task = WriteTask.newInstance(next, m, promise);
            }
          //执行
            safeExecute(executor, task, promise, m);
        }
    }
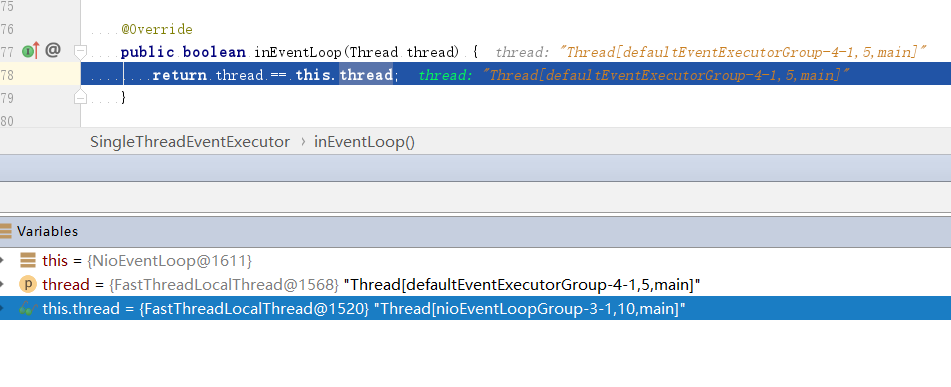
在executor.inEventLoop()追踪,我们发现一个是我们NioEventLoopGroup线程,一个是我们自定义的defaultEventExecutorGroup线程
不是当前线程,会返回false。
说明:
1)当判定下个outbound的executor 线程不是当前线程的时候,会将当前的工作封装成task ,然后放入
mpsc队列中,等待I0任务执行完毕后执行队列中的任务。
2)当我们使用了group .submit(new Callable<Object>O{}在handler 中加入线程池,就会进入到safeExecute(executor, task,
promise, m);如果去掉这段代码,而使用普通方式来执行耗时的业务,那么就不会进入到safeExecute(executor,task, promise, m);
第二种方式在Context中添加线程池
在main方法中加入线程池:
//创建线程池
static EventExecutorGroup eventExecutorGroup = new DefaultEventExecutorGroup(5);


 .childHandler(new ChannelInitializer<SocketChannel>() {//创建一个通道测试对象
                        //给pipeline设置处理器
                        @Override
                        protected void initChannel(SocketChannel ch) throws Exception {
                                ch.pipeline().addLast(eventExecutorGroup,new NettyHandelServer3());//调用处理器
                        }
                    });
addLast()方法中,加一个线程池。
这时候handler里面的线程就是我们自定义的线程
 /**
     * @param ctx 上下文对象,含有管道pipeline,通道channel,地址
     * @param msg 就是客户端发送的数据默认Object
     * @throws Exception
     */
    @Override
    public void channelRead(ChannelHandlerContext ctx, Object msg) throws Exception {
        System.out.println("当前线程:"+Thread.currentThread().getName());
        Thread.sleep(10*1000);
        System.out.println("当前线程:"+Thread.currentThread().getName());
    }
打印结果:
当前线程:defaultEventExecutorGroup-2-1
当前线程:defaultEventExecutorGroup-2-1
说明:
1) handler中的代码就使用普通的方式来处理耗时业务。
2)当我们在调用addLast 方法添加线程池后,handler将优先使用这个线程池,如果不添加,将使用I0线程
3)当走到AbstractChannelHandlerContext 的invokeChannelRead 方法的时候,executor.inEventLoop( 是不
会通过的,因为当前线程是I0线程Context(也就是Handler) 的executor 是业务线程,所以会异步执行, debug
我们来debug,来看看源码:前面的也是先判断是否是当前线程,否则就会invokeChannelRead()方法,
它会去调用真正的handler执行channelRead()方法:
 static void invokeChannelRead(final AbstractChannelHandlerContext next, Object msg) {
        final Object m = next.pipeline.touch(ObjectUtil.checkNotNull(msg, "msg"), next);
        EventExecutor executor = next.executor();
        if (executor.inEventLoop()) {
            next.invokeChannelRead(m);
        } else {
            executor.execute(new Runnable() {
                @Override
                public void run() {
                    next.invokeChannelRead(m);
                }
            });
        }
    }
private void invokeChannelRead(Object msg) {
        if (invokeHandler()) {
            try {
                ((ChannelInboundHandler) handler()).channelRead(this, msg);
            } catch (Throwable t) {
                notifyHandlerException(t);
            }
        } else {
            fireChannelRead(msg);
        }
    }
handler中加入线程池和Context中添加线程池小结:
两种方式的比较
1)第一种方式在handler 中添加异步,可能更加的自由,比如如果需要访问数据库,那我就异步,如果不需
要,就不异步,异步会拖长接口响应时间。因为需要将任务放进mpscTask 中。如果I0时间很短,task很多,可
能一个循环下来,都没时间执行整个task,导致响应时间达不到指标。
2)第二种方式是Netty 标准方式(即加入到队列),但是,这么做会将整个handler都交给业务线程池。不论
耗时不耗时,都加入到队列里,不够灵活。
3)各有优劣,从灵活性考虑,第-种较好