http://blog.csdn.net/yerenyuan_pku/article/details/52902282
前面我们以一种更加优雅的方式集成了Spring4.2.5+Hibernate4.3.11+Struts1.3.8,但是在实际开发中我们会碰到两个问题,在此先不言表,只通过例子将其引出来。
我们先在SSH项目的根目录WebRoot下新建一个JSP页面——index.jsp,即项目首页,其内容为:
<%@ page language="java" contentType="text/html; charset=UTF-8"
    pageEncoding="UTF-8"%>
<%@ taglib uri="http://struts.apache.org/tags-html" prefix="html" %>
<!DOCTYPE html PUBLIC "-//W3C//DTD HTML 4.01 Transitional//EN" "http://www.w3.org/TR/html4/loose.dtd">
<html>
<head>
<meta http-equiv="Content-Type" content="text/html; charset=UTF-8">
<title>Insert title here</title>
</head>
<body>
    <html:form action="/person/manage" method="post">
        名称:<html:text property="name" />
        <input type="submit" value="提交" />
        <input type="hidden" name="method" value="add">
    </html:form>
</body>
</html>- 1
紧接着,在src目录下新建一个cn.itcast.web.formbean包,并在该包下新建一个类——PersonForm.java,用于封装用户提交的数据。其代码为:
public class PersonForm extends ActionForm {
    private Integer id;
    private String name;
    public Integer getId() {
        return id;
    }
    public void setId(Integer id) {
        this.id = id;
    }
    public String getName() {
        return name;
    }
    public void setName(String name) {
        this.name = name;
    }
}- 1
接下来,在cn.itcast.web.action包下新建一个Action——PersonManageAction.java,用于处理添加用户的请求。其代码为:
public class PersonManageAction extends DispatchAction {
    @Resource PersonService personService;

    public ActionForward add(ActionMapping mapping, ActionForm form, HttpServletRequest request,
            HttpServletResponse response) throws Exception {
        PersonForm formbean = (PersonForm) form;
        personService.save(new Person(formbean.getName()));
        request.setAttribute("message", "添加成功");
        return mapping.findForward("message");
    }
}- 1
顺其自然地,我们还要在Struts配置文件配置该PersonManageAction,这样Struts配置文件的内容就变为:
<?xml version="1.0" encoding="UTF-8" ?>
<!DOCTYPE struts-config PUBLIC
          "-//Apache Software Foundation//DTD Struts Configuration 1.3//EN"
          "http://struts.apache.org/dtds/struts-config_1_3.dtd">

<struts-config>
    <form-beans>
        <form-bean name="personForm" type="cn.itcast.web.formbean.PersonForm"></form-bean>
    </form-beans>
    <action-mappings>
        <action path="/person/list" validate="false">
            <forward name="list" path="/WEB-INF/page/personlist.jsp"></forward>
        </action>
        <action path="/person/manage"
                parameter="method"
                validate="false"
                scope="request"
                name="personForm">
            <forward name="message" path="/WEB-INF/page/message.jsp"></forward>
        </action>
    </action-mappings>

    <controller>
        <set-property property="processorClass"
            value="org.springframework.web.struts.DelegatingRequestProcessor" />
    </controller>

</struts-config>- 1
接下来,我们还要在WEB-INF/page目录下新建一个全局消息显示页面——message.jsp,其内容为:
<%@ page language="java" contentType="text/html; charset=UTF-8"
    pageEncoding="UTF-8"%>
<!DOCTYPE html PUBLIC "-//W3C//DTD HTML 4.01 Transitional//EN" "http://www.w3.org/TR/html4/loose.dtd">
<html>
<head>
<meta http-equiv="Content-Type" content="text/html; charset=UTF-8">
<title>Insert title here</title>
</head>
<body>
    ${message } <br/>
</body>
</html>- 1
最后,我们不要忘了将PersonManageAction交给Spring管理,即需要在Spring配置文件中添加如下配置:
<bean name="/person/manage" class="cn.itcast.web.action.PersonManageAction" />上面一切工作准备好之后,我们就来引出其中一个问题。我们通过浏览器访问url地址:http://localhost:8080/SSH/,可以看到如下结果: 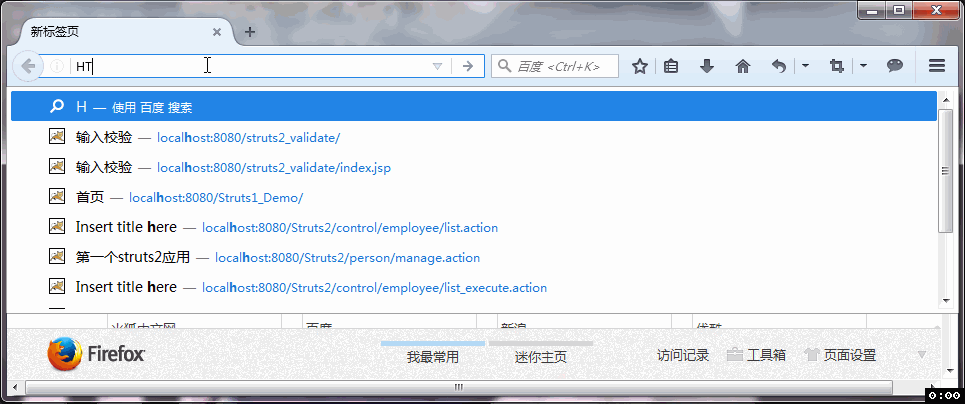
虽然我们添加用户是成功了,但是当我们查询数据库person表时,发现存进去的用户名是乱码,如下图所示: 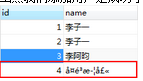
很显然,我们遇到的第一个问题就是当在使用Struts来做增删改查的时候,会发现当我们发送请求参数过去时,Struts得到的中文字符会是乱码,那么我们怎么样解决掉Struts的乱码问题呢?我们在Web应用里面可以使用Spring给我们提供的Filter来解决掉这个问题。即在web.xml文件中添加如下配置:
<filter>
    <filter-name>encoding</filter-name>
    <filter-class>org.springframework.web.filter.CharacterEncodingFilter</filter-class>
    <init-param>
        <param-name>encoding</param-name>
        <param-value>UTF-8</param-value>
    </init-param>
</filter>
<filter-mapping>
    <filter-name>encoding</filter-name>
    <url-pattern>/*</url-pattern>
</filter-mapping>- 1
这样,使用Spring就解决了Struts1.3.8的乱码问题了。
当我们使用Struts1.3.8、Spring4.2.5、Hibernate4.3.11进行开发时,还有一个问题——我们经常使用Hibernate的延迟属性时,经常遇到这样的异常,说session被关闭了,导致获取延迟属性的时候,出现一个延迟加载异常,我们在开发应用的时候,经常会出现这种错误。这种错误我们在Web应用里面也可以使用Spring给我们提供的Filter来解决这个问题。即在web.xml文件中添加如下配置:
<filter>
    <filter-name>OpenSessionInViewFilter</filter-name>
    <filter-class>org.springframework.orm.hibernate4.support.OpenSessionInViewFilter</filter-class>
</filter>
<filter-mapping>
    <filter-name>OpenSessionInViewFilter</filter-name>
    <url-pattern>/*</url-pattern>
</filter-mapping>- 1
这样,使用Spring就解决了Hibernate因session关闭导致的延迟加载异常问题。解决这个问题之后,session是在请求到来时打开,在请求结束时关闭,它横跨Servlet和Jsp,所以当Jsp需要用到某个延迟属性时,这时session仍然处于一种打开状态,所以说它不会出现延迟加载异常。这个在实际开发中非常有用,非常方便。
最终,整个web.xml文件的内容就应为:
<?xml version="1.0" encoding="UTF-8"?>
<web-app xmlns:xsi="http://www.w3.org/2001/XMLSchema-instance"
    xmlns="http://xmlns.jcp.org/xml/ns/javaee"
    xsi:schemaLocation="http://xmlns.jcp.org/xml/ns/javaee http://xmlns.jcp.org/xml/ns/javaee/web-app_3_1.xsd"
    id="WebApp_ID" version="3.1">
    <display-name>SSH</display-name>

    <!-- 指定spring的配置文件,默认从web根目录寻找配置文件,我们可以通过spring提供的classpath:前缀指定从类路径下寻找 -->
    <context-param>
        <param-name>contextConfigLocation</param-name>
        <param-value>classpath:beans.xml</param-value>
    </context-param>
    <!-- 对Spring容器进行实例化 -->
    <listener>
        <listener-class>org.springframework.web.context.ContextLoaderListener</listener-class>
    </listener>

    <filter>
        <filter-name>encoding</filter-name>
        <filter-class>org.springframework.web.filter.CharacterEncodingFilter</filter-class>
        <init-param>
            <param-name>encoding</param-name>
            <param-value>UTF-8</param-value>
        </init-param>
    </filter>
    <filter-mapping>
        <filter-name>encoding</filter-name>
        <url-pattern>/*</url-pattern>
    </filter-mapping>

    <filter>
        <filter-name>OpenSessionInViewFilter</filter-name>
        <filter-class>org.springframework.orm.hibernate4.support.OpenSessionInViewFilter</filter-class>
    </filter>
    <filter-mapping>
        <filter-name>OpenSessionInViewFilter</filter-name>
        <url-pattern>/*</url-pattern>
    </filter-mapping>

    <servlet>
        <servlet-name>struts</servlet-name>
        <servlet-class>org.apache.struts.action.ActionServlet</servlet-class>
        <init-param>
            <param-name>config</param-name>
            <param-value>/WEB-INF/struts-config.xml</param-value>
        </init-param>
        <load-on-startup>0</load-on-startup>
    </servlet>
    <servlet-mapping>
        <servlet-name>struts</servlet-name>
        <url-pattern>*.do</url-pattern>
    </servlet-mapping>

    <welcome-file-list>
        <welcome-file>index.html</welcome-file>
        <welcome-file>index.htm</welcome-file>
        <welcome-file>index.jsp</welcome-file>
        <welcome-file>default.html</welcome-file>
        <welcome-file>default.htm</welcome-file>
        <welcome-file>default.jsp</welcome-file>
    </welcome-file-list>
</web-app>如须查看源码,可点击Spring提供的CharacterEncoding和OpenSessionInView功能进行下载。