参考博客: @ConfigurationProperties 注解使用姿势,这一篇就够了
一、注解的作用:
@ConfigurationProperties注解的作用就是获取我们配置的参数值,这些参数一般配置在application.properties或者application.yml中。
二、使@ConfigurationProperties生效的几种方式
1.使用在配置类上,使用@Configuration或者@Component注解,让component scan扫描到。
2.在java配置类中,使用@Bean返回被@ConfigurationProperties标注的配置类。
3.使用@EnableConfigurationProperties
三、代码:
application.yml配置:
server:
  port: 8080
  servlet:
    context-path: /helloSpring


website:
  name: bianchengbang
  url: www.biancheng.net
  pets:
    - dog
    - cat
    - pig

#将这些person属性全部映射到配置文件PersonProperties.java上
person:
  lastName: 张三
  age: 18
  boss: true
  pets:
    - dog
    - cat
    - pig

student:
  name: 王子奇
  age: 12

teacher:
  lesson: mathematics
  gender: female
PersonProperties.java:
package com.cy.config;

import org.springframework.boot.context.properties.ConfigurationProperties;
import org.springframework.context.annotation.Configuration;

import java.util.List;

/**
 * 将配置文件中配置的每一个属性的值,映射到这个组件中
 */
@Configuration
@ConfigurationProperties(prefix = "person")
public class PersonProperties {

    private String lastName;

    private Integer age = 10;               //会被application.yml中配置的属性覆盖

    private Boolean boss = Boolean.FALSE;   //会被application.yml中配置的属性覆盖

    private List<String> pets;

    public Integer getAge() {
        return age;
    }

    public void setAge(Integer age) {
        this.age = age;
    }

    public Boolean getBoss() {
        return boss;
    }

    public void setBoss(Boolean boss) {
        this.boss = boss;
    }

    public List<String> getPets() {
        return pets;
    }

    public void setPets(List<String> pets) {
        this.pets = pets;
    }

    public String getLastName() {
        return lastName;
    }

    public void setLastName(String lastName) {
        this.lastName = lastName;
    }
}
StudentProperties.java:
package com.cy.config;

import lombok.Data;
import org.springframework.boot.context.properties.ConfigurationProperties;

@Data
@ConfigurationProperties(prefix = "student")
public class StudentProperties {

    private String name;

    private Integer age;
}
TeacherProperties.java:
package com.cy.config;

import lombok.Data;
import org.springframework.boot.context.properties.ConfigurationProperties;

@Data
@ConfigurationProperties(prefix = "teacher")
public class TeacherProperties {

    private String lesson;

    private String gender;
}
PropertiesConfig.java:
package com.cy.config;

import org.springframework.boot.context.properties.EnableConfigurationProperties;
import org.springframework.context.annotation.Bean;
import org.springframework.context.annotation.Configuration;

/**
 * 1.使用 @EnableConfigurationProperties 注解让我们的类(TeacherProperties)被 Spring Boot 所知道,
 *   激活@ConfigurationProperties
 */
@Configuration
@EnableConfigurationProperties(TeacherProperties.class)
public class PropertiesConfig {

    /**
     * 通过 Spring 的 Java Configuration 特性实现
     * 将StudentProperties配置属性@ConfigurationProperties激活
     */
    @Bean
    public StudentProperties studentProperties(){
        return new StudentProperties();
    }
}
测试代码,HelloController.java:
package com.cy.controller;

import com.cy.config.PersonProperties;
import com.cy.config.StudentProperties;
import com.cy.config.TeacherProperties;
import org.springframework.beans.factory.annotation.Autowired;
import org.springframework.beans.factory.annotation.Value;
import org.springframework.stereotype.Controller;
import org.springframework.web.bind.annotation.RequestMapping;
import org.springframework.web.bind.annotation.ResponseBody;

import java.util.HashMap;
import java.util.Map;

@Controller
public class HelloController {

    @Autowired
    private PersonProperties personProperties;

    @Autowired
    private StudentProperties studentProperties;

    @Autowired
    private TeacherProperties teacherProperties;

    /**
     * value: 只支持基本数据类型的封装,例如字符串、布尔值、整数等类型。
     */
    @Value("${website.name}")
    private String webSiteName;

    @Value("${website.url}")
    private String webSiteUrl;

    @ResponseBody
    @RequestMapping("/hello")
    public String hello() {
        return "Hello World!";
    }

    /**
     * 将personProperties javabean配置属性打印出来
     * @return
     */
    @ResponseBody
    @RequestMapping("/personProperties")
    public Map<String, Object> personProperties() {
        Map<String, Object> map = new HashMap<>();
        map.put("lastName", personProperties.getLastName());
        map.put("age", personProperties.getAge());
        map.put("isBoss", personProperties.getBoss());
        map.put("pets", personProperties.getPets());
        return map;
    }

    @ResponseBody
    @RequestMapping("/getStudentProps")
    public Map<String, Object> getStudentProps() {
        Map<String, Object> map = new HashMap<>();
        map.put("student name", studentProperties.getName());
        map.put("student age", studentProperties.getAge());
        return map;
    }

    @ResponseBody
    @RequestMapping("/getTeacherProps")
    public Map<String, Object> getTeacherProps() {
        Map<String, Object> map = new HashMap<>();
        map.put("teacher lesson", teacherProperties.getLesson());
        map.put("teacher gender", teacherProperties.getGender());
        return map;
    }

    @ResponseBody
    @RequestMapping("/getWebSiteProps")
    public String getWebSiteProps() {
        return "webSiteName: " + webSiteName + " webSiteUrl: " + webSiteUrl;
    }

}
测试结果:
输入 http://localhost:8080/helloSpring/personProperties
{"pets":["dog","cat","pig"],"lastName":"张三","isBoss":true,"age":18}
输入 http://localhost:8080/helloSpring/getStudentProps
{"student age":12,"student name":"王子奇"}
输入 http://localhost:8080/helloSpring/getTeacherProps
{"teacher lesson":"mathematics","teacher gender":"female"}
输入 http://localhost:8080/helloSpring/getWebSiteProps
webSiteName: bianchengbang webSiteUrl: www.biancheng.net
四、@PropertySource使用
如果将所有的配置都集中到 application.properties 或 application.yml 中,那么这个配置文件会十分的臃肿且难以维护,因此我们通常会将与 Spring Boot 无关的配置(例如自定义配置)提取出来,写在一个单独的配置文件中,并在对应的 JavaBean 上使用 @PropertySource 注解指向该配置文件。

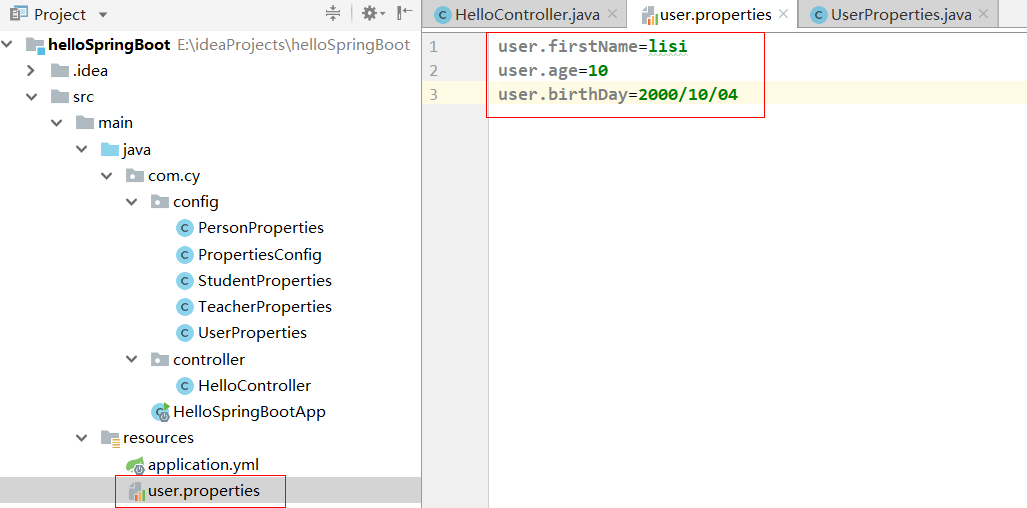
新建user.properties配置文件:放在classpath下面
user.firstName=lisi
user.age=10
user.birthDay=2000/10/04
UserProperties.java:
 1 package com.cy.config;
 2
 3 import lombok.Data;
 4 import org.springframework.boot.context.properties.ConfigurationProperties;
 5 import org.springframework.context.annotation.PropertySource;
 6 import org.springframework.stereotype.Component;
 7
 8 @PropertySource(value = "classpath:user.properties")//指向对应的配置文件
 9 @Component
10 @ConfigurationProperties(prefix = "user")
11 @Data
12 public class UserProperties {
13     private String firstName;
14
15     private String age;
16
17     private String birthDay;
18 }
HelloController.java中进行使用:
package com.cy.controller;

import com.cy.config.PersonProperties;
import com.cy.config.StudentProperties;
import com.cy.config.TeacherProperties;
import com.cy.config.UserProperties;
import org.springframework.beans.factory.annotation.Autowired;
import org.springframework.beans.factory.annotation.Value;
import org.springframework.stereotype.Controller;
import org.springframework.web.bind.annotation.RequestMapping;
import org.springframework.web.bind.annotation.ResponseBody;

import java.util.HashMap;
import java.util.Map;

@Controller
public class HelloController {

    @Autowired
    private UserProperties userProperties;


    @ResponseBody
    @RequestMapping("/getUserProps")
    public Map<String, Object> getUserProps() {
        Map<String, Object> map = new HashMap<>();
        map.put("user name", userProperties.getFirstName());
        map.put("user age", userProperties.getAge());
        map.put("user birthDay", userProperties.getBirthDay());
        return map;
    }

}
浏览器访问:http://localhost:8080/helloSpring/getUserProps,输出:
{"user name":"lisi","user birthDay":"2000/10/04","user age":"10"}
五、小记
1.这些注解的使用,代码中的例子比较简单。更多详细使用可见看考博客。
2.@Value的使用例子中也有,一般是在单个属性的使用中,可以看@Value和@ConfigurationProperties的区别。http://c.biancheng.net/spring_boot/config-bind.html
---