WordPress是使用PHP语言开发的博客平台,用户可以在支持PHP和MySQL数据库的服务器上架设属于自己的网站。也可以把 WordPress当作一个内容管理系统(CMS)来使用。
搭建WordPress 要分搭建php apache mysql 环境、配置数据库、安装WordPress
第一部分:搭建php apache mysql 环境,分开来搭建这些环境比较复杂,网络上有现成的工具包类似一键安装就能把环境搭建好,这个工具就是XAMPP 。这一部分步骤如下:
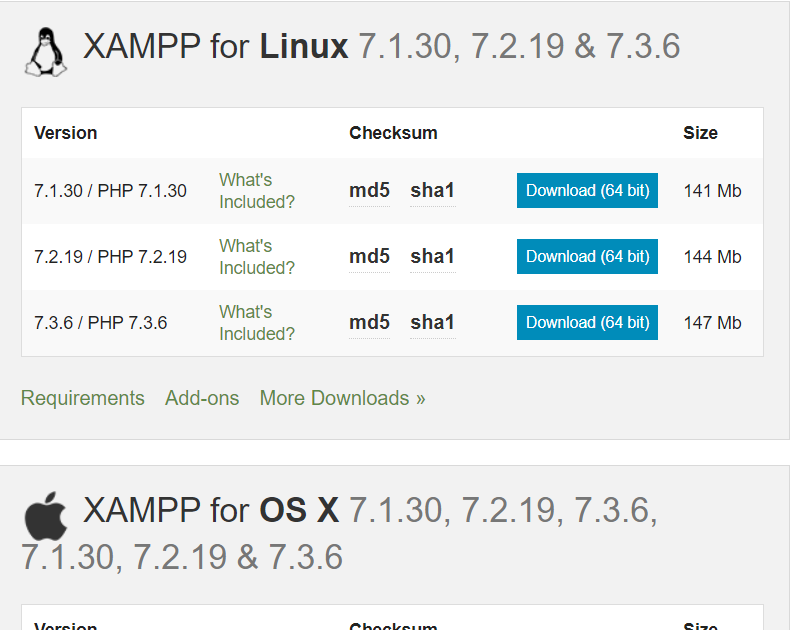
1、下载XAMPP ,下载地址:https://www.apachefriends.org/download.html 有windows、linux、macOS平台的可以下载。选择适合自己的系统。我这里下载的是linux版本
2、执行下载文件:xampp-linux-x64-7.2.8-0-installer.run ,把下载文件上传到centos服务器/opt 目录下。执行命令: ./xampp-linux-x64-7.2.8-0-installer.run (如果安装文件没有可执行权限,执行命令chmod +x xampp-linux-x64-7.2.8-0-installer.run 赋给可执行权限)。在执行过程中会遇到确认提示,选择y或者n,这里都选择y。选择完成后再和你确认安装路径安装在:/opt/lampp 目录下
[root@bogon opt]# pwd
/opt
[root@bogon opt]# ls
xampp-linux-x64-7.2.8-0-installer.run
[root@bogon opt]# ./xampp-linux-x64-7.2.8-0-installer.run
----------------------------------------------------------------------------
Welcome to the XAMPP Setup Wizard.

----------------------------------------------------------------------------
Select the components you want to install; clear the components you do not want
to install. Click Next when you are ready to continue.

XAMPP Core Files : Y (Cannot be edited)

XAMPP Developer Files [Y/n] :y

Is the selection above correct? [Y/n]: y

----------------------------------------------------------------------------
Installation Directory

XAMPP will be installed to /opt/lampp
Press [Enter] to continue:

----------------------------------------------------------------------------
Setup is now ready to begin installing XAMPP on your computer.

Do you want to continue? [Y/n]: y

----------------------------------------------------------------------------
Please wait while Setup installs XAMPP on your computer.

 Installing
 0% ______________ 50% ______________ 100%
 #########################################

----------------------------------------------------------------------------
Setup has finished installing XAMPP on your computer.

[root@bogon opt]#
3、安装xampp完成后,可以通过命令来启动xampp环境
/opt/lampp/lampp start 启动
/opt/lampp/lampp stop 停止
/opt/lampp/lampp restart 重启
启动后,可以通过ps -aef |grep lampp 来查看lampp 环境是否正常启动。如下提示中,可以看出Apache 和MySQL都启动正常
[root@bogon opt]# /opt/lampp/lampp stop
Stopping XAMPP for Linux 7.2.8-0...
XAMPP: Stopping Apache...ok.
XAMPP: Stopping MySQL...ok.
XAMPP: Stopping ProFTPD...not running.
[root@bogon opt]# /opt/lampp/lampp start
Starting XAMPP for Linux 7.2.8-0...
XAMPP: Starting Apache...ok.
XAMPP: Starting MySQL...ok.
XAMPP: Starting ProFTPD...fail.
Contents of "/opt/lampp/var/proftpd/start.err":
bogon proftpd[8021]: warning: unable to determine IP address of 'bogon'
bogon proftpd[8021]: error: no valid servers configured
bogon proftpd[8021]: Fatal: error processing configuration file '/opt/lampp/etc/proftpd.conf'
[root@bogon opt]# /opt/lampp/lampp restart
Restarting XAMPP for Linux 7.2.8-0...
XAMPP: Stopping Apache...ok.
XAMPP: Stopping MySQL...ok.
XAMPP: Stopping ProFTPD...not running.
XAMPP: Starting Apache...ok.
XAMPP: Starting MySQL...ok.
XAMPP: Starting ProFTPD...fail.
Contents of "/opt/lampp/var/proftpd/start.err":
bogon proftpd[8289]: warning: unable to determine IP address of 'bogon'
bogon proftpd[8289]: error: no valid servers configured
bogon proftpd[8289]: Fatal: error processing configuration file '/opt/lampp/etc/proftpd.conf'
[root@bogon opt]# ps -aef |grep lampp
root       8272      1  0 06:27 ?        00:00:00 /opt/lampp/bin/httpd -k start -E /opt/lampp/logs/error_log -DSSL -DPHP
daemon     8280   8272  0 06:27 ?        00:00:00 /opt/lampp/bin/httpd -k start -E /opt/lampp/logs/error_log -DSSL -DPHP
daemon     8290   8272  0 06:27 ?        00:00:00 /opt/lampp/bin/httpd -k start -E /opt/lampp/logs/error_log -DSSL -DPHP
daemon     8292   8272  0 06:27 ?        00:00:00 /opt/lampp/bin/httpd -k start -E /opt/lampp/logs/error_log -DSSL -DPHP
daemon     8294   8272  0 06:27 ?        00:00:00 /opt/lampp/bin/httpd -k start -E /opt/lampp/logs/error_log -DSSL -DPHP
daemon     8296   8272  0 06:27 ?        00:00:00 /opt/lampp/bin/httpd -k start -E /opt/lampp/logs/error_log -DSSL -DPHP
daemon     8297   8272  0 06:27 ?        00:00:00 /opt/lampp/bin/httpd -k start -E /opt/lampp/logs/error_log -DSSL -DPHP
root       8299      1  0 06:27 pts/0    00:00:00 /bin/sh /opt/lampp/bin/mysqld_safe --datadir=/opt/lampp/var/mysql --pid-file=/opt/lampp/var/mysql/bogon.pid
mysql      8448   8299  5 06:27 pts/0    00:00:00 /opt/lampp/sbin/mysqld --basedir=/opt/lampp --datadir=/opt/lampp/var/mysql --plugin-dir=/opt/lampp/lib/mysql/
4、关闭Centos7 防火墙命令:systemctl stop firewalld.service,关闭防火墙后,可以从外部访问到这台服务器,到此,第一部分完成
第二部分:配置数据库,数据库服务在第一部分一键安装好了,还需要配置下访问权限
1、登录mysql服务,执行命令:/opt/lampp/bin/mysql -uroot
2、登录后执行SQL
use mysql;
select t.host from user t where t.user='root';
GRANT ALL PRIVILEGES ON *.* TO 'root'@'%' IDENTIFIED BY '123456' WITH GRANT OPTION;
GRANT ALL PRIVILEGES ON *.* TO 'root'@'localhost' IDENTIFIED BY '123456' WITH GRANT OPTION;
FLUSH PRIVILEGES;
[root@bogon opt]# /opt/lampp/bin/mysql -uroot
Welcome to the MariaDB monitor.  Commands end with ; or g.
Your MariaDB connection id is 3
Server version: 10.1.34-MariaDB Source distribution

Copyright (c) 2000, 2018, Oracle, MariaDB Corporation Ab and others.

Type 'help;' or 'h' for help. Type 'c' to clear the current input statement.

MariaDB [(none)]> use mysql;
Database changed
MariaDB [mysql]> select t.host from user t where t.user='root';
+-----------+
| host      |
+-----------+
| 127.0.0.1 |
| ::1       |
| localhost |
+-----------+
3 rows in set (0.00 sec)

MariaDB [mysql]> GRANT ALL PRIVILEGES ON *.* TO 'root'@'%' IDENTIFIED BY '123456' WITH GRANT OPTION;
Query OK, 0 rows affected (0.00 sec)

MariaDB [mysql]> GRANT ALL PRIVILEGES ON *.* TO 'root'@'localhost' IDENTIFIED BY '123456' WITH GRANT OPTION;
Query OK, 0 rows affected (0.01 sec)

MariaDB [mysql]> FLUSH PRIVILEGES;
Query OK, 0 rows affected (0.00 sec)

MariaDB [mysql]>
3、登录mysql 服务创建wordpress 数据库,执行命令: /opt/lampp/bin/mysql -uroot -p 弹出输入password ,输入123456。登入后执行SQL:CREATE DATABASE IF NOT EXISTS wordpress DEFAULT CHARSET utf8 COLLATE utf8_general_ci;
[root@bogon opt]# /opt/lampp/bin/mysql -uroot -p
Enter password:
Welcome to the MariaDB monitor.  Commands end with ; or g.
Your MariaDB connection id is 5
Server version: 10.1.34-MariaDB Source distribution

Copyright (c) 2000, 2018, Oracle, MariaDB Corporation Ab and others.

Type 'help;' or 'h' for help. Type 'c' to clear the current input statement.

MariaDB [(none)]> CREATE DATABASE IF NOT EXISTS wordpress DEFAULT CHARSET utf8 COLLATE utf8_general_ci;
Query OK, 1 row affected (0.00 sec)

MariaDB [(none)]> show databases;
+--------------------+
| Database           |
+--------------------+
| information_schema |
| mysql              |
| performance_schema |
| phpmyadmin         |
| test               |
| wordpress          |
+--------------------+
6 rows in set (0.00 sec)

MariaDB [(none)]>
第三部分:安装Wordpress
1、下载Wordpress:https://wordpress.org/download/ 点击Download .tar.gz 下载wordpress 压缩包
2、解压wordepress 到目录/opt/lampp/htdocs/下:tar -xzvf wordpress-5.2.1.tar.gz -C /opt/lampp/htdocs/
3、浏览器中输入http://192.168.1.108/wordpress/index.php ip 为centos7 的ip,由于是首次打开,自动跳转到安装页面http://192.168.1.108/wordpress/wp-admin/setup-config.php
在安装页面,可以看出页面提示的必要数据库信息,这些信息在第二部分已经完成了
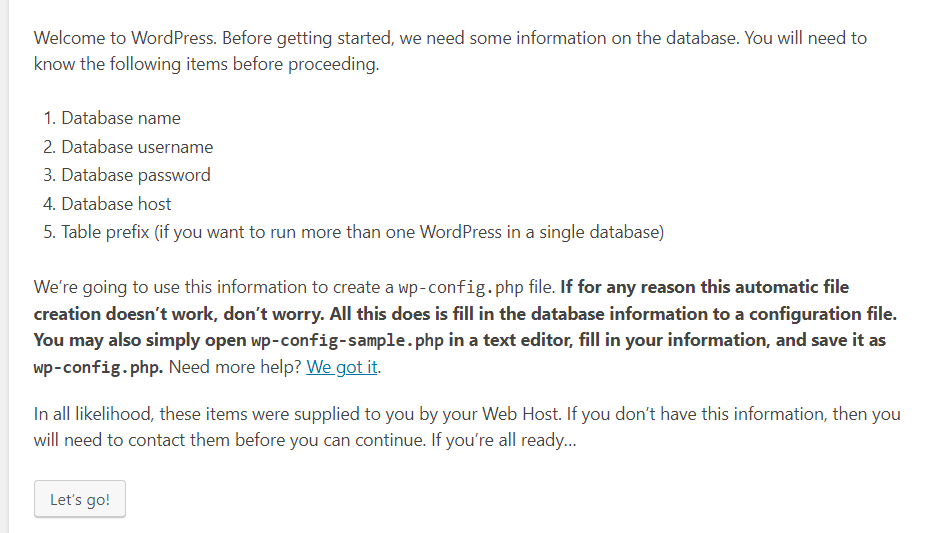
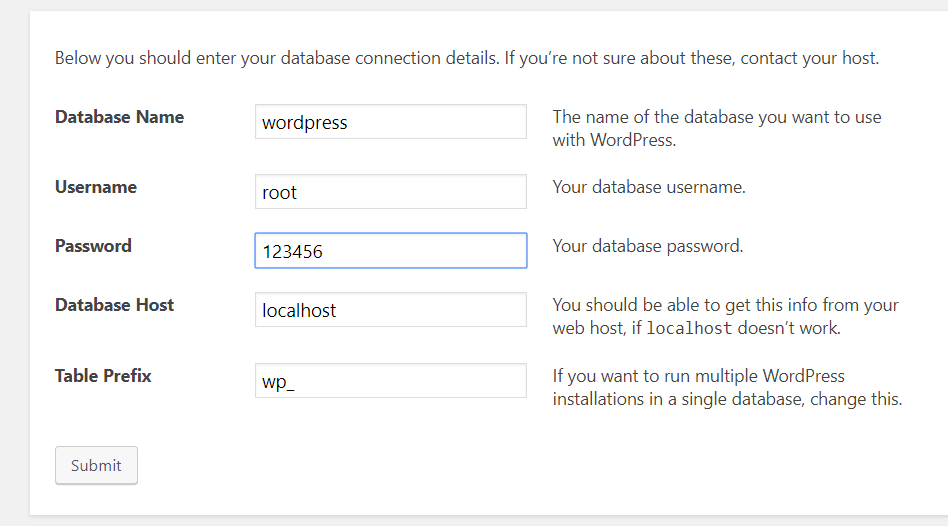
3、点击 【Let‘s go’】 进入填写数据库信息页面,点击【submit】
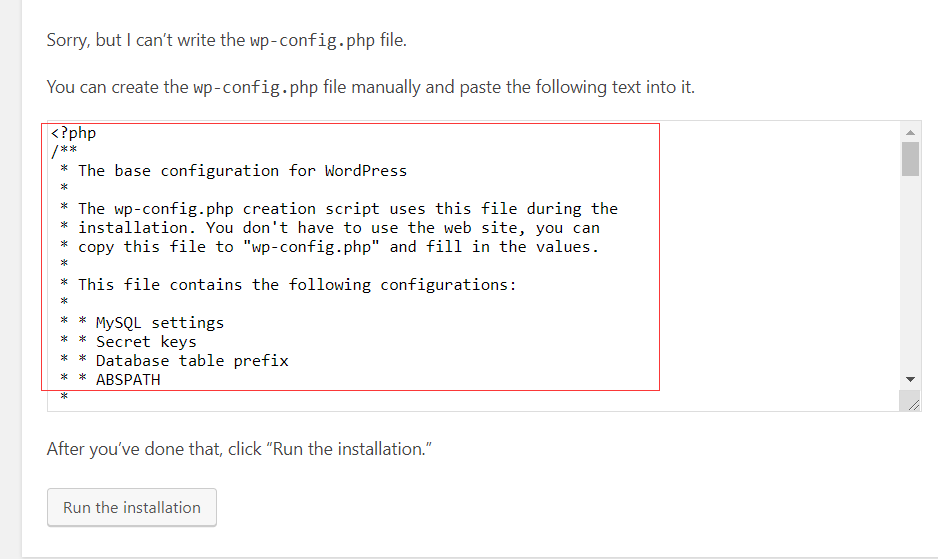
4、如果点击【Submit 】 按钮后出现如下提示:
说明在写wp-config.php 文件的时候没有权限,提示中也给了解决方法,就是手动在wordpress 目录下新建wp-config.php 文件,并且把提示中的代码复制保存到wp-config.php 文件中再点击【run the installation】就能继续安装
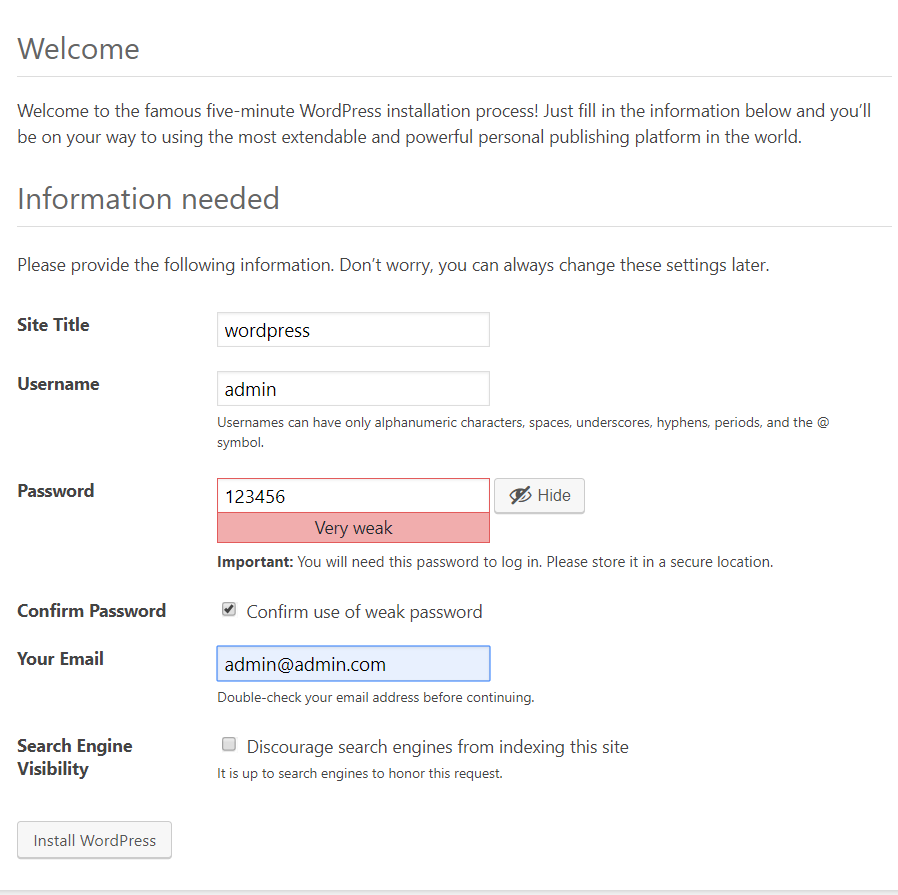
5、输入站点信息,管理员账号密码后 点击【Install WordPress】
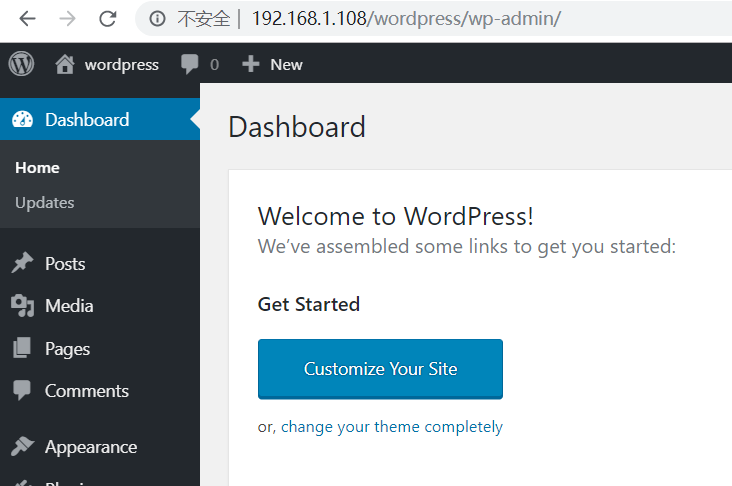
6、安装完成后,进入登录页:http://192.168.1.108/wordpress/wp-login.php,并登录成功,说明安装成功
欢迎关注技术微信公众号: