jmeter脚本需要执行脚本,先得下载jmeter并解压jmeter。如想在maven项目中通过mvn install 直接执行jmx文件,这样就能在测试服务器上通过一个命令就能执行下性能测试了,给自动化执行性能测试找到了一个便捷的途径。怎样实现在maven项目中运行jmx文件呢?jmeter-maven-plugin插件就能帮助我们来实现,具体过程如下:
1、新建一个maven项目,如jmeter-maven,pom主要的依赖有:ApacheJMeter_core、ApacheJMeter_java、jorphan, 再把jmeter-maven-plugin添加到pom的build节点中
<project xmlns="http://maven.apache.org/POM/4.0.0" xmlns:xsi="http://www.w3.org/2001/XMLSchema-instance" xsi:schemaLocation="http://maven.apache.org/POM/4.0.0 http://maven.apache.org/xsd/maven-4.0.0.xsd">
  <modelVersion>4.0.0</modelVersion>
  <groupId>test</groupId>
  <artifactId>jmeter-maven</artifactId>
  <packaging>jar</packaging>
  <version>1.0-SNAPSHOT</version>
  <name>jmeter-maven</name>
  <url>http://maven.apache.org</url>

    <dependencies>
        <dependency>
            <groupId>org.apache.jmeter</groupId>
            <artifactId>ApacheJMeter_core</artifactId>
            <version>5.0</version>
        </dependency>
        <dependency>
            <groupId>org.apache.jmeter</groupId>
            <artifactId>ApacheJMeter_java</artifactId>
            <version>5.0</version>
        </dependency>
        <dependency>
            <groupId>org.apache.jmeter</groupId>
            <artifactId>jorphan</artifactId>
            <version>5.0</version>
        </dependency>

    </dependencies>

    <build>
        <plugins>
            <plugin>
                <groupId>com.lazerycode.jmeter</groupId>
                <artifactId>jmeter-maven-plugin</artifactId>
                <version>2.8.0</version>
                <executions>
                    <execution>
                        <id>jmeter-tests</id>
                        <goals>
                            <goal>jmeter</goal>
                        </goals>
                    </execution>
                </executions>
            </plugin>
        </plugins>
    </build>
</project>
2、新建一个访问打开百度搜索页的jmx文件,放在src/test/jmeter 文件夹下(jmeter 文件夹是新建的,在执行性能测试的时候jmeter-maven插件到这个地方来找jmx 文件)
<?xml version="1.0" encoding="UTF-8"?>
<jmeterTestPlan version="1.2" properties="5.0" jmeter="5.0 r1840935">
  <hashTree>
    <TestPlan guiclass="TestPlanGui" testclass="TestPlan" testname="Test Plan" enabled="true">
      <stringProp name="TestPlan.comments"></stringProp>
      <boolProp name="TestPlan.functional_mode">false</boolProp>
      <boolProp name="TestPlan.tearDown_on_shutdown">true</boolProp>
      <boolProp name="TestPlan.serialize_threadgroups">false</boolProp>
      <elementProp name="TestPlan.user_defined_variables" elementType="Arguments" guiclass="ArgumentsPanel" testclass="Arguments" testname="User Defined Variables" enabled="true">
        <collectionProp name="Arguments.arguments"/>
      </elementProp>
      <stringProp name="TestPlan.user_define_classpath"></stringProp>
    </TestPlan>
    <hashTree>
      <ThreadGroup guiclass="ThreadGroupGui" testclass="ThreadGroup" testname="Thread Group" enabled="true">
        <stringProp name="ThreadGroup.on_sample_error">continue</stringProp>
        <elementProp name="ThreadGroup.main_controller" elementType="LoopController" guiclass="LoopControlPanel" testclass="LoopController" testname="Loop Controller" enabled="true">
          <boolProp name="LoopController.continue_forever">false</boolProp>
          <stringProp name="LoopController.loops">100</stringProp>
        </elementProp>
        <stringProp name="ThreadGroup.num_threads">10</stringProp>
        <stringProp name="ThreadGroup.ramp_time">1</stringProp>
        <boolProp name="ThreadGroup.scheduler">false</boolProp>
        <stringProp name="ThreadGroup.duration"></stringProp>
        <stringProp name="ThreadGroup.delay"></stringProp>
      </ThreadGroup>
      <hashTree>
        <HTTPSamplerProxy guiclass="HttpTestSampleGui" testclass="HTTPSamplerProxy" testname="HTTP Request" enabled="true">
          <elementProp name="HTTPsampler.Arguments" elementType="Arguments" guiclass="HTTPArgumentsPanel" testclass="Arguments" testname="User Defined Variables" enabled="true">
            <collectionProp name="Arguments.arguments"/>
          </elementProp>
          <stringProp name="HTTPSampler.domain">www.baidu.com</stringProp>
          <stringProp name="HTTPSampler.port"></stringProp>
          <stringProp name="HTTPSampler.protocol"></stringProp>
          <stringProp name="HTTPSampler.contentEncoding">utf-8</stringProp>
          <stringProp name="HTTPSampler.path"></stringProp>
          <stringProp name="HTTPSampler.method">GET</stringProp>
          <boolProp name="HTTPSampler.follow_redirects">true</boolProp>
          <boolProp name="HTTPSampler.auto_redirects">false</boolProp>
          <boolProp name="HTTPSampler.use_keepalive">true</boolProp>
          <boolProp name="HTTPSampler.DO_MULTIPART_POST">false</boolProp>
          <stringProp name="HTTPSampler.embedded_url_re"></stringProp>
          <stringProp name="HTTPSampler.connect_timeout"></stringProp>
          <stringProp name="HTTPSampler.response_timeout"></stringProp>
        </HTTPSamplerProxy>
        <hashTree>
          <ResponseAssertion guiclass="AssertionGui" testclass="ResponseAssertion" testname="Response Assertion" enabled="true">
            <collectionProp name="Asserion.test_strings">
              <stringProp name="49586">200</stringProp>
            </collectionProp>
            <stringProp name="Assertion.custom_message"></stringProp>
            <stringProp name="Assertion.test_field">Assertion.response_code</stringProp>
            <boolProp name="Assertion.assume_success">false</boolProp>
            <intProp name="Assertion.test_type">16</intProp>
          </ResponseAssertion>
          <hashTree/>
        </hashTree>
        <ResultCollector guiclass="ViewResultsFullVisualizer" testclass="ResultCollector" testname="View Results Tree" enabled="true">
          <boolProp name="ResultCollector.error_logging">false</boolProp>
          <objProp>
            <name>saveConfig</name>
            <value class="SampleSaveConfiguration">
              <time>true</time>
              <latency>true</latency>
              <timestamp>true</timestamp>
              <success>true</success>
              <label>true</label>
              <code>true</code>
              <message>true</message>
              <threadName>true</threadName>
              <dataType>true</dataType>
              <encoding>false</encoding>
              <assertions>true</assertions>
              <subresults>true</subresults>
              <responseData>false</responseData>
              <samplerData>false</samplerData>
              <xml>false</xml>
              <fieldNames>true</fieldNames>
              <responseHeaders>false</responseHeaders>
              <requestHeaders>false</requestHeaders>
              <responseDataOnError>false</responseDataOnError>
              <saveAssertionResultsFailureMessage>true</saveAssertionResultsFailureMessage>
              <assertionsResultsToSave>0</assertionsResultsToSave>
              <bytes>true</bytes>
              <sentBytes>true</sentBytes>
              <url>true</url>
              <threadCounts>true</threadCounts>
              <idleTime>true</idleTime>
              <connectTime>true</connectTime>
            </value>
          </objProp>
          <stringProp name="filename"></stringProp>
        </ResultCollector>
        <hashTree/>
        <ResultCollector guiclass="SummaryReport" testclass="ResultCollector" testname="Summary Report" enabled="true">
          <boolProp name="ResultCollector.error_logging">false</boolProp>
          <objProp>
            <name>saveConfig</name>
            <value class="SampleSaveConfiguration">
              <time>true</time>
              <latency>true</latency>
              <timestamp>true</timestamp>
              <success>true</success>
              <label>true</label>
              <code>true</code>
              <message>true</message>
              <threadName>true</threadName>
              <dataType>true</dataType>
              <encoding>false</encoding>
              <assertions>true</assertions>
              <subresults>true</subresults>
              <responseData>false</responseData>
              <samplerData>false</samplerData>
              <xml>false</xml>
              <fieldNames>true</fieldNames>
              <responseHeaders>false</responseHeaders>
              <requestHeaders>false</requestHeaders>
              <responseDataOnError>false</responseDataOnError>
              <saveAssertionResultsFailureMessage>true</saveAssertionResultsFailureMessage>
              <assertionsResultsToSave>0</assertionsResultsToSave>
              <bytes>true</bytes>
              <sentBytes>true</sentBytes>
              <url>true</url>
              <threadCounts>true</threadCounts>
              <idleTime>true</idleTime>
              <connectTime>true</connectTime>
            </value>
          </objProp>
          <stringProp name="filename"></stringProp>
        </ResultCollector>
        <hashTree/>
      </hashTree>
    </hashTree>
  </hashTree>
</jmeterTestPlan>
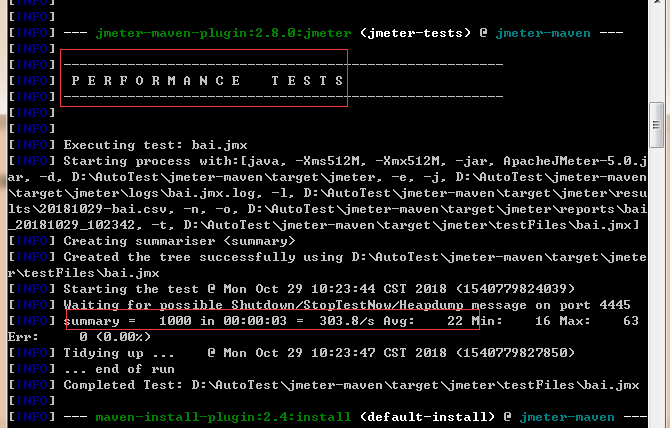
3、执行mvn install 命令,这个版本的jmeter-maven插件需要mvn版本3.5.0 以上,maven 版本要符合要求,执行结果如下图,可以看出在执行mvn install 过程中,执行了性能测试,并且可以看出这次执行的性能测试在3秒内发送了1000次请求
4、 查看结果,执行测试后,在maven项目的target目录下面,有一个jmeter 文件夹,jmeter文件夹如下
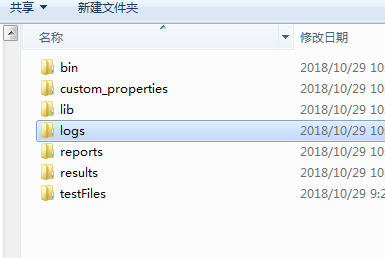
reports 文件夹:保存为html结果

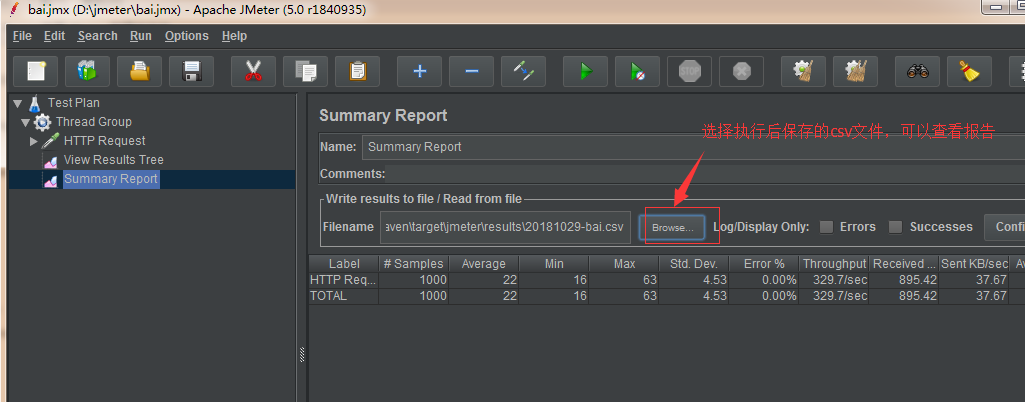
results文件夹:保存了csv 文件,这个csv文件在jmeter的Summary Report界面可以打开
testFiles文件夹:保存执行时的jmx文件
以上为jmeter-maven使用的一个示例,更高级的使用方法可以自定义文件夹参数等,请参考官方网站: https://jmeter.lazerycode.com/
欢迎扫描二维码关注技术公众号:为测,不定时分享技术文章