Security自定义认证授权
security在与springboot整合中,已经写好了认证授权等过滤器。在security中的通过cookie与session机制,将权限放在session中,很显然这种方法不能满足大型应用需求,通过自定义过滤器,可以很快解决这种需求。
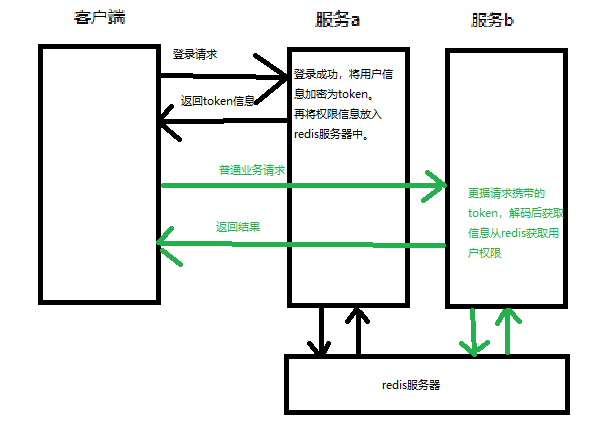
思路
用户通过登录页面请求登录,我们将用户的信息通过jwt加密,放在cookie中;将用户信息作为键,权限作为值放入redis即可实现单点登录。
流程如下:
依赖与配置
maven依赖
		<dependency>
            <groupId>org.springframework.boot</groupId>
            <artifactId>spring-boot-starter-web</artifactId>
        </dependency>

        <dependency>
            <groupId>org.springframework.boot</groupId>
            <artifactId>spring-boot-starter-test</artifactId>
        </dependency>

        <dependency>
            <groupId>org.springframework.boot</groupId>
            <artifactId>spring-boot-starter-security</artifactId>
        </dependency>

        <dependency>
            <groupId>io.jsonwebtoken</groupId>
            <artifactId>jjwt</artifactId>
            <version>0.9.1</version>
        </dependency>

        <dependency>
            <groupId>org.springframework.boot</groupId>
            <artifactId>spring-boot-starter-data-redis</artifactId>
        </dependency>
security核心配置类
	// 无加密器
	@Bean
    PasswordEncoder passwordEncoder() {
        return NoOpPasswordEncoder.getInstance();
    }

    @Autowired
    @Qualifier("redisTemplate")
    private RedisTemplate rt;

	//再内存中添加用户
    @Override
    protected void configure(AuthenticationManagerBuilder auth) throws Exception {
        auth.inMemoryAuthentication().withUser("admin")
                .password("123").roles("admin")
                .and()
                .withUser("sang")
                .password("456")
                .roles("user");
    }

	//添加权限访问
    @Override
    protected void configure(HttpSecurity http) throws Exception {
        http
                .formLogin()
                .and()
                .authorizeRequests()
                .antMatchers("/login")
                .permitAll()
                .antMatchers("/test1").hasRole("user")
                .antMatchers("/test2").hasRole("admin")
                .anyRequest().authenticated()
                .and()
            //将自定义的过滤器放入security中
                .addFilterAt(new MyAuthon(authenticationManager(),rt),UsernamePasswordAuthenticationFilter.class)
                .addFilterAt(new MyBaseFilter(authenticationManager(),rt),UsernamePasswordAuthenticationFilter.class)
                .csrf().disable();
    }
自定义认证
认证环节,我们只用把用户通过请求页面的用户名和密码提取出来,通过security的AuthonticationManager来验证有没有这个用户,实现登陆功能。再将用户的信息加密,塞入cookie返回给客户端,将查询出来的权限信息放入到redis服务器中。
public class MyAuthon extends AbstractAuthenticationProcessingFilter {

protected MyAuthon(AuthenticationManager manager, RedisTemplate redisTemplate) {
        super(new AntPathRequestMatcher("/login", "POST"));
        this.redisTemplate=redisTemplate;
        setAuthenticationManager(manager);
    }

    private RedisTemplate redisTemplate;


//根据输入信息,来进行认证
    @Override
    public Authentication attemptAuthentication(HttpServletRequest httpServletRequest, HttpServletResponse httpServletResponse) throws AuthenticationException, IOException {
        Map<String, String[]> user = httpServletRequest.getParameterMap();
        String username = (user.get("username"))[0];
        String password = (user.get("password"))[0];
        return getAuthenticationManager().authenticate(new UsernamePasswordAuthenticationToken(username,password));
    }

//认证成功
    @Override
    protected void successfulAuthentication(HttpServletRequest request, HttpServletResponse response, FilterChain chain, Authentication authResult) throws IOException, ServletException {
        //获取用户的主要信息,此User为UserDetails的实现类,为默认实现类
        User user = (User) authResult.getPrincipal();
        //根据用户名,将权限放入redis服务器
        redisTemplate.opsForList().leftPushAll(user.getUsername(),user.getAuthorities());
        //jwt加密
        String jwt = Jwts.builder()
                .claim("authorities", user.getUsername())
                .setSubject(authResult.getName())
                .setExpiration(new Date(System.currentTimeMillis() + 10 * 60 * 1000))
                .signWith(SignatureAlgorithm.HS512,"the_stone")
                .compact();
        response.addCookie(new Cookie("authorization",jwt));
        chain.doFilter(request,response);
    }
//认证失败,直接返回
    @Override
    protected void unsuccessfulAuthentication(HttpServletRequest request, HttpServletResponse response, AuthenticationException failed) throws IOException, ServletException {
        response.setContentType("application/json;charset=utf-8");
        PrintWriter out = response.getWriter();
        out.write("登录失败!");
        out.flush();
        out.close();
    }
}
自定义授权
授权环节,需要将用户请求数据中,携带的token数据提取出来。再认证中是塞入cookie中,通过req获取cookie集合遍历就能拿到cookie。将token解密即可获取到用户信息。通过用户信息从redis拉去储存的权限,再放入security上下文即可。
public class MyBaseFilter extends BasicAuthenticationFilter {
    public MyBaseFilter(AuthenticationManager authenticationManager,RedisTemplate redisTemplate) {
        super(authenticationManager);
        this.redisTemplate=redisTemplate;
    }

    private RedisTemplate redisTemplate;

    //授权操作,其实只是将权限放入Security的上下文中
    @Override
    protected void doFilterInternal(HttpServletRequest request, HttpServletResponse response, FilterChain chain) throws IOException, ServletException {
        //获取token
        Cookie[] cookies = request.getCookies();
        for (Cookie cookie : cookies) { if("authorization".equals(cookie.getName())&&cookie.getValue().toString().length()!=0){
                String jwtToken=cookie.getValue();
                System.out.println(jwtToken);
            //解密token,获取用户信息
                Claims claims = Jwts.parser()
                    .setSigningKey("the_stone")
                    .parseClaimsJws(jwtToken).getBody();
                String username = claims.getSubject();
            //从redis中获取权限信息
                Collection<GrantedAuthority> authorities = (Collection<GrantedAuthority>) redisTemplate.opsForList().range(username, 0, -1);
                UsernamePasswordAuthenticationToken token = new UsernamePasswordAuthenticationToken(username, null, authorities);
            //将权限信息放入security的上下文中
                SecurityContextHolder.getContext().setAuthentication(token);
            }
        }
        chain.doFilter(request,response);
    }
}
综上所述,有所不足,请指正!谢谢。