配置storm集群的过程中出现写问题,记录下来
1.storm是通过zookeeper管理的,先要安装zookeeper,从zk官网上下来,我这里下下来的的3.4.9,下载后移动到/usr/local,并解压。
tar -zxvf zookeeper-3.4.9.tar.gz
2.进入conf目录,复制zoo_sample.cfg且改名未zoo.cfg,修改zoo.cfg配置文件
cp zoo_sample.cfg /usr/local/zookeeper-3.4.9/conf/zoo.cfg
打开gedit zoo.cfg,配置:
# The number of milliseconds of each tick
tickTime=2000
# The number of ticks that the initial
# synchronization phase can take
initLimit=10
# The number of ticks that can pass between
# sending a request and getting an acknowledgement
syncLimit=5
# the directory where the snapshot is stored.
# do not use /tmp for storage, /tmp here is just
# example sakes.
dataDir=/tmp/zookeeper
dataLogDir=/tmp/zookeeperlogs
# the port at which the clients will connect
clientPort=2181
# the maximum number of client connections.
# increase this if you need to handle more clients
#maxClientCnxns=60
#
# Be sure to read the maintenance section of the
# administrator guide before turning on autopurge.
#
# http://zookeeper.apache.org/doc/current/zookeeperAdmin.html#sc_maintenance
#
# The number of snapshots to retain in dataDir
#autopurge.snapRetainCount=3
# Purge task interval in hours
# Set to "0" to disable auto purge feature
#autopurge.purgeInterval=1
server.1=192.168.154.129:2888:3888
server.2=192.168.154.133:2888:3888
server.3=192.168.154.132:2888:3888
注意红色部分,这个dataDir 下需要建立 myid,每个myid 的目录要和 dataDir 指定的目录相同,且每个机器的myid 不同,myid的值范围是1-255.
vi myid
3. server.myid=ip:port1:port2,ip 可以是本地的ip,如果在/etc/hosts 配置,也可以用该hosts的配置来制定,port1是默认指定端口,port2备用端口。
之后配置环境变量,vim /etc/profile,将其添加到环境变量中
export ZOOKEEPER_HOME=/usr/local/zookeeper-3.4.9
配置后发送到 另外的两台机器,
scp -r /usr/local/zookeeper-3.4.9 root@192.168.154.133:/usr/local (注意文件要加-r)
输入密码后即可,和上面类似配置zoo.cfg, vi myid ,修改环境变量,创建zookeeper的日志目录。
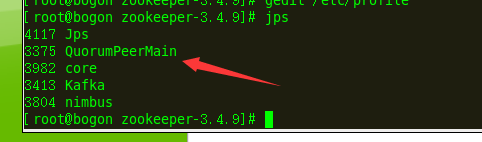
4.启动 zk
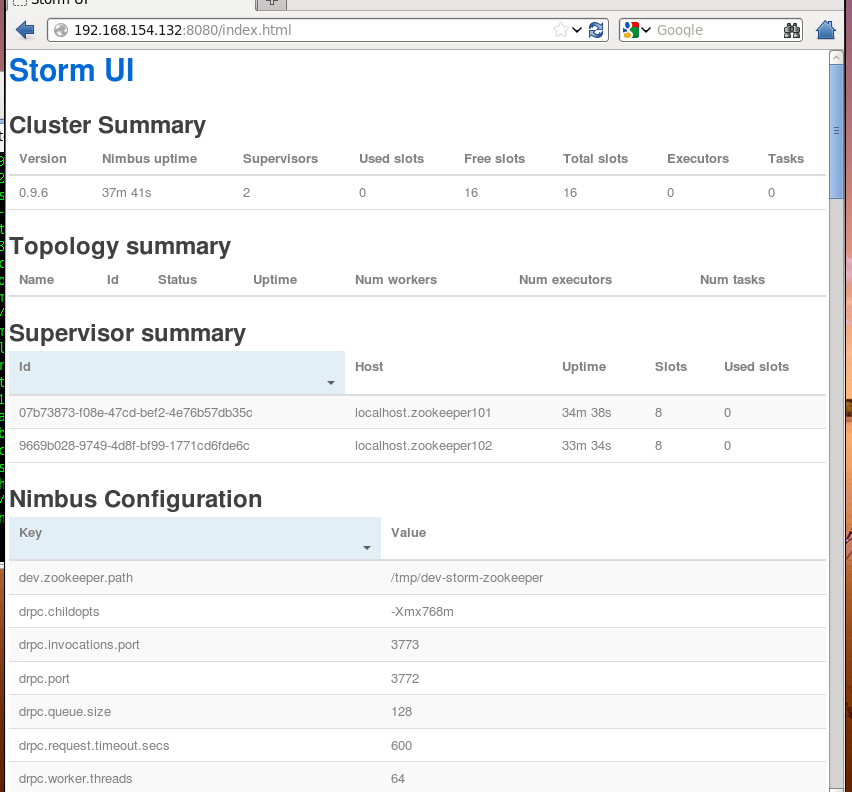
bin/zkServer.sh start ,用jps查看 是否成功,看到有quorumPeerMain显示成功
用bin/zkCli.sh -server 192.168.154.132:2181 测试是否可以链接到另外两台。
5.安装storm
从官网下载storm,我下载的0.9.6,非最新版本,下载后解压到 /usr/local/storm目录下
tar -zxvf apache-storm-0.9.6.tar.gz
6.进入conf目录下,修改storm.yaml
# Licensed to the Apache Software Foundation (ASF) under one
# or more contributor license agreements. See the NOTICE file
# distributed with this work for additional information
# regarding copyright ownership. The ASF licenses this file
# to you under the Apache License, Version 2.0 (the
# "License"); you may not use this file except in compliance
# with the License. You may obtain a copy of the License at
#
# http://www.apache.org/licenses/LICENSE-2.0
#
# Unless required by applicable law or agreed to in writing, software
# distributed under the License is distributed on an "AS IS" BASIS,
# WITHOUT WARRANTIES OR CONDITIONS OF ANY KIND, either express or implied.
# See the License for the specific language governing permissions and
# limitations under the License.
########### These MUST be filled in for a storm configuration
storm.zookeeper.servers:
- "192.168.154.129"
- "192.168.154.132"
- "192.168.154.133"
storm.zookeeper.port: 2181
# - "server1"
# - "server2"
#
nimbus.host: "192.168.154.129"
#
#
# ##### These may optionally be filled in:
#
## List of custom serializations
# topology.kryo.register:
# - org.mycompany.MyType
# - org.mycompany.MyType2: org.mycompany.MyType2Serializer
#
## List of custom kryo decorators
# topology.kryo.decorators:
# - org.mycompany.MyDecorator
#
## Locations of the drpc servers
# drpc.servers:
# - "server1"
# - "server2"
storm.local.dir: "/tmp/storm"
supervisor.slots.ports:
-6700
-6701
-6702
-6703
## Metrics Consumers
# topology.metrics.consumer.register:
# - class: "backtype.storm.metric.LoggingMetricsConsumer"
# parallelism.hint: 1
# - class: "org.mycompany.MyMetricsConsumer"
# parallelism.hint: 1
# argument:
# - endpoint: "metrics-collector.mycompany.org"
注意 上面的红色部分,前面要加上空格,要不会报expected '<document start>', but found BlockMappingStart
in 'reader', line 46, column 1:
supervisor.slots.ports:
我就是这个问题折腾了好久,,经试验原来是这几个配置名称前需要加空格。即: