注明:python版本为3.3.1、Django版本为1.5.1,操作系统为Windows7,其他版本有一些不同的地方读者可以自行探讨。
上一章我们讲到的模型需要通过一定的实践才能逐步掌握熟练,这一章我们来讲讲Django中的管理工具Admin。
我们先来解决几个问题,再来学习。
1、什么是Admin?
Admin是django.contrib包中的第一个部分,说白了就是django.contrib.admin,而contrib是一套庞大的功能集,它是Django基本代码的组成部分,Django框架就是由众多包含附加组件(add-on)的基本代码构成的。 你可以把django.contrib看作是可选的Python标准库或普遍模式的实际实现。 它的存在简化了很多重复性的操作,让开发更加迅速方便。
2、为什么要用Admin?
对于某一类网站,管理界面是基础设施中非常重要的一部分。 这是以网页和有限的可信任管理者为基础的界面,它可以让你添加,编辑和删除网站内容。 一些常见的例子: 你可以用这个界面发布博客,后台的网站管理者用它来润色读者提交的内容,你的客户用你给他们建立的界面工具更新新闻并发布在网站上,这些都是使用管理界面的例子。但是管理界面有一问题: 创建它太繁琐。 当你开发对公众的功能时,网页开发是有趣的,但是创建管理界面通常是千篇一律的。 你必须认证用户,显示并管理表格,验证输入的有效性诸如此类。 这很繁琐而且是重复劳动。
所以我们选择使用Django自带的admin管理界面。至于以后还可以使用contrib中的其他诸如auth等等功能,在以后的教程中将会有所涉及。
3、开始使用
好了,在了解了上述几个问题后咱们开始一步一步的配置好一个Admin管理界面,我们从头开始吧。
1.创建Project为testadmin
django-admin.py startproject testadmin
文档结构如下:
D:\DJCODE\TESTADMIN
|   manage.py
|
\---testadmin
        settings.py
        urls.py
        wsgi.py
        __init__.py
2.配置数据库(在postgreSQL中用pgAdmin新建了一个数据库django)
DATABASES = {
    'default': {
        'ENGINE': 'django.db.backends.postgresql_psycopg2', # Add 'postgresql_psycopg2', 'mysql', 'sqlite3' or 'oracle'.
        'NAME': 'django',                      # Or path to database file if using sqlite3.
        # The following settings are not used with sqlite3:
        'USER': 'postgres',
        'PASSWORD': '911027',
        'HOST': '',                      # Empty for localhost through domain sockets or '127.0.0.1' for localhost through TCP.
        'PORT': '',                      # Set to empty string for default.
    }
}
至于如何验证是否配置成功,请参见第六章模型。
3.创建一个应用为book
python manage.py startapp book
在book文件夹中找到models.py文件,将其代码修改为第六、七章中的代码即可,文件中代码如下:
from django.db import models
class Publisher(models.Model):
    name = models.CharField(max_length=30)
    address = models.CharField(max_length=50)
    city = models.CharField(max_length=60)
    state_province = models.CharField(max_length=30)
    country = models.CharField(max_length=50)
    website = models.URLField()
class Author(models.Model):
    first_name = models.CharField(max_length=30)
    last_name = models.CharField(max_length=40)
    email = models.EmailField()
然后配置app,将其添加到settings.py文件相应的地方,如:
INSTALLED_APPS = (
    'django.contrib.auth',
    'django.contrib.contenttypes',
    'django.contrib.sessions',
    'django.contrib.sites',
    'django.contrib.messages',
    'django.contrib.staticfiles',
    'book',#添加这一项,和前面那章不同,前面的是books,注意别搞错了
    # Uncomment the next line to enable the admin:
    # 'django.contrib.admin',
    # Uncomment the next line to enable admin documentation:
    # 'django.contrib.admindocs',
)
最后验证模型并且执行代码。
D:\Djcode\testadmin>python manage.py validate
0 errors found
D:\Djcode\testadmin>python manage.py syncdb
Creating tables ...
Creating table auth_permission
Creating table auth_group_permissions
Creating table auth_group
Creating table auth_user_groups
Creating table auth_user_user_permissions
Creating table auth_user
Creating table django_content_type
Creating table django_session
Creating table django_site
Creating table book_publisher
Creating table book_author

You just installed Django's auth system, which means you don't have any superuse
rs defined.
Would you like to create one now? (yes/no):
然后再按照下图操作即可。
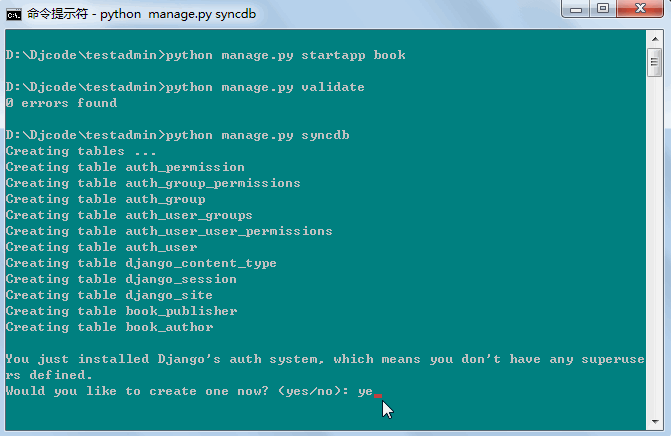
创建后的auth的用户名为:django 密码为:911027
说明:为什么直接跳到Auth的创建过程了呢?因为在settings.py中INSTALLED_APP里面并没有注释掉:
    'django.contrib.auth',
    'django.contrib.contenttypes',
    'django.contrib.sessions',
    'django.contrib.sites',
    'django.contrib.messages',
    'django.contrib.staticfiles',
只要在其前面加上#号即可。
4.配置admin和url
将settings.py中的INSTALLED_APP中的admin选项前面的#好去掉。
    # Uncomment the next line to enable the admin:
    'django.contrib.admin',
    # Uncomment the next line to enable admin documentation:
    'django.contrib.admindocs',
更改urls.py文件代码如下:
from django.conf.urls import patterns, include, url

# Uncomment the next two lines to enable the admin:
from django.contrib import admin#将注释取消
admin.autodiscover()#将注释取消

urlpatterns = patterns('',
    # Examples:
    # url(r'^$', 'testadmin.views.home', name='home'),
    # url(r'^testadmin/', include('testadmin.foo.urls')),

    # Uncomment the admin/doc line below to enable admin documentation:
    url(r'^admin/doc/', include('django.contrib.admindocs.urls')),#将注释取消

    # Uncomment the next line to enable the admin:
    url(r'^admin/', include(admin.site.urls)),#将注释取消
)
输入:http://127.0.0.1:8000/admin/ 访问后看到如下界面。
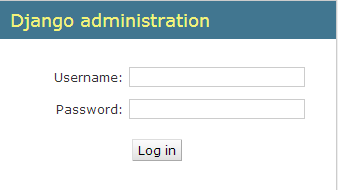
输入用户名django和密码911027即可登陆。
当然如果你的母语不是英语,而你不想用它来配置你的浏览器,你可以做一个快速更改来观察Django管理工具是否被翻译成你想要的语言。 仅需添加django.middleware.locale.LocaleMiddleware 到settings.py文件中MIDDLEWARE_CLASSES设置中,并确保它在django.contrib.sessions.middleware.SessionMiddleware之后。
5.将Models添加到Admin管理界面中
在上一步进入到Admin管理界面后,你只能看到几项简单的操作,其实我们最重要的是对book这个app进行操作,比如添加相关的信息等,那么我们就需要将其注册到Admin管理界面中来。具体如下:
在book目录下创建admin.py文件,其代码如下:
from django.contrib import admin
from book.models import Publisher, Author #这里需要特别注意,此处是book而不要因为看到别的书写成mysite.book
admin.site.register(Publisher)
admin.site.register(Author)
完成后重启web服务,在登陆:http://127.0.0.1:8000/admin/ 界面,你会注意到多了点什么呢?如下图:
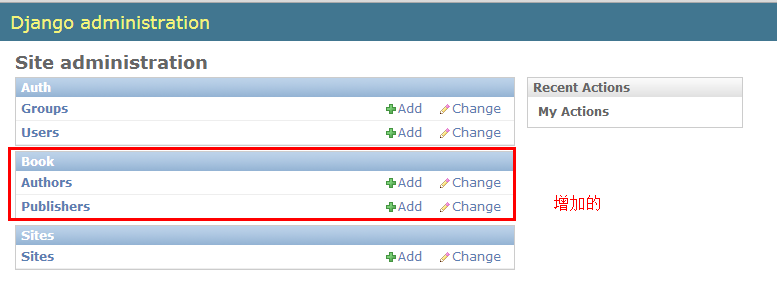
好了,现在可以在这里添加些数据了,你再去数据库看看是不是加上了呢!至于Admin的工作原理和一些使用方法,大家百度百度,自己动手吧。下一章我们讲解一下表单的创建和一些简单的处理吧。
本人既是python的初学者也是Django的初学者,写这一系列教程的目的就是为了加深自己的理解,希望大家多多包涵和指教,有什么问题请留言,谢谢。