1.pom.xml文件添加MyBatis和MySQL等依赖
<project xmlns="http://maven.apache.org/POM/4.0.0" xmlns:xsi="http://www.w3.org/2001/XMLSchema-instance"
  xsi:schemaLocation="http://maven.apache.org/POM/4.0.0 http://maven.apache.org/maven-v4_0_0.xsd">
  <modelVersion>4.0.0</modelVersion>
  <groupId>cn.itsource</groupId>
  <artifactId>springboot-shop</artifactId>
  <packaging>war</packaging>
  <version>0.0.1-SNAPSHOT</version>
  <name>springboot-shop Maven Webapp</name>
  <url>http://maven.apache.org</url>

  <!-- 如果添加了Parent,则dependency中可以不加入version,会自动匹配parent的版本 -->
  <parent>
      <groupId>org.springframework.boot</groupId>
      <artifactId>spring-boot-starter-parent</artifactId>
      <version>1.5.9.RELEASE</version>
  </parent>

  <properties>
      <java.version>1.8</java.version>
      <project.build.sourceEncoding>UTF-8</project.build.sourceEncoding>
    <maven.compiler.encoding>UTF-8</maven.compiler.encoding>
  </properties>

  <dependencies>
    <dependency>
          <groupId>org.springframework.boot</groupId>
          <artifactId>spring-boot-starter-web</artifactId>
      </dependency>
      <dependency>
          <groupId>javax.servlet</groupId>
          <artifactId>javax.servlet-api</artifactId>
          <scope>provided</scope>
      </dependency>
      <!-- 添加servlet依赖 -->
      <dependency>
          <groupId>javax.servlet</groupId>
          <artifactId>jstl</artifactId>
      </dependency>
      <!-- 添加tomcat依赖 -->
      <dependency>
          <groupId>org.springframework.boot</groupId>
          <artifactId>spring-boot-starter-tomcat</artifactId>
          <scope>provided</scope>
      </dependency>
      <dependency>
          <groupId>org.apache.tomcat.embed</groupId>
        <artifactId>tomcat-embed-jasper</artifactId>
      </dependency>
      <!-- 添加json解析依赖 -->
      <dependency>
          <groupId>com.alibaba</groupId>
          <artifactId>fastjson</artifactId>
          <version>1.2.15</version>
      </dependency>

      <!-- 添加mysql依赖 -->
      <dependency>
          <groupId>mysql</groupId>
          <artifactId>mysql-connector-java</artifactId>
      </dependency>

      <!-- 添加mybatis依赖 -->
      <!-- 这里用1.3.1版本 -->
      <dependency>
          <groupId>org.mybatis.spring.boot</groupId>
          <artifactId>mybatis-spring-boot-starter</artifactId>
          <version>1.3.1</version>
      </dependency>

      <!-- 添加mybatis分页依赖 -->
      <!-- GitHub地址:https://github.com/paeghelper/Mybatis-PageHelper -->
      <dependency>
          <groupId>com.github.pagehelper</groupId>
          <artifactId>pagehelper</artifactId>
          <version>4.1.0</version>
      </dependency>

      <!-- 添加spring-data-jpa依赖 -->
      <dependency>
          <groupId>org.springframework.boot</groupId>
          <artifactId>spring-boot-starter-data-jpa</artifactId>
      </dependency>

      <!-- 引入spring-data-jpa依赖,则不需要引入jdbc
      <dependency>
          <groupId>org.springframework.boot</groupId>
          <artifactId>spring-boot-starter-jdbc</artifactId>
      </dependency>
      -->

      <!-- 使用thymeleaf -->
      <dependency>
          <groupId>org.springframework.boot</groupId>
          <artifactId>spring-boot-starter-thymeleaf</artifactId>
      </dependency>

      <!-- 使用devtool热部署插件(推荐) -->
      <dependency>
          <groupId>org.springframework.boot</groupId>
          <artifactId>spring-boot-devtools</artifactId>
          <optional>true</optional>
          <scope>true</scope>
      </dependency>
  </dependencies>

  <build>
    <finalName>myshop</finalName>
    <!-- 热部署插件 -->
    <plugins>
        <plugin>
            <groupId>org.springframework.boot</groupId>
            <artifactId>spring-boot-maven-plugin</artifactId>
            <configuration>
                <!-- 这里得设置为true -->
                <fork>true</fork>
            </configuration>
        </plugin>
    </plugins>
  </build>
</project>
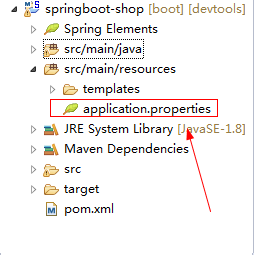
2.修改application.properties的MySQL配置
server.port=8080

spring.mvc.view.prefix=/WEB-INF/jsp/
spring.mvc.view.suffix=.jsp


#thymeleaf
#spring.thymeleaf.prefix=classpath:/templates/
#spring.thymeleaf.suffix=.html
#spring.thymeleaf.mode=HTML5
#spring.thymeleaf.encoding=UTF-8
#spring.thymeleaf.content-type=text/html; charset=utf-8
#spring.thymeleaf.cache=false


#jpa
spring.datasource.url=jdbc:mysql://localhost:3306/shop?useUnicode=true&characterEncoding=utf-8&useSSL=false
spring.datasource.username=root
spring.datasource.password=123456
spring.datasource.driver-class-name=com.mysql.jdbc.Driver
spring.datasource.tomcat.max-active=20
spring.datasource.tomcat.max-idle=8
spring.datasource.tomcat.min-idle=8
spring.datasource.tomcat.initial-size=10


spring.jpa.database=MYSQL
spring.jpa.show-sql=true
spring.jpa.hibernate.ddl-auto=update
spring.jpa.hibernate.naming.strategy=org.hibernate.cfg.ImprovedNamingStrategy
spring.jpa.properties.hibernate.dialect=org.hibernate.dialect.MySQL5Dialect

3.添加测试类
package myshop.bean;

import javax.persistence.Entity;
import javax.persistence.GeneratedValue;
import javax.persistence.GenerationType;
import javax.persistence.Id;

import org.hibernate.annotations.GenericGenerator;

@Entity
public class UserInfo {
    @Id
    @GeneratedValue(strategy=GenerationType.AUTO)
    private int id;
    private String username;
    private String password;

    public int getId() {
        return id;
    }
    public void setId(int id) {
        this.id = id;
    }
    public String getUsername() {
        return username;
    }
    public void setUsername(String username) {
        this.username = username;
    }
    public String getPassword() {
        return password;
    }
    public void setPassword(String password) {
        this.password = password;
    }
}
4. 添加MyBatisMapper
package myshop.mapper;

import java.util.List;

import myshop.bean.UserInfo;

import org.apache.ibatis.annotations.Insert;
import org.apache.ibatis.annotations.Options;
import org.apache.ibatis.annotations.Select;

public interface MyBatisMapper {
    //#{name}是参数占位符
    @Select("select * from user_info where username = #{username}")
    public List<UserInfo> likeName(String username);

    @Select("select * from user_info where id = #{id}")
    public UserInfo getById(int id);

    @Select("select name from user_info where id = #{id}")
    public String getNameById(int id);

    /*
     * 获取自增长id
     *
     * */
    @Insert("insert into user_info(username,password) values(#{username},#{password})")
    @Options(useGeneratedKeys=true,keyProperty="id",keyColumn="id")
    public void save(UserInfo userInfo);
}
5.添加MyBatisService
package myshop.service;

import java.util.List;

import org.springframework.beans.factory.annotation.Autowired;
import org.springframework.stereotype.Service;
import org.springframework.transaction.annotation.Transactional;

import myshop.bean.UserInfo;
import myshop.mapper.MyBatisMapper;

@Service
public class MyBatisService {
    @Autowired
    private MyBatisMapper myBatisMapper;

    public List<UserInfo> likeName(String username)
    {
        return myBatisMapper.likeName(username);
    }

    /*
     * 添加事物
     *
     * */
    @Transactional
    public void save(UserInfo userInfo)
    {
        myBatisMapper.save(userInfo);
    }
}
6.添加MyBatisController
package myshop.controller;

import java.util.List;

import org.springframework.beans.factory.annotation.Autowired;
import org.springframework.web.bind.annotation.RequestMapping;
import org.springframework.web.bind.annotation.RestController;

import com.github.pagehelper.PageHelper;

import myshop.bean.UserInfo;
import myshop.service.MyBatisService;

@RestController
public class MyBatisController {
     @Autowired
     private MyBatisService myBatisService;

     @RequestMapping("/likeName")
     public List<UserInfo> likeName(String username)
     {
         PageHelper.startPage(1,2);
         return myBatisService.likeName(username);
     }

     @RequestMapping("/save")
     public UserInfo save()
     {
         UserInfo userInfo = new UserInfo();
         userInfo.setUsername("天心");
         userInfo.setPassword("123456");
         myBatisService.save(userInfo);
         return userInfo;
     }
}
7.添加启动类
package myshop;

import org.mybatis.spring.annotation.MapperScan;
import org.springframework.boot.SpringApplication;
import org.springframework.boot.autoconfigure.SpringBootApplication;
import org.springframework.boot.autoconfigure.web.HttpMessageConverters;
import org.springframework.context.annotation.Bean;
import org.springframework.http.converter.HttpMessageConverter;

import com.alibaba.fastjson.serializer.SerializerFeature;
import com.alibaba.fastjson.support.config.FastJsonConfig;
import com.alibaba.fastjson.support.spring.FastJsonHttpMessageConverter;

/*
 * 扫描该包下相应的class,主要是MyBatis的持久化类
 *
 * */
@SpringBootApplication
@MapperScan("myshop.mapper")
public class App {
    public HttpMessageConverters fastJsonHttpMessageConverter()
    {
        FastJsonHttpMessageConverter fastConverter = new FastJsonHttpMessageConverter();
        FastJsonConfig fastConfig = new FastJsonConfig();
        fastConfig.setSerializerFeatures(SerializerFeature.PrettyFormat);
        fastConverter.setFastJsonConfig(fastConfig);

        HttpMessageConverter<?> converts = fastConverter;
        return new HttpMessageConverters(converts);
    }

    public static void main(String[] args) {
        // TODO Auto-generated method stub
        SpringApplication.run(App.class, args);
    }

}
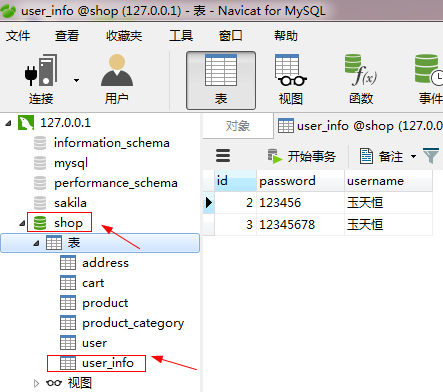
8.添加数据库shop和表user_info

9.运行,访问地址即可
http://localhost:8080/likeName?username=玉天恒