声明式事务
第一节 JdbcTemplate
1、简介
为了在特定领域帮助我们简化代码,Spring 封装了很多 『Template』形式的模板类。例如:RedisTemplate、RestTemplate 等等,包括我们今天要学习的 JDBCTemplate。
2、准备工作
①加入依赖
<dependencies>

    <!-- 基于Maven依赖传递性,导入spring-context依赖即可导入当前所需所有jar包 -->
    <dependency>
        <groupId>org.springframework</groupId>
        <artifactId>spring-context</artifactId>
        <version>5.3.1</version>
    </dependency>

    <!-- Spring 持久化层支持jar包 -->
    <!-- Spring 在执行持久化层操作、与持久化层技术进行整合过程中,需要使用orm、jdbc、tx三个jar包 -->
    <!-- 导入 orm 包就可以通过 Maven 的依赖传递性把其他两个也导入 -->
    <dependency>
        <groupId>org.springframework</groupId>
        <artifactId>spring-orm</artifactId>
        <version>5.3.1</version>
    </dependency>

    <!-- Spring 测试相关 -->
    <dependency>
        <groupId>org.springframework</groupId>
        <artifactId>spring-test</artifactId>
        <version>5.3.1</version>
    </dependency>

    <!-- junit测试 -->
    <dependency>
        <groupId>junit</groupId>
        <artifactId>junit</artifactId>
        <version>4.12</version>
        <scope>test</scope>
    </dependency>

    <!-- MySQL驱动 -->
    <dependency>
        <groupId>mysql</groupId>
        <artifactId>mysql-connector-java</artifactId>
        <version>5.1.3</version>
    </dependency>
    <!-- 数据源 -->
    <dependency>
        <groupId>com.alibaba</groupId>
        <artifactId>druid</artifactId>
        <version>1.0.31</version>
    </dependency>

</dependencies>
②jdbc.properties
atguigu.url=jdbc:mysql://192.168.198.100:3306/mybatis-example
atguigu.driver=com.mysql.jdbc.Driver
atguigu.username=root
atguigu.password=atguigu
③Spring 配置文件
[1]配置数据源
<!-- 导入外部属性文件 -->
<context:property-placeholder location="classpath:jdbc.properties" />

<!-- 配置数据源 -->
<bean id="druidDataSource" class="com.alibaba.druid.pool.DruidDataSource">
    <property name="url" value="${atguigu.url}"/>
    <property name="driverClassName" value="${atguigu.driver}"/>
    <property name="username" value="${atguigu.username}"/>
    <property name="password" value="${atguigu.password}"/>
</bean>
[2]配置 JDBCTemplate
<!-- 配置 JdbcTemplate -->
<bean id="jdbcTemplate" class="org.springframework.jdbc.core.JdbcTemplate">

    <!-- 装配数据源 -->
    <property name="dataSource" ref="druidDataSource"/>

</bean>
[3]在测试类装配 JdbcTemplate
@RunWith(SpringJUnit4ClassRunner.class)
@ContextConfiguration(value = {"classpath:spring-context.xml"})
public class JDBCTest {

    @Autowired
    private DataSource dataSource;

    @Autowired
    private JdbcTemplate jdbcTemplate;

    @Test
    public void testJdbcTemplateUpdate() {

    }

    @Test
    public void testConnection() throws SQLException {
        Connection connection = dataSource.getConnection();

        System.out.println("connection = " + connection);
    }

}
3、基本用法
①增删改操作
@Test
public void testJdbcTemplateUpdate() {

    // 1.编写 SQL 语句。需要传参的地方写问号占位符
    String sql = "update t_emp set emp_salary=? where emp_id=?";

    // 2.调用 jdbcTemplate 的 update() 方法执行 update 语句
    int count = jdbcTemplate.update(sql, 999.99, 3);

    System.out.println("count = " + count);

}
②查询:返回单个简单类型
@Test
public void testJdbcTemplateQueryForSingleValue() {

    // 1.编写 SQL 语句
    String sql = "select emp_name from t_emp where emp_id=?";

    // 2.调用 jdbcTemplate 的方法执行查询
    String empName = jdbcTemplate.queryForObject(sql, String.class, 6);

    System.out.println("empName = " + empName);

}
③查询:查询实体类类型
[1]封装实体类类型
public class Emp {

    private Integer empId;
    private String empName;
    private Double empSalary;
    ……
[2]借助 RowMapper 完成查询
@Test
public void testJdbcTemplateQueryForEntity() {

    // 1.编写 SQL 语句
    String sql = "select emp_id,emp_name,emp_salary from t_emp where emp_id=?";

    // 2.准备 RowMapper 对象
    RowMapper<Emp> rowMapper = new BeanPropertyRowMapper<>(Emp.class);

    // 3.调用 jdbcTemplate 的方法执行查询
    Emp emp = jdbcTemplate.queryForObject(sql, rowMapper, 7);

    System.out.println("emp = " + emp);

}
第二节 声明式事务概念
1、编程式事务
事务功能的相关操作全部通过自己编写代码来实现:
Connection conn = ...;

try {

    // 开启事务:关闭事务的自动提交
    conn.setAutoCommit(false);

    // 核心操作

    // 提交事务
    conn.commit();

}catch(Exception e){

    // 回滚事务
    conn.rollBack();

}finally{

    // 释放数据库连接
    conn.close();

}
编程式的实现方式存在缺陷:
- 细节没有被屏蔽:具体操作过程中,所有细节都需要程序员自己来完成,比较繁琐。
- 代码复用性不高:如果没有有效抽取出来,每次实现功能都需要自己编写代码,代码就没有得到复用。
2、声明式事务
既然事务控制的代码有规律可循,代码的结构基本是确定的,所以框架就可以将固定模式的代码抽取出来,进行相关的封装。
封装起来后,我们只需要在配置文件中进行简单的配置即可完成操作。
- 好处1:提高开发效率
- 好处2:消除了冗余的代码
- 好处3:框架会综合考虑相关领域中在实际开发环境下有可能遇到的各种问题,进行了健壮性、性能等各个方面的优化
所以,我们可以总结下面两个概念:
- 编程式:自己写代码实现功能
- 声明式:通过配置让框架实现功能
3、事务管理器
①顶级接口
[1]Spring 5.2以前
顶级接口
public interface PlatformTransactionManager {

    TransactionStatus getTransaction(TransactionDefinition definition) throws TransactionException;

    void commit(TransactionStatus status) throws TransactionException;

    void rollback(TransactionStatus status) throws TransactionException;

}
[2]从 Spring 5.2开始
PlatformTransactionManager 接口本身没有变化,它继承了 TransactionManager
public interface TransactionManager {
 }
TransactionManager接口中什么都没有,但是它还是有存在的意义——定义一个技术体系。
②技术体系
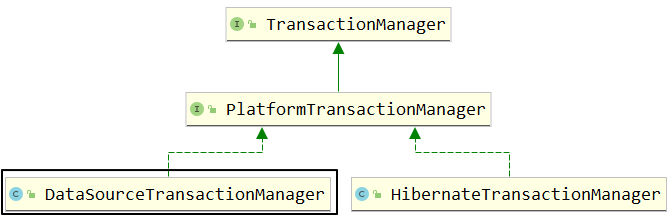
我们现在要使用的事务管理器是org.springframework.jdbc.datasource.DataSourceTransactionManager,将来整合 Mybatis 用的也是这个类。
DataSourceTransactionManager类中的主要方法:
- doBegin():开启事务
- doSuspend():挂起事务
- doResume():恢复挂起的事务
- doCommit():提交事务
- doRollback():回滚事务
第三节 基于注解的声明式事务
实验一 准备工作
1、加入依赖
<dependencies>

        <!-- 基于Maven依赖传递性,导入spring-context依赖即可导入当前所需所有jar包 -->
        <dependency>
            <groupId>org.springframework</groupId>
            <artifactId>spring-context</artifactId>
            <version>5.3.1</version>
        </dependency>

        <!-- Spring 持久化层支持jar包 -->
        <!-- Spring 在执行持久化层操作、与持久化层技术进行整合过程中,需要使用orm、jdbc、tx三个jar包 -->
        <!-- 导入 orm 包就可以通过 Maven 的依赖传递性把其他两个也导入 -->
        <dependency>
            <groupId>org.springframework</groupId>
            <artifactId>spring-orm</artifactId>
            <version>5.3.1</version>
        </dependency>

        <!-- Spring 测试相关 -->
        <dependency>
            <groupId>org.springframework</groupId>
            <artifactId>spring-test</artifactId>
            <version>5.3.1</version>
        </dependency>

        <!-- junit测试 -->
        <dependency>
            <groupId>junit</groupId>
            <artifactId>junit</artifactId>
            <version>4.12</version>
            <scope>test</scope>
        </dependency>

        <!-- MySQL驱动 -->
        <dependency>
            <groupId>mysql</groupId>
            <artifactId>mysql-connector-java</artifactId>
            <version>5.1.3</version>
        </dependency>
        <!-- 数据源 -->
        <dependency>
            <groupId>com.alibaba</groupId>
            <artifactId>druid</artifactId>
            <version>1.0.31</version>
        </dependency>

    </dependencies>
2、外部属性文件
atguigu.url=jdbc:mysql://192.168.198.100:3306/mybatis-example
atguigu.driver=com.mysql.jdbc.Driver
atguigu.username=root
atguigu.password=atguigu
3、Spring 配置文件
<!-- 配置自动扫描的包 -->
<context:component-scan base-package="com.atguigu.tx"/>

<!-- 导入外部属性文件 -->
<context:property-placeholder location="classpath:jdbc.properties" />

<!-- 配置数据源 -->
<bean id="druidDataSource" class="com.alibaba.druid.pool.DruidDataSource">
    <property name="url" value="${atguigu.url}"/>
    <property name="driverClassName" value="${atguigu.driver}"/>
    <property name="username" value="${atguigu.username}"/>
    <property name="password" value="${atguigu.password}"/>
</bean>

<!-- 配置 JdbcTemplate -->
<bean id="jdbcTemplate" class="org.springframework.jdbc.core.JdbcTemplate">

    <!-- 装配数据源 -->
    <property name="dataSource" ref="druidDataSource"/>

</bean>
4、测试类
@RunWith(SpringJUnit4ClassRunner.class)
@ContextConfiguration(value = {"classpath:spring-context.xml"})
public class JDBCTest {

}
5、创建组件
①EmpDao
@Repository
public class EmpDao {

    @Autowired
    private JdbcTemplate jdbcTemplate;

    public void updateEmpNameById(Integer empId, String empName) {
        String sql = "update t_emp set emp_name=? where emp_id=?";
        jdbcTemplate.update(sql, empName, empId);
    }

    public void updateEmpSalaryById(Integer empId, Double salary) {
        String sql = "update t_emp set emp_salary=? where emp_id=?";
        jdbcTemplate.update(sql, salary, empId);
    }

    public String selectEmpNameById(Integer empId) {
        String sql = "select emp_name from t_emp where emp_id=?";

        String empName = jdbcTemplate.queryForObject(sql, String.class, empId);

        return empName;
    }

}
②EmpService
在三层结构中,事务通常都是加到业务逻辑层,针对Service类使用事务。
@Service
public class EmpService {

    @Autowired
    private EmpDao empDao;

    // 为了便于核对数据库操作结果,不要修改同一条记录
    public void updateTwice(
            // 修改员工姓名的一组参数
            Integer empId4EditName, String newName,

            // 修改员工工资的一组参数
            Integer empId4EditSalary, Double newSalary
            ) {

        // 为了测试事务是否生效,执行两个数据库操作,看它们是否会在某一个失败时一起回滚
        empDao.updateEmpNameById(empId4EditName, newName);

        empDao.updateEmpSalaryById(empId4EditSalary, newSalary);

    }

}
实验二 应用最基本的事务控制
1、加事务前状态
①搞破坏
修改 EmpDao 中的 updateEmpSalaryById()方法:
public void updateEmpSalaryById(Integer empId, Double salary) {

    // 为了看到操作失败后的效果人为将 SQL 语句破坏
    String sql = "upd222ate t_emp set emp_salary=? where emp_id=?";
    jdbcTemplate.update(sql, salary, empId);
}
②执行Service方法
@Test
public void testBaseTransaction() {

    Integer empId4EditName = 2;
    String newName = "new-name";

    Integer empId4EditSalary = 3;
    Double newSalary = 444.44;

    empService.updateTwice(empId4EditName, newName, empId4EditSalary, newSalary);

}
效果:修改姓名的操作生效了,修改工资的操作没有生效。
2、添加事务功能
①配置事务管理器

<!-- 配置事务管理器 -->
<bean id="transactionManager" class="org.springframework.jdbc.datasource.DataSourceTransactionManager">

    <!-- 事务管理器的bean只需要装配数据源,其他属性保持默认值即可 -->
    <property name="dataSource" ref="druidDataSource"/>
</bean>
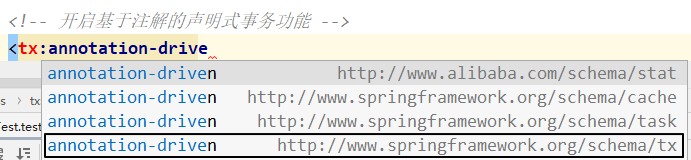
②开启基于注解的声明式事务功能

<!-- 开启基于注解的声明式事务功能 -->
<!-- 使用transaction-manager属性指定当前使用是事务管理器的bean -->
<!-- transaction-manager属性的默认值是transactionManager,如果事务管理器bean的id正好就是这个默认值,则可以省略这个属性 -->
<tx:annotation-driven transaction-manager="transactionManager"/>
注意:导入名称空间时有好几个重复的,我们需要的是 tx 结尾的那个。
③在需要事务的方法上使用注解

    @Transactional
public void updateTwice(
        // 修改员工姓名的一组参数
        Integer empId4EditName, String newName,

        // 修改员工工资的一组参数
        Integer empId4EditSalary, Double newSalary
        ) {

    // 为了测试事务是否生效,执行两个数据库操作,看它们是否会在某一个失败时一起回滚
    empDao.updateEmpNameById(empId4EditName, newName);

    empDao.updateEmpSalaryById(empId4EditSalary, newSalary);

}
④测试
junit测试方法不需要修改,执行后查看数据是否被修改。
3、从日志内容角度查看事务效果
①加入依赖
<!-- 加入日志 -->
<dependency>
    <groupId>ch.qos.logback</groupId>
    <artifactId>logback-classic</artifactId>
    <version>1.2.3</version>
</dependency>
②加入logback的配置文件
文件名:logback.xml
<?xml version="1.0" encoding="UTF-8"?>
<configuration debug="true">
    <!-- 指定日志输出的位置 -->
    <appender name="STDOUT"
              class="ch.qos.logback.core.ConsoleAppender">
        <encoder>
            <!-- 日志输出的格式 -->
            <!-- 按照顺序分别是:时间、日志级别、线程名称、打印日志的类、日志主体内容、换行 -->
            <pattern>[%d{HH:mm:ss.SSS}] [%-5level] [%thread] [%logger] [%msg]%n</pattern>
        </encoder>
    </appender>

    <!-- 设置全局日志级别。日志级别按顺序分别是:DEBUG、INFO、WARN、ERROR -->
    <!-- 指定任何一个日志级别都只打印当前级别和后面级别的日志。 -->
    <root level="INFO">
        <!-- 指定打印日志的appender,这里通过“STDOUT”引用了前面配置的appender -->
        <appender-ref ref="STDOUT" />
    </root>

    <!-- 根据特殊需求指定局部日志级别 -->
    <logger name="org.springframework.jdbc.datasource.DataSourceTransactionManager" level="DEBUG"/>
    <logger name="org.springframework.jdbc.core.JdbcTemplate" level="DEBUG" />

</configuration>
③日志中事务相关内容
[1]事务回滚时
[11:37:36.965] [DEBUG] [main] [org.springframework.jdbc.datasource.DataSourceTransactionManager] [ Creating new transaction with name [com.atguigu.tx.service.EmpService.updateTwice]: PROPAGATION_REQUIRED,ISOLATION_DEFAULT] [11:37:37.328] [INFO ] [main] [com.alibaba.druid.pool.DruidDataSource] [{dataSource-1} inited] [11:37:37.815] [DEBUG] [main] [org.springframework.jdbc.datasource.DataSourceTransactionManager] [ Acquired Connection [com.mysql.jdbc.JDBC4Connection@6b6776cb] for JDBC transaction] [11:37:37.818] [DEBUG] [main] [org.springframework.jdbc.datasource.DataSourceTransactionManager] [ Switching JDBC Connection [com.mysql.jdbc.JDBC4Connection@6b6776cb] to manual commit]
[11:44:32.311] [DEBUG] [main] [org.springframework.jdbc.core.JdbcTemplate] [Executing prepared SQL update] [11:44:32.312] [DEBUG] [main] [org.springframework.jdbc.core.JdbcTemplate] [Executing prepared SQL statement [update t_emp set emp_name=? where emp_id=?]] [11:44:32.339] [DEBUG] [main] [org.springframework.jdbc.core.JdbcTemplate] [Executing prepared SQL update] [11:44:32.339] [DEBUG] [main] [org.springframework.jdbc.core.JdbcTemplate] [Executing prepared SQL statement [upd222ate t_emp set emp_salary=? where emp_id=?]]
[11:37:37.931] [DEBUG] [main] [org.springframework.jdbc.datasource.DataSourceTransactionManager] [Initiating transaction rollback] [11:37:37.931] [DEBUG] [main] [org.springframework.jdbc.datasource.DataSourceTransactionManager] [Rolling back JDBC transaction on Connection [com.mysql.jdbc.JDBC4Connection@6b6776cb]] [11:37:37.933] [DEBUG] [main] [org.springframework.jdbc.datasource.DataSourceTransactionManager] [Releasing JDBC Connection [com.mysql.jdbc.JDBC4Connection@6b6776cb] after transaction]
[2]事务提交时
[11:42:40.093] [DEBUG] [main] [org.springframework.jdbc.datasource.DataSourceTransactionManager] [Creating new transaction with name [com.atguigu.tx.service.EmpService.updateTwice]: PROPAGATION_REQUIRED,ISOLATION_DEFAULT] [11:42:40.252] [INFO ] [main] [com.alibaba.druid.pool.DruidDataSource] [{dataSource-1} inited] [11:42:40.655] [DEBUG] [main] [org.springframework.jdbc.datasource.DataSourceTransactionManager] [Acquired Connection [com.mysql.jdbc.JDBC4Connection@6b6776cb] for JDBC transaction] [11:42:40.661] [DEBUG] [main] [org.springframework.jdbc.datasource.DataSourceTransactionManager] [Switching JDBC Connection [com.mysql.jdbc.JDBC4Connection@6b6776cb] to manual commit] [11:42:40.681] [DEBUG] [main] [org.springframework.jdbc.core.JdbcTemplate] [Executing prepared SQL update] [11:42:40.682] [DEBUG] [main] [org.springframework.jdbc.core.JdbcTemplate] [Executing prepared SQL statement [update t_emp set emp_name=? where emp_id=?]] [11:42:40.710] [DEBUG] [main] [org.springframework.jdbc.core.JdbcTemplate] [Executing prepared SQL update] [11:42:40.711] [DEBUG] [main] [org.springframework.jdbc.core.JdbcTemplate] [Executing prepared SQL statement [update t_emp set emp_salary=? where emp_id=?]] [11:42:40.712] [DEBUG] [main] [org.springframework.jdbc.datasource.DataSourceTransactionManager] [Initiating transaction commit] [11:42:40.712] [DEBUG] [main] [org.springframework.jdbc.datasource.DataSourceTransactionManager] [Committing JDBC transaction on Connection [com.mysql.jdbc.JDBC4Connection@6b6776cb]] [11:42:40.714] [DEBUG] [main] [org.springframework.jdbc.datasource.DataSourceTransactionManager] [Releasing JDBC Connection [com.mysql.jdbc.JDBC4Connection@6b6776cb] after transaction]
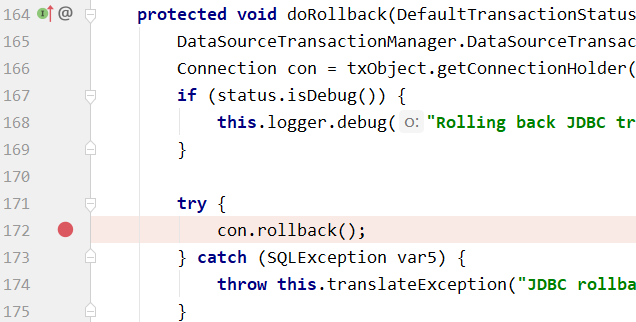
4、debug查看事务管理器中的关键方法
类:org.springframework.jdbc.datasource.DataSourceTransactionManager
①开启事务的方法
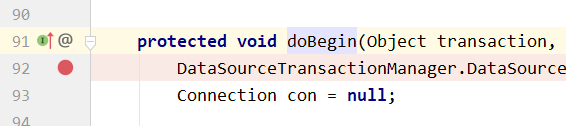
②提交事务的方法

③回滚事务的方法
实验三 事务属性:只读
1、介绍
对一个查询操作来说,如果我们把它设置成只读,就能够明确告诉数据库,这个操作不涉及写操作。这样数据库就能够针对查询操作来进行优化。默认为false。
2、设置方式
// readOnly = true把当前事务设置为只读
@Transactional(readOnly = true)
public String getEmpName(Integer empId) {

    return empDao.selectEmpNameById(empId);
}
3、针对增删改操作设置只读
会抛出下面异常:
Caused by: java.sql.SQLException: Connection is read-only. Queries leading to data modification are not allowed
4、@Transactional注解放在类上
①生效原则
如果一个类中每一个方法上都使用了@Transactional注解,那么就可以将@Transactional注解提取到类上。反过来说:@Transactional注解在类级别标记,会影响到类中的每一个方法。同时,类级别标记的@Transactional注解中设置的事务属性也会延续影响到方法执行时的事务属性。除非在方法上又设置了@Transactional注解。
对一个方法来说,离它最近的@Transactional注解中的事务属性设置生效。
②用法举例
在类级别@Transactional注解中设置只读,这样类中所有的查询方法都不需要设置@Transactional注解了。因为对查询操作来说,其他属性通常不需要设置,所以使用公共设置即可。
然后在这个基础上,对增删改方法设置@Transactional注解 readOnly 属性为 false。
@Service
@Transactional(readOnly = true)
public class EmpService {

    // 为了便于核对数据库操作结果,不要修改同一条记录
    @Transactional(readOnly = false)
    public void updateTwice(……) {
        ……
    }

    // readOnly = true把当前事务设置为只读
    // @Transactional(readOnly = true)
    public String getEmpName(Integer empId) {
        ……
    }

}
PS:Spring 环境下很多场合都有类似设定,一个注解如果标记了类的每一个方法那么通常就可以提取到类级别。
实验四 事务属性:超时
1、需求
事务在执行过程中,有可能因为遇到某些问题,导致程序卡住,从而长时间占用数据库资源。而长时间占用资源,大概率是因为程序运行出现了问题(可能是Java程序或MySQL数据库或网络连接等等)。
此时这个很可能出问题的程序应该被回滚,撤销它已做的操作,事务结束,把资源让出来,让其他正常程序可以执行。
概括来说就是一句话:超时回滚,释放资源。
2、设置
①@Transactional注解中的设置
@Transactional(readOnly = false, timeout = 3)
public void updateTwice(
        // 修改员工姓名的一组参数
        Integer empId4EditName, String newName,

        // 修改员工工资的一组参数
        Integer empId4EditSalary, Double newSalary
        ) {

    // 为了测试事务是否生效,执行两个数据库操作,看它们是否会在某一个失败时一起回滚
    empDao.updateEmpNameById(empId4EditName, newName);

    empDao.updateEmpSalaryById(empId4EditSalary, newSalary);

}
②Dao方法中让线程睡眠
public void updateEmpSalaryById(Integer empId, Double salary) {

    try {
        TimeUnit.SECONDS.sleep(5);
    } catch (InterruptedException e) {
        e.printStackTrace();
    }

    // 为了看到操作失败后的效果人为将 SQL 语句破坏
    String sql = "update t_emp set emp_salary=? where emp_id=?";
    jdbcTemplate.update(sql, salary, empId);
}
PS:注意:sleep操作如果放在执行 SQL 语句后面那就不起作用。
③执行效果
执行过程中日志和抛出异常的情况:
[16:25:41.706] [DEBUG] [main] [org.springframework.jdbc.datasource.DataSourceTransactionManager] [Initiating transaction rollback] [16:25:41.706] [DEBUG] [main] [org.springframework.jdbc.datasource.DataSourceTransactionManager] [Rolling back JDBC transaction on Connection [com.mysql.jdbc.JDBC4Connection@53b7f657]] [16:25:41.709] [DEBUG] [main] [org.springframework.jdbc.datasource.DataSourceTransactionManager] [Releasing JDBC Connection [com.mysql.jdbc.JDBC4Connection@53b7f657] after transaction]
org.springframework.transaction.TransactionTimedOutException: Transaction timed out: deadline was Fri Jun 04 16:25:39 CST 2021
实验五 事务属性:回滚和不回滚的异常
1、默认情况
默认只针对运行时异常回滚,编译时异常不回滚。情景模拟代码如下:
public void updateEmpSalaryById(Integer empId, Double salary) throws FileNotFoundException {

    // 为了看到操作失败后的效果人为将 SQL 语句破坏
    String sql = "update t_emp set emp_salary=? where emp_id=?";
    jdbcTemplate.update(sql, salary, empId);

//  抛出编译时异常测试是否回滚
    new FileInputStream("aaaa.aaa");

//  抛出运行时异常测试是否回滚
//  System.out.println(10 / 0);
}
2、设置回滚的异常
- rollbackFor属性:需要设置一个Class类型的对象
- rollbackForClassName属性:需要设置一个字符串类型的全类名
@Transactional(rollbackFor = Exception.class)
3、设置不回滚的异常
在默认设置和已有设置的基础上,再指定一个异常类型,碰到它不回滚。
 @Transactional(
            noRollbackFor = FileNotFoundException.class
    )
4、回滚和不回滚异常同时设置
①范围不同
不管是哪个设置范围大,都是在大范围内在排除小范围的设定。例如:
- rollbackFor = Exception.class
- noRollbackFor = FileNotFoundException.class
意思是除了 FileNotFoundException 之外,其他所有 Exception 范围的异常都回滚;但是碰到 FileNotFoundException 不回滚。
②范围一致
回滚和不回滚的异常设置了相同范围(这是有多想不开):
- noRollbackFor = FileNotFoundException.class
- rollbackFor = FileNotFoundException.class
此时 Spring 采纳了 rollbackFor 属性的设定:遇到 FileNotFoundException 异常会回滚。
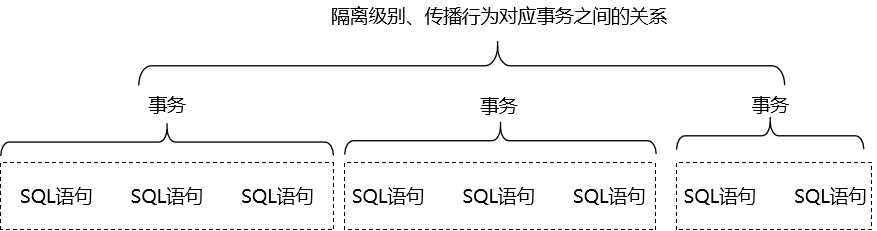
实验六 事务属性:事务隔离级别
1、视角需要提升
2、测试的准备工作
①思路
②EmpService中参与测试的方法
// readOnly = true把当前事务设置为只读
// @Transactional(readOnly = true)
public String getEmpName(Integer empId) {

    return empDao.selectEmpNameById(empId);
}

@Transactional(readOnly = false)
public void updateEmpName(Integer empId, String empName) {

    empDao.updateEmpNameById(empId, empName);
}
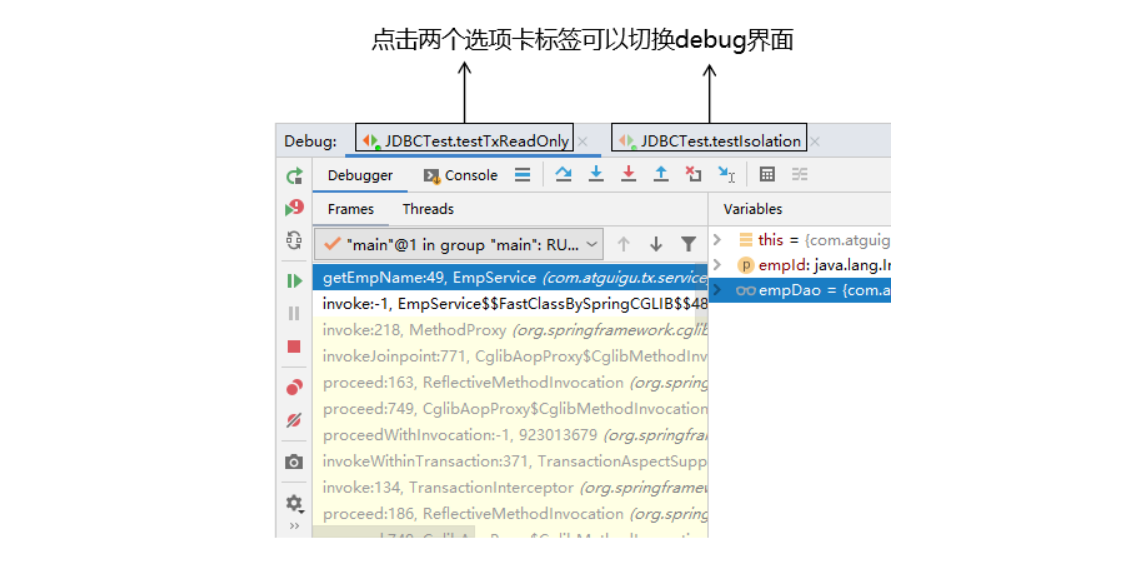
③junit中执行测试的方法
@Test
public void testTxReadOnly() {
String empName = empService.getEmpName(3);
System.out.println("empName = " + empName);
}
@Test
public void testIsolation() {
Integer empId = 2;
String empName = "aaaaaaaa";
empService.updateEmpName(empId, empName);
}
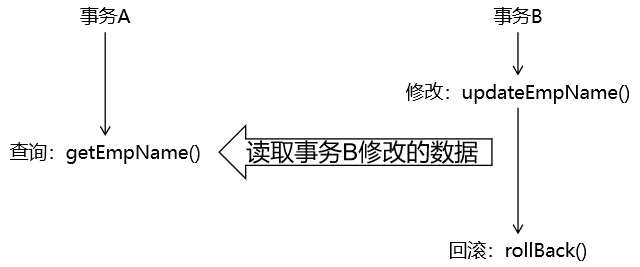
④搞破坏
为了让事务B(执行修改操作的事务)能够回滚,在EmpDao中的对应方法中人为抛出异常。
public void updateEmpNameById(Integer empId, String empName) {
    String sql = "update t_emp set emp_name=? where emp_id=?";
    jdbcTemplate.update(sql, empName, empId);
    System.out.println(10 / 0);
}
3、执行测试
在 @Transactional 注解中使用 isolation 属性设置事务的隔离级别。 取值使用 org.springframework.transaction.annotation.Isolation 枚举类提供的数值。
①测试读未提交
@Transactional(isolation = Isolation.READ_UNCOMMITTED)
public String getEmpName(Integer empId) {

    return empDao.selectEmpNameById(empId);
}

@Transactional(isolation = Isolation.READ_UNCOMMITTED, readOnly = false)
public void updateEmpName(Integer empId, String empName) {

    empDao.updateEmpNameById(empId, empName);
}
测试结果:执行查询操作的事务读取了另一个尚未提交的修改。
②测试读已提交
@Transactional(isolation = Isolation.READ_COMMITTED)
public String getEmpName(Integer empId) {

    return empDao.selectEmpNameById(empId);
}

@Transactional(isolation = Isolation.READ_COMMITTED, readOnly = false)
public void updateEmpName(Integer empId, String empName) {

    empDao.updateEmpNameById(empId, empName);
}
测试结果:执行查询操作的事务读取的是数据库中正确的数据。
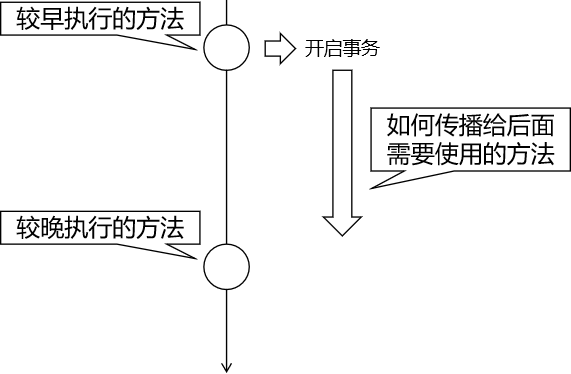
实验七 事务属性:事务传播行为
1、事务传播行为要研究的问题
2、propagation属性
①默认值
@Transactional 注解通过 propagation 属性设置事务的传播行为。它的默认值是:
Propagation propagation() default Propagation.REQUIRED;
②可选值说明
propagation 属性的可选值由 org.springframework.transaction.annotation.Propagation 枚举类提供:
| 名称 | 含义 |
|---|---|
| REQUIRED 默认值 | 当前方法必须工作在事务中,如果当前线程上有已经开启的事务可用,那么就在这个事务中运行 如果当前线程上没有已经开启的事务,那么就自己开启新事务,在新事务中运行 所以当前方法有可能和其他方法共用事务 在共用事务的情况下:当前方法会因为其他方法回滚而受连累 |
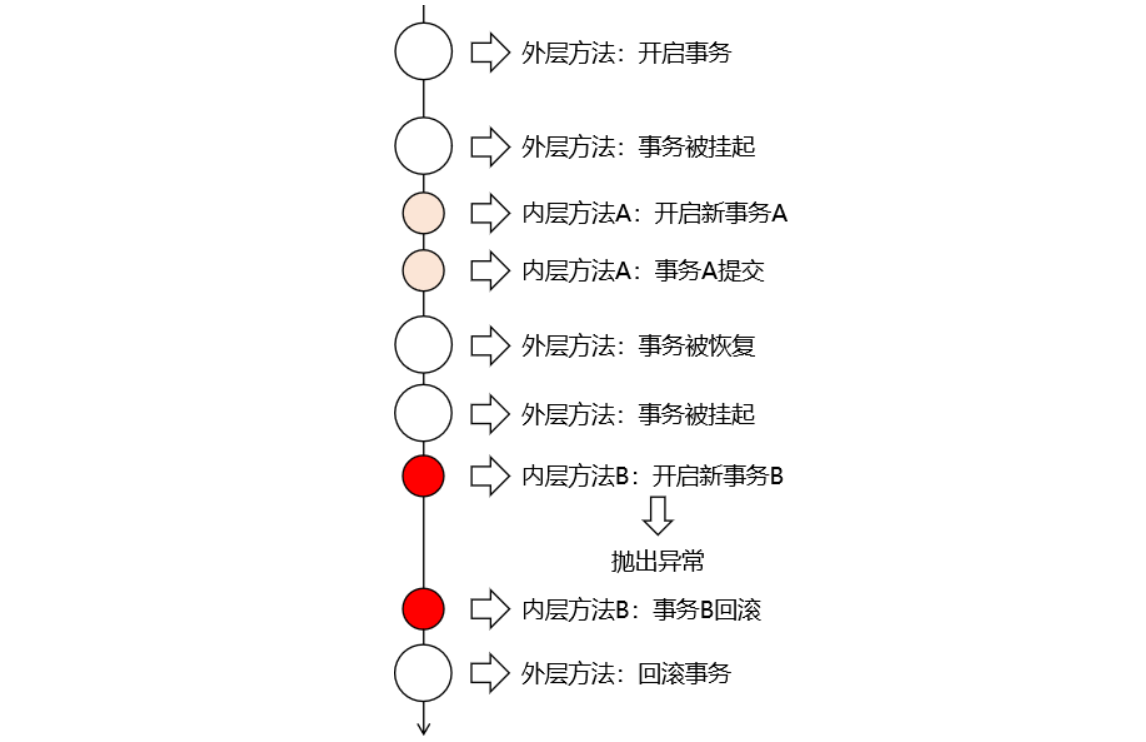
| REQUIRES_NEW 建议使用 | 当前方法必须工作在事务中 不管当前线程上是否有已经开启的事务,都要开启新事务 在新事务中运行 不会和其他方法共用事务,避免被其他方法连累 |
3、测试
①创建测试方法
[1]在EmpService中声明两个内层方法
@Transactional(readOnly = false, propagation = Propagation.REQUIRED)
public void updateEmpNameInner(Integer empId, String empName) {

    empDao.updateEmpNameById(empId, empName);
}

@Transactional(readOnly = false, propagation = Propagation.REQUIRED)
public void updateEmpSalaryInner(Integer empId, Double empSalary) {

    empDao.updateEmpSalaryById(empId, empSalary);
}
[2]创建TopService

@Service
public class TopService {

    // 这里我们只是为了测试事务传播行为,临时在Service中装配另一个Service
    // 实际开发时非常不建议这么做,因为这样会严重破坏项目的结构
    @Autowired
    private EmpService empService;

    @Transactional
    public void topTxMethod() {

        // 在外层方法中调用两个内层方法
        empService.updateEmpNameInner(2, "aaa");

        empService.updateEmpSalaryInner(3, 666.66);

    }

}
[3]junit测试方法
@Autowired
private TopService topService;

@Test
public void testPropagation() {

    // 调用外层方法
    topService.topTxMethod();

}
②测试 REQUIRED 模式
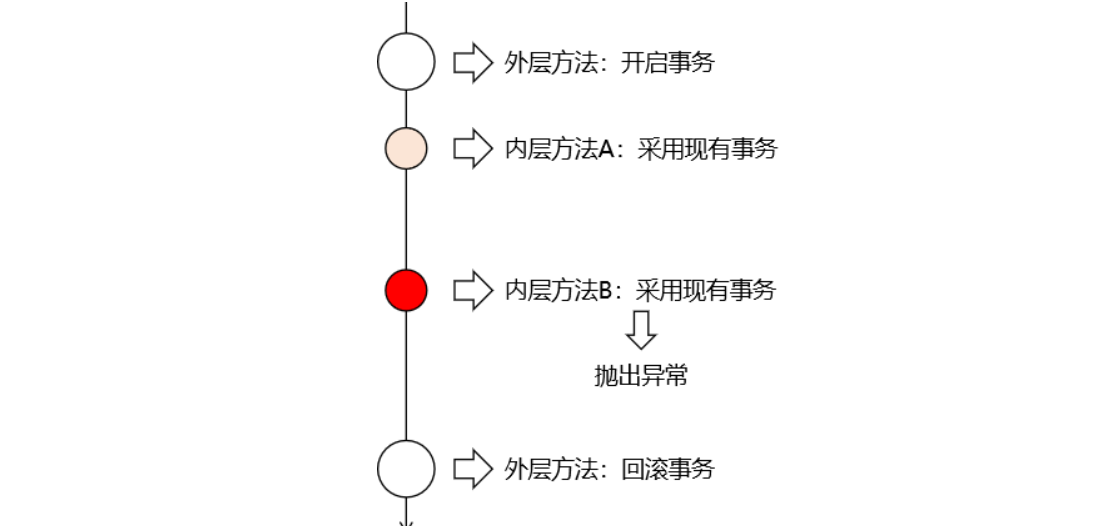
效果:内层方法A、内层方法B所做的修改都没有生效,总事务回滚了。
③测试 REQUIRES_NEW 模式
[1]修改 EmpService 中内层方法
@Transactional(readOnly = false, propagation = Propagation.REQUIRES_NEW)
public void updateEmpNameInner(Integer empId, String empName) {

    empDao.updateEmpNameById(empId, empName);
}

@Transactional(readOnly = false, propagation = Propagation.REQUIRES_NEW)
public void updateEmpSalaryInner(Integer empId, Double empSalary) {

    empDao.updateEmpSalaryById(empId, empSalary);
}
[2]执行流程
4、实际开发情景
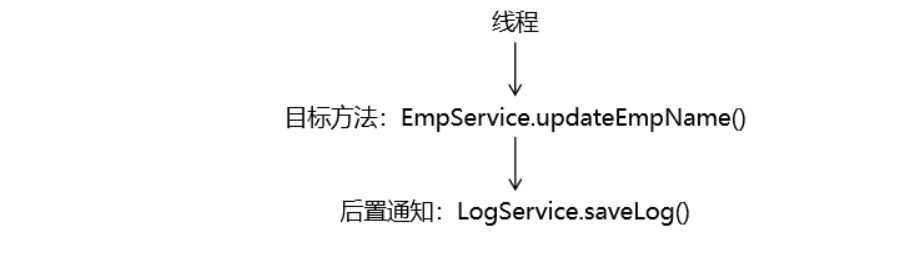
①Service方法应用了通知
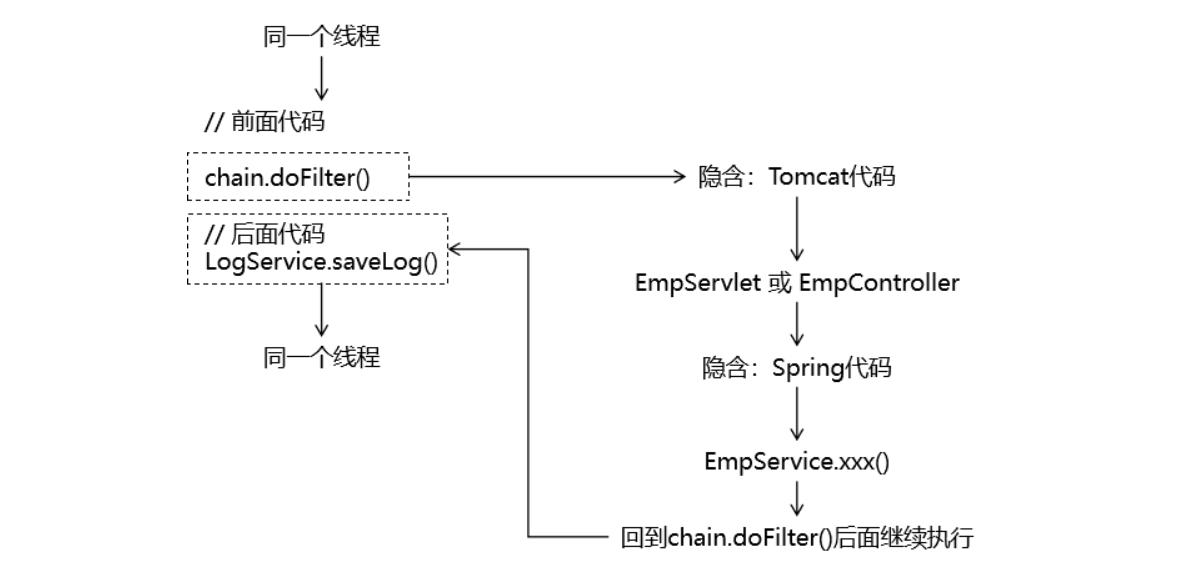
②过滤器或拦截器等类似组件
③升华
我们在事务传播行为这里,使用 REQUIRES_NEW 属性,也可以说是让不同事务方法从事务的使用上解耦合,不要互相影响。
第四节 基于XML的声明式事务
1、加入依赖
相比于基于注解的声明式事务,基于 XML 的声明式事务需要一个额外的依赖:
<dependency>
            <groupId>org.springframework</groupId>
            <artifactId>spring-aspects</artifactId>
            <version>5.3.1</version>
        </dependency>
2、迁移代码
将上一个基于注解的 module 中的代码转移到新module。去掉 @Transactional 注解。
3、修改 Spring 配置文件
去掉 tx:annotation-driven 标签,然后加入下面的配置:
<aop:config>
    <!-- 配置切入点表达式,将事务功能定位到具体方法上 -->
    <aop:pointcut id="txPoincut" expression="execution(* *..*Service.*(..))"/>

    <!-- 将事务通知和切入点表达式关联起来 -->
    <aop:advisor advice-ref="txAdvice" pointcut-ref="txPoincut"/>

</aop:config>

<!-- tx:advice标签:配置事务通知 -->
<!-- id属性:给事务通知标签设置唯一标识,便于引用 -->
<!-- transaction-manager属性:关联事务管理器 -->
<tx:advice id="txAdvice" transaction-manager="transactionManager">
    <tx:attributes>

        <!-- tx:method标签:配置具体的事务方法 -->
        <!-- name属性:指定方法名,可以使用星号代表多个字符 -->
        <tx:method name="get*" read-only="true"/>
        <tx:method name="query*" read-only="true"/>
        <tx:method name="find*" read-only="true"/>

        <!-- read-only属性:设置只读属性 -->
        <!-- rollback-for属性:设置回滚的异常 -->
        <!-- no-rollback-for属性:设置不回滚的异常 -->
        <!-- isolation属性:设置事务的隔离级别 -->
        <!-- timeout属性:设置事务的超时属性 -->
        <!-- propagation属性:设置事务的传播行为 -->
        <tx:method name="save*" read-only="false" rollback-for="java.lang.Exception" propagation="REQUIRES_NEW"/>
        <tx:method name="update*" read-only="false" rollback-for="java.lang.Exception" propagation="REQUIRES_NEW"/>
        <tx:method name="delete*" read-only="false" rollback-for="java.lang.Exception" propagation="REQUIRES_NEW"/>
    </tx:attributes>
</tx:advice>
4、注意
即使需要事务功能的目标方法已经被切入点表达式涵盖到了,但是如果没有给它配置事务属性,那么这个方法就还是没有事务。所以事务属性必须配置。
第四章 Spring5 新特性
Spring Framework 从 2017 年 9 月推出了 5.0.0 正式版,在原来 4 版本基础上做出了大量新的改进。整个 Spring5 框架的代码基于 Java 8,运行时兼容 JDK 9,许多不建议使用的类和方法在代码库中删除。
第一节 JSR305标准相关注解
1、从JSR说起
①JCP
CP(Java Community Process) 是一个由SUN公司发起的,开放的国际组织。主要由Java开发者以及被授权者组成,负责Java技术规范维护,Java技术发展和更新。
JCP官网地址:https://jcp.org/en/home/index

②JSR
JSR 的全称是:Java Specification Request,意思是 Java 规范提案。谁向谁提案呢?任何人都可以向 JCP (Java Community Process) 提出新增一个标准化技术规范的正式请求。JSR已成为Java界的一个重要标准。登录 JCP 官网可以查看所有 JSR 标准。
2、JSR 305
JSR 305: Annotations for Software Defect Detection
This JSR will work to develop standard annotations (such as @NonNull) that can be applied to Java programs to assist tools that detect software defects.
主要功能:使用注解(例如@NonNull等等)协助开发者侦测软件缺陷。
Spring 从 5.0 版本开始支持了 JSR 305 规范中涉及到的相关注解。
package org.springframework.lang;

import java.lang.annotation.Documented;
import java.lang.annotation.ElementType;
import java.lang.annotation.Retention;
import java.lang.annotation.RetentionPolicy;
import java.lang.annotation.Target;

import javax.annotation.Nonnull;
import javax.annotation.meta.TypeQualifierNickname;

/**
 * A common Spring annotation to declare that annotated elements cannot be {@code null}.
 *
 * <p>Leverages JSR-305 meta-annotations to indicate nullability in Java to common
 * tools with JSR-305 support and used by Kotlin to infer nullability of Spring API.
 *
 * <p>Should be used at parameter, return value, and field level. Method overrides should
 * repeat parent {@code @NonNull} annotations unless they behave differently.
 *
 * <p>Use {@code @NonNullApi} (scope = parameters + return values) and/or {@code @NonNullFields}
 * (scope = fields) to set the default behavior to non-nullable in order to avoid annotating
 * your whole codebase with {@code @NonNull}.
 *
 * @author Sebastien Deleuze
 * @author Juergen Hoeller
 * @since 5.0
 * @see NonNullApi
 * @see NonNullFields
 * @see Nullable
 */
@Target({ElementType.METHOD, ElementType.PARAMETER, ElementType.FIELD})
@Retention(RetentionPolicy.RUNTIME)
@Documented
@Nonnull
@TypeQualifierNickname
public @interface NonNull {
}
3、相关注解
| 注解名称 | 含义 | 可标记位置 |
|---|---|---|
| @Nullable | 可以为空 | @Target({ElementType.METHOD, ElementType.PARAMETER, ElementType.FIELD}) |
| @NonNull | 不应为空 | @Target({ElementType.METHOD, ElementType.PARAMETER, ElementType.FIELD}) |
| @NonNullFields | 在特定包下的字段不应为空 | @Target(ElementType.PACKAGE) @TypeQualifierDefault(ElementType.FIELD) |
| @NonNullApi | 参数和方法返回值不应为空 | @Target(ElementType.PACKAGE) @TypeQualifierDefault({ElementType.METHOD, ElementType.PARAMETER}) |
第二节 整合junit5
1、导入依赖
在原有环境基础上增加如下依赖:
<dependency>
    <groupId>org.junit.jupiter</groupId>
    <artifactId>junit-jupiter-api</artifactId>
    <version>5.7.0</version>
    <scope>test</scope>
</dependency>
<dependency>
    <groupId>org.springframework</groupId>
    <artifactId>spring-test</artifactId>
    <version>5.3.1</version>
</dependency>
2、创建测试类
- @ExtendWith(SpringExtension.class) 表示使用 Spring 提供的扩展功能。
- @ContextConfiguration(value = {"classpath:spring-context.xml"}) 还是用来指定 Spring 配置文件位置,和整合 junit4 一样。
@ExtendWith(SpringExtension.class)
@ContextConfiguration(value = {"classpath:spring-context.xml"})
public class Junit5IntegrationTest {

    @Autowired
    private EmpDao empDao;

    @Test
    public void testJunit5() {
        System.out.println("empDao = " + empDao);
    }

}
3、使用复合注解
@SpringJUnitConfig 注解综合了前面两个注解的功能,此时指定 Spring 配置文件位置即可。但是注意此时需要使用 locations 属性,不是 value 属性了。
@SpringJUnitConfig(locations = {"classpath:spring-context.xml"})
public class Junit5IntegrationTest {

    @Autowired
    private EmpDao empDao;

    @Test
    public void testJunit5() {
        System.out.println("empDao = " + empDao);
    }

}