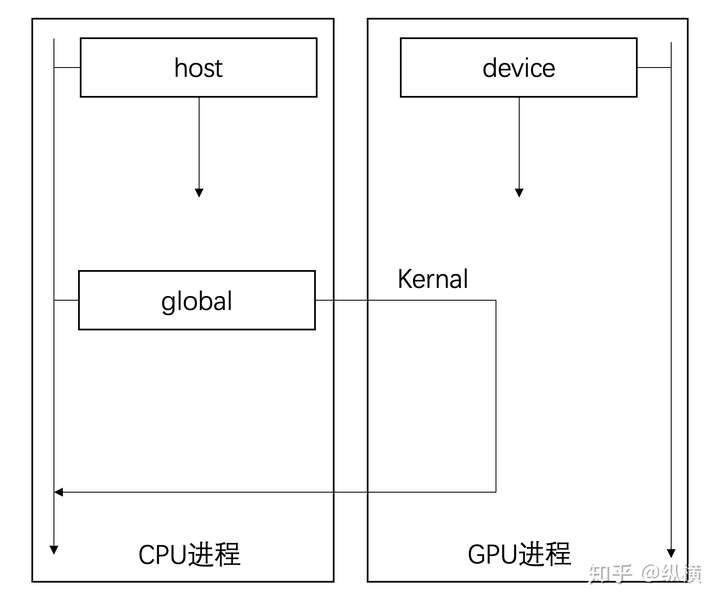
在使用 CUDA 之后,我们获得了 GPU 的控制权,现在在编写代码时需要指明是 CPU 还是 GPU 进行数据运算。我们可以简单的将数据运算(即函数的调用方式)分为三种:
- global 在 CPU 调用函数,函数在 GPU 执行(异步)
- device 在 GPU 调用函数,函数在 GPU 执行
- host 在 CPU 调用函数,函数在 CPU 执行(同步)
 函数的调用方式
CUDA 在 C 语言的基础上添加了三个关键字区分三种不同的函数,我们现在需要这样声明:
__global__ void MyFunc(float func_input)
{
    // DO SOMETHING
}
__host__ void MyFunc(int func_input)
{
    // DO SOMETHING
}
__device__ void MyFunc(byte func_input)
{
    // DO SOMETHING
}
__global__ 和 __device__ 声明的函数,在调用时会被分配给 CUDA 中众多的核,在多个线程中执行。因此在调用函数时,我们需要告诉 GPU,哪些线程要执行该函数。由于 GPU 的线程太多了,因此我们为 GPU 的线程划分了国(grid)-省(block)-市(thread)的分级。(终于看到一个地方一句话讲清楚了GPU的dim3的概念)
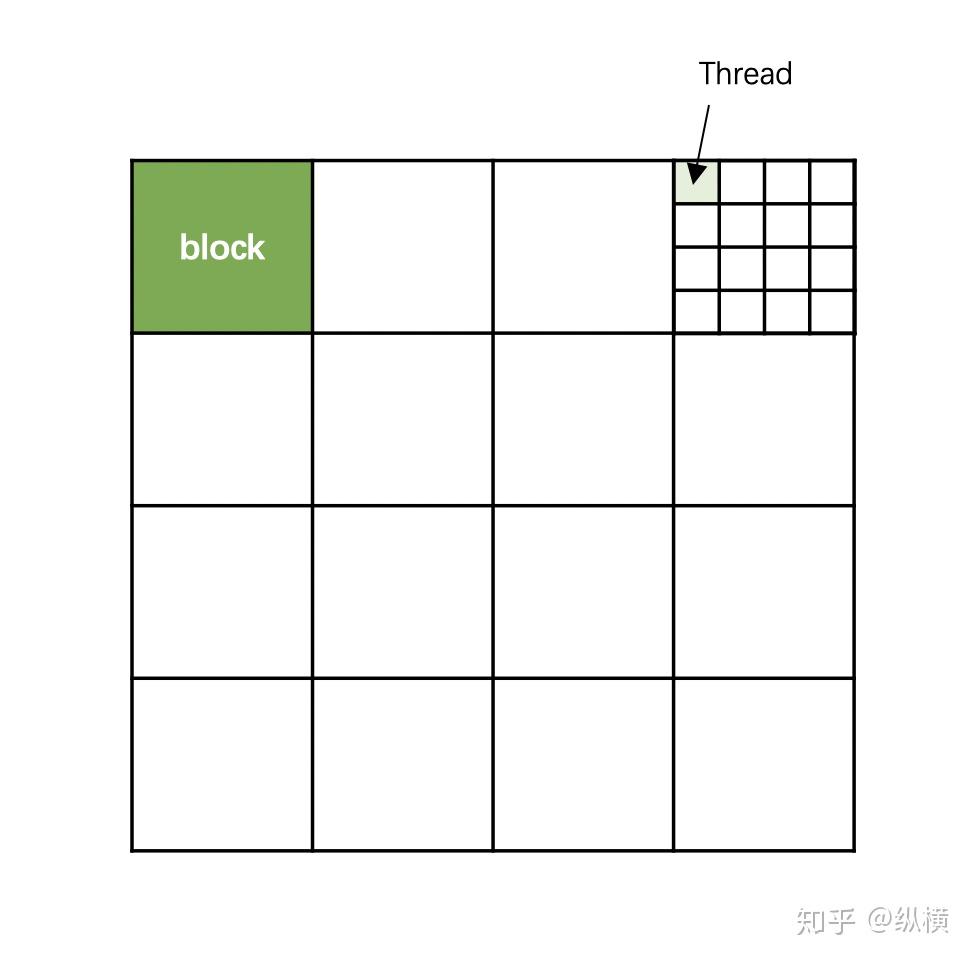 一个grid
在一个 grid 中也有很多 block。让我们来声明一个有 4*4 个 block 的 grid:
// dim3 代表一个三元组 <x,y,z>,我们可以拿到 x y 和 z
// 在学习过程中我们只考虑二维问题,因此只定义 x 和 y
dim3 grid(4, 4);
这时候深绿色 block 有自己的位置:
// 第一行 第一列
blockId.x = 1;
blockId.y = 1;
一个 block 中有很多 thread。让我们定义一个有 4*4 个 thread 的 block:
// dim3 代表一个三元组 <x,y,z>,我们可以拿到 grad.x grad.y 和 grid.z
// 在学习过程中我们只考虑二维问题,因此只定义 x 和 y
dim3 block(4, 4);
这时候 thread 也有自己的位置。让我们看一下浅绿色的 Thread 的位置:
// block 第一行 第四列
blockId.x = 1;
blockId.y = 4;
// thread 第一行 第一列
threadId.x = 1;
threadId.y = 1;
现在,你可以让一个函数去管理自己的线程们了。还记得我们之前讨论的吗,要在 main 中(CPU 中)调用 GPU 进行计算,我们要用 global 关键字修饰。在调用函数的时候需要为函数(按级别)分配 GPU 线程:
// 定义
__global__ void MyFunc(float func_input)
{
    DO SOMETHING
}
int main()
{
    ...
    // 领土范围
    dim3 threadsPerBlock(16, 16);
    dim3 numBlocks(16, 16);
    // 调用
    MatAdd<<<numBlocks, threadsPerBlock>>>(A, B, C);
    ...
}
在 MyFunc 中,CUDA 已经为我们注入了关键字 blockId 和 threadId 用于获取 thread 的位置,在矩阵运算中,我们通常会将矩阵中的元素与 GPU 中的 thread 一一对应:
__global__ void MatAdd(float A[N][N], float B[N][N], float C[N][N])
{
    // 这里就获取了当前市 thread 的位置
    int i = blockIdx.x * blockDim.x + threadIdx.x;
    int j = blockIdx.y * blockDim.y + threadIdx.y;
    // 根据位置 thread 情况计算
    if (i < N && j < N)
        C[i][j] = A[i][j] + B[i][j];
}
CPU 的内润和 GPU 的内存是两个独立的空间。我们现在已经能够通过 global function(kernal)指定 GPU 对 GPU 内存上的数据进行加工了。然而,我们怎样把 CPU 内存的数据传送到 GPU 内存,又怎样传输回来呢。
我们先看一下 global function 能运过去什么,运回来什么:
__global__ void MatAdd(float A[N][N], float B[N][N], float C[N][N]) ;global 函数的输入是有限的,因此无法用来传输数组(的内容),但是可以用来传递数组的(CPU 内存或 GPU 内存)地址。global 函数的返回时 void,没有什么用。
因此我们需要一个接口,把 CPU 内存上的数据传送到 GPU 内存,然后告诉我们 GPU 内存上的位置。我们就可以通过 global function 对指定 GPU 内存的数据进行操作了。CUDA 是这样实现的:通过 cudaMalloc 在 GPU 上申请一块空间并获得空间的地址,再通过 cudaMemcpyHostToDevice 把数据放在这块空间(利用前面获得的地址),最后再把数据的地址(就是前面获得的地址)作为输入传递给 global function。
float *func_input_in_device;
float func_input[] = [...]
cudaMalloc((void**)&func_input_in_device, nBytes);
cudaMemcpy((void*)func_input_in_device, (void*)x, nBytes, cudaMemcpyHostToDevice);

dim3 blockSize(16,16);
dim3 gridSize(16,16);
MyFunc <<<gridSize, blockSize>>>(func_input_in_device);
获得返回也是一样,通过 cudaMalloc 在 GPU 上申请一块空间并获得空间的地址,再把这块空间的地址(就是前面获得的地址)作为输入传递给 global function 留给 GPU 填充结果,最后再通过 cudaMemcpyDeviceToHost 把地址指定的数据拷贝回来。
float *func_input_in_device;
cudaMalloc((void**)&func_input_in_device, nBytes);
cudaMemcpy((void*)func_input_in_device, (void*)x, nBytes, cudaMemcpyHostToDevice);

float *func_output_in_device;
cudaMalloc((void**)&func_output_in_device, nBytes);
float *func_output
func_outputs = (float*)malloc(nBytes);

dim3 blockSize(16,16);
dim3 gridSize(16,16);
MyFunc <<<gridSize, blockSize>>>(func_input_in_device, func_output_in_device);
cudaMemcpy((void*)func_output, (void*)func_output_in_device, nBytes, cudaMemcpyDeviceToHost);
你可能注意到,我们之前强调过,的计算是异步的。你是否觉得 cudaMemcpy 不一定会拿到我们期望的计算结果?其实,运算过程是这样的:
MyFunc1 <<<...>>>(...);
// MyFunc1加入GPU的任务队列,CPU不等待GPU的执行结果继续向下执行
MyFunc2 <<<...>>>(...);
//MyFunc2加入GPU的任务队列,等待MyFunc2执行完毕后执行,CPU不等待GPU的执行结果继续向下执行
cudaMemcpy(...);
// CPU被阻塞,等待GPU完成任务队列中所有任务后开始从GPU拷贝数据,直到拷贝完成再向下执行
由于这样写太复杂(需要来回拷贝),因此 CUDA 提供了一个语法糖进行简化。我们可以直接使用 cudaMallocManaged 开辟一个 CPU 和 GPU 都能访问到的公共空间。使用这个接口,我们不再需要手动对数据进行复制,但是其实原理和上面相同。
float *func_input, *func_output;

cudaMallocManaged(&func_input, nBytes);
cudaMallocManaged(&func_output, nBytes);

for (int i = 0; i < N; i++) {
    func_input[i] = x[i];
}
MyFunc <<<gridSize, blockSize>>>(func_input, func_output);
// CPU 可以拿到 func_output
需要注意的是,GPU 和公共区域上开辟的空间不会自动释放,需要我们手动调用 cudaFree 释放:
cudaFree(func_input)
cudaFree(func_output)
其实,这部分内容并不常用,因为大部分时候我们都会直接对 Tensor.data 进行操作生成一个结果赋给另一个 Tensor.data,而 Tensor.data 是被 ATEN 分配在 GPU 上的,也就不涉及到和 CPU 进行数据交换的问题了。
CUDA 库
在 CPU 上我们有各种各样的函数库,然而这些函数库无法直接在 GPU 上(global function里)调用。不过不要担心,CUDA 本身为我们提供了丰富的函数库。
我们常用的数学运算在 CUDA math 中:
#include <ATen/ATen.h>

#include <cuda.h>

template <typename scalar_t>
__device__ __forceinline__ scalar_t sigmoid(scalar_t z) {
  return 1.0 / (1.0 + exp(-z));
  // exp 函数
}
矩阵运算在 cuBLAS 中:
...
// 创建 handle
cublasHandle_t handle;
cublasCreate(&handle);
// 调用函数,传入计算所需参数
cublasSgemm(handle,CUBLAS_OP_N,CUBLAS_OP_N,1,3,2,&alpha,d_b,1,d_a,2,&beta,d_c,1);
利用这些库,我们可以将 LLTM 用到的操作用 CUDA 重构:
template <typename scalar_t>
__device__ __forceinline__ scalar_t d_sigmoid(scalar_t z) {
  const auto s = sigmoid(z);
  return (1.0 - s) * s;
}

template <typename scalar_t>
__device__ __forceinline__ scalar_t d_tanh(scalar_t z) {
  const auto t = tanh(z);
  return 1 - (t * t);
}

template <typename scalar_t>
__device__ __forceinline__ scalar_t elu(scalar_t z, scalar_t alpha = 1.0) {
  return fmax(0.0, z) + fmin(0.0, alpha * (exp(z) - 1.0));
}

template <typename scalar_t>
__device__ __forceinline__ scalar_t d_elu(scalar_t z, scalar_t alpha = 1.0) {
  const auto e = exp(z);
  const auto d_relu = z < 0.0 ? 0.0 : 1.0;
  return d_relu + (((alpha * (e - 1.0)) < 0.0) ? (alpha * e) : 0.0);
}

template <typename scalar_t>
__global__ void lltm_cuda_forward_kernel(
    const scalar_t* __restrict__ gates,
    const scalar_t* __restrict__ old_cell,
    scalar_t* __restrict__ new_h,
    scalar_t* __restrict__ new_cell,
    scalar_t* __restrict__ input_gate,
    scalar_t* __restrict__ output_gate,
    scalar_t* __restrict__ candidate_cell,
    size_t state_size) {
  const int column = blockIdx.x * blockDim.x + threadIdx.x;
  const int index = blockIdx.y * state_size + column;
  const int gates_row = blockIdx.y * (state_size * 3);
  if (column < state_size) {
    input_gate[index] = sigmoid(gates[gates_row + column]);
    output_gate[index] = sigmoid(gates[gates_row + state_size + column]);
    candidate_cell[index] = elu(gates[gates_row + 2 * state_size + column]);
    new_cell[index] =
        old_cell[index] + candidate_cell[index] * input_gate[index];
    new_h[index] = tanh(new_cell[index]) * output_gate[index];
  }
}