搜狗输入法linux版:http://pinyin.sogou.com/linux/help.php
win/linux同时支持比较好用的浏览器:maxthon,firefox,maxthon,opera,konqueror,chrome
邮件客户端:kmail, Claws Mail,Thunderbird,Balsa,Sylpheed,Alpine,Cone,Pine,Mutt,SquirrelMail,,,
图形图像处理:linux下有gimp一般安装完大多数都自带的,功能强大,号称linux下的ps。gimp也有windows版本。
客户端删邮件:kmail: acounts-->modify acount-->leave fetched messages on the server.
办公:wps linux版本。
1、系统自带 screenshot,
2、Shutter,
3、Scrot,
4、Linux中的完美截图工具:Deepin-ScreenShot,
5、KSnapshot,
6、ScreenCloud,
7、HotShots,
8、GIMP和ImageMagick这两款主攻图像处理的工具,也能提供像样的屏幕捕捉功能。
下载:
http://sourceforge.net/projects/axel2/files/latest/download
./configure;make;make install
curl下载:
wget下载:
amule下载:
默认安装后,kad网络大多失效,处于无法连接状态。这里推荐一个kad
http://upd.emule-security.org/nodes.dat

在“网络”,“kad”中进行替换。
如果这个失效,请访问这个地址查看最新的kad
http://emulefans.com/emule-kad-node-dat/

网络eD2k
服务器列表http://emulefans.com/news/plugin/server-list/

大家要把前面的多于的地址去掉,正常的地址应该为http://ed2k.im/server.met

Firefox中启动aMule:
firefox3.0以后的版本应该这么办: firefox下about:config
新建布尔项:network.protocol-handler.expose.ed2k 值:false

以下适用firefox3.0以前的版本 firefox下about:config
    新建一个Boolean,名字为 network.protocol-handler.external.ed2k,值为true
    新建一个String,名字为 network.protocol-handler.app.ed2k,在我的系统中,值为/usr/bin/ed2k。也许在你的系统中就是/usr/bin/ed2k.amule或者 ed2k.amule了,视情况!

前两个步骤一样,重点是接下来...
    安装"amule-utils"套件,因为要用到其中的/usr/bin/ed2k程式,接着点选ed2k的连结,如果跑出询问关联的视窗,记住不要使用默认的,点选其他程式,照着路径/usr/bin/ed2k找出ed2k的程式来使用.

注意:设置完后记得重启firefox生效。下载时,在firefox中点了链接后只是将下载链接加到下载列表里,并不会自动打开amule,需要手动打开才开始下载。
收发邮件:
http://www.centoscn.com/CentosServer/lighttpd/2013/0726/650.html
http://jingyan.baidu.com/article/e6c8503c04b2cce54f1a18b1.html
http://blog.csdn.net/shaobingj126/article/details/9813339
http://blog.163.com/xiaoyu_zhou/blog/static/224187702012327111517641/
双屏设置:
更新nvidia驱动,进入“控制面板”-“nvidia控制面板”-“设置多个显示器”
播放器:
mplayer,totem,gstreamer, ffmpeg,kmplayer ,realplayer ,smplayer,umplayer,gomplayer,
mpc,beoplayer,potplayer,moboplayer,gomplayer,mxplayer,vplayer,zplayer,,,,
beoplayer,airplay, vplayer
CentOS 6.5 下的截图方法
1.利用命令模式
捕获整个屏幕 : $ gnome-screenshot
捕获当前终端Terminal : $ gnome-screenshot -w
捕获自定义区域 :$ gnome-screenshot -a
利用-B参数可以去除终端窗口的名称状态条:$ gnome-screenshot -w -B
使用-d参数来延迟截图的时间(仅限于截全屏时使用) :$ gnome-screenshot -d [n] (n为自定义延迟的秒数)
使用-e参数为所截终端窗口添加外边框及阴影 :(若-e 后面跟boder为添加外边框,跟shadow为添加阴影)
- 添加外边框: $ gnome-screenshot -w -e border
- 添加阴影 : $ gnome-screenshot -w -e shadow
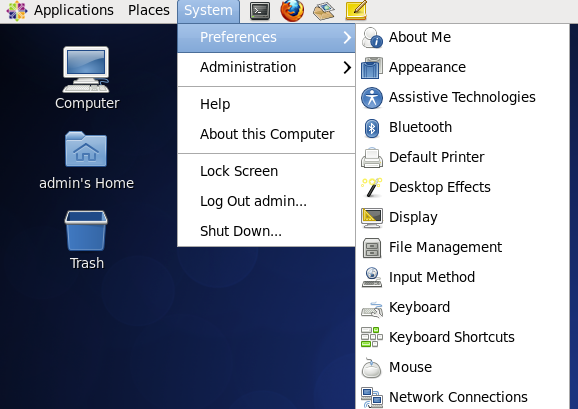
2.设置截屏快捷键
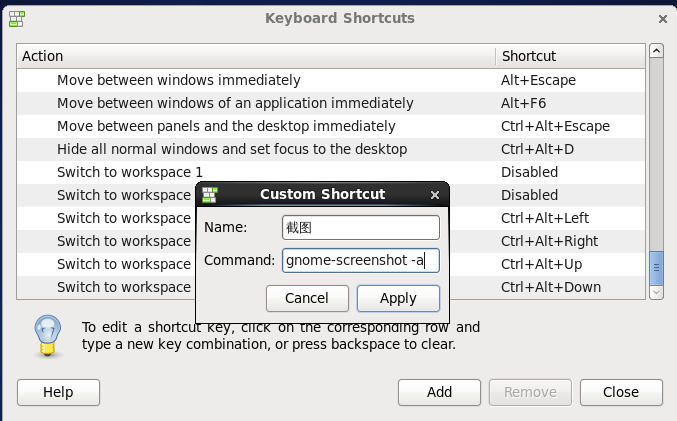
System->Preferences->Keyboard Shortcunts->ADD
点击ADD后输入Name(自定义)、Command(该快捷键命令),完成后点击Apply,如下图:
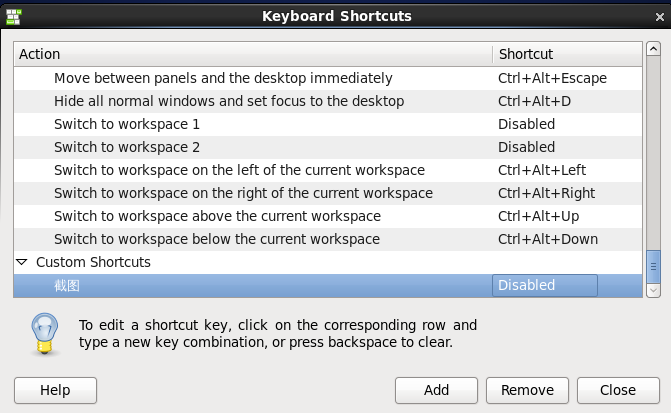
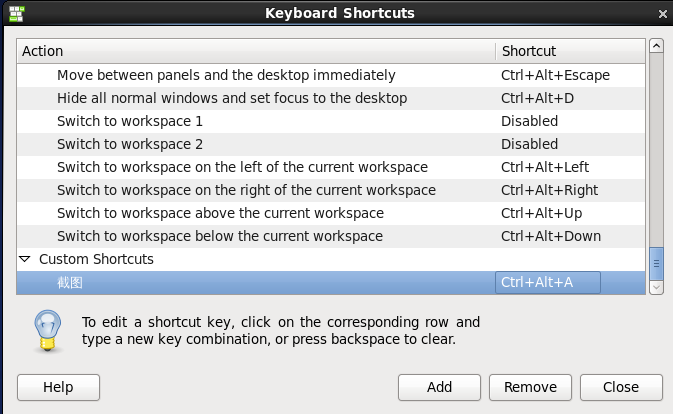
完成后如下图:选中Disabled,并直接敲下你自定义的快捷键(例如:Ctrl+Alt+a),快捷键就设置好了
linux office安装:
一、libreoffice
centos自带的openoffice,实在差劲,版本太老;没办法,centos为了稳定,没有新软件;尤其是openoffice被oracle捣腾得...不多说,放弃openoffice,安装libreoffice,是一个正确的选择。首先下
二、永中office
1、永中对微软word的兼容性最好,几乎达到完美地步,在中国完全可以替代word,建议大家使用,而OOO则在段落和图类表现不佳,不怪它,毕竟和微软的word打的就不是一套拳;
2、暂不明确中国政府在办公文档标准上的态度,是继续支持中国的uof,还是世界的odf;
3、OOO实力不俗,打破微软文档标准后,odf不论是大小、功能上都很强势,应该是未来的发展方向。大家一定要注意到,同一篇文档doc大小是208KB,uof则是2M,而odt却只有区区的32.5K而已;
4、永中和OOO的uof与odf互不兼容,可以预见,一是永中会开发odf转换工具,二是中国政府很可能未来采用odf格式,这样又浪费了uof的N多金钱,呵呵,这,就是,中国特色。
三、OpenOffice.org由于主要是支持开放文档格式ODF标准,所以它与微软MS Office格式的兼容性并不完美,我的部分.doc、.xls和.ppt文件用OpenOffice.org打开,版面和格式都不太一致。
Linux平台其它office软件,除了三强争霸,其实Linux平台还有其它office软件,比如IBM Lotus Symphony、GNOME Office、KOffice、中标普华Office、Google Docs等,
四、 Centos 安装 WPS Office
http://blog.chinaunix.net/uid-27666459-id-3992947.html
http://wenku.baidu.com/view/a638321e1ed9ad51f01df282.html
不可错过的十大Linux应用程序
  一、ClamTk
  ClamTk是著名的开放源代码杀毒软件 ClamAV 的图形前端,采用的是 GTK2-Perl 脚本制作,可以在32位/64位系统上运行。ClamTk Virus Scanner 同样是一款开放源代码,所以可以在包括商业公司、盈利机构等在内的任何场所免费使用。与采用KDE组件构造的 Klamav 相比,ClamTK 更适合以 GNOME 为桌面环境的用户。
  更多详情:http://clamtk.sourceforge.net/

  二、GParted
  GParted是一款linux下的功能非常强大的分区工具,和windows下的‘分区魔术师’类似,操作和显示上也很相似。GParted可以方便的创建、删除分区,也可以调整分区的大小和移动分区的位置。
  它支持多种linux下常见的分区格式,包括ext2、ext4、fat、hfs、jfs、reiser4、reiserfs、xfs,甚至ntfs。
  更多详情:http://gparted.sourceforge.net/

  三、Kate编辑器
  Kate编辑器要比Windows XP下的WordPad要强大得多。Kate还提供了大量便捷的文本操作,例如搜索、替换、更改文字大小写以及加入以及拆分行、拼写检查。它支持CVS,在开源协同的条件下为我们的日常工作带来了不少方便。
  更多详情:http://kate-editor.org/

  四、Libre Office
  LibreOffice是OpenOffice.org 办公套件衍生版, 同样免费开源。LibreOffice拥有强大的数据导入和导出功能,能直接导入PDF文档、微软Works、LotusWord,支持主要的OpenXML格式。
  更多详情:http://www.libreoffice.org/
  下载:http://down.tech.sina.com.cn/content/49444.html

  五、LuckyBackup
  LuckyBackup,顾名思义,是一个强大,快速并且可靠的备份/同步工具。它的界面友好,操作简单,从单向复制到双向同步都可轻易胜任。当然,它还有一些更高级的同步功能值得你去挖掘。内置行程表,并且会在完成任务的时候邮件告知用户。
  更多详情:http://luckybackup.sourceforge.net/

  六、PeaZip
  这是一款免费绿色便携的解压缩软件,其主要功能是提供一套具备搜索及浏览历史纪录的压缩档浏览接口,来直觉式地对压缩档内容进行浏览,并可以使用详细的筛选规则。此外也能使用扁平式的浏览模式作为另一种浏览压缩档的方式。
  PeaZip提供用户通过图形化用户界面的前端程序来自动产生命令提示列的压缩或解压缩动作(支持7Z、ARC、BZ2、GZ、PAQ、PEA、 QUAD/BALZ、TAR、UPX、WIM、XZ、ZIP等格式)。它同时也提供了制作、编辑以及撤消压缩设置档来加速压缩或备份的设置。
PeaZip解压缩工具
  此外,还包含了文件的切割与合并、安全删档、位式文件比对、文件完整性检查、系统效能监控、随机密码/密钥产生器、及集成进资源管理器右键菜单。除此之外,程序的用户界面(包含图片及颜色配置)都可以自行调整。
  更多详情:http://peazip.sourceforge.net/
  本地下载 http://down.tech.sina.com.cn/content/38273.html

  七、Shutterr截图工具
不论你出于何种目的,只要是屏幕截图,Shutter都是你的不二之选。它不仅功能丰富而且反映迅速。
  通过Shutter,你可以截取包括选定区域、全屏幕、窗口、窗口内的控件甚至网页的图像。通过内置的强大插件机制,你可以在截图后,对图像进行各式各样的增强,如增加阴影,打上标志。还可以对截图进行编辑:插入文字或图标等等。
  更多详情:http://shutter-project.org/

  八、SMPlayer播放器
  SMPlayer可能大家都比较熟悉,今天我们要讲的Linux版本的SMPlayer。
  MPlayer 是 Linux 下最受欢迎的影音播放器之一,SMPlayer 是 MPlayer 的一款前端界面,这两者都是免费的开源软件。它支持几乎所有格式的视频。另外,它能记住每个文件的设置和每个视频的播放记录。
  更多详情:http://smplayer.sourceforge.net/
  本地下载:http://down.tech.sina.com.cn/content/39483.html

  九、Synapse启动器
  Synapse是一个Linux系统上面的启动器,可以给用户节省不少时间。计算器,Launchpad插件(在Launchpad寻找漏洞和分 支),Pastebin, Imgur(图片上传)和一个选择插件(允许你在当前选择的文本中执行动作)。新版本同时对Zeitgeist搜索,复制粘贴,用户界面和反应速度做了一 些改善。
  更多详情:https://launchpad.net/synapse-project

  十、Synaptic Package Manager软件包管理器
  Synaptic Package Manager软件包管理器是Ubuntu中的一个基本功能(Ubuntu软件中心)。如果想运行第三方软件或者管理安装的软件,Synaptic将是不二之选。
  更多详情:http://www.nongnu.org/synaptic/
terminal进入file manager文件夹命令"nautils ."
删除整行命令:ctrl+u

删除整行命令:
方法一:
Ctrl + u

方法二:
$ set -o vi
dd

方法三:
$ set -o emacs
C-a C-l
我都是Ctrl+a 再ctrl+k,跟emacs里差不多
ctrl k 与ctrl u是一样的
ctrl+c
ctrl+a & ctrl+k
ctrl+e & ctrl+u
 evince, PDF
evince (gnome),okular (kde),epdfview (lxde),xpdf?evince? acroread? kpdf? fbgs?
 linux下截图软件scrot的安装
scrot的安装
系统centos6.2 i386
    # wget http://fossies.org/unix/privat/scrot-0.8.tar.gz
    # tar xvf scrot-0.8.tar.gz
    # cd scrot-0.8
    # ./configure  下面出现错误

[root@localhost scrot-0.8]# ./configure
checking for a BSD-compatible install... /usr/bin/install -c
checking whether build environment is sane... yes
checking whether make sets $(MAKE)... yes
checking for working aclocal-1.4... missing
checking for working autoconf... found
checking for working automake-1.4... missing
checking for working autoheader... found
checking for working makeinfo... found
checking for gcc... gcc
checking for C compiler default output... a.out
checking whether the C compiler works... yes
checking whether we are cross compiling... no
checking for suffix of executables...
checking for suffix of object files... o
checking whether we are using the GNU C compiler... yes
checking whether gcc accepts -g... yes
checking for gcc option to accept ANSI C... none needed
checking for gcc option to accept ANSI C... none needed
checking for an ANSI C-conforming const... yes
checking for a BSD-compatible install... /usr/bin/install -c
checking whether make sets $(MAKE)... (cached) yes
checking whether to enable maintainer-specific portions of Makefiles... no
checking for giblib-config... no
checking for giblib - version >= 1.2.3... no
*** The giblib-config script installed by giblib could not be found
*** If giblib was installed in PREFIX, make sure PREFIX/bin is in
*** your path, or set the GIBLIB_CONFIG environment variable to the
*** full path to giblib-config.
configure: error: Cannot find giblib: Is giblib-config in the path?

提示缺少giblib

    # wget http://linuxbrit.co.uk/downloads/giblib-1.2.4.tar.gz
    或者是下面的链接
    # wget http://pkgs.fedoraproject.org/repo/pkgs/giblib/giblib-1.2.4.tar.gz/c810ef5389baf24882a1caca2954385e/giblib-1.2.4.tar.gz
    # tar zxvf  giblib-1.2.4.tar.gz
    # cd giblib-1.2.4
    #./configure 继续提示错误

checking whether to build static libraries... yes
checking for f95 option to produce PIC... -fPIC
checking if f95 PIC flag -fPIC works... yes
checking if f95 supports -c -o file.o... yes
checking whether the f95 linker (/usr/bin/ld) supports shared libraries... yes
checking dynamic linker characteristics... GNU/Linux ld.so
checking how to hardcode library paths into programs... immediate
checking whether stripping libraries is possible... yes
checking for a BSD-compatible install... /usr/bin/install -c
checking whether make sets $(MAKE)... (cached) yes
checking whether build environment is sane... yes
checking whether to enable maintainer-specific portions of Makefiles... no
checking if malloc debugging is wanted... no
checking for imlib2-config... no
checking for imlib2 - version >= 1.0.0... no
*** The imlib2-config script installed by imlib2 could not be found
*** If imlib2 was installed in PREFIX, make sure PREFIX/bin is in
*** your path, or set the IMLIB2_CONFIG environment variable to the
*** full path to imlib2-config.
configure: error: Cannot find imlib2: Is imlib2-config in the path?

提示缺少imlib2,遂下载安装之,则OK。

安装顺序记录如下,
    ######################imlib########################
    wget http://sourceforge.net/projects/enlightenment/files/imlib2-src/1.4.5/imlib2-1.4.5.tar.gz/download
    tar xvf imlib2-1.4.5.tar.gz
    cd imlib2-1.4.5
    ./configure
    make
    make install
    ########################giblib#####################
    wget http://linuxbrit.co.uk/downloads/giblib-1.2.4.tar.gz
    cd giblib-1.2.4
    ./configure
    make
    make install
    ########################scrot#######################
    wget http://fossies.org/unix/privat/scrot-0.8.tar.gz
    tar xvf scrot-0.8.tar.gz
    cd scrot-0.8
    ./configure
    make
    make install
    #########################over#####################

安装完毕,问题还未结束
    #scrot 运行scrot命令,如下提示libgiblib的库没有找到
    scrot: error while loading shared libraries: libgiblib.so.1: cannot open shared object file: No such file or directory
    在系统里面寻找libgiblib库文件
    #find /usr -name libgiblib.so.1
    /usr/local/lib/libgiblib.so.1
    #cat /etc/ld.so.conf  查看当前库加载路径
    include ld.so.conf.d/*.conf
    #echo "/usr/local/lib" >> /etc/ld.so.conf 添加库路径
    #ldconfig  加载库文件后scrot正常使用来
    #scrot --help 查看scrot的帮助信息
    Usage : scrot [OPTIONS]... [FILE]
      Where FILE is the target file for the screenshot.
      If FILE is not specified, a date-stamped file will be dropped in the
      current directory.
      See man scrot for more details
      -h, --help                display this help and exit
      -v, --version             output version information and exit
      -b, --border              When selecting
    ……

scrot的使用方法

scrot 的使用格式为:scrot [options] [file]。

一般用法

就一般而言,使用 scrot 可以抓取整个桌面、某个指定的窗口、以及选择的矩形区域。

    抓取桌面:scrot desktop.png,该命令将当前的整个桌面抓取下来,并保存为 desktop.png 文件。可以在当前的目录中找到此图像文件。

    抓取窗口:scrot -bs window.png,选项 b 使 scrot 在抓取窗口时一同将外边框抓取下来,而 s 选项则让用户选择所要抓取的是何窗口。


抓取区域:scrot -s rectangle.png,在执行此命令后,使用鼠标拖曳的矩形区域将被 scrot 抓取下来。
对于普通的抓取使用 scrot 的基础便足以应付了。但在某些特殊情况之下,使用 scrot 抓取图像需要讲究一些技巧。
    延时抓取:scrot -cd 10 menu.png,此命令中的 d 选项用于延时抓取图像,其后的 10 代表延时 10 秒;前面的选项 c 显示倒计时。在抓取菜单或是命令提示时,该技巧将充分展示其魔力。
    生成缩图:scrot -t 50% thumb.png,这个命令在抓取图像的同时生成该图像的缩略图。选项 t 将打开此功能,其后的 50% 为原图的缩放百分比。
    更改品质:scrot -q 70 quality.jpg,此命令中的 q 选项用于更改所抓图像的品质,其数值介于 1-100 之间,默认为 75。数值越大,意味着图像品质越高;同时,图像的压缩率也就越低,占用空间越大。
操作抓图:scrot action.png -e 'mv $f ~/images/',该命令将抓取的图像移动到 ~/images/ 目录。显然,操作图像的功能由 e 选项开启,其中的 $f 代表原图的路径/文件名。
以上示例皆指定了需要保存的抓图的文件名称。实际上,如果不指定名称,那么 scrot 在抓取图像后会自动使用当前的日期时间、宽度高度的组合来生成文件名称。
传个图片看一下抓图效果,
itniaho的博客
打开查看如下
itniaho的博客
似乎有一点遗憾的是不能支持粘贴功能,只能把文件保存为图片,不过可以满足日常用了。
 另一个截屏软件是import
几个常用的import命令:
1 import my.jpg
然后可以使用鼠标选择的范围

2 sleep 5; import my.jpg

等待5秒钟后,截取鼠标选择的范围

3 import -frame my.jpg

截取鼠标所点击的窗口

4 import -window root my.jpg

截取整个屏幕,作用相当于Print Screen键

5 import -frame -window 0xe00003 mypicture.jpg

用于截取window ID为0xe00003的窗口。

你可以使用xwininfo命令获取到特定窗口的window ID

ps:截取完成的图片,如果你想了解它的各项参数,可以使用identify命令加图片文件名称就可以了。
