一. domz.py
from scrapy.linkextractors import LinkExtractor
from scrapy.spiders import CrawlSpider, Rule


class DmozSpider(CrawlSpider):
    """Follow categories and extract links."""
    name = 'dmoz'
    #gihtub上面给的举例网址挂了,换成这个
    allowed_domains = ['dmoztools.net']
    start_urls = ['http://dmoztools.net/']

    #这个链接提取器秩序要定位到标签,他会自动提取链接
    rules = [
        Rule(LinkExtractor(
            restrict_css=('.top-cat', '.sub-cat', '.cat-item')
        ), callback='parse_directory', follow=True),
    ]
    #解析过程
    def parse_directory(self, response):
        for div in response.css('.title-and-desc'):
            yield {
                'name': div.css('.site-title::text').extract_first(),
                'description': div.css('.site-descr::text').extract_first().strip(),
                'link': div.css('a::attr(href)').extract_first(),
            }
看一下和scapy的主要区别:

二. settings.py
# Scrapy settings for example project
#
# For simplicity, this file contains only the most important settings by
# default. All the other settings are documented here:
#
#     http://doc.scrapy.org/topics/settings.html
#
SPIDER_MODULES = ['example.spiders']
NEWSPIDER_MODULE = 'example.spiders'

#ua不同
USER_AGENT = 'scrapy-redis (+https://github.com/rolando/scrapy-redis)'

#比scrappy多了这三行
DUPEFILTER_CLASS = "scrapy_redis.dupefilter.RFPDupeFilter"  #指定去重方法给requests对象去重
SCHEDULER = "scrapy_redis.scheduler.Scheduler"              #指定scheduler队列
SCHEDULER_PERSIST = True                                    #队列中的内容是否持久化保存,如果为False会在会在关闭redis的时候清空redis
#SCHEDULER_QUEUE_CLASS = "scrapy_redis.queue.SpiderPriorityQueue"
#SCHEDULER_QUEUE_CLASS = "scrapy_redis.queue.SpiderQueue"
#SCHEDULER_QUEUE_CLASS = "scrapy_redis.queue.SpiderStack"

#pipline多了下面一行,并且打开的
ITEM_PIPELINES = {
    'example.pipelines.ExamplePipeline': 300,
    'scrapy_redis.pipelines.RedisPipeline': 400,   #scrapy_redis实现item保存到redis的pipline
}

LOG_LEVEL = 'DEBUG'

# 这个需要自己添加
#链接数据库,只要pipline开启,并且'scrapy_redis.pipelines.RedisPipeline': 400,
#那么数据就会保存到数据库,并且我们并不需要去pipline写保存的函数
REDIS_URL='redis://127.0.0.1:6379'

#redis也可以这么写:
# REDIS_HOST='127.0.0.1'
# REDIS_PORT=6379

# Introduce an artifical delay to make use of parallelism. to speed up the
# crawl.
DOWNLOAD_DELAY = 1
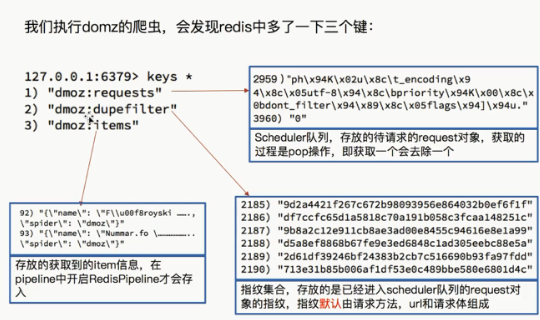
三.运行爬虫后的的结果
进入项目文件夹,执行:
scrapy crawl domz
再看一下数据库:
·
注意:
1.这个并没有用到items和pipline所以我们先研究这两个文件
四.注释掉写入reid的语句,在运行一下看下结果
在settings.py 注释这一句
ITEM_PIPELINES = {
    'example.pipelines.ExamplePipeline': 300,
    # 'scrapy_redis.pipelines.RedisPipeline': 400,
}
运行爬虫,发现
爬虫正常运行,但是items的数量并没有增多,说明RedisPipeline只是实现了item出具存储到redis的过程,
我们可以新建一个pipeline(或者修改example的的examplepipinne),让数据存储到任意地方