一、Mybatis回顾
1、MyBatis介绍
Mybatis是一个半ORM框架,它使用简单的 XML 或注解用于配置和原始映射,将接口和Java的POJOs(普通的Java 对象)映射成数据库中的记录。
2、Mybatis整体架构

二、Spring Boot整合Mybatis + Druid
1、在应用中导入maven依赖如下:
     <!-- mybatis -->
        <dependency>
            <groupId>org.mybatis.spring.boot</groupId>
            <artifactId>mybatis-spring-boot-starter</artifactId>
        </dependency>
        <!--database pool-->
        <dependency>
            <groupId>com.alibaba</groupId>
            <artifactId>druid</artifactId>
            <version>1.1.8</version>
        </dependency>
        <!--mysql数据库-->
        <dependency>
            <groupId>mysql</groupId>
            <artifactId>mysql-connector-java</artifactId>
            <scope>runtime</scope>
        </dependency>
2、在应用中加配置
① 配置Druid数据源参数:
#配置数据源
spring.datasource.druid.url=jdbc:mysql://127.0.0.1:3306/demo_db?useUnicode=true&characterEncoding=utf8&useSSL=false
spring.datasource.druid.username=root
spring.datasource.druid.password=123qwe
spring.datasource.druid.driverClassName=com.mysql.jdbc.Driver
spring.datasource.druid.initialSize: 5
spring.datasource.druid.minIdle: 5
spring.datasource.druid.maxActive: 20
spring.datasource.druid.maxWait: 60000
spring.datasource.druid.timeBetweenEvictionRunsMillis: 60000
spring.datasource.druid.minEvictableIdleTimeMillis: 300000
spring.datasource.druid.validationQuery: SELECT 1 FROM DUAL
spring.datasource.druid.testWhileIdle: true
spring.datasource.druid.testOnBorrow: false
spring.datasource.druid.testOnReturn: false
spring.datasource.druid.poolPreparedStatements: true
spring.datasource.druid.filters: stat,wall
spring.datasource.druid.maxPoolPreparedStatementPerConnectionSize: 20
spring.datasource.druid.useGlobalDataSourceStat: true
spring.datasource.druid.connectionProperties: druid.stat.mergeSql=true;druid.stat.slowSqlMillis=500
② 编写Druid数据源属性接收类:
/**
 * @desc: 自定义druid的属性
 * @author: toby
 */
@ConfigurationProperties(prefix = "spring.datasource.druid")
@Data
public class DruidDataSourceProperties {
    private String username;
    private String password;
    private String url;
    private String driverClassName;
    private Integer initialSize;
    private Integer maxActive;
    private Integer minIdle;
    private Long maxWait;
    ......
}
③ 编写Druid数据源配置类:
/**
 * @desc: 自定义druid配置,如不自定义,配置文件设置的属性不生效自行测试
 * @author: toby
 */
@Configuration
@EnableConfigurationProperties(value = DruidDataSourceProperties.class)
@MapperScan(basePackages="com.toby.mapper", value="sqlSessionFactory")
public class DruidDataSourceConfig {

    @Autowired
    private DruidDataSourceProperties druidDataSourceProperties;

    @Bean
    public DataSource dataSource() throws SQLException {
        DruidDataSource druidDataSource = new DruidDataSource();
        druidDataSource.setUsername(druidDataSourceProperties.getUsername());
        druidDataSource.setPassword(druidDataSourceProperties.getPassword());
        druidDataSource.setUrl(druidDataSourceProperties.getUrl());
        druidDataSource.setDriverClassName(druidDataSourceProperties.getDriverClassName());
        druidDataSource.setInitialSize(druidDataSourceProperties.getInitialSize());
        druidDataSource.setMinIdle(druidDataSourceProperties.getMinIdle());
        druidDataSource.setMaxActive(druidDataSourceProperties.getMaxActive());
        druidDataSource.setMaxWait(druidDataSourceProperties.getMaxWait());
        druidDataSource.setFilters(druidDataSourceProperties.getFilters());
        druidDataSourceProperties.setPoolPreparedStatements(druidDataSourceProperties.getPoolPreparedStatements());
        return druidDataSource;
    }
}
3、在应用中加@MapperScan注解,他的主要作用就是扫描basePackage包下面的TobyMapper接口,然后getBean的时候通过JDK的动态代理,生成代理对象,所以我们程序中看到的是TobyMapper接口,其实是被动态代理过的。验证方式很简单,DEUBG到TobyMapper的方法里面,就可以发现其就是个动态代理
/**
 * @desc: spring boot 启动类
 * @author: toby
 */
@SpringBootApplication
@MapperScan(basePackages="com.toby.mapper")
public class MybatisApplication {
    public static void main(String[] args) {
        SpringApplication.run(MybatisApplication.class, args);
    }
}
三、源码解析
1、Mybatis自动装配
自动装配的流程图:
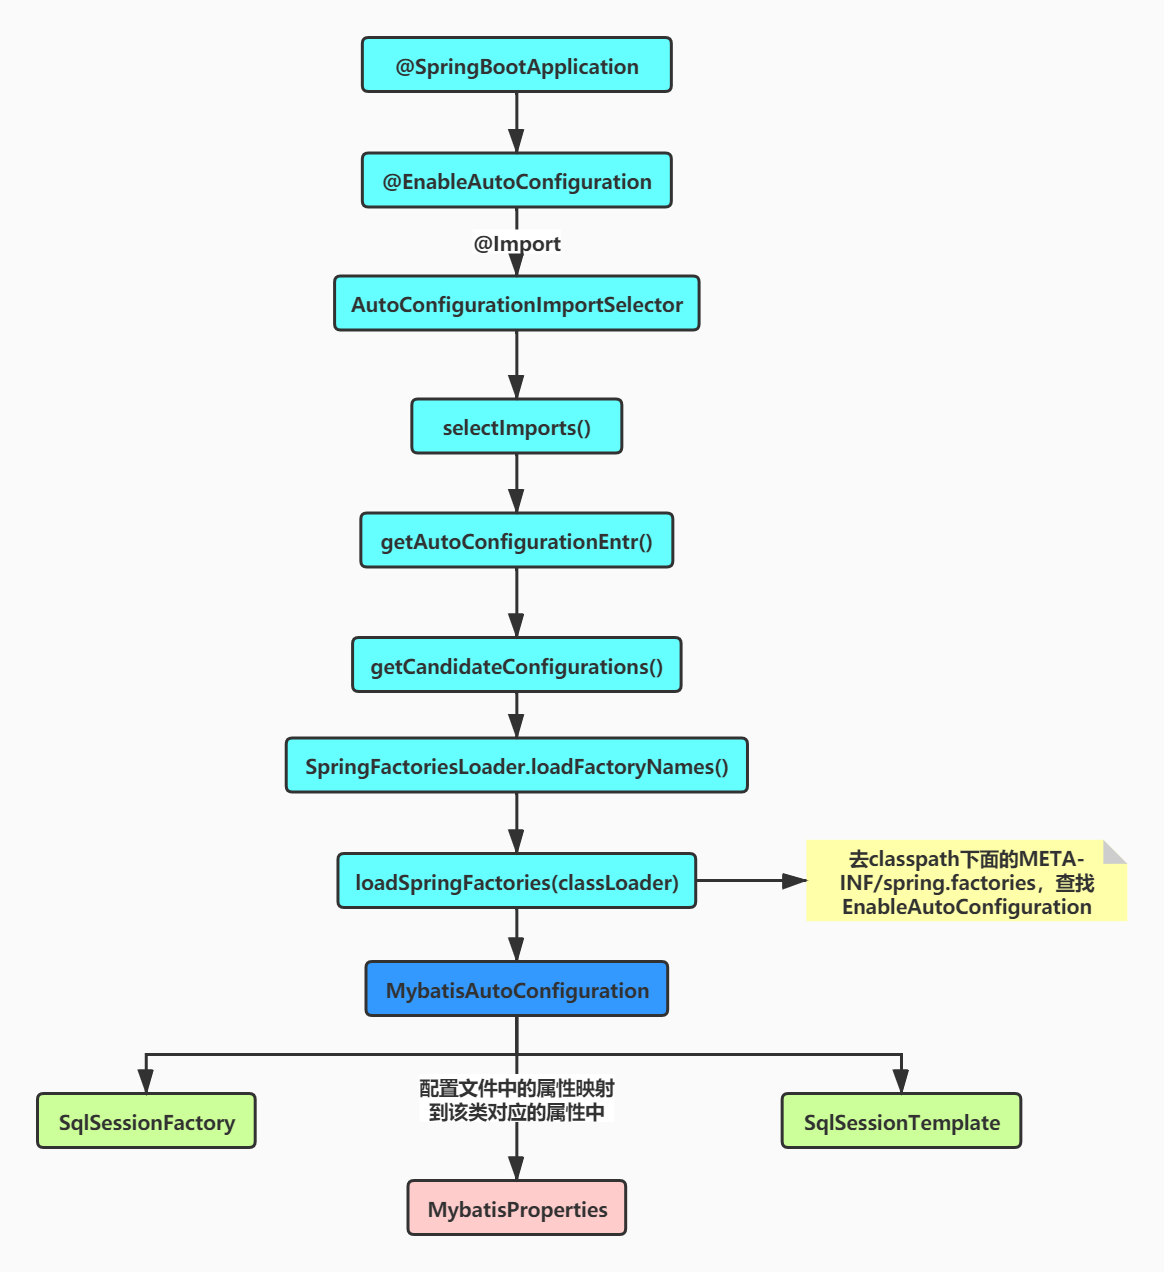
具体详细见Spring Boot系列(二):Spring Boot自动装配原理解析中的Spring Boot自动装配流程图。Mybatis的自动配置类给我们配置了什么组件,我们接下来看下MybatisAutoConfiguration类
① SqlSessionFactory:当容器中没有SqlSessionFactory这个类型的Bean的时候,Spring就加载该组件。

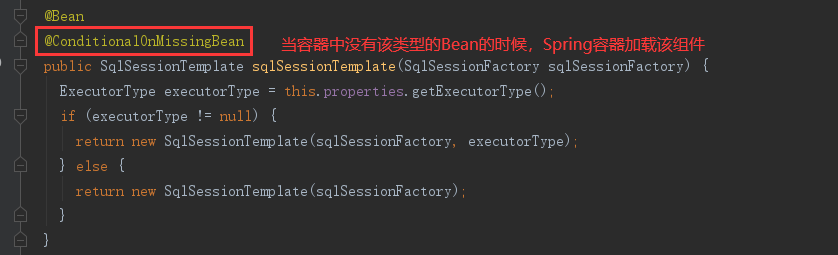
② SqlSessionTemplate:同样当容器中没有SqlSessionTemplate这个类型的Bean的时候,Spring就加载该组件。
到此SqlSessionFactory和SqlSessionTemplate组件有了。
2、@MapperScan注解
@MapperScan注解:他的作用就是扫描basePackages包下面的TobyMapper接口,然后getBean("tobyMapper")的时候把该接口通过JDK的动态代理,生成代理对象,用于和数据库打交道。
① 从@MapperScan入手:
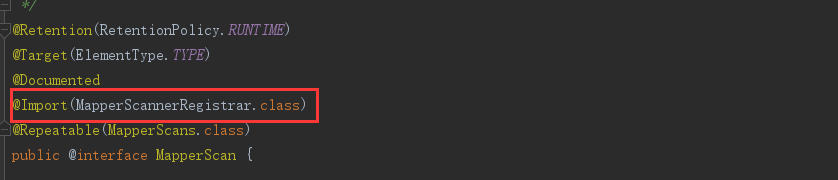
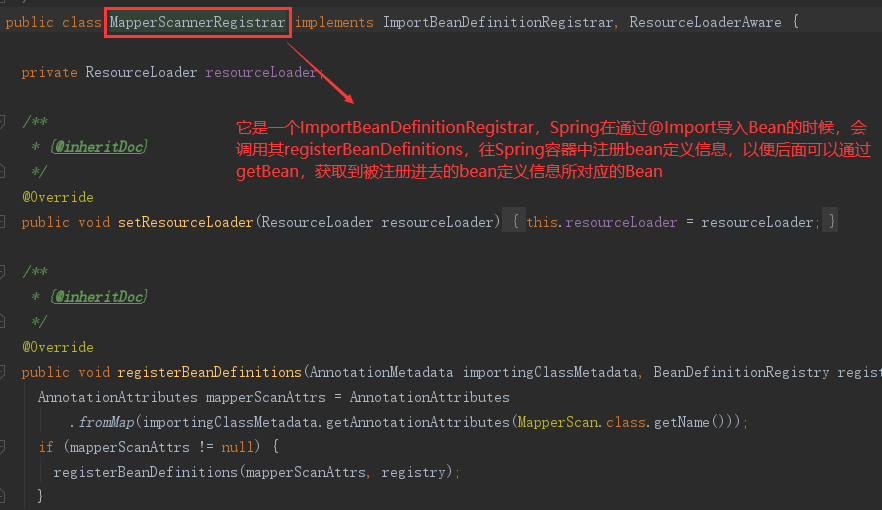
② 导入了MapperScanner注册类MapperScannerRegistrar:
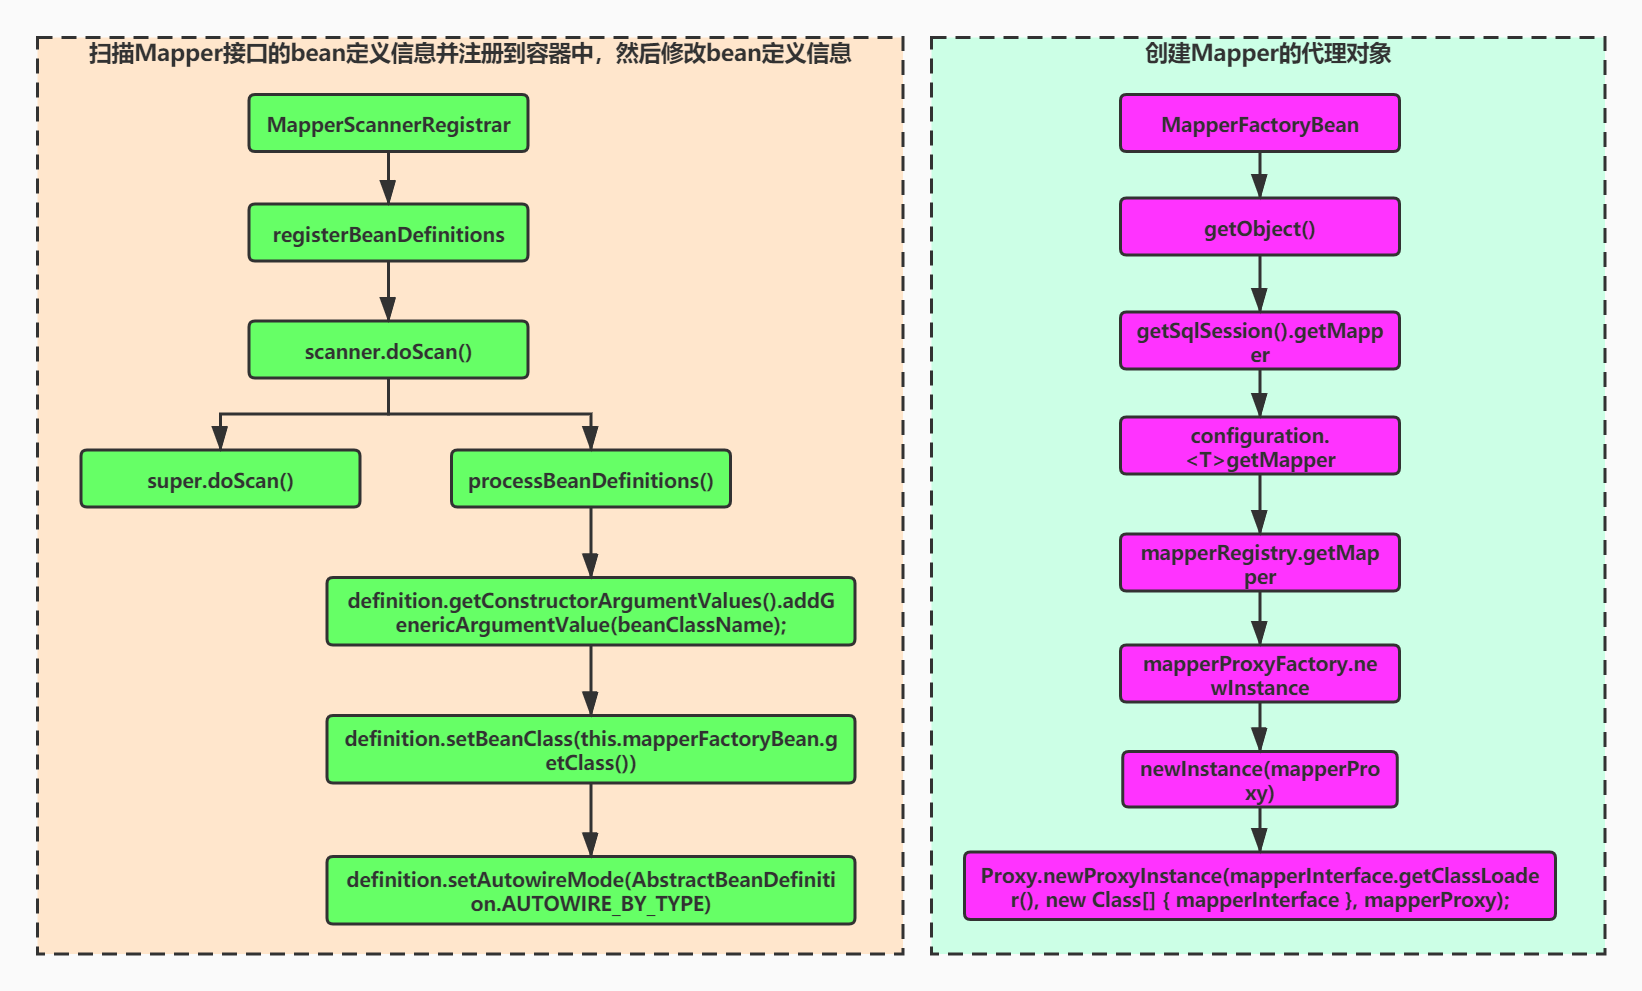
它是一个ImportBeanDefinitionRegistrar,Spring在通过@Import导入Bean的时候,会调用其registerBeanDefinitions,往Spring容器中注册bean定义信息,以便后面可以通过getBean获取到被注册进行的bean的定义信息所对应的Bean,其往Spring容器中注册的是MapperFactoryBean类型的Bean定义信息,为什么是MapperFactoryBean类型,而不是TobyMapper类型?原因很简单,Spring容器在getBean的时候,会忽略掉接口,接口是不能new的,而Spring容器默认在实例化的时候就是通过调用beanDefinition的beanClass属性所对应的类的无参构造方法。
③ 进去到注册bean定义信息的registerBeanDefinitions方法如下:
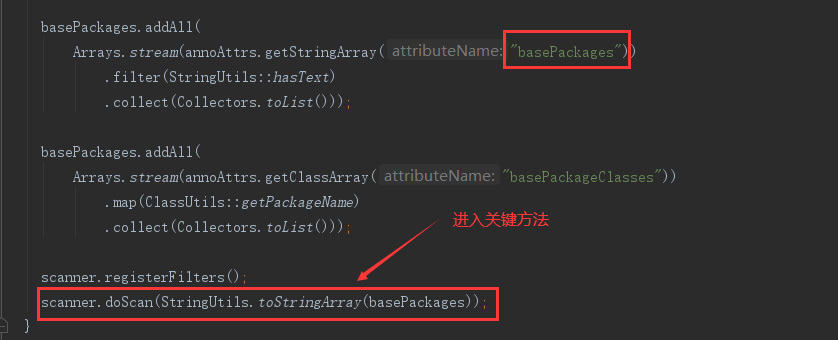
④ 进入到ClassPathMapperScanner的doScan,其作用是扫描basePackages所有的包,这里ClassPathMapper Scanner继承了Spring的包扫描ClassPathBeanDefinitionScanner

重写(覆盖)了判断是否是候选的Component方法isCandidateComponent,因为Spring默认的isCandidateComponent是会过滤掉接口的,显然不满足,所以重写了该方法
  /**
     * Spring默认的,独立的非接口,非抽象类
     */
    protected boolean isCandidateComponent(AnnotatedBeanDefinition beanDefinition) {
        AnnotationMetadata metadata = beanDefinition.getMetadata();
        return (metadata.isIndependent() && (metadata.isConcrete() ||
                (metadata.isAbstract() && metadata.hasAnnotatedMethods(Lookup.class.getName()))));
    }

    /**
     * ClassPathMapperScanner的可以是独立的接口
     */
    @Override
    protected boolean isCandidateComponent(AnnotatedBeanDefinition beanDefinition) {
        return beanDefinition.getMetadata().isInterface() && beanDefinition.getMetadata().isIndependent();
    }
接下来进入到处理TobyMapper的bean的定义信息方法:

⑤ 处理TobyMapper的bean定义信息,主要由3个重要改动:
//第一:修改构造函数为有参的构造函数;
definition.getConstructorArgumentValues().addGenericArgumentValue(beanClassName);
//第二:修改bean的class为MapperFactoryBean,该MapperFactoryBean是FactoryBean;
definition.setBeanClass(this.mapperFactoryBean.getClass());
//第三:修改注入类型为按照类型注入;
definition.setAutowireMode(AbstractBeanDefinition.AUTOWIRE_BY_TYPE);
到此,扫描TobyMapper的时候,往Spring容器中注册的是beanClass为MapperFactoryBean,一个有参数的构造函数,按照类型注入的这么一个Bean定义信息。
3、通过getBean("tobyMapper")获取TobyMapper的动态代理类
我们知道,此时的tobyMapper的bean定义信息中的beanClass的属性是MapperFactoryBean.class,而MapperFactoryBean又是一个FactoryBean,FactoryBean的特点就是在getBean的时候会调用其getObject方法;
① 我们找到MapperFactoryBean的getObject方法:

② 我们再进入org.apache.ibatis.session.defaults.DefaultSqlSession#getMapper方法,其实已经到了Mybatis的逻辑了。

③ 最后调用到org.apache.ibatis.binding.MapperRegistry#getMapper,其实就是创建JDK的动态代理了。
@SuppressWarnings("unchecked")
    public <T> T getMapper(Class<T> type, SqlSession sqlSession) {
        final MapperProxyFactory<T> mapperProxyFactory = (MapperProxyFactory<T>) knownMappers.get(type);
        if (mapperProxyFactory == null) {
            throw new BindingException("Type " + type + " is not known to the MapperRegistry.");
        }
        try {
            //创建代理实例
            return mapperProxyFactory.newInstance(sqlSession);
        } catch (Exception e) {
            throw new BindingException("Error getting mapper instance. Cause: " + e, e);
        }
    }
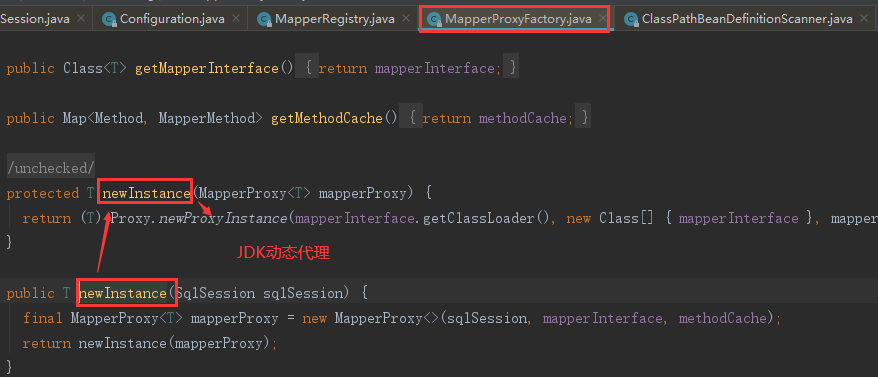
代理的逻辑在org.apache.ibatis.binding.MapperProxy#invoke方法,到此tobyMapper创建完成,可以操作数据库。
四、扫描Mapper和Mapper动态代理对象生成流程图