Springcloud 里面对于MQ的整合一个是前一篇的消息总线一个是本文介绍的消息驱动
大体要学习这么几个知识点:
课题:SpringCloud消息驱动Stream
1.什么是SpringCloud消息驱动
2.消息驱动Stream实现原理
3.消息驱动Stream与传统MQ区别
4.基于消息驱动整合Kafka
5.基于消息驱动整合Rabbitmq
6.基于消息驱动Stream消息分组
什么是消息驱动?
SpringCloud Stream消息驱动可以简化开发人员对消息中间件的使用复杂度,让系统开发人员更多尽力专注与核心业务逻辑的开发。SpringCloud Stream基于SpringBoot实现,自动配置化的功能可以帮助我们快速上手学习,类似与我们之前学习的orm框架,可以平滑的切换多种不同的数据库。
目前SpringCloud Stream 目前只支持 RabbitMQ和kafka
在topic模式上 区别很大的 这两个MQ SpringCloud去整合了 类似于Hibernate 通过对象得到sql语句
开发人员不需要知道具体的MQ底层实现,只需要关心业务逻辑编码就OK了
底层是如何实现的? Stream组件对rabbitMQ和kafka进行封装成同一个API,开发人员只需要对接Stream即可 !
消息驱动原理
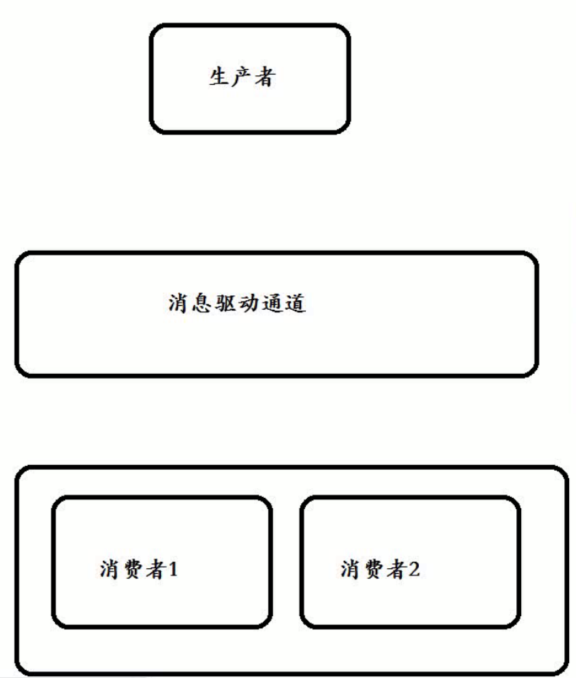
绑定器
通过定义绑定器作为中间层,实现了应用程序与消息中间件细节之间的隔离。通过向应用程序暴露统一的Channel通过,是的应用程序不需要再考虑各种不同的消息中间件的实现。当需要升级消息中间件,或者是更换其他消息中间件产品时,我们需要做的就是更换对应的Binder绑定器而不需要修改任何应用逻辑 。
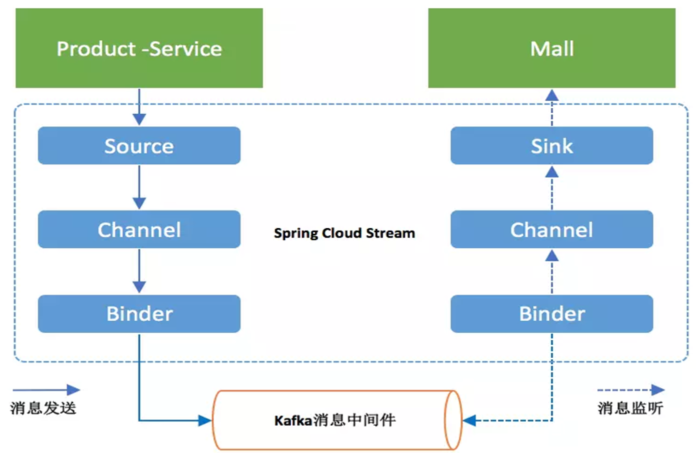
在该模型图上有如下几个核心概念:
- Source: 当需要发送消息时,我们就需要通过Source,Source将会把我们所要发送的消息(POJO对象)进行序列化(默认转换成JSON格式字符串),然后将这些数据发送到Channel中;
- Sink: 当我们需要监听消息时就需要通过Sink来,Sink负责从消息通道中获取消息,并将消息反序列化成消息对象(POJO对象),然后交给具体的消息监听处理进行业务处理;
- Channel: 消息通道是Stream的抽象之一。通常我们向消息中间件发送消息或者监听消息时需要指定主题(Topic)/消息队列名称,但这样一旦我们需要变更主题名称的时候需要修改消息发送或者消息监听的代码,但是通过Channel抽象,我们的业务代码只需要对Channel就可以了,具体这个Channel对应的是那个主题,就可以在配置文件中来指定,这样当主题变更的时候我们就不用对代码做任何修改,从而实现了与具体消息中间件的解耦;
- Binder: Stream中另外一个抽象层。通过不同的Binder可以实现与不同消息中间件的整合,比如上面的示例我们所使用的就是针对Kafka的Binder,通过Binder提供统一的消息收发接口,从而使得我们可以根据实际需要部署不同的消息中间件,或者根据实际生产中所部署的消息中间件来调整我们的配置。
消息驱动有通道,绑定MQ。
生产者消息传递到通道里面之后,通道是跟MQ做绑定,封装的。消息一旦到MQ之后,发送给消费者通道,然后消费者进行消费 。绑定部分是底层帮助实现的。
封装也只是实现了部分功能。MQ的功能不是百分百都实现了的
消息驱动环境搭建
生产者:
maven的pom:

引入配置文件pom:
其实就是对springboot整合rabbitmq再进行了一层封装
<project xmlns="http://maven.apache.org/POM/4.0.0" xmlns:xsi="http://www.w3.org/2001/XMLSchema-instance" xsi:schemaLocation="http://maven.apache.org/POM/4.0.0 http://maven.apache.org/xsd/maven-4.0.0.xsd">
  <modelVersion>4.0.0</modelVersion>
  <groupId>com.toov5</groupId>
  <artifactId>SpringCloud-stream-producer</artifactId>
  <version>0.0.1-SNAPSHOT</version>

      <parent>
        <groupId>org.springframework.boot</groupId>
        <artifactId>spring-boot-starter-parent</artifactId>
        <version>2.0.1.RELEASE</version>
    </parent>
    <dependencies>
        <!-- SpringBoot整合Web组件 -->
        <dependency>
            <groupId>org.springframework.boot</groupId>
            <artifactId>spring-boot-starter-web</artifactId>
        </dependency>
        <dependency>
            <groupId>org.springframework.cloud</groupId>
            <artifactId>spring-cloud-starter-stream-rabbit</artifactId>
            <version>2.0.1.RELEASE</version>
        </dependency>
    </dependencies>

</project>
然后编码:
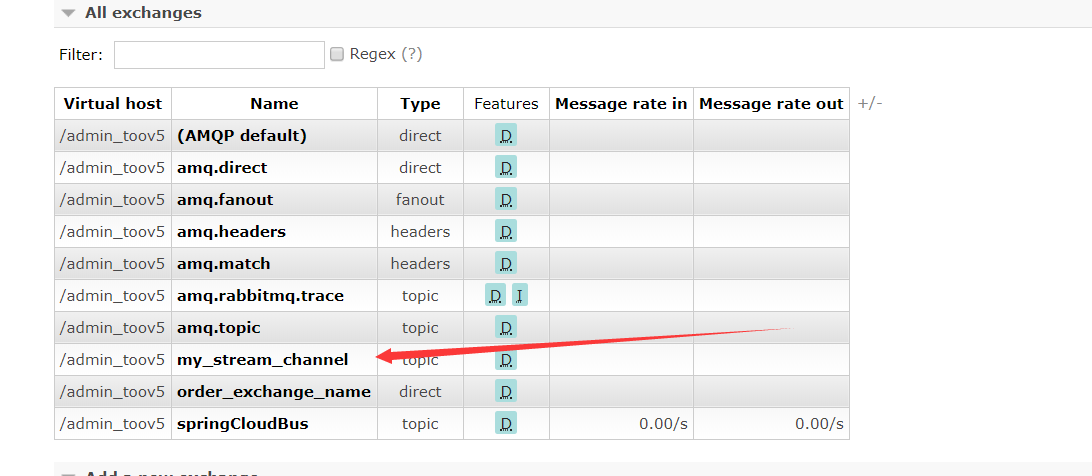
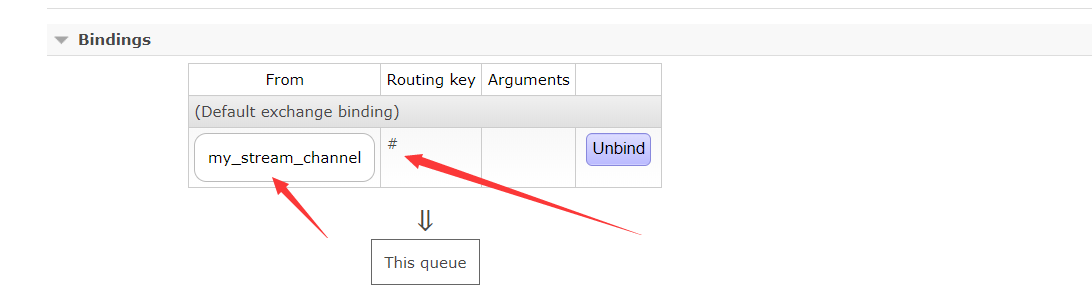
在rebbitmq中需要有交换机 队列 底层都帮助实现了! 以通道名称创建交换机 消费者启动时候 随机创建一个队列名称
创建通道:
package com.toov5.stream;
//创建发送通道

import org.springframework.cloud.stream.annotation.Output;
import org.springframework.messaging.SubscribableChannel;

public interface  SendMsgInterface {

    //创建发送通道
    @Output("my_stream_channel")
    SubscribableChannel sendMsg();

}
controller:
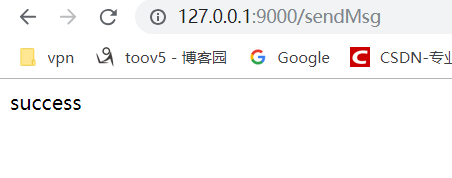
package com.toov5.controller;

import java.util.UUID;

import org.springframework.beans.factory.annotation.Autowired;
import org.springframework.messaging.Message;
import org.springframework.messaging.support.MessageBuilder;

import com.toov5.stream.SendMsgInterface;

public class SendMsgController {
   //生产者流程
   // 1 生产者发送消息通道   获取通道
    @Autowired
    private SendMsgInterface sendMsgInterface;

   //2. 生产者投递消息  往通道发送消息
    public String sendMsg() {
            String msg = UUID.randomUUID().toString();
            System.out.println("生产者发送内容msg:" + msg);
            Message build = MessageBuilder.withPayload(msg.getBytes()).build();
            sendMsgInterface.sendMsg().send(build);
            return "success";

    }
   //3. 开启绑定  然后业务逻辑中就可以从Springboot中拿对象了  启动类去绑定

}
启动类: 开启通道绑定
package com.toov5;

import org.springframework.boot.SpringApplication;
import org.springframework.boot.autoconfigure.SpringBootApplication;
import org.springframework.cloud.stream.annotation.EnableBinding;

import com.toov5.stream.SendMsgInterface;

@SpringBootApplication
@EnableBinding(SendMsgInterface.class)   //开启绑定通道(通道接口)  然后业务逻辑中就可以从Springboot中拿对象了
public class AppProducer {
   public static void main(String[] args) {
    SpringApplication.run(AppProducer.class, args);
}
}
yml:
server:
  port: 9000
spring:
  application:
    name: spingcloud-stream-producer
  rabbitmq:
  ####连接地址
    host: 192.168.91.6
   ####端口号
    port: 5672
   ####账号
    username: admin
   ####密码
    password: admin
   ### 地址  主机独立的virtualhost
    virtual-host: /admin_toov5
启动生产者:
此时还没有创建队列 没有进行绑定:
小结:只需要发送信息到通道里面就OK了
下面创建消费者: 对应生产者去写就OK了
maven依赖:
<project xmlns="http://maven.apache.org/POM/4.0.0" xmlns:xsi="http://www.w3.org/2001/XMLSchema-instance" xsi:schemaLocation="http://maven.apache.org/POM/4.0.0 http://maven.apache.org/xsd/maven-4.0.0.xsd">
  <modelVersion>4.0.0</modelVersion>
  <groupId>com.toov5</groupId>
  <artifactId>SpringCloud-stream-consumer</artifactId>
  <version>0.0.1-SNAPSHOT</version>

  <parent>
        <groupId>org.springframework.boot</groupId>
        <artifactId>spring-boot-starter-parent</artifactId>
        <version>2.0.1.RELEASE</version>
    </parent>
    <dependencies>
        <!-- SpringBoot整合Web组件 -->
        <dependency>
            <groupId>org.springframework.boot</groupId>
            <artifactId>spring-boot-starter-web</artifactId>
        </dependency>
        <dependency>
            <groupId>org.springframework.cloud</groupId>
            <artifactId>spring-cloud-starter-stream-rabbit</artifactId>
            <version>2.0.1.RELEASE</version>
        </dependency>
    </dependencies>

</project>
通道接口:
package com.toov5.stream;
//创建发送通道

import org.springframework.cloud.stream.annotation.Input;
import org.springframework.messaging.SubscribableChannel;

public interface  ReadMsgInterface {

    //创建发送通道
    @Input("my_stream_channel")
    SubscribableChannel readMsg();

}
消费者:监听通道
package com.toov5.consumer;

import org.springframework.cloud.stream.annotation.StreamListener;
import org.springframework.stereotype.Component;

@Component
public class Consumer {

    @StreamListener("my_stream_channel") //监听生产者响应的通道
    public void readMsg(String msg) {
      System.out.println("消费者获取到生产者投递的消息:"+msg);
    }
}
启动类: 绑定通道
package com.toov5;

import org.springframework.boot.SpringApplication;
import org.springframework.boot.autoconfigure.SpringBootApplication;
import org.springframework.cloud.stream.annotation.EnableBinding;

import com.toov5.stream.ReadMsgInterface;

@SpringBootApplication
@EnableBinding(ReadMsgInterface.class)
public class AppConsumer {
    public static void main(String[] args) {
        SpringApplication.run(AppConsumer.class, args);
    }
}
yml:
server:
  port: 8000
spring:
  application:
    name: spingcloud-stream-consumer
  rabbitmq:
  ####连接地址
    host: 192.168.91.6
   ####端口号
    port: 5672
   ####账号
    username: admin
   ####密码
    password: admin
   ### 地址  主机独立的virtualhost
    virtual-host: /admin_toov5
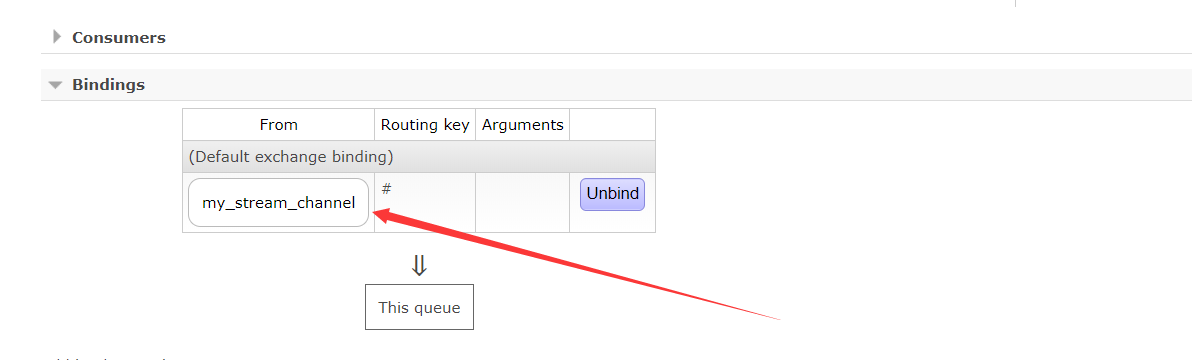
消费者是有队列的 我们在代码中没有写队列的相关哦 底层会创建的哦 底层自动创建一个队列 绑定交换机 队列名字是随机的
消费者启动后的多了个队列
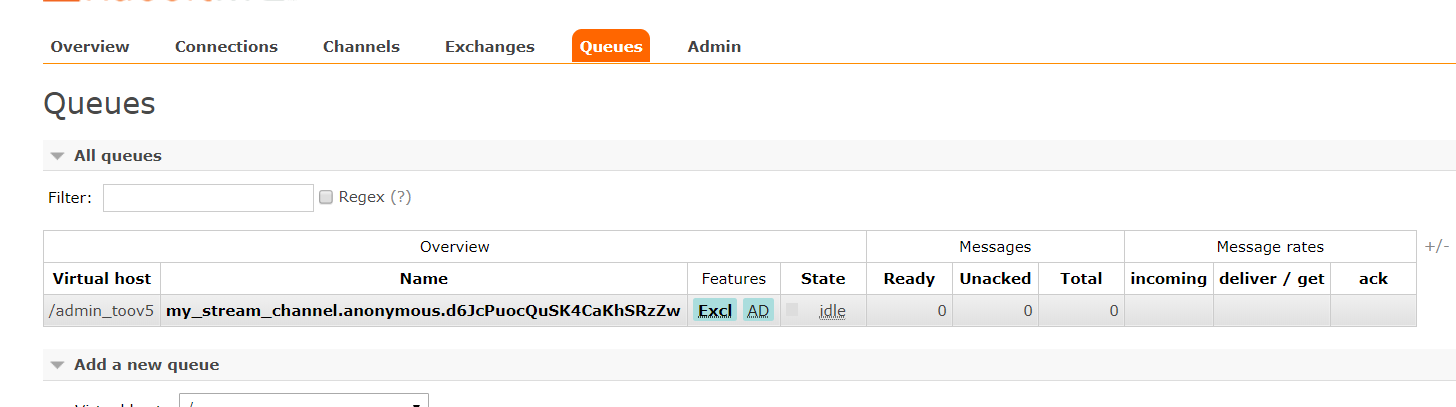
也绑定上了
下面访问接口 发送个消息试试:

如果换成kafka,修改下maven依赖,配置文件依赖名称改成kafka就OK了~~kafka 的连接信息一配置就搞定
关于消息分组:
生产者投递消息 投递消息到通道后 两个消费者会都进行消费 重复消费了
通过分组去解决,同一个组的消费者会进行轮训消费,只有一个消费者进行消费
consumer关闭,控制台中的队列会消失了。连接关闭会消失,因为木有固定队列哦 随机生成的
我们启动两个队列 通过端口号去标识:

并且绑定了同一个交换机:

访问接口后:


都能收到消息呀
分组配置:
消费者yml加入配置:
cloud:
stream:
bindings:
my_stream_channel: ###指定 管道名称!!!!
#指定该应用实例属于 stream 消费组
group: stream
此时的yml:
server:
  port: 8002
spring:
  application:
    name: spingcloud-stream-consumer
  rabbitmq:
  ####连接地址
    host: 192.168.91.6
   ####端口号
    port: 5672
   ####账号
    username: admin
   ####密码
    password: admin
   ### 地址  主机独立的virtualhost
    virtual-host: /admin_toov5
  cloud:
    stream:
      bindings:
        my_stream_channel: ###指定 管道名称!!!!
          #指定该应用实例属于 stream 消费组
          group: stream
启动两个consumer:
分组之后只有一个队列!

绑定信息依然不变
访问:


只有一个能接收消息 且轮训
分组 的概念是由于这个框架搞的 不是原先的MQ固有的
Kafka的策略整合 暂时先不写了 很简单的 有空再补上吧~~~