Android Studio为开发者提供了很多内建的Activity, 其中Settings Activity是非常有用且功能强大的一种内建Activity.
Setting Activity其实本质上是从PreferenceActivity中继承过来的。使用Setting Activity后,完全不需要自己控制Preferences的读写,PreferenceActivity会帮我们处理一切。
PreferenceActivity和普通的Activity不同,它不再使用普通的界面布局文件,而是使用选项设置的布局文件。选项设置的布局文件以PreferenceScreen作为根元素,每一个PreferenceScreen对应后台的一个PreferenceFragment。
使用Android Studio添加一个Activity,会默认帮我们生成一个Pref_header.xml文件和若干个Pref*.xml文件。对应到Activity里,需要对应定义几个PreferenceFragment和重写onBuildHeaders方法用于载入定义在Pref_header.xml中的入口布局。
相应的代码片段如下
Pref_header.xml

<preference-headers xmlns:android="http://schemas.android.com/apk/res/android">

    <!-- These settings headers are only used on tablets. -->

    <header
        android:fragment="com.example.xpshen.myapplication.SettingsActivity$GeneralPreferenceFragment"
        android:icon="@drawable/ic_info_black_24dp"
        android:title="@string/pref_header_general" />

    <header
        android:fragment="com.example.xpshen.myapplication.SettingsActivity$NotificationPreferenceFragment"
        android:icon="@drawable/ic_notifications_black_24dp"
        android:title="@string/pref_header_notifications" />

    <header
        android:fragment="com.example.xpshen.myapplication.SettingsActivity$DataSyncPreferenceFragment"
        android:icon="@drawable/ic_sync_black_24dp"
        android:title="@string/pref_header_data_sync" />

</preference-headers>
Pref_general.xml
<PreferenceScreen xmlns:android="http://schemas.android.com/apk/res/android">

    <SwitchPreference
        android:defaultValue="true"
        android:key="example_switch"
        android:summary="@string/pref_description_social_recommendations"
        android:title="@string/pref_title_social_recommendations" />

    <!-- NOTE: EditTextPreference accepts EditText attributes. -->
    <!-- NOTE: EditTextPreference's summary should be set to its value by the activity code. -->
    <EditTextPreference
        android:capitalize="words"
        android:defaultValue="@string/pref_default_display_name"
        android:inputType="textCapWords"
        android:key="example_text"
        android:maxLines="1"
        android:selectAllOnFocus="true"
        android:singleLine="true"
        android:title="@string/pref_title_display_name" />

    <!-- NOTE: Hide buttons to simplify the UI. Users can touch outside the dialog to
         dismiss it. -->
    <!-- NOTE: ListPreference's summary should be set to its value by the activity code. -->
    <ListPreference
        android:defaultValue="-1"
        android:entries="@array/pref_example_list_titles"
        android:entryValues="@array/pref_example_list_values"
        android:key="example_list"
        android:negativeButtonText="@null"
        android:positiveButtonText="@null"
        android:title="@string/pref_title_add_friends_to_messages" />

</PreferenceScreen>
SettingActivity.java
public class SettingsActivity extends AppCompatPreferenceActivity {
...
  @Override
    @TargetApi(Build.VERSION_CODES.HONEYCOMB)
    public void onBuildHeaders(List<Header> target) {
        loadHeadersFromResource(R.xml.pref_headers, target);
    }
...
@TargetApi(Build.VERSION_CODES.HONEYCOMB)
    public static class GeneralPreferenceFragment extends PreferenceFragment {
        @Override
        public void onCreate(Bundle savedInstanceState) {
            super.onCreate(savedInstanceState);
            addPreferencesFromResource(R.xml.pref_general);
            setHasOptionsMenu(true);

            // Bind the summaries of EditText/List/Dialog/Ringtone preferences
            // to their values. When their values change, their summaries are
            // updated to reflect the new value, per the Android Design
            // guidelines.
            bindPreferenceSummaryToValue(findPreference("example_text"));
            bindPreferenceSummaryToValue(findPreference("example_list"));
        }

        @Override
        public boolean onOptionsItemSelected(MenuItem item) {
            int id = item.getItemId();
            if (id == android.R.id.home) {
                startActivity(new Intent(getActivity(), SettingsActivity.class));
                return true;
            }
            return super.onOptionsItemSelected(item);
        }
    }
}
这样一个setting activity就可以工作了。
但是此类activity由于不使用普通的界面布局文件,我们无法在布局文件中添加自定以的控件。
比如我们想要在页面的底部添加一个任务栏,其实是无法简单的通过修改布局文件来增加的。
本文采用的方法是基于下面文章的思路来的。
http://www.jcodecraeer.com/a/anzhuokaifa/androidkaifa/2014/0331/1608.html
基本的思路是,在Setting Activity的onCreate方法中,截获之前布局树上的content元素,插入我们自定义的底部任务栏。
代码如下
SettingActivity.java
    @Override
    protected void onCreate(Bundle savedInstanceState) {
        super.onCreate(savedInstanceState);
        setupActionBar();
        hookThebottomBar();
        BottomNavigationView navigation = (BottomNavigationView) findViewById(R.id.navigation);
        navigation.setOnNavigationItemSelectedListener(mOnNavigationItemSelectedListener);
    }

    private void hookThebottomBar(){
        ViewGroup content = (ViewGroup) findViewById(android.R.id.content);
        LayoutInflater.from(this).inflate(R.layout.com_bottombar, content, true);
    }
com_bottombar.xml
<?xml version="1.0" encoding="utf-8"?>
<LinearLayout xmlns:android="http://schemas.android.com/apk/res/android"
    android:orientation="vertical"
    xmlns:app="http://schemas.android.com/apk/res-auto"
    android:layout_width="match_parent"
    android:layout_height="wrap_content"
    android:layout_gravity="bottom">
    <android.support.design.widget.BottomNavigationView
        android:id="@+id/navigation"
        android:layout_width="match_parent"
        android:layout_height="wrap_content"
        android:layout_gravity="bottom"
        android:background="?android:attr/windowBackground"
        app:menu="@menu/navigation" />

</LinearLayout>
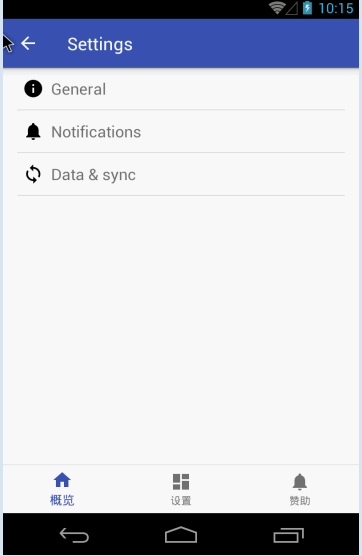
这里注意,我们拦截到的content其实是Framelayout,而我们的目标是添加一个底部任务栏,所以需要在上面的com_bottombar.xml设置 android:layout_gravity="bottom",这样这个我们后续添加的帧才不会覆盖之前的内容。
最后的效果图如下