在上一篇文章(《SpringBoot(二十四)整合Redis》)中,已经实现了Spring Boot对Redis的整合,既然已经讲到Cache了,今天就介绍介绍缓存注解。各家互联网产品现在数据量越来越大,其快速增长造成网络拥塞和服务器超载,导致客户访问延迟增大,服务质量日益显现出来。缓存技术被认为是减轻服务器负载、降低网络拥塞、增强可扩展性的有效途径之一。
v概念介绍
Spring为我们提供了几个注解来支持Spring Cache。其核心主要是@Cacheable和@CacheEvict。使用@Cacheable标记的方法在执行后Spring Cache将缓存其返回结果,而使用@CacheEvict标记的方法会在方法执行前或者执行后移除Spring Cache中的某些元素。下面我们将来详细介绍一下Spring基于注解对Cache的支持所提供的几个注解。
Spring Cache常见概念介绍
| 名称 | 解释 |
|---|---|
| Cache | 缓存接口,定义缓存操作。实现有:RedisCache、EhCacheCache、ConcurrentMapCache等 |
| CacheManager | 缓存管理器,管理各种缓存(cache)组件 |
| @Cacheable | 主要针对方法配置,能够根据方法的请求参数对其进行缓存 |
| @CacheEvict | 清空缓存 |
| @CachePut | 保证方法被调用,又希望结果被缓存。 与@Cacheable区别在于是否每次都调用方法,常用于更新 |
| @EnableCaching | 开启基于注解的缓存 |
| keyGenerator | 缓存数据时key生成策略 |
| serialize | 缓存数据时value序列化策略 |
| @CacheConfig | 统一配置本类的缓存注解的属性 |
注解(@Cacheable/@CachePut/@CacheEvict)的主要参数
| 名称 | 解释 | example |
|---|---|---|
| value | 缓存的名称,在 spring 配置文件中定义,必须指定至少一个 | e.g. @Cacheable(value=”mycache”) 或者 @Cacheable(value={”cache1”,”cache2”} |
| key | 缓存的 key,可以为空,如果指定要按照 SpEL 表达式编写, 如果不指定,则缺省按照方法的所有参数进行组合 |
e.g. @Cacheable(value=”testcache”,key=”#id”) |
| condition | 缓存的条件,可以为空,使用 SpEL 编写,返回 true 或者 false, 只有为 true 才进行缓存/清除缓存 |
e.g.@Cacheable(value=”testcache”,condition=”#userName.length()>2”) |
| unless | 否定缓存。当条件结果为TRUE时,就不会缓存。 | e.g.@Cacheable(value=”testcache”,unless=”#userName.length()>2”) |
| allEntries (@CacheEvict ) |
是否清空所有缓存内容,缺省为 false,如果指定为 true, 则方法调用后将立即清空所有缓存 |
e.g. @CachEvict(value=”testcache”,allEntries=true) |
| beforeInvocation (@CacheEvict) |
是否在方法执行前就清空,缺省为 false,如果指定为 true, 则在方法还没有执行的时候就清空缓存,缺省情况下,如果方法 执行抛出异常,则不会清空缓存 |
e.g. @CachEvict(value=”testcache”,beforeInvocation=true) |
v准备工作
1.1 引入依赖pom.xml
        <dependency>
            <groupId>org.springframework.boot</groupId>
            <artifactId>spring-boot-starter-cache</artifactId>
        </dependency>
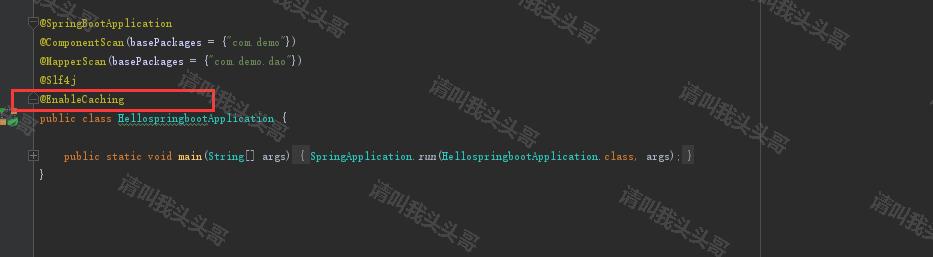
激活启动类注解@EnableCaching
v实战演练
2.1 添加service层
package com.demo.service;

import com.demo.pojo.UserDetails;

/**
 * Created by toutou on 2019/1/20.
 */
public interface CacheService {
    UserDetails getUserDetailsByUid(int uid);

    UserDetails updateUserInfo(UserDetails userDetails);

    int delUserInfoById(int uid);
}
package com.demo.service;

import com.demo.dao.UserDetailsMapper;
import com.demo.pojo.UserDetails;
import org.springframework.beans.factory.annotation.Autowired;
import org.springframework.cache.annotation.CacheEvict;
import org.springframework.cache.annotation.CachePut;
import org.springframework.cache.annotation.Cacheable;
import org.springframework.stereotype.Service;

/**
 * Created by toutou on 2019/1/20.
 */
@Service
public class CacheServiceImpl implements CacheService{

    @Autowired
    UserDetailsMapper userDetailsMapper;

    @Override
    @Cacheable(value = "user_details", key = "#uid", unless="#result == null")
    public UserDetails getUserDetailsByUid(int uid){
        System.out.println(" Cacheable 有请求过来了");
        UserDetails userDetails = userDetailsMapper.getUserDetailsByUid(uid);
        return userDetails;
    }

    @Override
    @CachePut(value = "user_details", key = "#user.id")
    public UserDetails updateUserInfo(UserDetails user){
        System.out.println(" CachePut 有请求过来了");
        if(userDetailsMapper.updateByPrimaryKeySelective(user) > 0) {
            // 这里也可以直接在updateByPrimaryKeySelective的方法里,修改后直接查询出该记录返回UserDetails实例,看需求。
            user = userDetailsMapper.getUserDetailsByUid(user.getId());
            return user;
        }else{
            return null;
        }
    }

    @Override
    @CacheEvict(value = "user_details", key = "#uid")
    public int delUserInfoById(int uid){
        System.out.println(" CacheEvict 有请求过来了");
        return userDetailsMapper.deleteByPrimaryKey(uid);
    }
}
unless="#result == null"是指当查询为空时,不缓存,默认是空也会缓存。
2.2 添加CacheController
package com.demo.controller;

import com.demo.pojo.UserDetails;
import com.demo.service.CacheService;
import lombok.extern.slf4j.Slf4j;
import org.springframework.beans.factory.annotation.Autowired;
import org.springframework.web.bind.annotation.RequestMapping;
import org.springframework.web.bind.annotation.RestController;

/**
 * Created by toutou on 2019/1/20.
 */
@RestController
@Slf4j
public class CacheController {

    @Autowired
    CacheService cacheService;

    @RequestMapping(value = "/cache/getuserbyid")
    public UserDetails getUserDetailsByUid(int uid){
        try {
            return cacheService.getUserDetailsByUid(uid);
        }catch (Exception e){
            System.out.println(e.toString());
            return null;
        }
    }

    @RequestMapping(value = "/cache/updateuserinfo")
    public int updateUserInfo(int uid, String city){
        UserDetails userDetails = new UserDetails();
        userDetails.setId(uid);
        userDetails.setCity(city);
        userDetails = cacheService.updateUserInfo(userDetails);
        return userDetails == null ? 0 : userDetails.getUid();
    }

    @RequestMapping(value = "/cache/deluserinfobyid")
    public int delUserInfoById(int uid){
        return cacheService.delUserInfoById(uid);
    }
}
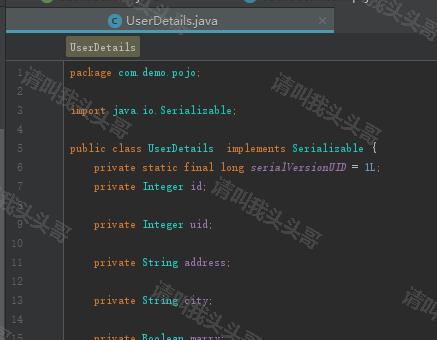
2.3 实现Serializable接口
v效果展示
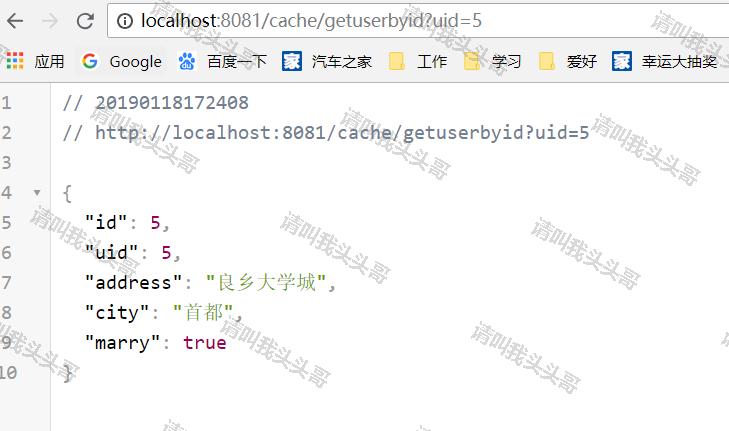
3.1 Cacheable效果
当我们本地请求http://localhost:8081/cache/getuserbyid?uid=5接口时,可以看到控制台输出Cacheable 有请求过来了,而后续再次请求该接口时,不会再输出Cacheable 有请求过来了,这是因为直接走了缓存机制了,CacheServiceImpl的方法不再被调用。

通过Redis可以看到,user_details::5的记录已被创建。

3.2 CachePut效果
当我们本地请求http://localhost:8081/cache/updateuserinfo?uid=5&city=首都 接口时,将更新数据库和Redis中对应的字段值。

查询接口,更新成功。控制台再次输出Cacheable 有请求过来了
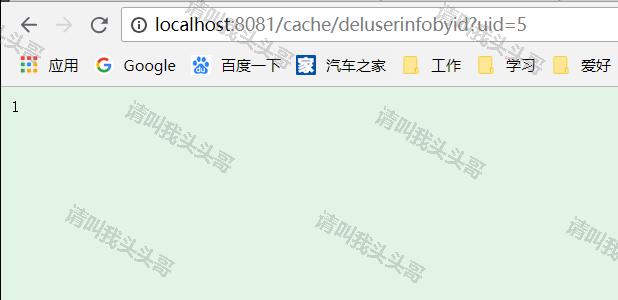
3.3 CacheEvict效果
当我们本地请求http://localhost:8081/cache/deluserinfobyid?uid=5 接口时,将删除数据中和Redis中的数据。
v博客总结
Redis和@Cacheable、@CachePut、@CacheEvict结合使用,效果挺好,结合这篇和上篇文章(《SpringBoot(二十四)整合Redis》),可以尝试着结合使用试试。
v源码地址
https://github.com/toutouge/javademosecond/tree/master/hellospringboot
作 者:请叫我头头哥
出 处:http://www.cnblogs.com/toutou/
关于作者:专注于基础平台的项目开发。如有问题或建议,请多多赐教!
版权声明:本文版权归作者和博客园共有,欢迎转载,但未经作者同意必须保留此段声明,且在文章页面明显位置给出原文链接。
特此声明:所有评论和私信都会在第一时间回复。也欢迎园子的大大们指正错误,共同进步。或者直接私信我
声援博主:如果您觉得文章对您有帮助,可以点击文章右下角【推荐】一下。您的鼓励是作者坚持原创和持续写作的最大动力!