一 .概述
本部分的主要的内容都是从spring amqp的官文档之中摘录过来的.
二 .spring amqp的抽象
[1] 消息 :
在spring amqp之中,使用Message来抽象消息的内容.
public class Message {

    private final MessageProperties messageProperties;

    private final byte[] body;

    public Message(byte[] body, MessageProperties messageProperties) {
        this.body = body;
        this.messageProperties = messageProperties;
    }

    public byte[] getBody() {
        return this.body;
    }

    public MessageProperties getMessageProperties() {
        return this.messageProperties;
    }
}
从上面的定义之中,我们可以看到,一个消息被抽象称为两个部分,一个就是消息的主体,被抽象为是一个字节数组,另外一个部分就是MessageProperties .
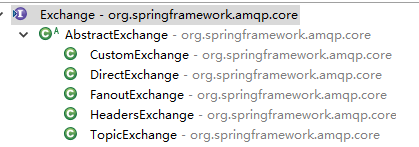
[2]交换机Exchange
public interface Exchange {

    String getName();

    String getExchangeType();

    boolean isDurable();

    boolean isAutoDelete();

    Map<String, Object> getArguments();

}
常见的,我们可以使用下面的实现类:
public abstract class ExchangeTypes {

    public static final String DIRECT = "direct";

    public static final String TOPIC = "topic";

    public static final String FANOUT = "fanout";

    public static final String HEADERS = "headers";

    public static final String SYSTEM = "system";

    /**
     * The constant to represent {@code x-delayed-message} exchange mode.
     * @deprecated since 1.6.4, it's not a user-available exchange type,
     * the delayed {@code boolean} is used for that.
     */
    @Deprecated
    public static final String DELAYED = "x-delayed-message";
}

我们可以看到最常用的direct类型, topic类型,fanout类型.
[3]队列
public class Queue  {

    private final String name;

    private volatile boolean durable;

    private volatile boolean exclusive;

    private volatile boolean autoDelete;

    private volatile Map<String, Object> arguments;

    /**
     * 队列是持久的,非排他的和非自动删除的。
     *
     * @param name 队列名
     */
    public Queue(String name) {
        this(name, true, false, false);
    }

    // Getters and Setters omitted for brevity

}
我们可以通过上面的队列完成一个队列的创建.
[4]绑定
public class Binding extends AbstractDeclarable {

    public enum DestinationType {
        QUEUE, EXCHANGE;
    }
另外,我们也可以通过构建者模式来创建一个队列
Binding b = BindingBuilder.bind(someQueue).to(someTopicExchange).with("foo.*");
上面的代码表示的就是 绑定 一个队列到一个交换机,然后使用的一个绑定建.
三 .连接
在spring amqp之中使用ConnectionFactory来抽象Rabbitmq客户端之中的ConnectionFacory对象,我们一般会使用CachingConnectionFacotory对象来作为实现.
如何声明一个ConnectionFactory对象.
[1]xml的方式:
<rabbit:connection-factory
    id="connectionFactory" channel-cache-size="50"/>
上面的代码会默认向容器之中添加一个ConnectionFactory对象.
另外,我们通过这种方式进行ConnetionFactory的一些属性的设置.
四 .配置RabbitTemplate对象
[1]return机制
我们使用return机制非常的简单.
        template.setMandatory(true);
        template.setReturnCallback(new ReturnCallback() {
            @Override
            public void returnedMessage(Message message, int replyCode, String replyText, String exchange,
                    String routingKey) {
                // 当消息没有被送回到的时候,会回调这个方法.
                // 其中基本的信息都已经有了.
            }
        });
在上面,我们需要注意的就是两点内容:
[1]设置属性mandatory属性为true
[2]设置一个回调的函数
[2]Confirm机制
我们使用确认机制也非常的简单,如下:
template.setConfirmCallback(new ConfirmCallback() {
            @Override
            public void confirm(CorrelationData correlationData, boolean ack, String cause) {
                System.out.println("确认消息");
            }
        });
五 . 消息的发送
void send(Message message) throws AmqpException;

void send(String routingKey, Message message) throws AmqpException;

void send(String exchange, String routingKey, Message message) throws AmqpException;
在发送过程之中,我们需要创建一个消息.
Message message = MessageBuilder.withBody("foo".getBytes())
    .setContentType(MessageProperties.CONTENT_TYPE_TEXT_PLAIN)
    .setMessageId("123")
    .setHeader("bar", "baz")
    .build();
Message message = MessageBuilder.withBody("foo".getBytes())
    .setContentType(MessageProperties.CONTENT_TYPE_TEXT_PLAIN)
    .setMessageId("123")
    .setHeader("bar", "baz")
    .build();
上面的两种方式都可以使用构建者模式创建一个消息对象.
六 .消息的接收
我们一般情况下都会使用注解驱动的方式完成消息的消费.
<rabbit:annotation-driven/>
@Component
public class MyService {

  @RabbitListener(bindings = @QueueBinding(
        value = @Queue(value = "myQueue", durable = "true"),
        exchange = @Exchange(value = "auto.exch", ignoreDeclarationExceptions = "true"),
        key = "orderRoutingKey")
  )
  public void processOrder(String data) {
    ...
  }

  @RabbitListener(bindings = @QueueBinding(
        value = @Queue,
        exchange = @Exchange(value = "auto.exch"),
        key = "invoiceRoutingKey")
  )
  public void processInvoice(String data) {
    ...
  }

}
在上面,我们使用@RabbitListener来完成一个消息的监听,每当消息到达的时候,都会回调对应的方法.
更常见的:
我们仅仅只需要监听一个队列就可以了.
   @RabbitListener(queues = "myQueue")
    public void processOrder(String data) {
        ...
    }
其中,我们最为关系的就是方法的参数,在spring amqp之中,变得更加的灵活了.
原始的org.springframework.amqp.core.Message。
接收消息的com.rabbitmq.client.Channel
另外,我们可以使用下面的注解完成一些参数的映射.
(1)@payload 将消息的body进行转换
(2)使用@Header 叫消息的头进行转换
更一般的,我们喜欢使用下面的这种方式进行.
@RabbitListener(queues = "myQueue")
public void processOrder(Message<Order> order) { ...
}
注意:这个接口是下面的这种类型:
public interface Message<T> {
    T getPayload();
    MessageHeaders getHeaders();
}