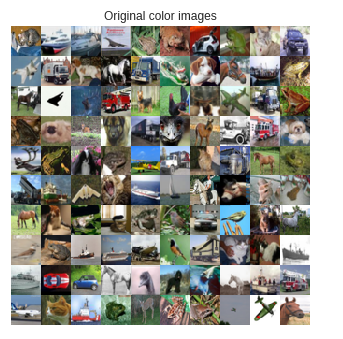
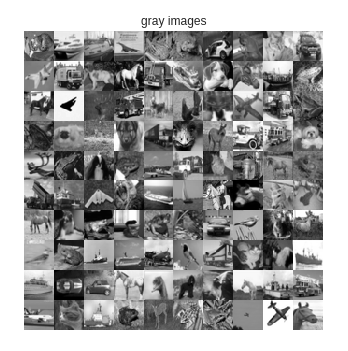
'''
加载cifar10图片集并准备将图片进行灰度化
'''
from keras.datasets import cifar10

def rgb2gray(rgb):
  #把彩色图转化为灰度图,如果当前像素点为[r,g,b],那么对应的灰度点为0.299*r+0.587*g+0.114*b
  return np.dot(rgb[...,:3], [0.299, 0.587, 0.114])

(x_train, _),(x_test, _) = cifar10.load_data()

img_rows = x_train.shape[1]
img_cols = x_train.shape[2]
channels = x_train.shape[3]

#将100张彩色原图集合在一起显示
imgs = x_test[: 100]
imgs = imgs.reshape((10, 10, img_rows, img_cols, channels))
imgs = np.vstack([np.hstack(i) for i in imgs])
plt.figure()
plt.axis('off')
plt.title('Original color images')
plt.imshow(imgs, interpolation = 'none')
plt.show()

#将图片灰度化后显示出来
x_train_gray = rgb2gray(x_train)
x_test_gray = rgb2gray(x_test)
imgs = x_test_gray[: 100]
imgs = imgs.reshape((10, 10, img_rows, img_cols))
imgs = np.vstack([np.hstack(i) for i in imgs])
plt.figure()
plt.axis('off')
plt.title('gray images')
plt.imshow(imgs, interpolation='none', cmap='gray')
plt.show()

#将彩色图片和灰度图正规化,也就是把像素点值设置到[0,1]之间
x_train = x_train.astype('float32') / 255
x_test = x_test.astype('float32') / 255

x_train_gray = x_train_gray.astype('float32') / 255
x_test_gray = x_test_gray.astype('float32') / 255

'''
将二维图片集合压扁为一维向量[num *row * col * 3],
num 是图片数量
'''
x_train = x_train.reshape(x_train.shape[0], img_rows, img_cols, channels)
x_test = x_test.reshape(x_test.shape[0], img_rows, img_cols, channels)

x_train_gray = x_train_gray.reshape(x_train_gray.shape[0], img_rows, img_cols,
                                   1)
x_test_gray = x_test_gray.reshape(x_test_gray.shape[0], img_rows, img_cols, 1)
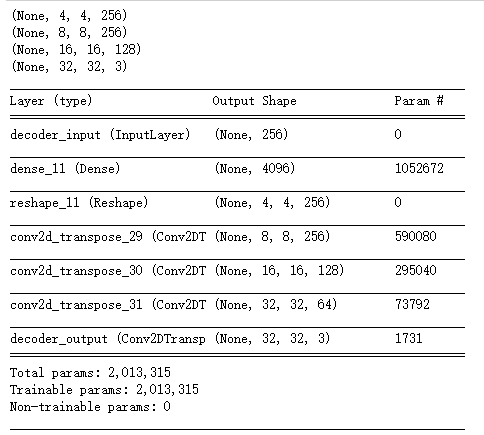
input_shape = (img_rows, img_cols, 1)
batch_size = 32
kernel_size = 3
#由于图片编码后需要保持图片物体与颜色信息,因此编码后的一维向量维度要变大
latent_dim = 256
layer_filters = [64, 128, 256]

inputs = Input(shape=input_shape, name = 'encoder_input')
x = inputs
for filters in layer_filters:
  x = Conv2D(filters = filters, kernel_size = kernel_size, strides = 2,
            activation = 'relu', padding = 'same')(x)


'''
得到最后一层卷积层输出的数据格式,输入时格式为(32, 32, 3),
经过三层卷积层后输出为(4, 4, 256)
'''
shape = K.int_shape(x)
x = Flatten()(x)
latent = Dense(latent_dim, name = 'latent_vector')(x)
encoder = Model(inputs, latent, name = 'encoder')
encoder.summary()

latent_inputs = Input(shape=(latent_dim, ), name = 'decoder_input')
'''
将编码器输出的一维向量传入一个全连接网络层,输出的数据格式与上面shape变量相同,为[4, 4, 256]
'''
x = Dense(shape[1] * shape[2] * shape[3])(latent_inputs)
x = Reshape((shape[1], shape[2], shape[3]))(x)
'''
解码器对应编码器做反向操作,因此它将数据经过三个反卷积层,卷积层的输出维度与编码器恰好相反,分别为
256, 128, 64,每经过一个反卷积层,数据维度增加一倍,因此输入时数据维度为[4,4],经过三个反卷积层后
维度为[32,32]恰好与图片格式一致
'''
for filters in layer_filters[::-1]:
  x = Conv2DTranspose(filters = filters, kernel_size = kernel_size,
                     strides = 2, activation = 'relu',
                     padding = 'same')(x)


outputs = Conv2DTranspose(filters = channels, kernel_size = kernel_size,
                          activation='relu', padding='same',
                          name = 'decoder_output')(x)
print(K.int_shape(outputs))

decoder = Model(latent_inputs, outputs, name = 'decoder')
decoder.summary()
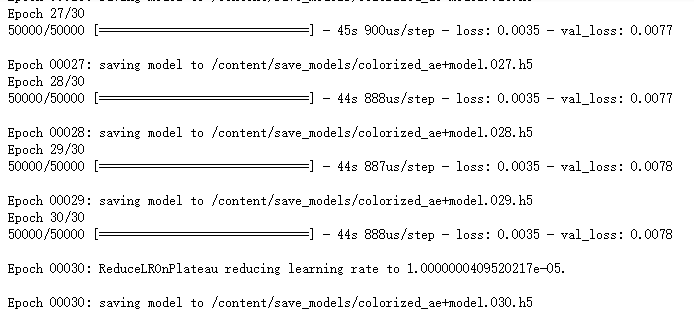
from keras.callbacks import ReduceLROnPlateau, ModelCheckpoint
import os

autoencoder = Model(inputs, decoder(encoder(inputs)), name='autoencoder')
autoencoder.summary()
#如果经过5次循环训练后效果没有改进,那么就把学习率减少0.1的开方,通过调整学习率促使训练效果改进
lr_reducer = ReduceLROnPlateau(factor = np.sqrt(0.1), cooldown = 0, patience = 5,
                              verbose = 1, min_lr = 0.5e-6)
save_dir = os.path.join(os.getcwd(), 'save_models')
model_name = 'colorized_ae+model.{epoch:03d}.h5'
if os.path.isdir(save_dir) is not True:
  os.makedirs(save_dir)
filepath = os.path.join(save_dir, model_name)

checkpoint = ModelCheckpoint(filepath = filepath, monitor = 'val_loss',
                            verbose = 1)
autoencoder.compile(loss='mse', optimizer = 'adam')
callbacks = [lr_reducer, checkpoint]
autoencoder.fit(x_train_gray, x_train, validation_data = (x_test_gray, x_test),
               epochs = 30,
               batch_size = batch_size,

                callbacks = callbacks)
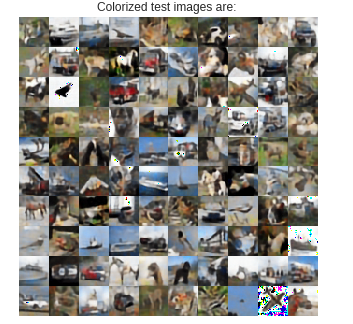
#将灰度图和上色后的图片显示出来
x_decoded = autoencoder.predict(x_test_gray)
imgs = x_decoded[:100]
imgs = imgs.reshape((10, 10, img_rows, img_cols, channels))
imgs = np.vstack([np.hstack(i) for i in imgs])
plt.figure()
plt.axis('off')
plt.title('Colorized test images are: ')
plt.imshow(imgs, interpolation='none')
plt.show()