以下代码实现使用pytorch测试一张图片
引用文章:
https://www.learnopencv.com/pytorch-for-beginners-image-classification-using-pre-trained-models/
from __future__ import print_function, division

from PIL import Image
import torch
from torchvision import transforms
import matplotlib.pyplot as plt


plt.ion()   # interactive mode

# 模型存储路径
model_save_path = '/home/guomin/.cache/torch/checkpoints/resnet18-customs-angle.pth'

# ------------------------ 加载数据 --------------------------- #
# Data augmentation and normalization for training
# Just normalization for validation
# 定义预训练变换
preprocess_transform = transforms.Compose([
        transforms.Resize(256),
        transforms.CenterCrop(224),
        transforms.ToTensor(),
        transforms.Normalize([0.485, 0.456, 0.406], [0.229, 0.224, 0.225])
    ])


class_names = ['0', '180', '270', '90']  # 这个顺序很重要,要和训练时候的类名顺序一致
device = torch.device("cuda:0" if torch.cuda.is_available() else "cpu")

# ------------------------ 载入模型并且训练 --------------------------- #
model = torch.load(model_save_path)
model.eval()
# print(model)

image_PIL = Image.open('image.jpg')
#
image_tensor = preprocess_transform(image_PIL)
# 以下语句等效于 image_tensor = torch.unsqueeze(image_tensor, 0)
image_tensor.unsqueeze_(0)
# 没有这句话会报错
image_tensor = image_tensor.to(device)

out = model(image_tensor)
# 得到预测结果,并且从大到小排序
_, indices = torch.sort(out, descending=True)
# 返回每个预测值的百分数
percentage = torch.nn.functional.softmax(out, dim=1)[0] * 100

print([(class_names[idx], percentage[idx].item()) for idx in indices[0][:5]])
结果返回:
[('270', 99.9299545288086), ('90', 0.06985548883676529), ('0', 0.0001458235055906698), ('180', 4.714601891464554e-05)]
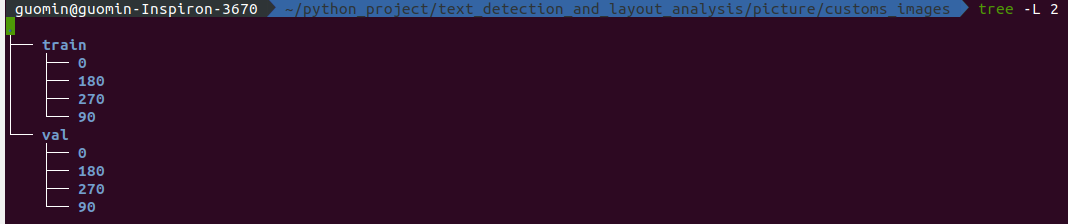
注意: 这里,class_names的顺序尤为重要,我这个顺序的由来是因为我在训练模型的时候是按照标签名称分类图片,即我把文件名就命名为标签的名字,然后里面存放这相应的训练图片。这样的话 python 就会根据文件名的第一个首字母的顺序排列文件,所以得到 class_names = ['0', '180', '270', '90'] ,因为python读取字符串的时候不是按照自然序列的来读,而是按照首字母的大小顺序进行读取。
以下是我的文件结构,大家可以参考下
或者准确来说,我的class_names的由来使用代码是:
# 获取val图片已得到类别class_names
image_datasets_val = datasets.ImageFolder(os.path.join(data_dir, 'val'), preprocess_transform)

# 得到分类的种类名称
class_names = image_datasets_val.classes
希望大家能好好理解这一部分,加油!