1、查看系统是否已安装NFS
[root@bogon ~]# rpm -qa | grep nfs
[root@bogon ~]# rpm -qa | grep rpcbind
2、安装NFS
[root@bogon ~]# yum -y install nfs-utils rpcbind
一、服务端配置
在NFS服务端上创建共享目录/data/lys并设置权限
[root@bogon ~]# mkdir -p /data/lys
[root@bogon ~]# chmod 666 /data/lys/
编辑export文件
[root@bogon ~]# vim /etc/exports
/data/lys 192.168.2.0/24(rw,no_root_squash,no_all_squash,sync)
##############################################################
参数说明
rw ro
该目录分享的权限是可擦写 (read-write) 或只读 (read-only),但最终能不能读写,还是与文件系统的 rwx 及身份有关。
sync async
sync 代表数据会同步写入到内存与硬盘中,async 则代表数据会先暂存于内存当中,而非直接写入硬盘
no_root_squash root_squash
户端使用 NFS 文件系统的账号若为 root 时,系统该如何判断这个账号的身份?预设的情况下,客户端 root 的身份会由 root_squash 的设定压缩成 nfsnobody, 如此对服务器的系统会较有保障
但如果你想要开放客户端使用 root 身份来操作服务器的文件系统,那么这里就得要开 no_root_squash 才行
all_squash
不论登入 NFS 的使用者身份为何, 他的身份都会被压缩成为匿名用户,通常也就是 nobody(nfsnobody)
anonuid anongid
anon 意指 anonymous (匿名者) 前面关于 *_squash 提到的匿名用户的 UID 设定值,通常为 nobody(nfsnobody),但是你可以自行设定这个 UID 的值!当然,这个 UID 必需要存在于你的 /etc/passwd 当中
anonuid 指的是 UID 而 anongid 则是群组的 GID
配置生效
[root@bogon lys]# exportfs -r
启动rpcbind、nfs服务
[root@bogon lys]# service rpcbind start
[root@bogon lys]# service nfs start
查看 RPC 服务的注册状况
[root@bogon lys]# rpcinfo -p
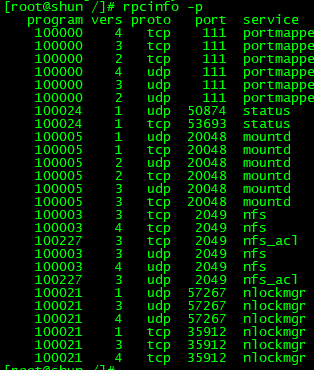
选项与参数: -p :针对某 IP (未写则预设为本机) 显示出所有的 port 与 porgram 的信息; -t :针对某主机的某支程序检查其 TCP 封包所在的软件版本; -u :针对某主机的某支程序检查其 UDP 封包所在的软件版本;
查看本地对外共享的目录
[root@bogon lys]# showmount -e localhost
选项与参数:
-a :显示目前主机与客户端的 NFS 联机分享的状态;
-e :显示某部主机的 /etc/exports 所分享的目录数据。
-d :仅显示已被NFS客户端加载的目录;
如果-d -a没有显示输出,则可能是版本问题,挂载的时候加 -o nfsvers=3 则显示正常
【nfsvers=n:设定要使用的NFS版本,默认是使用2,这个选项的设定还要取决于server端是否支持NFS VER 3】
=========================================================================
为了方便配置防火墙,需要固定nfs服务端口
NFS启动时会随机启动多个端口并向RPC注册,这样如果使用iptables对NFS端口进行限制就会有点麻烦,可以更改配置文件固定NFS服务相关端口。
1、查看端口开启情况
[root@bogon lys]# rpcinfo -p localhost
2、分配端口,编辑配置文件
[root@bogon lys]# vim /etc/sysconfig/nfs
3、添加:
RQUOTAD_PORT=30001
LOCKD_TCPPORT=30002
LOCKD_UDPPORT=30002
MOUNTD_PORT=30003
STATD_PORT=30004
4、重启
[root@bogon lys]# service nfs restart
=========================================================================
二、客户端配置
安装nfs-utils客户端
[root@bogon ~]# yum -y install nfs-utils
创建挂载目录
[root@bogon ~]# mkdir /lys
查看服务器抛出的共享目录信息
[root@bogon ~]# showmount -e 192.168.2.203
Export list for 192.168.2.203: /data/lys 192.168.2.0/24
为了提高NFS的稳定性,使用TCP协议挂载,NFS默认用UDP协议
[root@bogon ~]# mount -t nfs 192.168.2.203:/data/lys /lys -o proto=tcp -o nolock
三、测试结果
查看挂载结果
[root@bogon ~]# df -h
Filesystem Size Used Avail Use% Mounted on
/dev/mapper/VolGroup-lv_root 18G 1.1G 16G 7% /
tmpfs 112M 0 112M 0% /dev/shm
/dev/sda1 477M 54M 398M 12% /boot
192.168.2.203:/data/lys 18G 1.1G 16G 7% /lys
服务端
[root@bogon lys]# echo "test" > test.txt
客户端
[root@bogon ~]# cat /lys/test.txt
test
[root@bogon ~]# echo "204" >> /lys/test.txt
服务端
[root@bogon lys]# cat /data/lys/test.txt test 204
四、卸载已挂在的NFS
[root@bogon ~]# umount /lys/
[root@bogon ~]# df -h
Filesystem Size Used Avail Use% Mounted on
/dev/mapper/VolGroup-lv_root 18G 1.1G 16G 7% /
tmpfs 112M 0 112M 0% /dev/shm
/dev/sda1 477M 54M 398M 12% /boot