在页面中如何大面积操作DOM的话,性能肯定是一个很大的问题,然而聪明的ReactJS实现了Virtual DOM技术,这是他的亮点之一。将组件的DOM结构映射到这个Virtual DOM对象上,并且ReactJS还实现了一套Diff算法,这也是他亮点之一。当需要更新组件的时候,会通过Diff算法找到要变更的内容,最后,在把这个修改更新到实际的DOM节点上,所以,组件更新实际上不是真的渲染整个DOM树,而是指更新需要修改的DOM节点,这样在性能上会比原生DOM快很多。
那么这个Virtual DOM到底是什么?假设我们要创建一个组件,其结构如下:
 1 <ul>
 2     <li>
 3         A
 4     </li>
 5     <li>
 6         <ul>
 7             <li>
 8                 B
 9             </li>
10         </ul>
11     </li>
12 </ul>
然后我们开始创建原生组件:
 1 //用JSX实现的
 2 var root = <ul>
 3         <li>A</li>
 4         <li>
 5             <ul>
 6                 <li>
 7                     B
 8                 </li>
 9             </ul>
10         </li>
11     </ul>;
12 //用javascript实现的
13 var A = React.createElement('li',null,'A');
14 var B = React.createElement('ul',null,React.createElement('li',null,'B'));
15 var root = React.createElement('ul',null,A,B);
16 //输出虚拟的DOM结构
17 console.log(root);
打开控制台我们就能看到输出的一个javascript的对象,没错这就是我们所说的Virtual DOM对象;
接下来我们看看Diff算法在ReactJS中的体现,首先我们借助浏览器中的MutationObderver功能,对页面元素进行监听


 1 'use strict';
 2 const mutation = window.MutationObserver
 3                 ||window.WebKitMutationObserver
 4                 ||window.MozMutationObserver;
 5 if(!!mutation){
 6     const mutationObserver = new mutation((item) => {
 7         item.forEach((item) => {
 8             console.log(item);
 9         });
10     });
11     const options = {
12         "childList" : true,
13         "attributes" : true,
14         "characterData" : true,
15         "subtree" : true,
16         "attributeOldValue" : true,
17         "characterDataOldValue" : true
18     };
19     mutationObserver.observe(document.body,options);
20 }
然后再把ReactJS组件的生命周期进行封装,便于组件来调用
 1 'use strict';
 2 const LifeCycle = name => {
 3     let obj = {
 4         name : name
 5     };
 6     return Object.assign(obj,Cycle);
 7 };
 8 const Cycle = {
 9     getDefaultProps:function(){
10         console.log(this.name,'getDefaultProps');
11         return {};
12     },
13     getInitialState:function(){
14         console.log(this.name,'getInitailState');
15         return {};
16     },
17     componentWillMount:function(){
18         console.log(this.name,'componentWillMount');
19     },
20     componentDidMount:function(){
21         console.log(this.name,'componentDidMount');
22     },
23     componentWillRecieveProps:function(){
24         console.log(this.name,'componentWillRecieveProps');
25     },
26     shouldComponentUpdate:function(){
27         console.log(this.name,'shouldComponentUpdate');
28         return true;
29     },
30     componentWillUpdate:function(){
31         console.log(this.name,'componentWillUpdate');
32     },
33     componentDidUpdate:function(){
34         console.log(this.name,'componentDidUpdate');
35     },
36     componentWillUnmount:function(){
37         console.log(this.name,'componentWillUnmount');
38     }
39 };
接着定义需要用到的组件
 1 'use strict';
 2 //A组件
 3 let A = React.createClass({
 4     mixins:[LifeCycle('A')],
 5     render:function(){
 6         console.log('A','render');
 7         return (
 8             <ul>
 9                 <li>A</li>
10                 <li>
11                     <ul>
12                         {this.props.children}
13                     </ul>
14                 </li>
15             </ul>
16         );
17     }
18 });
19 //B组件
20 let B = React.createClass({
21     mixins:[LifeCycle('B')],
22     render:function(){
23         console.log('B','render');
24         return (
25             <li>B</li>
26         );
27     }
28 });
29 //C组件
30 let C = React.createClass({
31     mixins:[LifeCycle('C')],
32     render:function(){
33         console.log('C','render');
34         return (
35             <li>C</li>
36         );
37     }
38 });
39 //D组件
40 let D = React.createClass({
41     mixins:[LifeCycle('D')],
42     render:function(){
43         console.log('D','render');
44         return (
45             <li>D</li>
46         );
47     }
48 });
最后,定义我们的主逻辑
 1 console.log('----------------first-----------------');
 2 React.render(
 3     <A><B></B><C></C></A>,
 4     document.body
 5 );
 6
 7 setTimeout(() => {
 8     console.log('-----------------second--------------');
 9     React.render(
10         <A><B></B><D></D><C></C></A>,
11         document.body
12     );
13 },1000);
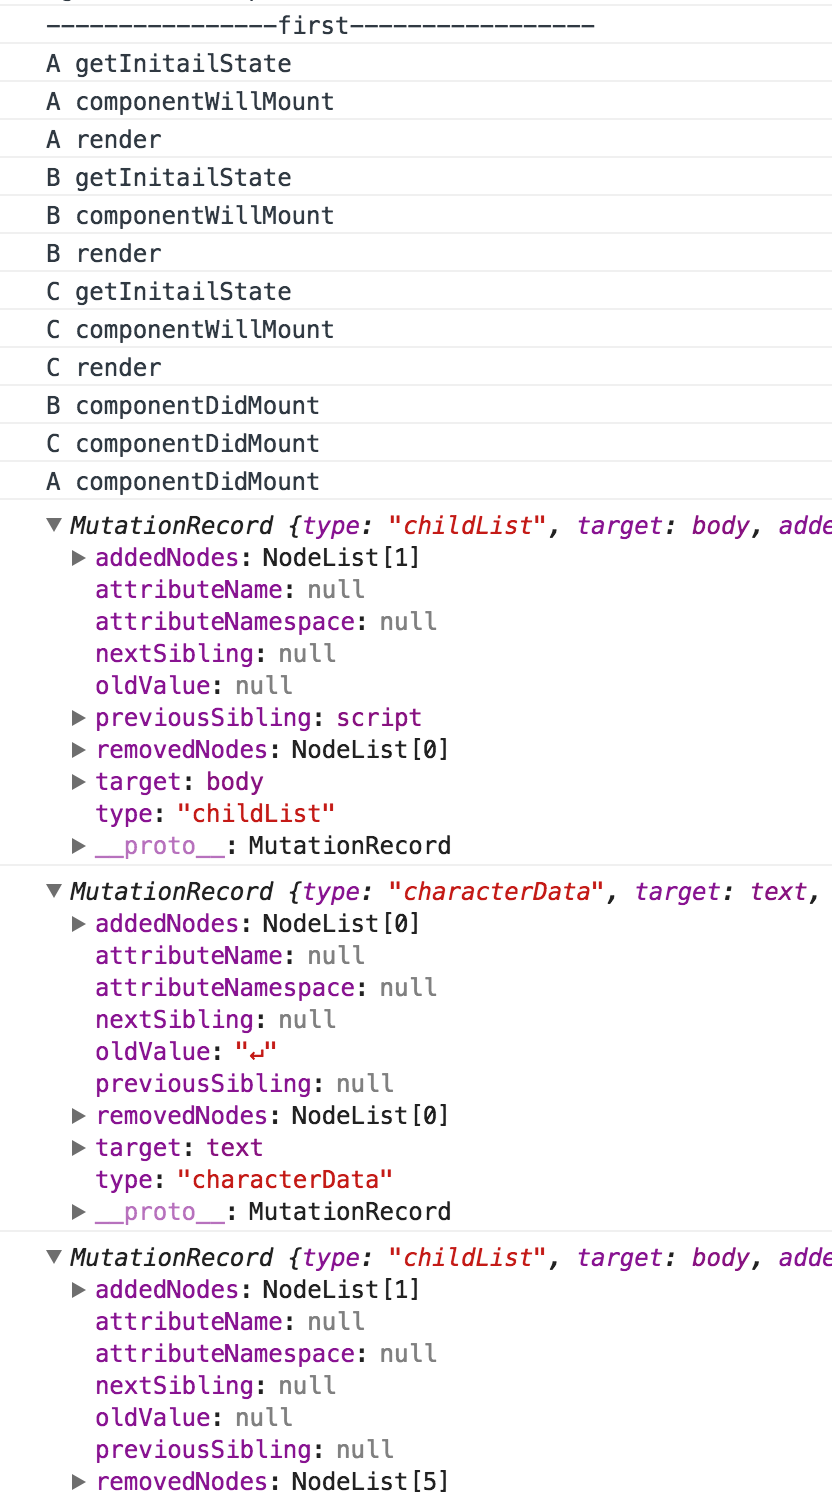
常规的做法就是将B和C组件先删除,然后依次创建和插入A,B,C组件。接下来我们打开浏览器的控制台看下ReactJS是怎么做的
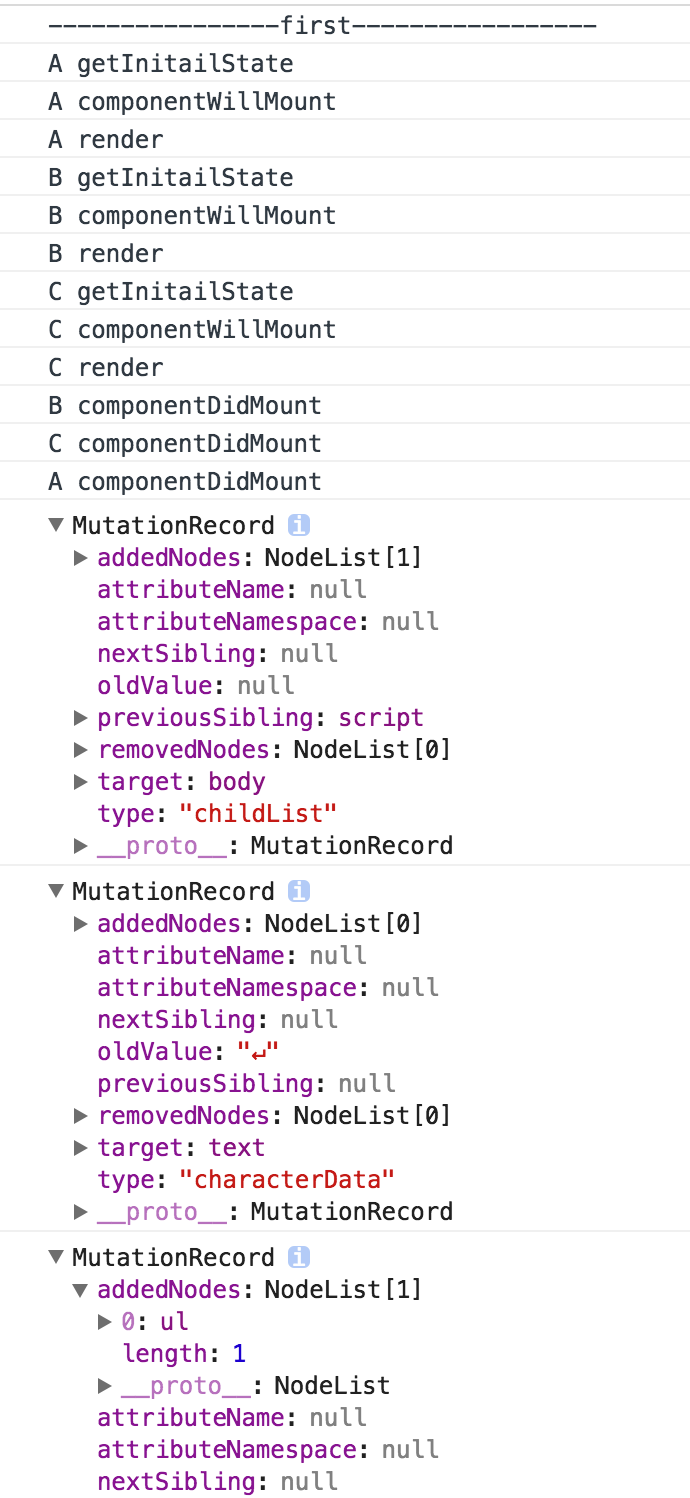
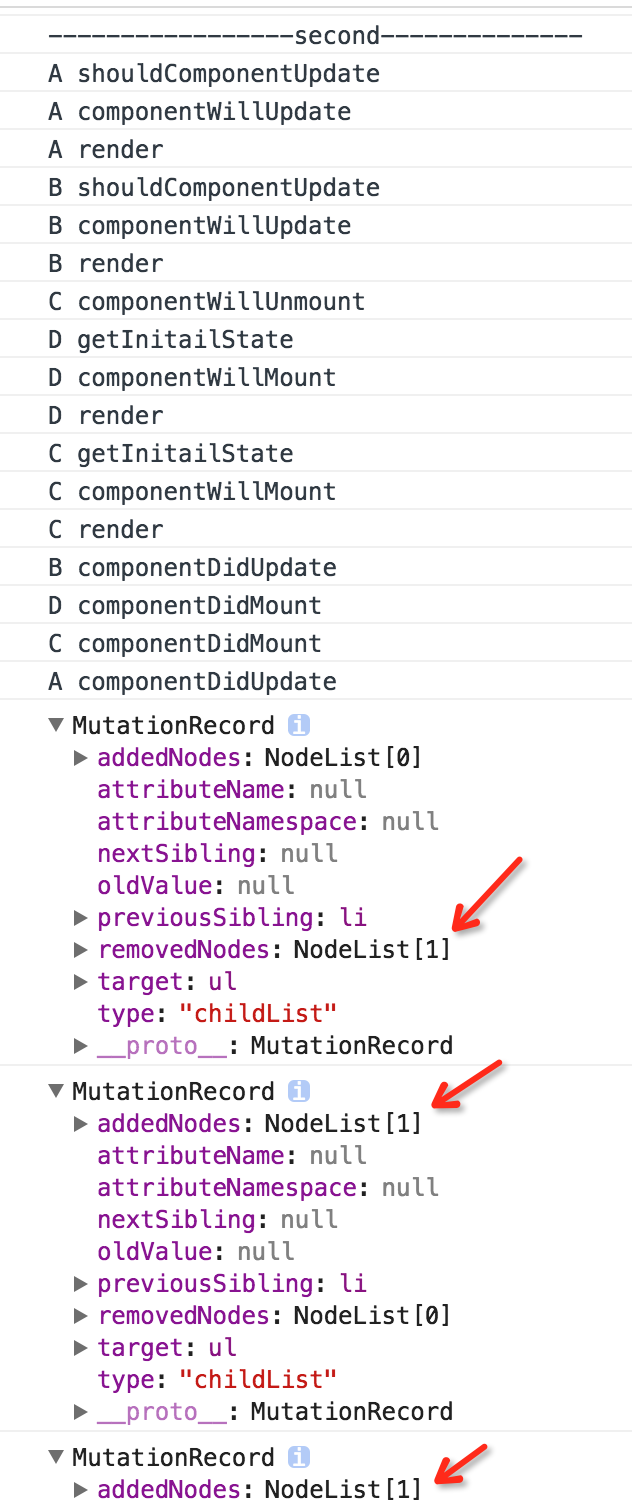
从日志中可以看出,React的Diff算法的结果是,A组件不变,先将C组件进行删除,然后在创建D组件并插入D组件,最后创建并插入C组件,这比我们常规的做法省去了对B组件的删除操作。这样其实并没有将Diff算法的作用发挥到极限。下面我们调整下逻辑代码:
 1 console.log('----------------first-----------------');
 2 React.render(
 3     <A key="A"><B key="B"></B><C key="C"></C></A>,
 4     document.body
 5 );
 6
 7 setTimeout(() => {
 8     console.log('-----------------second--------------');
 9     React.render(
10         <A key="A"><B key="B"></B><D key="D"></D><C key="C"></C></A>,
11         document.body
12     );
13 },1000);
主要的修改就是给每个组件加了一个key属性,此时再来运行下代码看下控制台的日志:
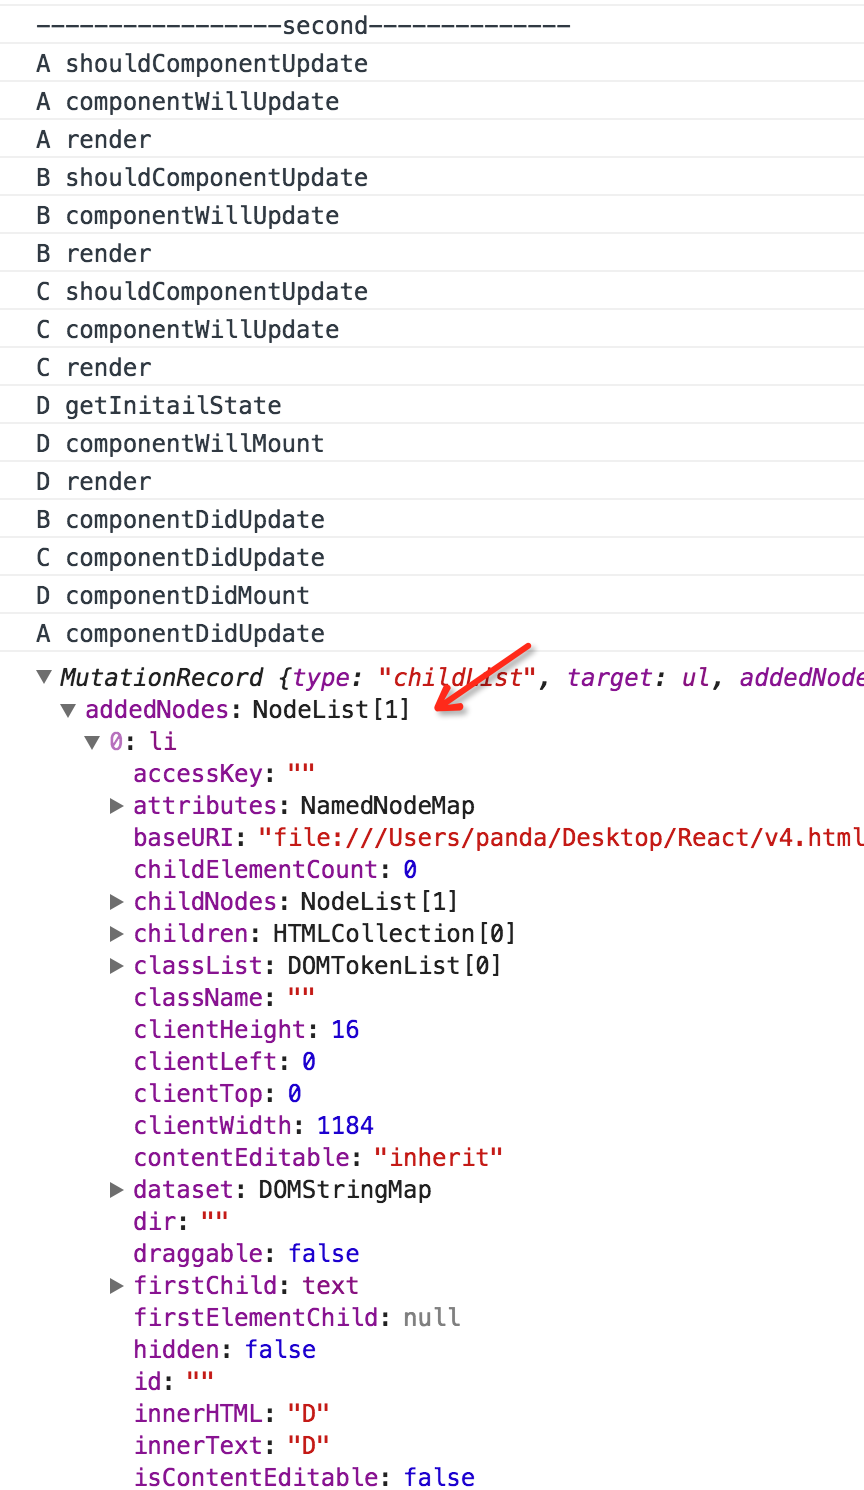
可以看出,这次Diff算法与之前的有很大的不同。B组件不变,C组件不变,只是在C组件之前创建并插入了D组件。
以上便是Virtual DOM和Diff算法的一些简单的使用和分析,学习来源:
http://calendar.perfplanet.com/2013/diff/ 《React Native入门与实践》