以前在百度写的文档,转移到此处
前些天在做NetAnalyzer时,需要使用一个指针仪表,网上看了一下,也有人做过,但是大部分都是收费的,本着自力更生的原则,于是决定自己设计一个,今天拿出来有读者分享一下。
首先是截图:
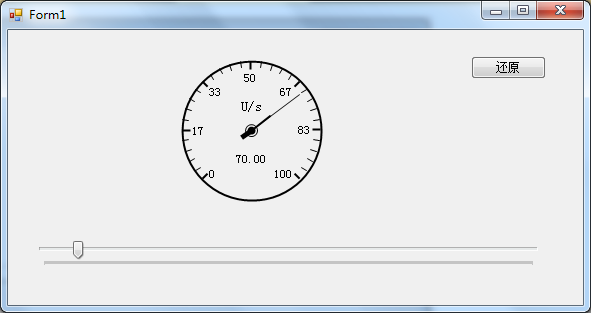
该仪表是以控件形式提供
在开始之前还要赘述一点关于GDI+中角度的计算
如下图
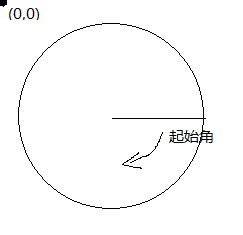
在WinForm中左上角的点位(0,0),即原点,而其起始角则是图中划线处开始的,即为 rad=0;
在绘图时,尤其是做过扇形统计图的人应该比较清楚。
--------------------------------------------------------
接下来就是正式开始
首先新建控件,设置为witdth=height=150 ,可以自己定义,我在这里时可以自适应的
将背景颜色设置为Transparent(透明色),方便以后使用时减少干扰
在该仪表中主要分为两部分:背景部分(外框,刻度,单位等一些列基本不需要频繁变化的部分),前景部分(指针部分)
所以为了不是两个图层不相互影响,我们将背景绘制在控件的BackgroundImage 属性上,而指针部分则需要一个pictrueBox控件作为载体。
首先画背景
在绘制背景时,又分为外框、刻度,指针固定中心等
  1   // 绘制背景 用来总体控制背景的绘制
  2         private void DrawBackImg()
  3         {
  4             Bitmap bit = new Bitmap(this.Width, this.Height);
  5             Graphics gp = Graphics.FromImage(bit);
  6             gp.SmoothingMode = System.Drawing.Drawing2D.SmoothingMode.HighQuality;
  7             #region 在这里可以扩展需要绘制的背景项目
  8             //外框
  9             drawFrame(gp);
 10             // 画刻度
 11             DrawRuling(gp);
 12             //画点
 13             drawPoint(gp);
 14
 15             //绘制单位
 16
 17             DrawUnitStr(gp);
 18
 19             #endregion
 20
 21            //当绘制完成后,直接直接设置为背景
 22
 23             this.BackgroundImage = bit;
 24         }
 25
 26
 27       //绘制单位
 28
 29        private void DrawUnitStr(Graphics gp)
 30         {
 31             int cer = _diameter / 2;
 32             gp.DrawString(_unitStr, new Font("宋体", 10), new SolidBrush(_frameColor), new PointF(cer, (float)(cer - cer * 0.3)), strFormat);
 33
 34         }
 35
 36         /// <summary>
 37         /// 画外框
 38         /// </summary>
 39         /// <param name="gp"></param>
 40         private void drawFrame(Graphics gp)
 41         {
 42             Pen pen = new Pen(_frameColor, 2);
 43             Rectangle rec = new Rectangle(5, 5, _diameter - 10, _diameter - 10);
 44             gp.DrawEllipse(pen, rec);
 45         }
 46         // 画刻度  此次较为复杂,主要是在绘制刻度值时需要处理
 47         private void DrawRuling(Graphics gp)
 48         {
 49             //刻度
 50             int cerX = _diameter / 2;
 51             int cerY = _diameter / 2;
 52
 53            //这里需要注意,因外在上面的图中标识了rad=0的位置,而我们的仪表时270度的,0点在135度处,
 54
 55            //为了符合该效果所以起始位置设为135度。
 56             float start = 135;
 57             float sweepShot = 0;
 58             int dx = 0;
 59             int dy = 0;
 60             int soildLenght = 8;
 61             Pen linePen = new Pen(_frameColor, 1);
 62             float span = (float)(_maxValue / 30);
 63             float sp = 0;
 64             //用于右边数字右对齐
 65             StringFormat stf = new StringFormat();
 66             stf.Alignment = StringAlignment.Far;
 67
 68             StringFormat stfMid = new StringFormat();
 69             stfMid.Alignment = StringAlignment.Center;
 70             stfMid.LineAlignment = StringAlignment.Center;
 71             for (int i = 0; i <= 30; i++)
 72             {
 73                 //注意此处,C#提供的三角函数计算中使用的弧度值,而此处获取的是角度值,需要转化
 74
 75                 double rad = (sweepShot + start) * Math.PI / 180;
 76                 float radius = _diameter / 2 - 5;
 77                 int px = (int)(cerX + radius * Math.Cos(rad));
 78                 int py = (int)(cerY + radius * Math.Sin(rad));
 79                 if (sweepShot % 15 == 0)
 80                 {
 81                     linePen.Width = 2;
 82
 83                    //计算刻度中的粗线
 84                     dx = (int)(cerX + (radius - soildLenght) * Math.Cos(rad));
 85                     dy = (int)(cerY + (radius - soildLenght) * Math.Sin(rad));
 86
 87                     //绘制刻度值,注意字串对其方式
 88                     string str = sp.ToString("f0");
 89                     if (sweepShot <= 45)
 90                     {
 91                         gp.DrawString(str, new Font("宋体", 9), new SolidBrush(_frameColor), new PointF(dx, dy - 5));
 92                     }
 93                     else if (sweepShot > 45 && sweepShot < 135)
 94                     {
 95                         gp.DrawString(str, new Font("宋体", 9), new SolidBrush(_frameColor), new PointF(dx, dy));
 96                     }
 97                     else if (sweepShot == 135)
 98                     {
 99                         gp.DrawString(str, new Font("宋体", 9), new SolidBrush(_frameColor), new PointF(dx, dy + 10), stfMid);
100                     }
101                     else if (sweepShot > 135 && sweepShot < 225)
102                     {
103                         gp.DrawString(str, new Font("宋体", 9), new SolidBrush(_frameColor), new PointF(dx, dy), stf);
104                     }
105                     else if (sweepShot >= 225)
106                     {
107                         gp.DrawString(str, new Font("宋体", 9), new SolidBrush(_frameColor), new PointF(dx, dy - 5), stf);
108                     }
109
110                 }
111                 else
112                 {
113
114                     //计算刻度中细线
115
116                     linePen.Width = 1;
117                     dx = (int)(cerX + (radius - soildLenght + 2) * Math.Cos(rad));
118                     dy = (int)(cerY + (radius - soildLenght + 2) * Math.Sin(rad));
119                 }
120
121                  //绘制刻度线
122                 gp.DrawLine(linePen, new Point(px, py), new Point(dx, dy));
123                 sp += span;
124                 sweepShot += 9;
125             }
126         }
127         //画中间的点
128         private void drawPoint(Graphics gp)
129         {
130             Pen p = new Pen(_frameColor);
131             int tmpWidth = 6;
132             int px = _diameter / 2 - tmpWidth;
133
134             gp.DrawEllipse(p, new Rectangle(px, px, 2 * tmpWidth, 2 * tmpWidth));
135
136             //在画点时,我使用了指针的颜色,这样看起来,更真实一点
137             gp.FillEllipse(new SolidBrush(_pinColor), new Rectangle(px + 2, px + 2, 2 * tmpWidth - 4, 2 * tmpWidth - 4));
138         }
139
140 -------------------------------------------
141
142 画指针
143
144 绘制指正时,最大的问题就是界面闪速,除了在控件构造方法里添加如下代码:
145
146         SetStyle(ControlStyles.OptimizedDoubleBuffer | ControlStyles.ResizeRedraw | ControlStyles.AllPaintingInWmPaint, true);
147         UpdateStyles();
148
149 绘制方式也需要调整,方法如下:
150
151
152
153   //为了方式绘制指针时产生的闪烁,PictureBox添加该事件方法
154
155         private void pic_Paint(object sender, PaintEventArgs e)
156         {
157               DrawForeImg(e.Graphics);
158        }
159
160       //使用方法
161
162          public double ChangeValue
163         {
164             get { return _changeValue; }
165             set
166             {
167                 if (value <= _maxValue)
168                     _changeValue = value;
169                 else
170                 {
171                     //完成自适应性
172                     MaxValue = value;
173                     _changeValue = value;
174                 }
175                //通过该方法,可以使指针自动绘制(其实就是强制重绘)
176
177                pic.Invalidate();
178             }
179         }
180
181         //指针的具体画法
182
183         private void DrawForeImg(Graphics gp)
184         {
185             Bitmap bit = new Bitmap(this.Width, this.Height);
186             Graphics g = Graphics.FromImage(bit);
187             g.SmoothingMode = System.Drawing.Drawing2D.SmoothingMode.HighQuality;
188
189             //画针
190             DrawPin(g);
191             DrawString(g);
192
193             //注意此处的绘制方式,这样可以有效减少界面的闪烁问题。
194             gp.DrawImage(bit, new Point(0, 0));
195             g.Dispose();
196
197         }
198         //画针
199         private void DrawPin(Graphics g)
200         {
201             int cer = _diameter / 2;
202             float start = 135;
203             float sweepShot = (float)(_changeValue / _maxValue * 270);
204
205             Pen linePen = new Pen(_pinColor, 1);
206             Pen NxPen = new Pen(_pinColor, 2);
207             Pen xPen = new Pen(_pinColor, 5);
208             double rad = (sweepShot + start) * Math.PI / 180;
209             float radius = _diameter / 2 - 5;
210             int dx = (int)(cer + (_PinLen) * Math.Cos(rad));
211             int dy = (int)(cer + (_PinLen) * Math.Sin(rad));
212
213             int px = (int)(cer + (_PinLen * 0.4) * Math.Cos(rad));
214             int py = (int)(cer + (_PinLen * 0.4) * Math.Sin(rad));
215
216             int nx = (int)(cer - (NxPinLen) * Math.Sin(rad));
217             int ny = (int)(cer - (NxPinLen) * Math.Cos(rad));
218             g.DrawLine(linePen, new Point(cer, cer), new Point(dx, dy));
219             g.DrawLine(NxPen, new Point(cer, cer), new Point(px, py));
220             g.DrawLine(xPen, new Point(cer, cer), new Point(ny, nx));
221         }
222
223        //绘制在仪表下面的值
224
225         private void DrawString(Graphics g)
226         {
227             int cer = _diameter / 2;
228             string str = _changeValue.ToString("F2");
229             g.DrawString(str, new Font("宋体", 9), new SolidBrush(_pinColor), new PointF(cer, (float)(cer + cer * 0.4)), strFormat);
230         }