.•●•✿.。.:*.•●•✿.。.:*.•●•✿.。.:*.•●•✿.。.:*.•●•✿.。.:*.•●•✿.。.:*.•.•●•✿.。.:*.•●•✿.。.:*.•●•✿.。.:*.•●•✿.。.:*.•●•✿.。.:*.•●•✿.。.:*.•
环境:
Linux CentOS 7.6
mysql-8.0.18-linux-glibc2.12-x86_64.tar.xz 下载连接 https://dev.mysql.com/downloads/mysql/
工具:
Xshell 6 & Xftp 6 https://www.cnblogs.com/unityworld/p/11182616.html (这是以前用的 Ubuntu 18.0 版本的连接, centos 7 更加方便一些, 不过也差不多)
Navicat Premium 12
.•●•✿.。.:*.•●•✿.。.:*.•●•✿.。.:*.•●•✿.。.:*.•●•✿.。.:*.•●•✿.。.:*.•.•●•✿.。.:*.•●•✿.。.:*.•●•✿.。.:*.•●•✿.。.:*.•●•✿.。.:*.•●•✿.。.:*.•
第一步:推荐将 mysql 解压安装到 /usr/local 下
[root@gz-server ~]# cd /usr/local/ 进入文件目录, 注意这里要 root 用户操作
第二步: 下载好 mysql 的安装包后, 通过 xftp 将压缩包上传到服务器

也就是将 mysql-8.0.18-linux-glibc2.12-x86_64.tar.xz 上传到 /usr/local/ 中
第三步: 解压 压缩包, 并且授权文件夹
[root@gz-server local]# xz -d mysql-8.0.18-linux-glibc2.12-x86_64.tar.xz   解压 .xz 格式的压缩包, 其实就是讲 .xz 变成 .tar
[root@gz-server local]# tar -zxvf mysql-8.0.18-linux-glibc2.12-x86_64.tar  解压 .tar 压缩包, 得到 mysql-8.0.18-linux-glibc2.12-x86_64 文件夹
[root@gz-server local]# mv mysql-8.0.18-linux-glibc2.12-x86_64 mysql    将 mysql-8.0.18-linux-glibc2.12-x86_64 文件夹 更名为 mysql 方便后续操作
[root@gz-server local]# chown -R [user]:[user] /usr/local/mysql            将操作 mysql 文件夹的权限授权给你想要授权的用户,  [user] 里填写的是用户名
第三步: 安装并配置 mysql
安装的时候, 日志最末尾位置 root@localhost : 后的字符串, 是 root 用户临时登录的密码。
[root@gz-server mysql]# cd bin 进入目录
[root@gz-server bin]#./mysqld --initialize --user=mysql --datadir=/usr/local/mysql/data --basedir=/usr/local/mysql 开始安装 mysql,这里要注意的一点就是在安装 mysql 的时候, 系统会显示初始密码, 请务必记住
[root@gz-server bin]# cd ../support-files/ 进入目录[root@gz-serversupport-files]# ./mysql.server start 启动 mysql 服务器[root@gz-server mysql]# mysql -u root -p 登录 mysql , 并输入密码, 这里的密码就是日志里显示的那串字符串
mysql>set password for root@localhost = password('你要修改的密码'); 进入 mysql 后我们需要修改一次密码
Query OK, 0 rows affected (0.29 sec)   说明操作成功
第四步: 开启远程连接
mysql> show databases; 查看数据库
+--------------------+
| Database |
+--------------------+
| information_schema |
| mysql |
| performance_schema |
| sys |
+--------------------+
4 rows in set (0.00 sec)
连接名为 mysql 数据库
mysql> use mysql
Reading table information for completion of table and column names
You can turn off this feature to get a quicker startup with -A

Database changed
查看 mysql 数据库里的 数据表, 这里只显示需要用到的
  mysql> show tables;
  +---------------------------+
  | Tables_in_mysql |
  +---------------------------+
  | user |
  +---------------------------+
  33 rows in set (0.00 sec)
查看 user 表里的相关信息, 在 user 为 root 的这一栏, host 为 localhost , 说明 root 用户只能在本地(云服务器)登录, 而 plugin 为用户密码的加密方式
mysql> select host, user, authentication_string, plugin from user;
+-----------+------------------+------------------------------------------------------------------------+-----------------------+
| host      | user             | authentication_string                                                  | plugin                |
+-----------+------------------+------------------------------------------------------------------------+-----------------------+
| localhost | root             | $A$005$n@"3hhK-&@g?2!/ULAWAS/d/txGgcVJbj.pS2nNyf8Dk3rmH6tqXoLSEIA      | caching_sha2_password |
| localhost | mysql.infoschema | $A$005$THISISACOMBINATIONOFINVALIDSALTANDPASSWORDTHATMUSTNEVERBRBEUSED | caching_sha2_password |
| localhost | mysql.session    | $A$005$THISISACOMBINATIONOFINVALIDSALTANDPASSWORDTHATMUSTNEVERBRBEUSED | caching_sha2_password |
| localhost | mysql.sys        | $A$005$THISISACOMBINATIONOFINVALIDSALTANDPASSWORDTHATMUSTNEVERBRBEUSED | caching_sha2_password |
+-----------+------------------+------------------------------------------------------------------------+-----------------------+
4 rows in set (0.00 sec)
开启远程登录, 将 host 字段里的 localhost 改为 %, 表示允许 root 远程登录, 记得要加 where 条件啊啊啊啊啊啊啊!!!!!!!
mysql> update user set host = '%' where user = 'root';
Query OK, 1 row affected (0.43 sec)
Rows matched: 1  Changed: 1  Warnings: 0
修改 root 用户密码的加密方式,,,,记得加 where 条件啊啊啊啊啊啊!!!!!!!
mysql> update user set plugin = 'mysql_native_password' where user = 'root';
Query OK, 1 row affected (0.43 sec)
Rows matched: 1  Changed: 1  Warnings: 0
查看修改结果
mysql> select host, user, authentication_string, plugin from user;
+-----------+------------------+------------------------------------------------------------------------+-----------------------+
| host      | user             | authentication_string                                                  | plugin                |
+-----------+------------------+------------------------------------------------------------------------+-----------------------+
| %         | root             | $A$005$n@"3hhK-&@g?2!/ULAWAS/d/txGgcVJbj.pS2nNyf8Dk3rmH6tqXoLSEIA      | mysql_native_password |
| localhost | mysql.infoschema | $A$005$THISISACOMBINATIONOFINVALIDSALTANDPASSWORDTHATMUSTNEVERBRBEUSED | caching_sha2_password |
| localhost | mysql.session    | $A$005$THISISACOMBINATIONOFINVALIDSALTANDPASSWORDTHATMUSTNEVERBRBEUSED | caching_sha2_password |
| localhost | mysql.sys        | $A$005$THISISACOMBINATIONOFINVALIDSALTANDPASSWORDTHATMUSTNEVERBRBEUSED | caching_sha2_password |
+-----------+------------------+------------------------------------------------------------------------+-----------------------+
4 rows in set (0.00 sec)
康, 修改成功~ 然后再修改一次 root 用户的密码
mysql> ALTER USER 'root'@'%' IDENTIFIED WITH mysql_native_password BY '你的密码';
Query OK, 0 rows affected (0.29 sec)
退出 mysql
mysql> exit
Bye
开放 3306 端口
[root@gz_server local]# firewall-cmd --zone=public --add-port=8080/tcp --permanent
重启防火墙
[root@gz_server local]# firewall-cmd --reload
查看服务器开放的端口号
[root@gz_server local]# firewall-cmd --zone=public --list-ports
3306/tcp
第五步: 创建 mysql 用户, 并设置密码,
其实这一步应该是要放在第一步的, 但是我的云服务器已经默认创建了这个用户, 所以就没在一开始的创建, 如果没有的话就需要先创建这个用户, 而且第三步的授权也是授权给这个用户
[root@gz-server mysql]# useradd mysql
[root@gz-server mysql]# passwd mysql
Changing password for user mysql.
New password:
BAD PASSWORD: The password contains the user name in some form
Retype new password:
passwd: all authentication tokens updated successfully.
[root@gz-server mysql]# id mysql
uid=1002(mysql) gid=1002(mysql) groups=1002(mysql)
第六步: Navicat 远程连接 mysql
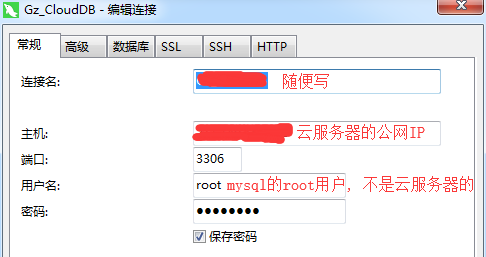
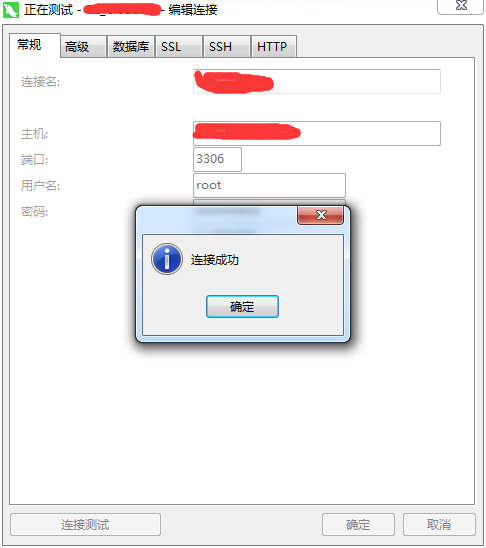
OK, 连接成功, 但是这样会发现一个问题, 我们无法在 Navicat 上创建数据库, 是因为我们还没有进行 SSH 连接
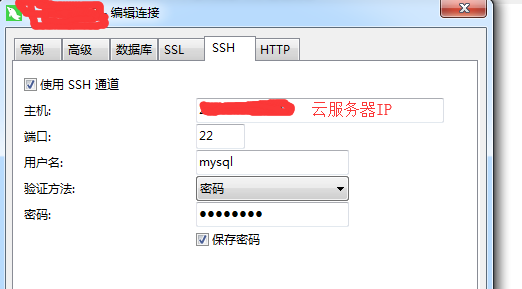
这里的用户名 mysql, 就是刚刚创建的云服务器的用户 mysql, 然后输入刚刚设置的密码, 就可以连接了

然后我们点击连接, 连接成功后试着创建一个数据库试试康
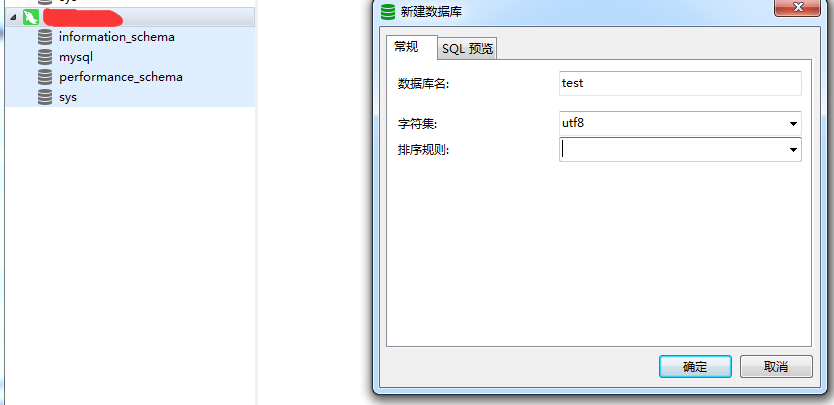
OK, 搞定, 这样就可以远程控制 mysql 服务器了