实验内容:
- 找一个系统调用,系统调用号为学号最后 2位相同的系统调用【即 97号系统调用】
- 通过汇编指令触发该系统调用
- 通过 gdb 跟踪该系统调用的内核处理过程
- 重点阅读分析系统调用入口的保存现场、恢复现场和系统调用返回,以及重点关注系统调用过程中内核堆栈状态的变化
实验环境:
VMWare虚拟机下的Ubuntu18.04.4,实验采用的内核版本为linux-5.4.34。
1 环境准备
1.1 内核编译
回退实验一的补丁操作:
cd linux-5.4.34
patch -R -p1 < ../mykernel-2.0_for_linux-5.4.34.patch
make defconfig
修改内核编译配置重新编译:
#打开debug相关选项
Kernel hacking --->
     Compile-time checks and compiler options --->
         [*] Compile the kernel with debug info
         [*] Provide GDB scripts for kernel debugging
     [*] Kernel debugging
#关闭KASLR,否则断点失败
Processor type and features --->
     [] Randomize the address of the kernel image (KASLR)
make menuconfig
make -j$(nproc)
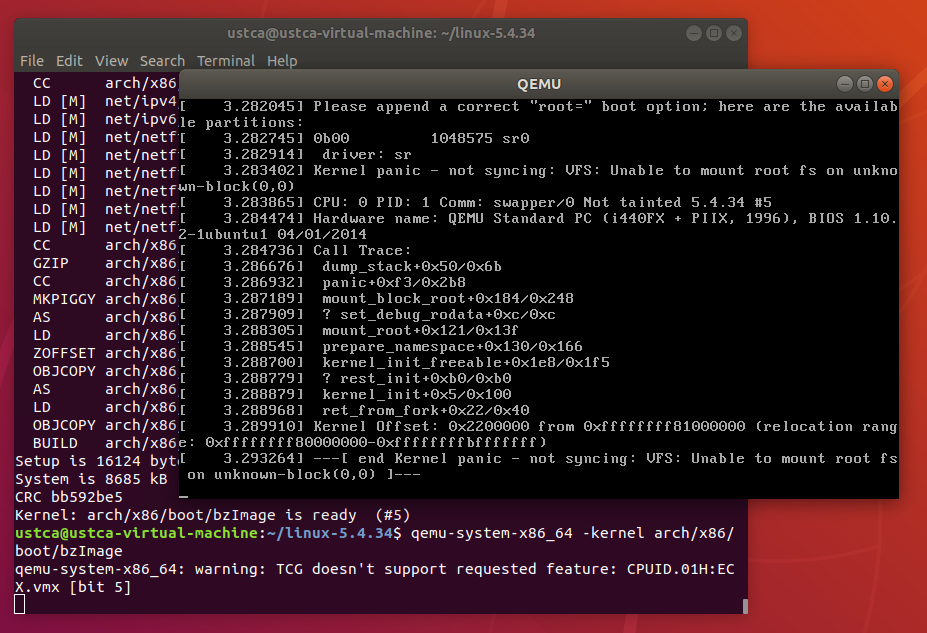
启动内核,此时内核无法正常运行,提示Kernel panic报错:
qemu-system-x86_64 -kernel arch/x86/boot/bzImage
根据报错提示,可以看出是缺少必要的根文件系统,导致内核无法挂载。
1.2 制作根文件系统
电脑加电启动首先由bootloader加载内核,内核紧接着需要挂载内存根文件系统,其中包含必要的设备驱动和工具。
为了简化实验环境,仅借助 BusyBox 制作极简内存根文件系统,提供基本的用户态可执行程序。
首先从https://www.busybox.net下载 busybox源代码解压,解压完成后,配置编译并安装。
axel -n 20 https://busybox.net/downloads/busybox-1.31.1.tar.bz2
tar -jxvf busybox-1.31.1.tar.bz2
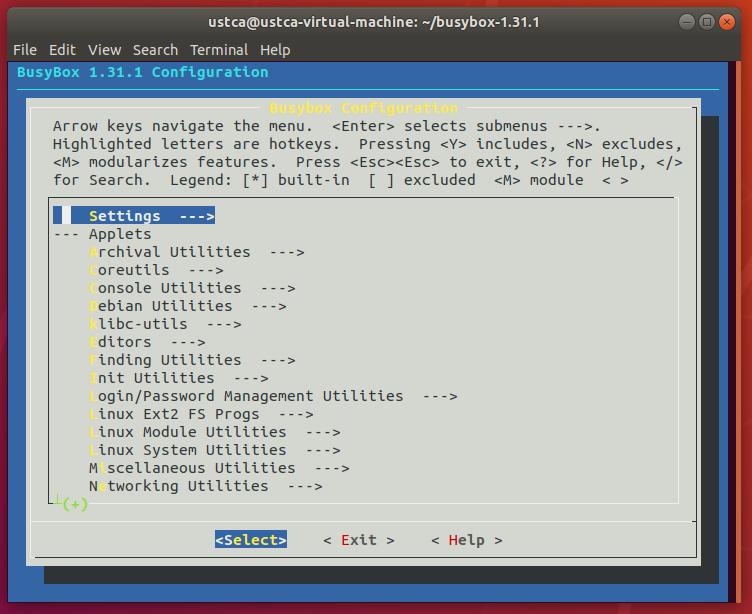
配置编译成静态链接,不用动态链接库。
cd busybox-1.31.1
make menuconfig

编译安装,默认会安装到源码目录下的 _install 目录中。
make -j$(nproc) && make install
制作内存根文件系统镜像:
mkdir rootfs
cd rootfs
cp ../busybox-1.31.1/_install/* ./ -rf
mkdir dev proc sys home
sudo cp -a /dev/{null,console,tty,tty1,tty2,tty3,tty4} dev/
在根文件系统目录下添加init脚本文件(rootfs/init),init内容如下:
#!/bin/sh
mount -t proc none /proc
mount -t sysfs none /sys
echo "Wellcome MengningOS!"
echo "--------------------"
cd home
/bin/sh
给init脚本添加可执行权限:
chmod +x init
打包成内存根文件系统镜像:
find . -print0 | cpio --null -ov --format=newc | gzip -9 > ../rootfs.cpio.gz
测试挂载根文件系统,看内核启动完成后是否执行init脚本:
qemu-system-x86_64 -kernel linux-5.4.34/arch/x86/boot/bzImage -initrd rootfs.cpio.gz

bootloader成功加载根文件系统到内存中后,内核会将其挂载到根目录下。
然后运行根文件系统中 init 脚本执行一些启动任务,最后才挂载真正的磁盘根文件系统。
2 系统调用
2.1 查找系统调用
在 linux-5.4.34/arch/x86/entry/syscalls/syscall_64.tbl 文件中找到相应的系统调用:
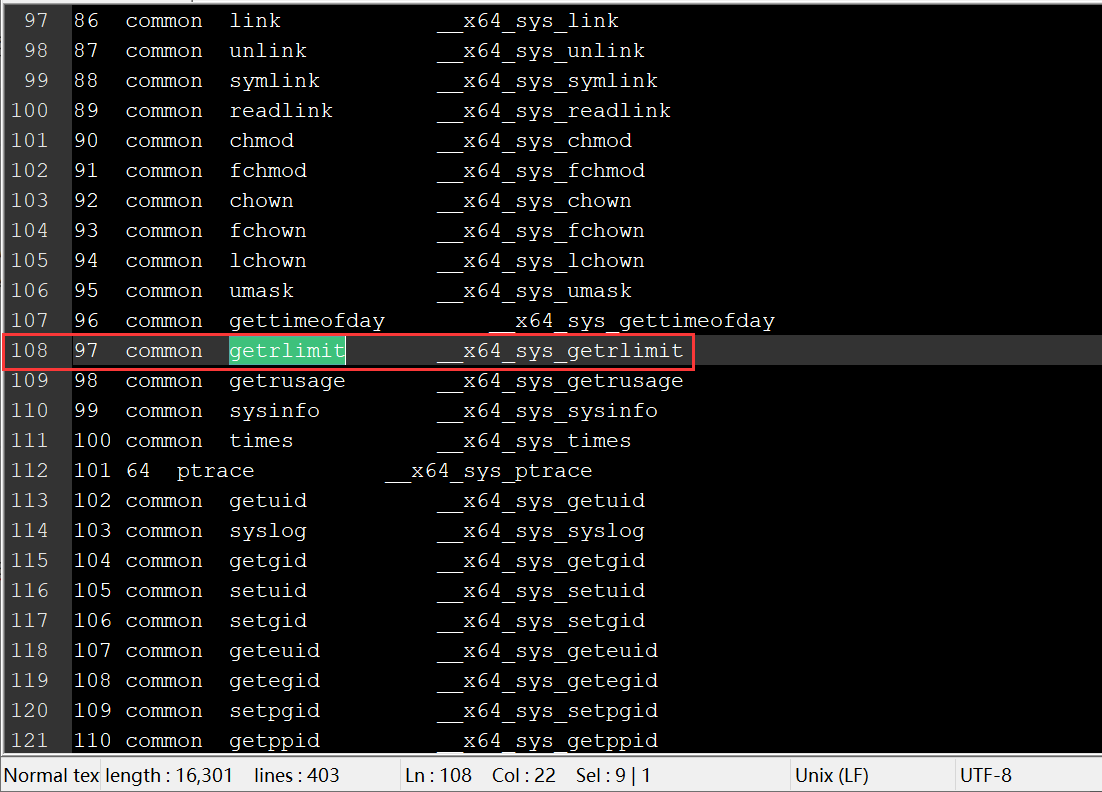
2.2 触发系统调用
getrlimit用于获得每个进程能够创建的各种系统资源的限制使用量。
在rootfs/home/目录下新建getrlimit_test.c进行测试:
#include <stdio.h>
#include <sys/resource.h>
int main()
{
        struct rlimit limit;
        int ret = getrlimit(RLIMIT_NOFILE, &limit);
        printf("ret = %d,	cur = %ld,	max = %ld
",
        			ret, limit.rlim_cur, limit.rlim_max);
        return 0;
}
函数执行成功返回0,失败返回1。
其中,RLIMIT_NOFILE表示每个进程能打开的最多文件数。
limit.rlim_cur为当前软件限制,limit.rlim_max为最大硬件限制。
采用静态编译:
gcc -o getrlimit_test getrlimit_test.c -static
代码测试结果如下:

getrlimit测试成功后,通过编写汇编代码来触发系统调用:
#include <stdio.h>
#include <sys/resource.h>
int main()
{
        struct rlimit limit;
        int ret = -1;
		asm volatile(
			"movq %2, %%rsi
	"
			"movl %1, %%edi
	"
			"movl $0x61, %%eax
	"
			"syscall
	"
			"movq %%rax,%0
	"
			:"=m"(ret)
			:"a"(RLIMIT_NOFILE), "b"(&limit)
        );
        printf("ret = %d,	cur = %ld,	max = %ld
",
        			ret, limit.rlim_cur, limit.rlim_max);
        return 0;
}
2.3 跟踪系统调用内核处理过程
重新制作根文件系统:
find . -print0 | cpio --null -ov --format=newc | gzip -9 > ../rootfs.cpio.gz
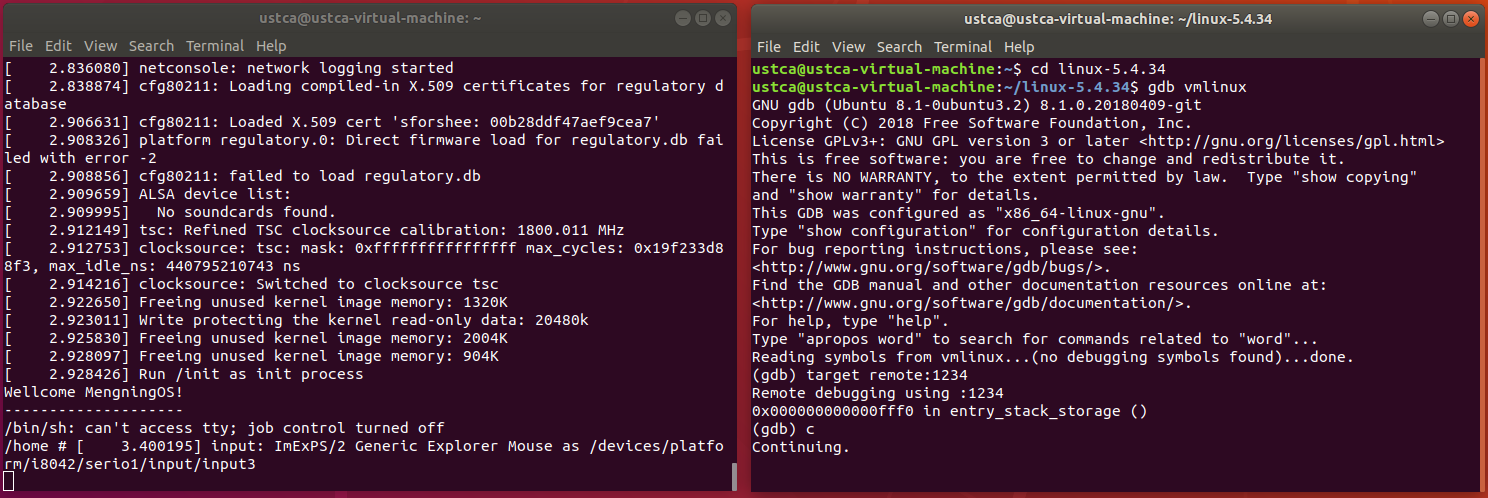
纯命令行启动qemu:
qemu-system-x86_64 -kernel linux-5.4.34/arch/x86/boot/bzImage -initrd rootfs.cpio.gz -S -s -nographic -append "console=ttyS0"
开启新的terminal进行gdb调试:
cd linux-5.4.34
gdb vmlinux
target remote:1234
c
添加断点测试:
b __x64_sys_getrlimit
发现断点处无法停止,需要分析getrlimit反汇编的代码:
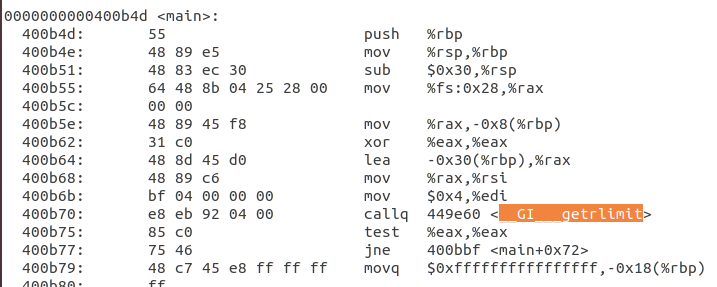
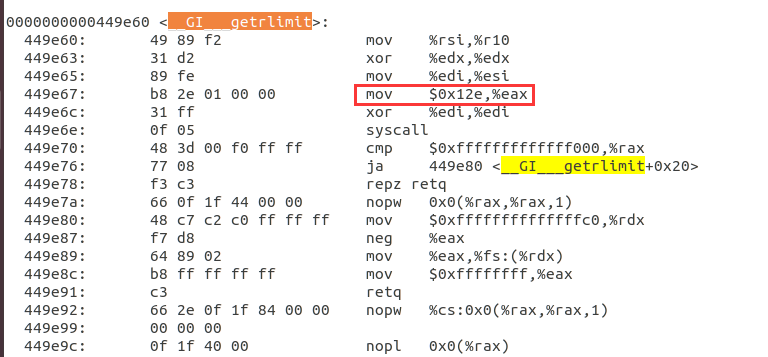
之前的断点是根据97号系统调用设置,但根据反汇编具体程序可以看到,此处实际调用的是0x12e也就是302号系统调用。
因此之前根据97号系统调用设置的断点并没有起到作用,这里应该按照302号系统调用进行断点设置,302号系统调用对应的是__x64_sys_prlimit64。
重新设置断点:
b __x64_sys_prlimit64
成功进入中断:
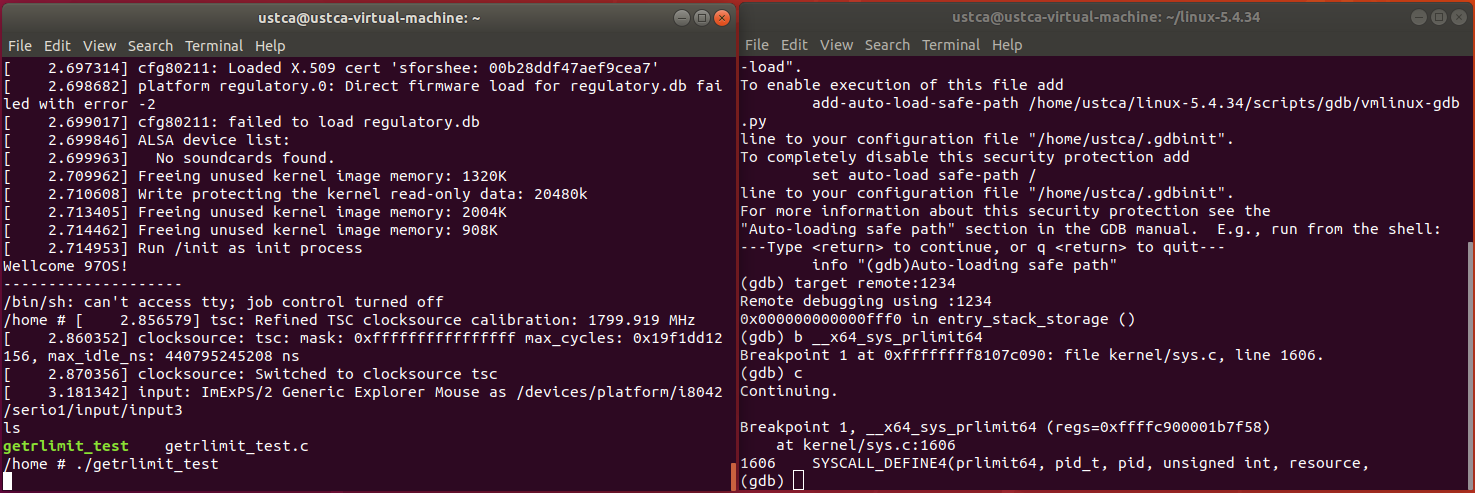

观察函数调用栈,可以找到系统调用入口 entry_SYSCALL_64:
ENTRY(entry_SYSCALL_64)
	UNWIND_HINT_EMPTY
	/*
	 * Interrupts are off on entry.
	 * We do not frame this tiny irq-off block with TRACE_IRQS_OFF/ON,
	 * it is too small to ever cause noticeable irq latency.
	 */

	swapgs
	/* tss.sp2 is scratch space. */
	movq	%rsp, PER_CPU_VAR(cpu_tss_rw + TSS_sp2)
	SWITCH_TO_KERNEL_CR3 scratch_reg=%rsp
	movq	PER_CPU_VAR(cpu_current_top_of_stack), %rsp

	/* Construct struct pt_regs on stack */
	pushq	$__USER_DS				/* pt_regs->ss */
	pushq	PER_CPU_VAR(cpu_tss_rw + TSS_sp2)	/* pt_regs->sp */
	pushq	%r11					/* pt_regs->flags */
	pushq	$__USER_CS				/* pt_regs->cs */
	pushq	%rcx					/* pt_regs->ip */
GLOBAL(entry_SYSCALL_64_after_hwframe)
	pushq	%rax					/* pt_regs->orig_ax */

	PUSH_AND_CLEAR_REGS rax=$-ENOSYS

	TRACE_IRQS_OFF
        /* IRQs are off. */
	movq	%rax, %rdi
	movq	%rsp, %rsi
	call	do_syscall_64		/* returns with IRQs disabled */
用户态程序通过系统调用进入内核态,程序执行到entry_SYSCALL_64时,先保存进程现场,然后call do_syscall_64执行:
#ifdef CONFIG_X86_64
__visible void do_syscall_64(unsigned long nr, struct pt_regs *regs)
{
	struct thread_info *ti;

	enter_from_user_mode();
	local_irq_enable();
	ti = current_thread_info();
	if (READ_ONCE(ti->flags) & _TIF_WORK_SYSCALL_ENTRY)
		nr = syscall_trace_enter(regs);

	if (likely(nr < NR_syscalls)) {
		nr = array_index_nospec(nr, NR_syscalls);
		regs->ax = sys_call_table[nr](regs);
#ifdef CONFIG_X86_X32_ABI
	} else if (likely((nr & __X32_SYSCALL_BIT) &&
			  (nr & ~__X32_SYSCALL_BIT) < X32_NR_syscalls)) {
		nr = array_index_nospec(nr & ~__X32_SYSCALL_BIT,
					X32_NR_syscalls);
		regs->ax = x32_sys_call_table[nr](regs);
#endif
	}

	syscall_return_slowpath(regs);
}
#endif
在do_syscall_64中,通过查询sys_call_table得到具体的系统调用函数,本文被调用的核心代码如下:
SYSCALL_DEFINE4(prlimit64, pid_t, pid, unsigned int, resource,
		const struct rlimit64 __user *, new_rlim,
		struct rlimit64 __user *, old_rlim)
{
	struct rlimit64 old64, new64;
	struct rlimit old, new;
	struct task_struct *tsk;
	unsigned int checkflags = 0;
	int ret;

	if (old_rlim)
		checkflags |= LSM_PRLIMIT_READ;

	if (new_rlim) {
		if (copy_from_user(&new64, new_rlim, sizeof(new64)))
			return -EFAULT;
		rlim64_to_rlim(&new64, &new);
		checkflags |= LSM_PRLIMIT_WRITE;
	}

	rcu_read_lock();
	tsk = pid ? find_task_by_vpid(pid) : current;
	if (!tsk) {
		rcu_read_unlock();
		return -ESRCH;
	}
	ret = check_prlimit_permission(tsk, checkflags);
	if (ret) {
		rcu_read_unlock();
		return ret;
	}
	get_task_struct(tsk);
	rcu_read_unlock();

	ret = do_prlimit(tsk, resource, new_rlim ? &new : NULL,
			old_rlim ? &old : NULL);

	if (!ret && old_rlim) {
		rlim_to_rlim64(&old, &old64);
		if (copy_to_user(old_rlim, &old64, sizeof(old64)))
			ret = -EFAULT;
	}

	put_task_struct(tsk);
	return ret;
}
当系统调用函数运行结束后,函数调用栈先返回到do_syscall_64处为返回用户态做准备。
返回到entry_SYSCALL_64中后再完成用户态程序的恢复工作,系统调用完毕。