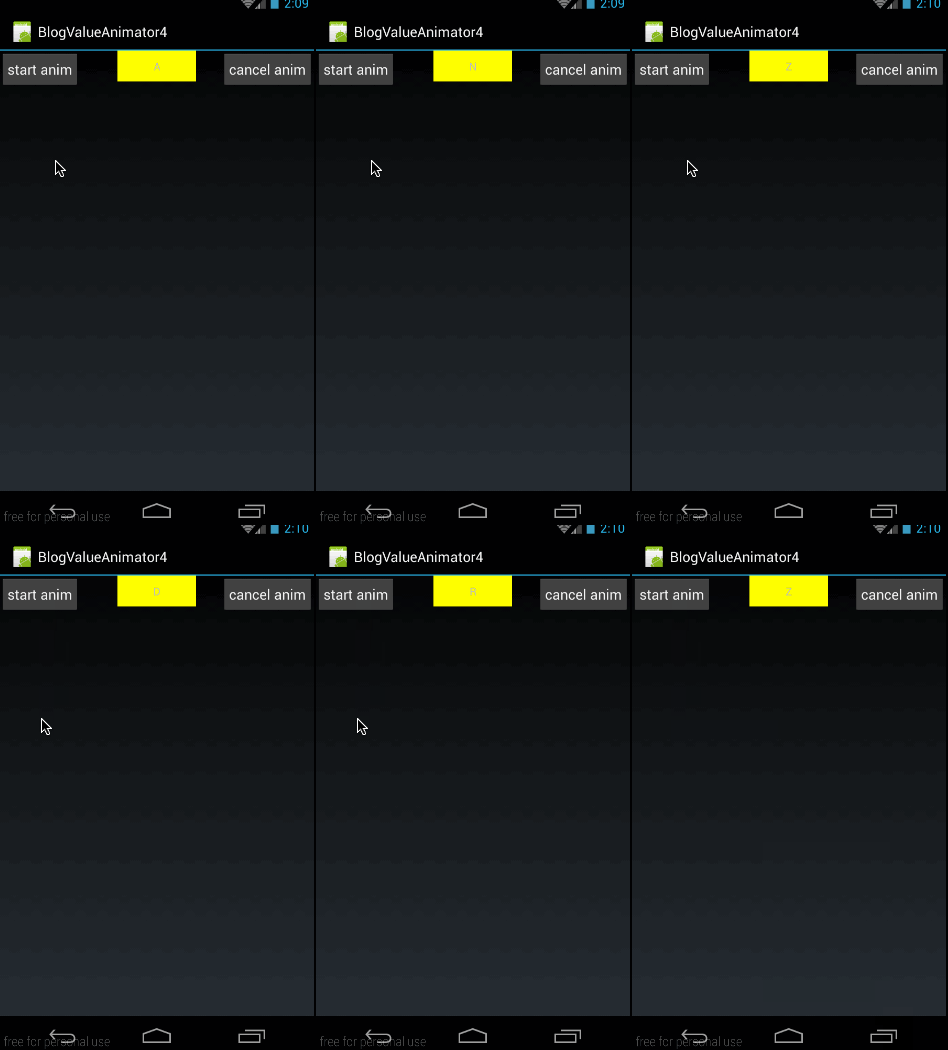
通过上两篇的讲解,我们对ValueAnimator的动画的整个过程应该都已经有较深入的理解,不过还有两个概念我们还没有讲解关键帧和ofObject(),关键帧的部分涉及问题比较多,我们将其放在系列的末尾再讲,这篇着重讲一下ofObject函数的使用
一、ofObject()概述
前面我们讲了ofInt()和ofFloat()来定义动画,但ofInt()只能传入Integer类型的值,而ofFloat()则只能传入Float类型的值。那如果我们需要操作其它类型的变量要怎么办呢?其实ValueAnimator还有一个函数ofObject(),可以传进去任何类型的变量,定义如下:
-
public static ValueAnimator ofObject(TypeEvaluator evaluator, Object... values);
它有两个参数,第一个是自定义的Evaluator,第二个是可变长参数,Object类型的;
大家可能会疑问,为什么要强制传进去自定义的Evaluator?首先,大家知道Evaluator的作用是根据当前动画的显示进度,计算出当前进度下把对应的值。那既然Object对象是我们自定的,那必然从进度到值的转换过程也必须由我们来做,不然系统哪知道你要转成个什么鬼。
好了,现在我们先简单看一下ofObject这个怎么用。
我们先来看看我们要实现的效果:

从效果图中可以看到,按钮上的字母从A变化到Z,刚开始变的慢,后来逐渐加速;
-
ValueAnimator animator = ValueAnimator.ofObject(new CharEvaluator(),new Character('A'),new Character('Z'));
-
animator.addUpdateListener(new ValueAnimator.AnimatorUpdateListener() {
-
@Override
-
public void onAnimationUpdate(ValueAnimator animation) {
-
char text = (char)animation.getAnimatedValue();
-
tv.setText(String.valueOf(text));
-
}
-
});
-
animator.setDuration(10000);
-
animator.setInterpolator(new AccelerateInterpolator());
-
animator.start();
这里注意三点:
第一,构造时:
-
ValueAnimator animator = ValueAnimator.ofObject(new CharEvaluator(),new Character('A'),new Character('Z'));
我们自定义的一个CharEvaluator,这个类实现,后面会讲;在初始化动画时,传进去的是Character对象,一个是字母A,一个是字母Z;
我们这里要实现的效果是,对Character对象来做动画,利用动画自动从字母A变到字母Z,具体怎么实现就是CharEvaluator的事了,这里我们只需要知道,在构造时传进去的是两个Character对象
第二:看监听:
-
char text = (char)animation.getAnimatedValue();
-
tv.setText(String.valueOf(text));
通过animation.getAnimatedValue()得到当前动画的字符,然后把字符设置给textview;大家知道我们构造时传进去的值类型是Character对象,所以在动画过程中通过Evaluator返回的值类型必然跟构造时的类型是一致的,也是Character
第三:插值器
-
animator.setInterpolator(new AccelerateInterpolator());
我们使用的是加速插值器,加速插值器的特点就是随着动画的进行,速度会越来越快,这点跟我们上面的效果图是一致的。
下面最关键的就是看CharEvaluator是怎么实现的了,先抛开的代码,我们先讲一个点,ASCII码中数值与字符的转换方法。
我们知道在ASCII码表中,每个字符都是有数字跟他一一对应的,字母A到字母Z之间的所有字母对应的数字区间为65到90;
而且在程序中,我们能通过数字强转成对应的字符。
比如:
数字转字符:
字符转数字:
-
char temp = 'A';
-
int num = (int)temp;
在这里得到的num值就是对应的ASCII码值65;
好了,在我们理解了ASCII码数值与对应字符的转换原理之后,再来看看CharEvaluator的实现:
-
public class CharEvaluator implements TypeEvaluator<Character> {
-
@Override
-
public Character evaluate(float fraction, Character startValue, Character endValue) {
-
int startInt = (int)startValue;
-
int endInt = (int)endValue;
-
int curInt = (int)(startInt + fraction *(endInt - startInt));
-
char result = (char)curInt;
-
return result;
-
}
-
}
在这里,我们就利用A-Z字符在ASCII码表中对应数字是连续且递增的原理,先求出来对应字符的数字值,然后再转换成对应的字符。代码难度不大,就不再细讲了。
源码在文章底部给出
好了,到这里,有关ofObject()的使用大家应该就会了,上面我们说过,ofObject()能够初始化任何对象,下面我们就稍微加深些难度, 我们自定义一个类对象,然后利用ofObject()来构造这个对象的动画。
二、ofObject之自定义对象示例
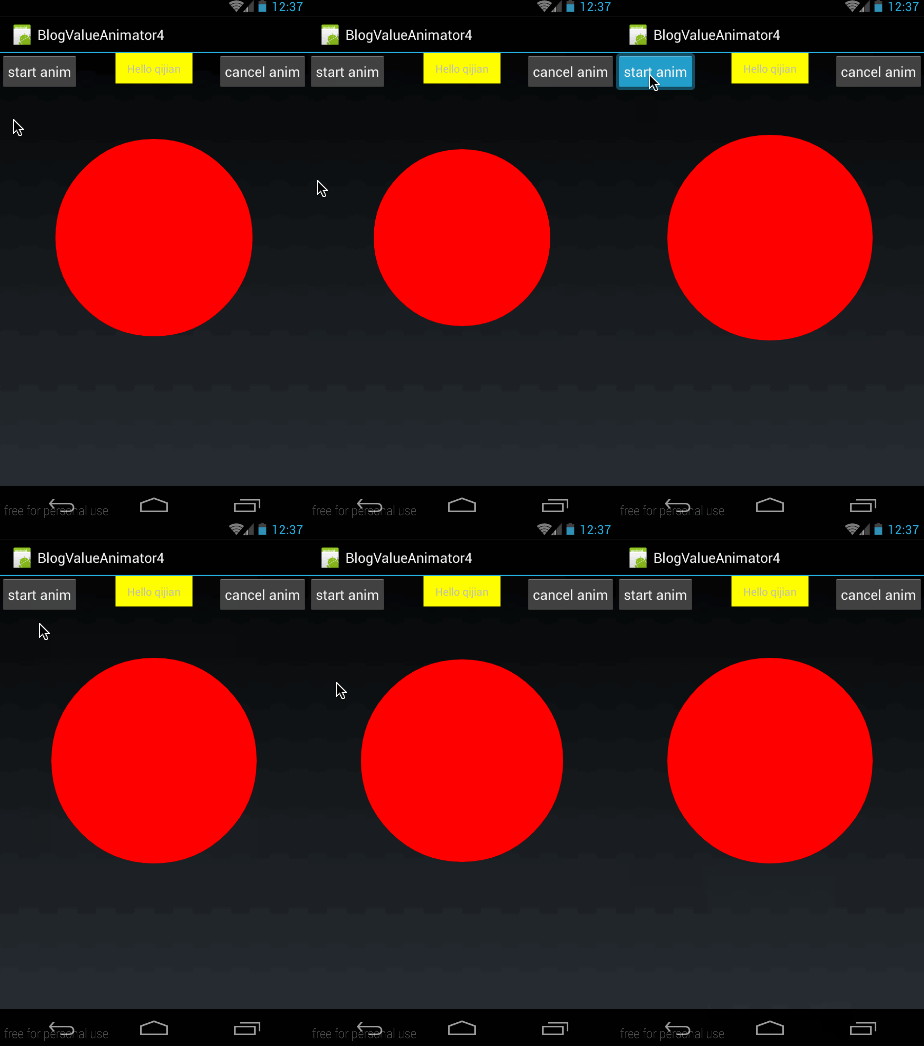
我们先看看这部分,我们将实现的效果:

在这里,我们自定义了一个View,在这个view上画一个圆,但这个圆是有动画效果的。从效果中可以看出使用的插值器应该是回弹插值器(BounceInterpolator)
下面就来看看这个动画是怎么做出来的
1、首先,我们自定义一个类Point:
-
public class Point {
-
private int radius;
-
-
public Point(int radius){
-
this.radius = radius;
-
}
-
-
public int getRadius() {
-
return radius;
-
}
-
-
public void setRadius(int radius) {
-
this.radius = radius;
-
}
-
}
point类内容很简单,只有一个成员变量:radius表示当前point的半径。
2、然后我们自定义一个View:MyPointView
-
public class MyPointView extends View {
-
private Point mCurPoint;
-
public MyPointView(Context context, AttributeSet attrs) {
-
super(context, attrs);
-
}
-
-
@Override
-
protected void onDraw(Canvas canvas) {
-
super.onDraw(canvas);
-
if (mCurPoint != null){
-
Paint paint = new Paint();
-
paint.setAntiAlias(true);
-
paint.setColor(Color.RED);
-
paint.setStyle(Paint.Style.FILL);
-
canvas.drawCircle(300,300,mCurPoint.getRadius(),paint);
-
}
-
}
-
-
public void doPointAnim(){
-
ValueAnimator animator = ValueAnimator.ofObject(new PointEvaluator(),new Point(20),new Point(200));
-
animator.addUpdateListener(new ValueAnimator.AnimatorUpdateListener() {
-
@Override
-
public void onAnimationUpdate(ValueAnimator animation) {
-
mCurPoint = (Point)animation.getAnimatedValue();
-
invalidate();
-
}
-
});
-
animator.setDuration(1000);
-
animator.setInterpolator(new BounceInterpolator());
-
animator.start();
-
}
-
}
(1)、doPointAnim()函数
在这段代码中,首先来看看供外部调用开始动画的doPointAnim()函数:
-
public void doPointAnim(){
-
ValueAnimator animator = ValueAnimator.ofObject(new PointEvaluator(),new Point(20),new Point(200));
-
animator.addUpdateListener(new ValueAnimator.AnimatorUpdateListener() {
-
@Override
-
public void onAnimationUpdate(ValueAnimator animation) {
-
mCurPoint = (Point)animation.getAnimatedValue();
-
invalidate();
-
}
-
});
-
animator.setDuration(1000);
-
animator.setInterpolator(new BounceInterpolator());
-
animator.start();
-
}
同样,先来看ofObject的构造动画的方法:
-
ValueAnimator animator = ValueAnimator.ofObject(new PointEvaluator(),new Point(20),new Point(200));
在构造动画时,动画所对应的值的类型是Point对象,那说明我们自定义的PointEvaluator中的返回值也必然是Point了。有关PointEvaluator的实现后面再讲
然后再来看看动画过程监听:
-
animator.addUpdateListener(new ValueAnimator.AnimatorUpdateListener() {
-
@Override
-
public void onAnimationUpdate(ValueAnimator animation) {
-
mCurPoint = (Point)animation.getAnimatedValue();
-
invalidate();
-
}
-
});
在监听过程中,先根据animation.getAnimatedValue()得到当前动画进度所对应的Point实例,保存在mCurPoint中,然后强制刷新
(2)、OnDraw()函数
在强制刷新之后,就会走到OnDraw()函数下面:
-
protected void onDraw(Canvas canvas) {
-
super.onDraw(canvas);
-
if (mCurPoint != null){
-
Paint paint = new Paint();
-
paint.setAntiAlias(true);
-
paint.setColor(Color.RED);
-
paint.setStyle(Paint.Style.FILL);
-
canvas.drawCircle(300,300,mCurPoint.getRadius(),paint);
-
}
-
}
onDraw函数没什么难度,就是根据mCurPoint的半径在(300,300)的位置画出来圆形,有关绘图的知识大家可以参考另一个系列《android
Graphics(一):概述及基本几何图形绘制》
(3)、PointEvaluator
在构造ofObject中,我们也可以知道,初始值和动画中间值的类型都是Point类型,所以PointEvaluator输入的返回类型都应该是Point类型的,先看看PointEvaluator的完整代码:
-
public class PointEvaluator implements TypeEvaluator<Point> {
-
@Override
-
public Point evaluate(float fraction, Point startValue, Point endValue) {
-
int start = startValue.getRadius();
-
int end = endValue.getRadius();
-
int curValue = (int)(start + fraction * (end - start));
-
return new Point(curValue);
-
}
-
}
这段代码其实比较容易理解,就是根据初始半径和最终半径求出当前动画进程所对应的半径值,然后新建一个Point对象返回。
3、使用MyPointView
首先在main.xml中添加对应的控件布局:从效果图中也可以看到,我们将MyPointView是布局在最下方的,布局代码如下:
-
<?xml version="1.0" encoding="utf-8"?>
-
<RelativeLayout xmlns:android="http://schemas.android.com/apk/res/android"
-
android:orientation="vertical"
-
android:layout_width="fill_parent"
-
android:layout_height="fill_parent">
-
-
<Button
-
android:id="@+id/btn"
-
android:layout_width="wrap_content"
-
android:layout_height="wrap_content"
-
android:layout_alignParentLeft="true"
-
android:padding="10dp"
-
android:text="start anim"
-
/>
-
-
<Button
-
android:id="@+id/btn_cancel"
-
android:layout_width="wrap_content"
-
android:layout_height="wrap_content"
-
android:layout_alignParentRight="true"
-
android:padding="10dp"
-
android:text="cancel anim"
-
/>
-
<TextView
-
android:id="@+id/tv"
-
android:layout_width="100dp"
-
android:layout_height="wrap_content"
-
android:layout_centerHorizontal="true"
-
android:gravity="center"
-
android:padding="10dp"
-
android:background="#ffff00"
-
android:text="Hello qijian"/>
-
-
<com.harvic.BlogValueAnimator4.MyPointView
-
android:id="@+id/pointview"
-
android:layout_below="@id/tv"
-
android:layout_width="match_parent"
-
android:layout_height="match_parent"/>
-
</RelativeLayout>
其实也没什么难度,就是在原来的布局代码下面加一个MyPointView控件,难度不大,不再细讲了
然后我们来看看在MyActivity.java中是怎么来用的吧
-
public class MyActivity extends Activity {
-
private Button btnStart;
-
private MyPointView mPointView;
-
-
@Override
-
public void onCreate(Bundle savedInstanceState) {
-
super.onCreate(savedInstanceState);
-
setContentView(R.layout.main);
-
-
btnStart = (Button) findViewById(R.id.btn);
-
mPointView = (MyPointView)findViewById(R.id.pointview);
-
-
btnStart.setOnClickListener(new View.OnClickListener() {
-
@Override
-
public void onClick(View v) {
-
mPointView.doPointAnim();
-
}
-
});
-
}
-
}
这段代码没什么难度,就是在点击start anim按钮的时候,调用mPointView.doPointAnim()方法开始动画。
源码在文章底部给出
好了,这篇到这里就结束了,其实没想再开这一篇单独来讲ofObject的,但上篇实在是太长了,所以只能再开一篇,这篇讲了两个实例,确实有些唠叨,毕竟开了一篇还是要多写点,不然也太辜负这一篇文章的地了。就此,有关VauleAnimator的所有问题我们都讲完了,下一篇讲会讲述有关ObjectAnimator系列的知识。
如果本文有帮到你,记得加关注哦
源码下载地址:
csdn:http://download.csdn.net/detail/u013210620/9420359
github:https://github.com/harvic/BlogResForGitHub
请大家尊重原创者版权,转载请标明出处:http://blog.csdn.net/harvic880925/article/details/50549385 谢谢

