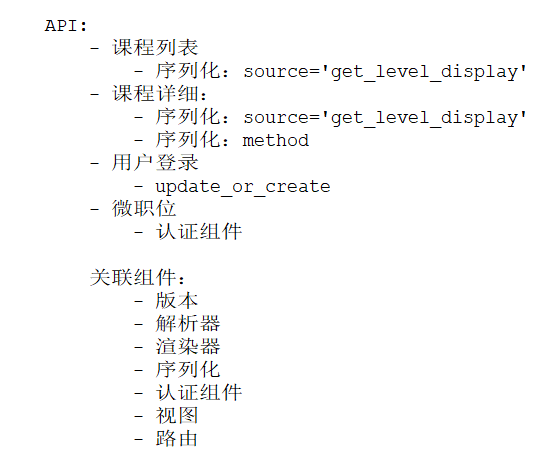
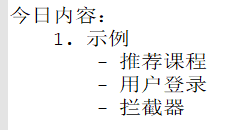
1、内容回顾


1、视图中常见的继承

2、频率访问控制源码

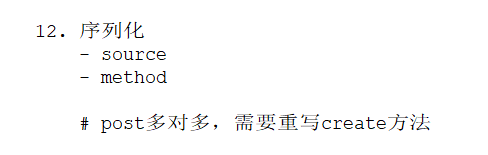
3、序列化,反序列化
2、初始化代码
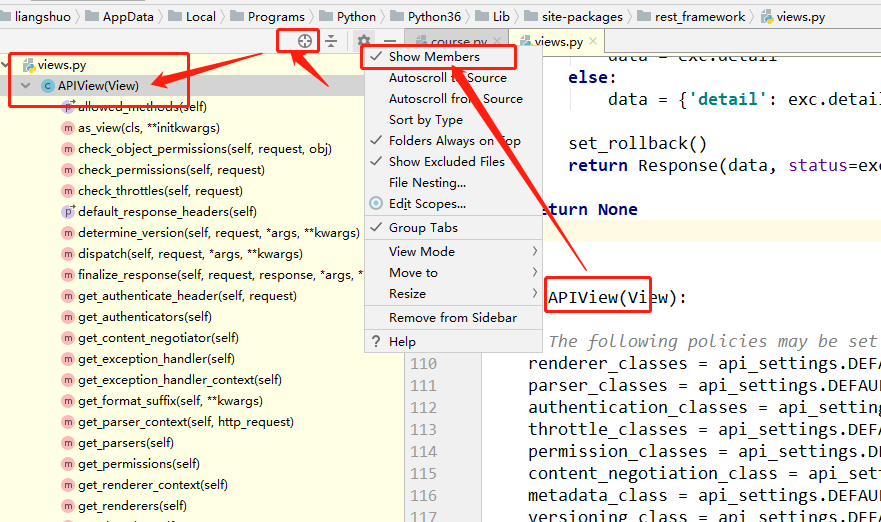
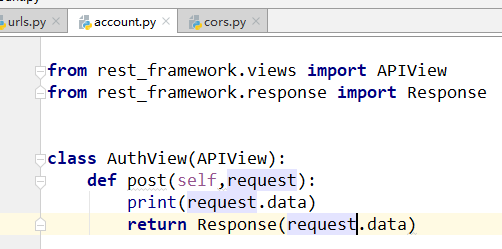
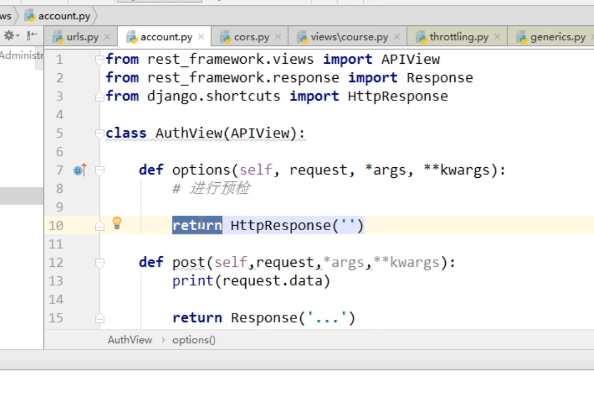
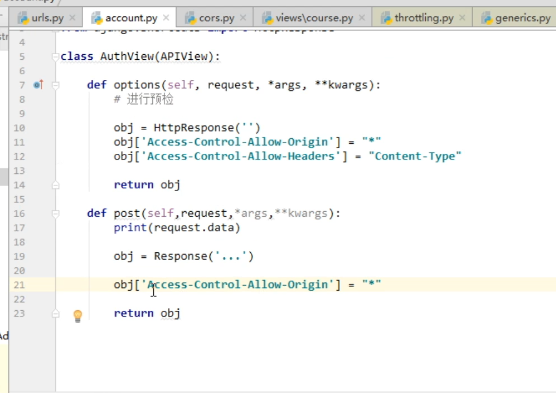
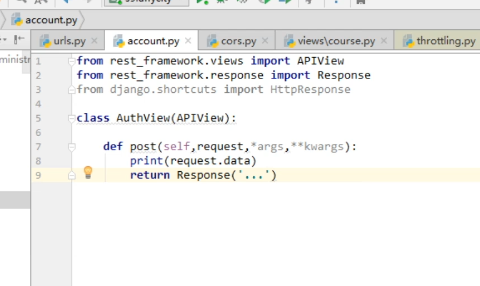
1、后端代码:AuthView
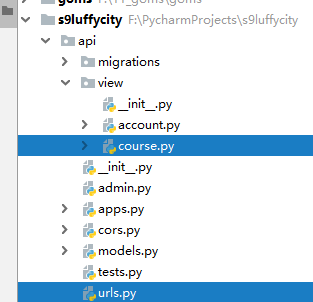
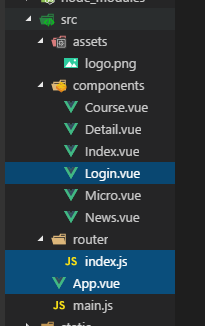
(1)目录结构
(2)urls

(3)view
(4)注释掉cors

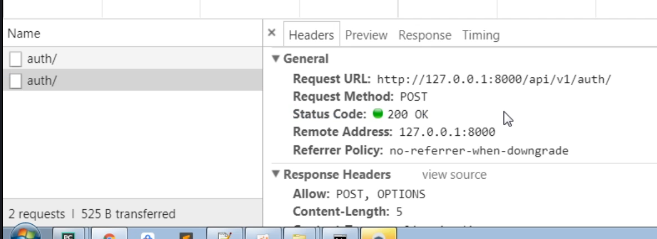
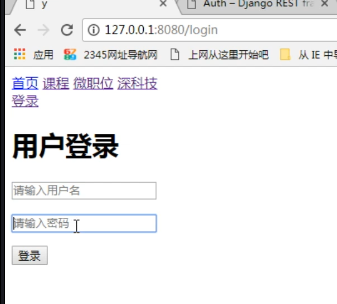
(5)效果

2、前端代码:Login组件
(1)App.vue 主组件

(2)router/index.js 路由

(3)Login.vue组件
v-model监听数据
@click 方法
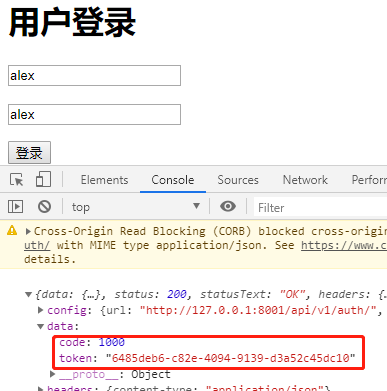
ajax请求
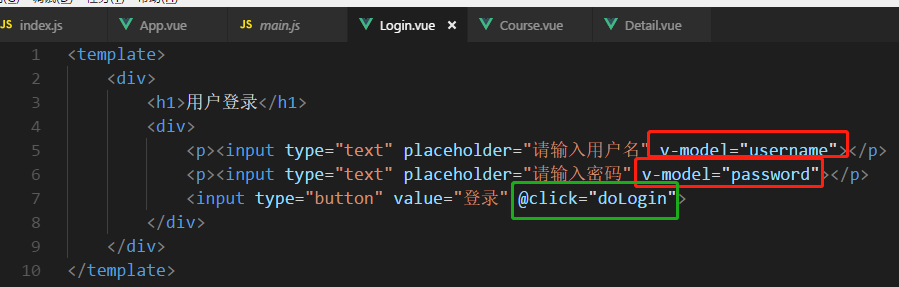


<template>
    <div>
        <h1>用户登录</h1>
        <div>
            <p><input type="text" placeholder="请输入用户名" v-model="username"></p>
            <p><input type="text" placeholder="请输入密码" v-model="password"></p>
            <input type="button" value="登录" @click="doLogin">
        </div>
    </div>
</template>

<script>
export default {
    name:"login",
    data(){
        return {
            username:'',
            password:'',
        }
    },
    methods:{
        doLogin(){
            // alert(123);
            // alert(this.username);
            // alert(this.password);

            this.$axios.request({
                url:'http://127.0.0.1:8001/api/v1/auth/',
                method:'POST',
                data:{
                    user:this.username,
                    pwd:this.password,
                },
                headers:{
                    'Content-Type':'application/json'
                }
            }).then(function(arg){
                console.log(arg)

            }).catch(function(arg){
                console.log('发生了错误')
            })
        }
    }
}
</script>

<style  scoped>

</style>
3、用户登录(含跨域处理)
wupeiqi : https://www.cnblogs.com/wupeiqi/article/5703697.html
1、复杂请求
浏览器帮助发送option请求,跨域了


添加headers变成 复杂请求 了
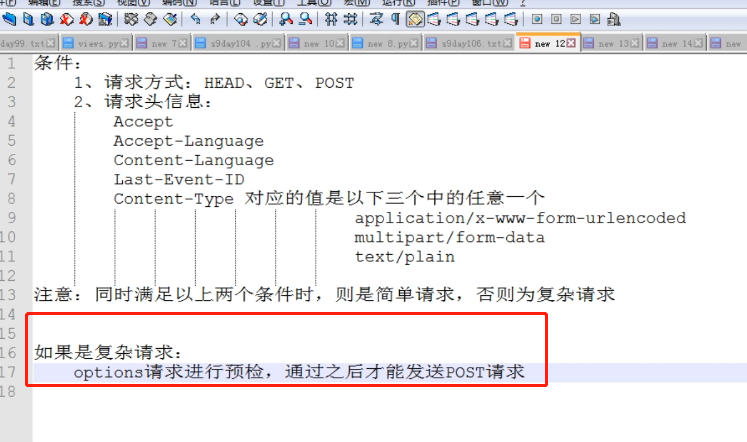
2、局部,预检option

预检通过了


post请求,允许给哪个host返回data


3、全局配置 :中间件
全局cors中间件,详见01章节的跨域

View中只写业务逻辑
4、自定义请求头


5、put方法
用most


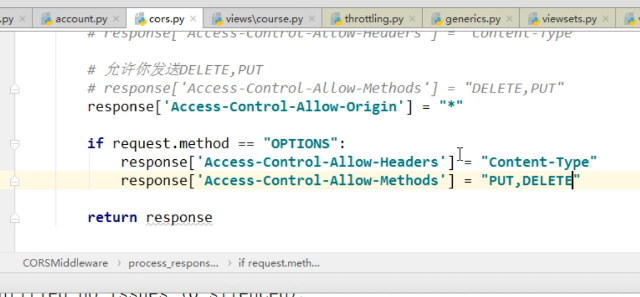
6、cors代码
settings导入中间件
MIDDLEWARE = [
    'django.middleware.security.SecurityMiddleware',
    'django.contrib.sessions.middleware.SessionMiddleware',
    'django.middleware.common.CommonMiddleware',
    'django.middleware.csrf.CsrfViewMiddleware',
    'django.contrib.auth.middleware.AuthenticationMiddleware',
    'django.contrib.messages.middleware.MessageMiddleware',
    'django.middleware.clickjacking.XFrameOptionsMiddleware',
    'api.cors.CORSMiddleware',
]
cors代码
from django.middleware.clickjacking import XFrameOptionsMiddleware


class MiddlewareMixin:
    def __init__(self, get_response=None):
        self.get_response = get_response
        super().__init__()

    def __call__(self, request):
        response = None
        if hasattr(self, 'process_request'):
            response = self.process_request(request)
        response = response or self.get_response(request)
        if hasattr(self, 'process_response'):
            response = self.process_response(request, response)
        return response


class CORSMiddleware(MiddlewareMixin):

    def process_response(self,request,response):
        # 添加响应头
        '''
        # response['XXXXX'] = 8888

        # 1.允许你的域名来获取我的数据
        # response['Access-Control-Allow-Origin'] = "http://localhost:8080"
        # response['Access-Control-Allow-Origin'] = "*"

        # 2.允许你携带Content-Type请求头
        # response['Access-Control-Allow-Headers'] = "Content-Type,Host,XXX"

        # 3.允许你发送DELETE,PUT
        # response['Access-Control-Allow-Methods'] = "DELETE,PUT"
        '''

        response['Access-Control-Allow-Origin'] = "*"
        if request.method == "OPTIONS":
            response['Access-Control-Allow-Headers'] = "Content-Type,k1"
            response['Access-Control-Allow-Methods'] = "DELETE,PUT,POST"

        return response
4、vuex和vue-cookie的应用
1、用户登录表

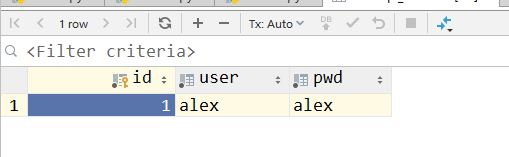
2、uuid生成token
用户名密码,数据库校验
uuid 根据当前的网卡,时间,随机生成字符串


3、vuex保存token
登录页面获取的token,每个组件都要用
需要 vuex (中央空调,发数据)
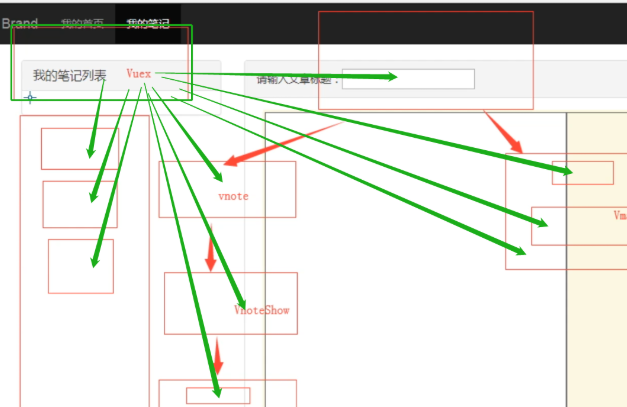
vuex


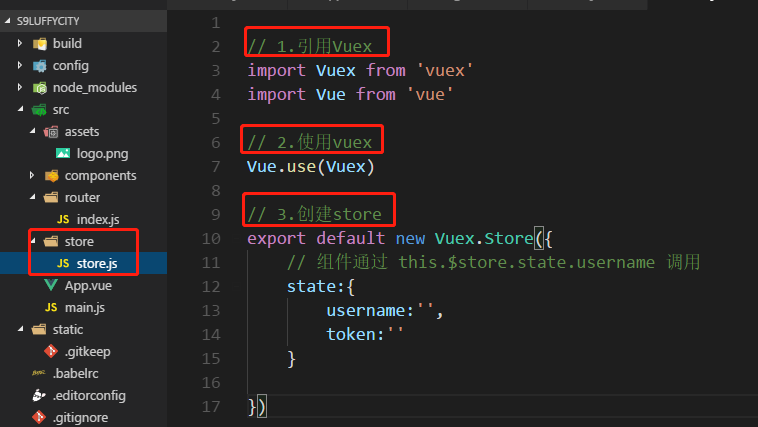
(1)vuex的使用
方法1
main中引入,router中设置
https://www.cnblogs.com/venicid/p/11572473.html#_label0_2
方法2
创建store目录保存vuex的相关东西

(2)ajax请求
(3)全局变量有了,前端 if 显示


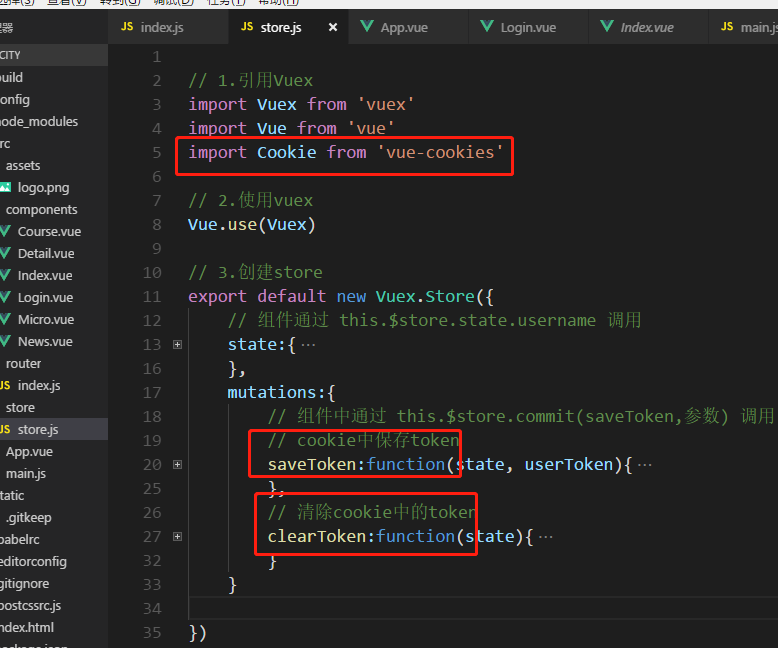
4、刷新失败,引入cookie
(1)下载cookie


(2)引入cookie
组件中通过 this.$store.commit(saveToken,参数) 调用
(3)ajax

(4)操作


(5)刷新,消失
cookie不会丢失,全局变量丢失

(6)注销


5、代码
(1)知识点
vuex , vue-cookie 跨域 复杂请求
option是,复杂的跨域请求的,预检
(2)后端代码
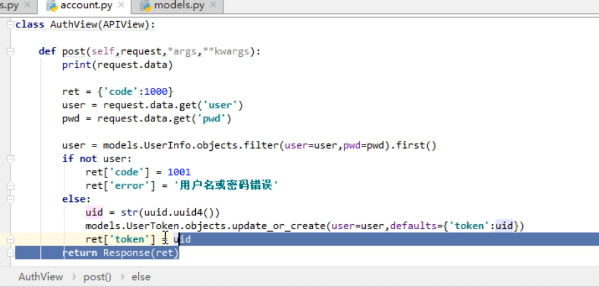
account.py
import uuid

from rest_framework.views import APIView
from rest_framework.response import Response
from django.http import HttpResponse

from api.models import UserInfo, UserToken


class AuthView(APIView):

    def post(self, request):
        print(request.data)

        ret = {'code': 1000}
        user = request.data.get('user')
        pwd = request.data.get('pwd')

        user = UserInfo.objects.filter(user=user, pwd=pwd).first()
        if not user:
            ret['code'] = 1001
            ret['error'] = 'user or pwd error'
        else:
            uid = str(uuid.uuid4())
            UserToken.objects.update_or_create(user=user, defaults={'token': uid})
            ret['token'] = uid

        return Response(ret)
(3)前端
main.js
// The Vue build version to load with the `import` command
// (runtime-only or standalone) has been set in webpack.base.conf with an alias.
import Vue from 'vue'
import App from './App'
import router from './router'

import axios from "axios"
// 在vue的全局变量中设置 $axios=axios
// 以后每个组件使用时: this.$axios
Vue.prototype.$axios = axios

// 4.引入store
import store from './store/store'
Vue.prototype.$store = store

Vue.config.productionTip = false

/* eslint-disable no-new */
new Vue({
  el: '#app',
  router,
  components: { App },
  template: '<App/>'
})
router/index.js
import Vue from 'vue'
import Router from 'vue-router'
// import HelloWorld from '@/components/HelloWorld'

import Index from "@/components/Index"
import Course from "@/components/Course"
import Micro from "@/components/Micro"
import News from "@/components/News"
import Detail from "@/components/Detail"
import Login from "@/components/Login"

Vue.use(Router)

export default new Router({
  routes: [
    {
      path: '/index',
      name: 'index',
      component: Index
    },
    {
      path: '/course',
      name: 'course',
      component: Course
    },
    {
      path: '/micro',
      name: 'micro',
      component: Micro
    },
    {
      path: '/news',
      name: 'news',
      component: News
    },
    {
      path: '/detail/:id',
      name: 'detail',
      component: Detail
    },
    {
      path: '/login',
      name: 'login',
      component: Login
    },
  ],
  'mode':'history'
})
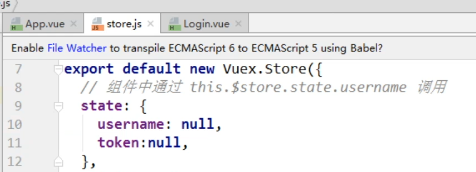
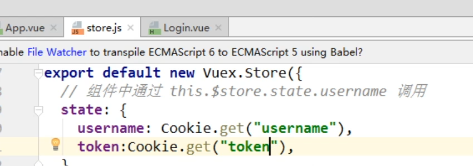
sotre.js
// 1.引用Vuex
import Vuex from 'vuex'
import Vue from 'vue'
import Cookie from 'vue-cookies'

// 2.使用vuex
Vue.use(Vuex)

// 3.创建store
export default new Vuex.Store({
    // 组件通过 this.$store.state.username 调用
    state:{
        username:Cookie.get('username'),
        token:Cookie.get('token')
    },
    mutations:{
        // 组件中通过 this.$store.commit(saveToken,参数) 调用
        // cookie中保存token
        saveToken:function(state, userToken){
            state.username = userToken.username
            state.token = userToken.token
            Cookie.set('username',userToken.username,'20min')
            Cookie.set('token',userToken.token,'20min')
        },
        // 清除cookie中的token
        clearToken:function(state){
            state.username = null
            state.token = null
            Cookie.remove('username')
            Cookie.remove('token')
        }
    }

})
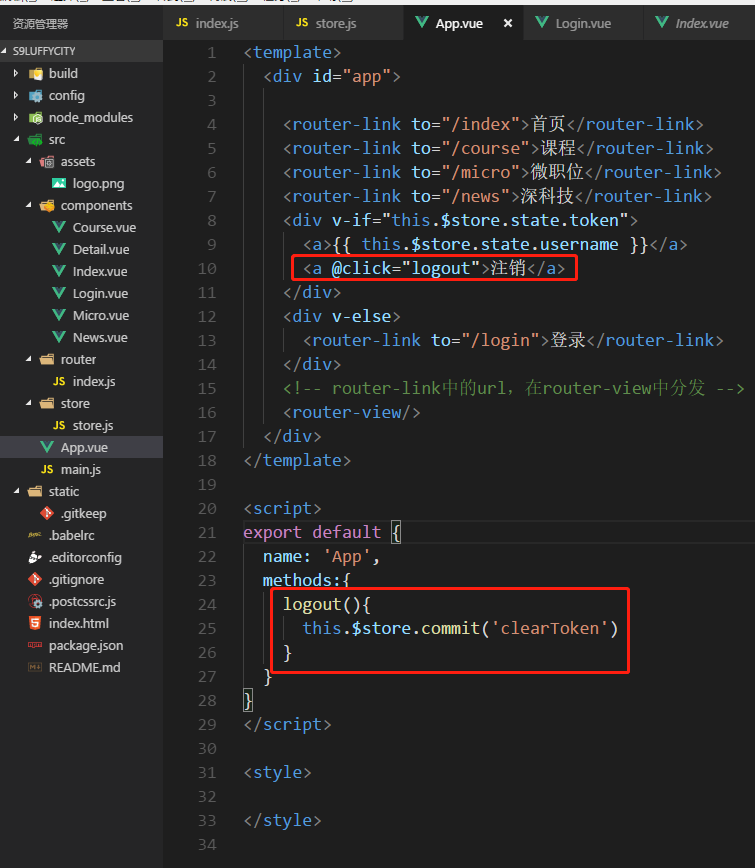
App.vue
<template>
  <div id="app">

    <router-link to="/index">首页</router-link>
    <router-link to="/course">课程</router-link>
    <router-link to="/micro">微职位</router-link>
    <router-link to="/news">深科技</router-link>
    <div v-if="this.$store.state.token">
      <a>{{ this.$store.state.username }}</a>
      <a @click="logout">注销</a>
    </div>
    <div v-else>
      <router-link to="/login">登录</router-link>
    </div>
    <!-- router-link中的url,在router-view中分发 -->
    <router-view/>
  </div>
</template>

<script>
export default {
  name: 'App',
  methods:{
    logout(){
      this.$store.commit('clearToken')
    }
  }
}
</script>

<style>

</style>
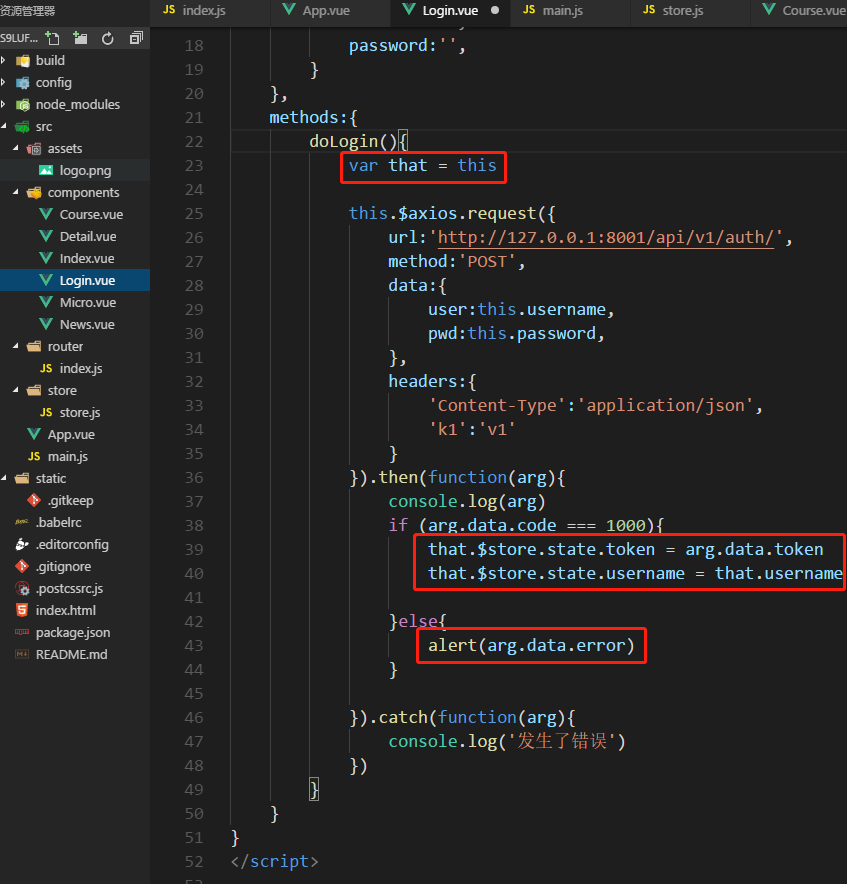
Login.vue
<template>
    <div>
        <h1>用户登录</h1>
        <div>
            <p><input type="text" placeholder="请输入用户名" v-model="username"></p>
            <p><input type="text" placeholder="请输入密码" v-model="password"></p>
            <input type="button" value="登录" @click="doLogin">
        </div>
    </div>
</template>

<script>
export default {
    name:"login",
    data(){
        return {
            username:'',
            password:'',
        }
    },
    methods:{
        doLogin(){
            var that = this

            this.$axios.request({
                url:'http://127.0.0.1:8001/api/v1/auth/',
                method:'POST',
                data:{
                    user:this.username,
                    pwd:this.password,
                },
                headers:{
                    'Content-Type':'application/json',
                    'k1':'v1'
                }
            }).then(function(arg){
                console.log(arg)
                if (arg.data.code === 1000){

                    // 方法1:暂存token
                    // that.$store.state.token = arg.data.token
                    // that.$store.state.username = that.username

                    // 方法2: cookie保存token
                    console.log({token:arg.data.token,username:that.username})
                    that.$store.commit('saveToken',{token:arg.data.token,username:that.username})


                }else{
                    alert(arg.data.error)
                }

            }).catch(function(arg){
                console.log('发生了错误')
            })
        }
    }
}
</script>

<style  scoped>

</style>
5、用户认证(含认证组件)
1、Vue 拦截器
未登录,跳回到login

路由自带的拦截器
(1)router 添加标识

import Vue from 'vue'
import Router from 'vue-router'
// import HelloWorld from '@/components/HelloWorld'

import Index from "@/components/Index"
import Course from "@/components/Course"
import Micro from "@/components/Micro"
import News from "@/components/News"
import Detail from "@/components/Detail"
import Login from "@/components/Login"

Vue.use(Router)

export default new Router({
  routes: [
    {
      path: '/index',
      name: 'index',
      component: Index
    },
    {
      path: '/course',
      name: 'course',
      component: Course
    },
    {
      path: '/micro',
      name: 'micro',
      component: Micro,
      meta:{
        requireAuth:true
      }
    },
    {
      path: '/news',
      name: 'news',
      component: News,
      meta:{
        requireAuth:true
      }
    },
    {
      path: '/detail/:id',
      name: 'detail',
      component: Detail
    },
    {
      path: '/login',
      name: 'login',
      component: Login
    },
  ],
  'mode':'history'
})
(2)拦截器:beforEach
多个页面的话如何做呢?
main.js
// The Vue build version to load with the `import` command
// (runtime-only or standalone) has been set in webpack.base.conf with an alias.
import Vue from 'vue'
import App from './App'
import router from './router'

import axios from "axios"
// 在vue的全局变量中设置 $axios=axios
// 以后每个组件使用时: this.$axios
Vue.prototype.$axios = axios

// 4.引入store
import store from './store/store'
Vue.prototype.$store = store

Vue.config.productionTip = false

/* eslint-disable no-new */
new Vue({
  el: '#app',
  router,
  components: { App },
  template: '<App/>'
})

router.beforeEach(function(to,from,next){

  if(to.meta.requireAuth){
    // 要去的url,只有登录成功后,才能访问
    if (store.state.token){
      next()
    }else{
      next({name:'login',query:{backUrl:to.fullPath}})
    }
  }else{
    next()
  }

})


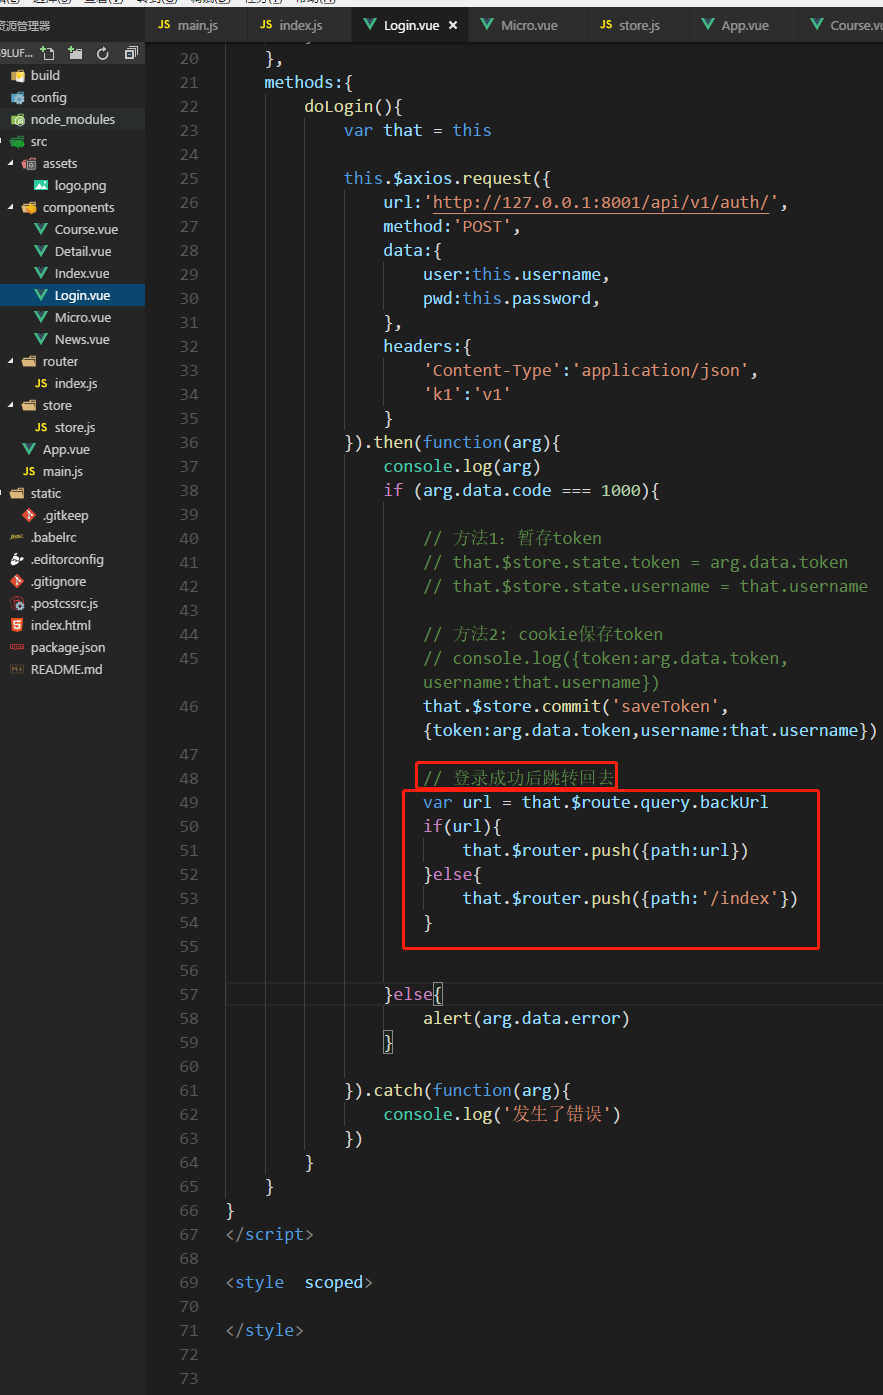
(3)login登录成功跳转回去
login.vue
<template>
    <div>
        <h1>用户登录</h1>
        <div>
            <p><input type="text" placeholder="请输入用户名" v-model="username"></p>
            <p><input type="text" placeholder="请输入密码" v-model="password"></p>
            <input type="button" value="登录" @click="doLogin">
        </div>
    </div>
</template>

<script>
export default {
    name:"login",
    data(){
        return {
            username:'',
            password:'',
        }
    },
    methods:{
        doLogin(){
            var that = this

            this.$axios.request({
                url:this.$store.state.apiList.auth,
                method:'POST',
                data:{
                    user:this.username,
                    pwd:this.password,
                },
                headers:{
                    'Content-Type':'application/json',
                    'k1':'v1'
                }
            }).then(function(arg){
                console.log(arg)
                if (arg.data.code === 1000){

                    // 方法1:暂存token
                    // that.$store.state.token = arg.data.token
                    // that.$store.state.username = that.username

                    // 方法2: cookie保存token
                    // console.log({token:arg.data.token,username:that.username})
                    that.$store.commit('saveToken',{token:arg.data.token,username:that.username})

                    // 登录成功后跳转回去
                    var url = that.$route.query.backUrl
                    if(url){
                        that.$router.push({path:url})
                    }else{
                        that.$router.push({path:'/index'})
                    }


                }else{
                    alert(arg.data.error)
                }

            }).catch(function(arg){
                console.log('发生了错误')
            })
        }
    }
}
</script>

<style  scoped>

</style>


2、局部认证:后端MicroView


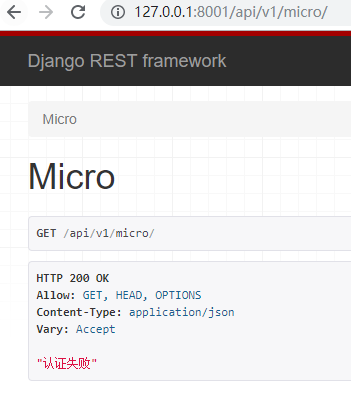
没有token也可以取数据

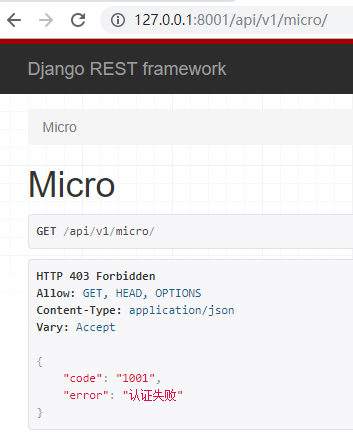
3、全局认证:Auth组件

(1)auth.py代码

from rest_framework.authentication import BaseAuthentication
from rest_framework.exceptions import AuthenticationFailed
from api import models


class LuffyAuth(BaseAuthentication):

    def authenticate(self, request):
        token = request.query_params.get('token')
        obj = models.UserToken.objects.filter(token=token).first()
        if not obj:
            raise AuthenticationFailed({'code': 1001, 'error': '认证失败'})

        return (obj.user.user, obj)
(2)micro.py代码

from rest_framework.views import APIView
from rest_framework.response import Response

from api import models
from api.auth.auth import LuffyAuth


class MicroView(APIView):
    # 全局token认证
    authentication_classes = [LuffyAuth, ]

    def get(self, request, *args, **kwargs):
        ret = {'code': 1000, 'title': '微职位'}
        return Response(ret)

    # 局部token认证
    '''
    def get(self, request, *args, **kwargs):
        token = request.query_params.get('token')
        obj = models.UserToken.objects.filter(token=token).first()
        if not obj:
            return Response('认证失败')

        return Response('微职位')
    '''

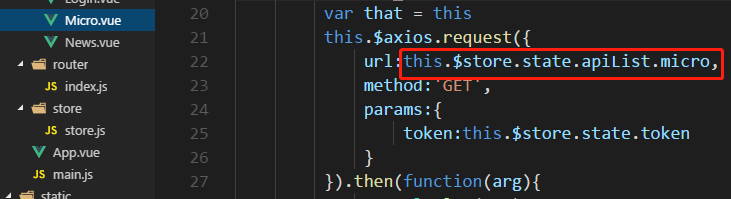
4、前端Micro的ajax请求
携带token


ajax
Micro.vue代码
<template>
    <div>
        <h1>LuffyX学位:{{ title }}</h1>
    </div>
</template>

<script>
export default {
    name:"micro",
    data(){
        return {
            title:null,
        }
    },
    mounted(){
        this.initMicro()
    },
    methods:{
     initMicro(){
         var that = this
         this.$axios.request({
             url:this.$store.state.apiList.micro,
             method:'GET',
             params:{
                 token:this.$store.state.token
             }
         }).then(function(arg){
             console.log(arg)
             if(arg.data.code === 1000){
                 that.title = arg.data.title
             }
         })

     }
    }
}
</script>

<style  scoped>

</style>


5、统一:api接口List
公共的方法,与字段放在一起

子vue中从store中引用 url


6、总结
1、今日内容
2、Vue

3、API