一、SiteMesh介绍
SiteMesh是一个网页布局和修饰的框架,利用它可以将网页的内容和页面结构分离,以达到页面结构共享的目的。[来自百度百科]
通俗的理解就是,SiteMesh把页面中变化的和不变的分离开来,用不变的去装饰各种变化的内容。从而使页面具有统一的布局,而且方便页面的管理。不变的页面称之为装饰页面,内容变化的页面称之为被装饰页面。
装饰页面一般包括:页面标题、头部、底部、主体以及公共的css、js。
被装饰页面只需要写它自己需要的内容就可以了。
根据页面需要,装饰页面可以有多个,被装饰页面也可以有不被装饰而保持自己风格的选择,这只需要在配置文件中配置一下就可以了。
siteMesh3.0运行环境:servlet、 jdk

二、SiteMesh使用
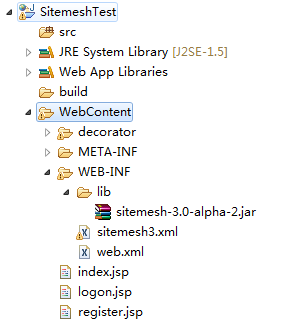
SiteMesh的使用也非常简单。这里使用的是sitemesh3.0。整个项目结构如图:
1. 下载sitemesh3.0 ,将disk文件夹下的sitemesh-3.0-alpha-2.jar放到lib目录下。
2. 建立装饰页面,装饰页可以是静态文件,也可以是动态文件,这里用jsp来测试
(1)带有菜单栏的装饰页面:decorator.jsp
- <html xmlns="http://www.w3.org/1999/xhtml">
- <head>
- <sitemesh:write property='head'/>
- <style type='text/css'>
- .mainBody {
- padding: 10px;
- border: 1px solid #555555;
- }
- .conbgbtm {
- 100%;
- min-height:400px;
- height:auto;
- overflow:hidden;
- zoom:1;
- }
- </style>
- </head>
- <body>
- <!--头部 -->
- <div align="center">
- <h1 >头部信息:
- <sitemesh:write property='title' />
- </h1>
- </div>
- <hr>
- <!--左侧菜单栏 -->
- <div class="conbgbtm">
- <div class="leftbox">
- <ul>
- <li><a href="#">菜单1</a></li>
- <li><a href="#">菜单2</a></li>
- <li><a href="#">菜单3</a></li>
- </ul>
- </div>
- <sitemesh:write property='body'></sitemesh:write>
- </div>
- <hr>
- <div align="center">
- <span>Copyright © 2012-2013 廊坊信息技术提高班 版权所有</span>
- </div>
- </body>
- </html>
(2)不带菜单栏的装饰页面:registerDecorator.jsp
- <html xmlns="http://www.w3.org/1999/xhtml">
- <head>
- <sitemesh:write property='head'/>
- <style type='text/css'>
- .mainBody {
- padding: 10px;
- border: 1px solid #555555;
- }
- .conbgbtm {
- 100%;
- min-height:400px;
- height:auto;
- overflow:hidden;
- zoom:1;
- }
- </style>
- </head>
- <body>
- <!--头部 -->
- <div align="center">
- <h1 >头部信息:
- <sitemesh:write property='title' />
- </h1>
- </div>
- <hr>
- <!--主体内容 -->
- <div class="conbgbtm">
- <sitemesh:write property='body'></sitemesh:write>
- </div>
- <hr>
- <!--底部 -->
- <div align="center">
- <span>Copyright © 2012-2013 廊坊信息技术提高班 版权所有</span>
- </div>
- </body>
- </html>
3. 建立被装饰页
(1)index首页
- <html>
- <head>
- <meta http-equiv="Content-Type" content="text/html; charset=GB18030">
- <title>SiteMesh3 title</title>
- </head>
- <body>
- <span>sitemesh3 body</span>
- </body>
- </html>
(2)logon.jsp、register.jsp页面
- <html>
- <head>
- <meta http-equiv="Content-Type" content="text/html; charset=GB18030">
- <title></title>
- </head>
- <body>
- <div align="center">
- <p>用户名:<input type="text" id="userName" ></p>
- <p>密码: <input type="text" id="pwd"></p>
- <p>验证码:<input type="text" id="validate"></p>
- </div>
- </body>
- </html>
4. web-inf/lib下建立Sitemesh3.xml配置文件
- <?xml version="1.0" encoding="UTF-8"?>
- <sitemesh>
- <!--register页面的装饰页面为没有菜单栏 的registerDecorator.jsp -->
- <mapping>
- <path>/register.jsp</path>
- <decorator>/decorator/registerDecorator.jsp</decorator>
- </mapping>
- <!--带有菜单栏的装饰页面 -->
- <mapping decorator="/decorator/decorator.jsp"/>
- <!--登录页面不被装饰。没有配置为true的页面,表示使用装饰页面,例如index.jsp -->
- <mapping path="/logon.jsp" exclue="true"/>
- </sitemesh>
5. Web.xml里加载sitemesh模板系统
- <!-- 加载sitemesh模板系统 -->
- <filter>
- <filter-name>sitemesh</filter-name>
- <filter-class>org.sitemesh.config.ConfigurableSiteMeshFilter</filter-class>
- </filter>
- <filter-mapping>
- <filter-name>sitemesh</filter-name>
- <url-pattern>/*</url-pattern>
- </filter-mapping>
6. sitemesh3.xml 配置详解
 1 <sitemesh>
 2     <!--默认情况下,
 3         sitemesh 只对 HTTP 响应头中 Content-Type 为 text/html 的类型进行拦截和装饰,
 4         我们可以添加更多的 mime 类型-->
 5   <mime-type>text/html</mime-type>
 6   <mime-type>application/vnd.wap.xhtml+xml</mime-type>
 7   <mime-type>application/xhtml+xml</mime-type>
 8   ...
 9
10   <!-- 默认装饰器,当下面的路径都不匹配时,启用该装饰器进行装饰 -->
11   <mapping decorator="/default-decorator.html"/>
12
13   <!-- 对不同的路径,启用不同的装饰器 -->
14   <mapping path="/admin/*" decorator="/another-decorator.html"/>
15   <mapping path="/*.special.jsp" decorator="/special-decorator.html"/>
16
17   <!-- 对同一路径,启用多个装饰器 -->
18   <mapping>
19     <path>/articles/*</path>
20     <decorator>/decorators/article.html</decorator>
21     <decorator>/decorators/two-page-layout.html</decorator>
22     <decorator>/decorators/common.html</decorator>
23   </mapping>
24
25   <!-- 排除,不进行装饰的路径 -->
26   <mapping path="/javadoc/*" exclue="true"/>
27   <mapping path="/brochures/*" exclue="true"/>
28
29   <!-- 自定义 tag 规则 -->
30   <content-processor>
31     <tag-rule-bundle class="com.something.CssCompressingBundle" />
32     <tag-rule-bundle class="com.something.LinkRewritingBundle"/>
33   </content-processor>
34   ...
35
36 </sitemesh>
7 . 自定义 tag 规则
Sitemesh 3 默认只提供了 body,title,head 等 tag 类型,我们可以通过实现 TagRuleBundle 扩展自定义的 tag 规则:
 1 public class MyTagRuleBundle implements TagRuleBundle {
 2     @Override
 3     public void install(State defaultState, ContentProperty contentProperty,
 4             SiteMeshContext siteMeshContext) {
 5         defaultState.addRule("myHeader", new ExportTagToContentRule(contentProperty.getChild("myHeader"), false));
 6
 7     }
 8
 9     @Override
10     public void cleanUp(State defaultState, ContentProperty contentProperty,
11             SiteMeshContext siteMeshContext) {
12     }
13 }
最后在 sitemesh3.xml 中配置即可:
1 <content-processor>
2     <tag-rule-bundle class="com.lt.common.ext.sitemesh3.MyTagRuleBundle" />
3 </content-processor>

