事件是所有交互式应用的基础,人机对话需要通过事件机制来完成,Flex应用程序能够为用户提供绝佳的使用体验,就必须要有完善的事件机制作为各种交互的基础。Flex事件机制遵守W3C标准--Document Object Model(DOM) Level 3 Events Specification Version 1.0,具体请参考:http://www.w3.org/TR/DOM-Level-3-Events/
1.事件响应过程
和其他语言时间处理机制不同,除了应用传统监听者设计模式来注册事件的监听外,Flex事件还分为三阶段--Capturing、Targeting、Bubbling,来应对更复杂场景的事件响应需求,根据Flex官方文档,对于三者的描述分别为:
About the capturing phase
The first part of the event flow is called the capturing phase. This phase comprises all of the nodes from the root node to the parent of the target node. During this phase, Flash Player examines each node, starting with the root, to see if it has a listener registered to handle the event. If it does, Flash Player sets the appropriate values of the Event object and then calls that listener. Flash Player stops after it reaches the target node's parent and calls any listeners registered on the parent.
About the targeting phase
The second part of the event flow, the targeting phase, consists solely of the target node. Flash Player sets the appropriate values on the Event object, checks the target node for registered event listeners, and then calls those listeners.
About the bubbling phase
The third part of the event flow, the bubbling phase, comprises all of the nodes from the target node's parent to the root node. Starting with the target node's parent, Flash Player sets the appropriate values on the Event object and then calls event listeners on each of these nodes. Flash Player stops after calling any listeners on the root node.
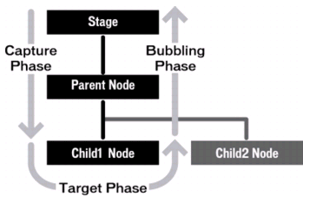
用文档中的插图来描述整个过程:
Capturing阶段处理的对象是Stage和Parent,Targeting处理的对象是Child1和Child2,Bubbling针对Parent和Stage,并且按照顺序进行,这样就可以在不同的阶段去处理不同的事情,设计出结构更好的事件代码。
2.target和currentTarget
target指向事件的发起者,或为事件的调度对象,由谁产生这一系列的事件,target就指向谁,currentTarget为当前正在处理事件的结点,感觉就像是事件的两种this指针,跟踪事件的发展过程。举个更具体的例子,技术总监有一项任务,交给技术经理完成,技术经理将该任务分配给具体的技术工程师,技术工程师在执行该任务时,target指向技术总监,crrentTarget指向该技术工程师。
3.事件停止
stopPropagation和stopImmediatePropagation是停止事件处理的两个方法,两者的区别有点类似于循环中的continue和break,前者允许当前结点对象所有事件执行完毕后,再停止事件向前发展,后者直接停止所有事件。
4.系统事件
Flex事件分为用户事件和系统事件,前者存在于预定义好的组件之中,后者有两个重要的方法:Initialize和CreationComplete,在组件创建时调用。
Initialize
Fires before determines appearance
Can use to set appearance properties
CreationComplete
Fires after measurement and layout
Can use if code relies on appearance
Fires after objects are created and ready for use
例子:
 View Code
<?xml version="1.0"?>
<!-- events/SingleRegisterHandler.mxml -->
<mx:Application xmlns:mx="http://www.adobe.com/2006/mxml" creationComplete="createLinkHandler();">
    <mx:Script>
        <![CDATA[
        private function linkHandler(event:MouseEvent):void {
            var url:URLRequest = new URLRequest("http://finance.google.com/finance?q=" +
            event.target.label);
            navigateToURL(url);
        }
        private function createLinkHandler():void {
            p1.addEventListener(MouseEvent.CLICK,linkHandler);
        }
        ]]>
    </mx:Script>
    <mx:Panel id="p1" title="Click on a stock ticker symbol">
        <mx:LinkButton label="ADBE"/>
        <mx:LinkButton label="GE"/>
        <mx:LinkButton label="IBM"/>
        <mx:LinkButton label="INTC"/>
    </mx:Panel>
</mx:Application>
应用界面全部创建好之后,调用createLinkHandler()方法,给Panel增加一个鼠标点击监听事件。
5.传统事件注册方法
最典型的事件注册方法,和HTML中增加一个js事件类似:
 View Code
<?xml version="1.0"?>
<!-- events/SimplerEventHandler.mxml -->
<mx:Application xmlns:mx="http://www.adobe.com/2006/mxml">
    <mx:Script>
        <![CDATA[
            import mx.controls.Alert;

            private function myEventHandler(event:Event):void {
                Alert.show("An event occurred.");
            }
        ]]>
    </mx:Script>
    <mx:Button id="b1" label="Click Me" click="myEventHandler(event)"/>
</mx:Application>
或是通过代码方式添加一个事件监听,同样也可以通过removeEventListener()移除一个事件监听,这样处理相比上面的代码更灵活方便:
 View Code
<?xml version="1.0"?>
<!-- events/SimpleEventHandler.mxml -->
<mx:Application xmlns:mx="http://www.adobe.com/2006/mxml" creationComplete="initApp();">
    <mx:Script>
        <![CDATA[
            import mx.controls.Alert;

            private function initApp():void {
                b1.addEventListener(MouseEvent.CLICK, myEventHandler);
            }

            private function myEventHandler(event:Event):void {
                Alert.show("An event occurred.");
            }
        ]]>
    </mx:Script>

    <mx:Button id="b1" label="Click Me"/>
</mx:Application>
增加事件方法的参数,这种思想可以应用到webgis的方向控制中:
 View Code
<?xml version="1.0"?>
<!-- events/MultipleHandlerParametersInline.mxml -->
<mx:Application xmlns:mx="http://www.adobe.com/2006/mxml">
  <mx:Script>
      <![CDATA[
         public function runMove(dir:String, e:Event):void {
            if (dir == "up") {
               moveableButton.y = moveableButton.y - 5;
            } else if (dir == "down") {
               moveableButton.y = moveableButton.y + 5;
            } else if (dir == "left") {
               moveableButton.x = moveableButton.x - 5;
            } else if (dir == "right") {
               moveableButton.x = moveableButton.x + 5;
            }
         }
      ]]>
  </mx:Script>

  <mx:Canvas height="100%" width="100%">
     <mx:Button id="moveableButton"
        label="{moveableButton.x.toString()},{moveableButton.y.toString()}"
        x="75"
        y="100"
        width="80"
     />
  </mx:Canvas>

  <mx:VBox horizontalAlign="center">
     <mx:Button id="b1"
        label="Up"
        click='runMove("up",event);'
        width="75"
     />
        <mx:HBox horizontalAlign="center">
           <mx:Button id="b2"
            label="Left"
            click='runMove("left",event);'
            width="75"
           />
           <mx:Button id="b3"
            label="Right"
            click='runMove("right",event);'
            width="75"
           />
        </mx:HBox>
     <mx:Button id="b4"
        label="Down"
        click='runMove("down",event);'
        width="75"
     />
  </mx:VBox>
</mx:Application>
addEventListener也包含一些可选参数,有时在实际应用中比较有用:
 View Code
public function addEventListener(type:String, listener:Function, useCapture:Boolean = false, priority:int = 0, useWeakReference:Boolean = false):void
前面两个参数不用介绍了,priority是事件响应的优先级,useCapture默认为false,如果为true,则仅在Capturing阶段进行事件监听,如:
 View Code
private function initApp():void {
    b1.addEventListener(MouseEvent.CLICK, myEventHandler, true);
    b1.addEventListener(MouseEvent.CLICK, myEventHandler, false);
}
意味着先在Capturing阶段进行监听,然后再Targeting和Bubbling阶段进行监听,Targeting和Bubbling不能分开,根据前面的介绍可知,“Bubbling针对Parent和Stage”。
useWeakReference指定监听的引用是强类型还是弱类型,强类型可以避免监听被垃圾自动回收机制销毁,但是系统交互设计比较复杂的时候,也有可能成为内存溢出的原因之一,还有一个规则,当监听方法是嵌套方法,并且有用于其他地方时,避免使用弱引用。
6.EventDispatcher
EventDispatcher类给显示列表中的组件提供了一系列非常重要的事件模型功能,DisplayObject继承了EventDispatcher,当一个DisplayObject添加到显示列表后,就能访问EventDispatcher所有方法。
所有继承了UIComponent组件都拥有dispatchEvent方法:
objectInstance.dispatchEvent(event:Event):Boolean
Event(event_type:String, bubbles:Boolean, cancelable:Boolean)
一个简单的应用,当鼠标触发MOUSE_OVER事件时,将dispatch一个CLICK事件:
7.自定义事件
自定义事件处理机制比较灵活,首先要专门生成一个AS类,例如OptionSelectEvent.as(以adobe网站上的例子为例),然后,需要在MXML页面中声明一个Metadata标签,CDATA中使用dispatchEvent调用事件方法,下面是一个自定义Canvas组件:
 View Code
<?xml version="1.0" encoding="utf-8"?>
<mx:Canvas xmlns:mx="http://www.adobe.com/2006/mxml" width="840" height="80">
    <mx:Script>
        <![CDATA[
            import events.OptionSelectEvent;

            private function clickHandler(event:Event):void{
                var selection:String = event.target.label;
                var optionSelectEvent:OptionSelectEvent = new OptionSelectEvent("optionSelected",selection);

                dispatchEvent(optionSelectEvent);
            }
        ]]>
    </mx:Script>
    <mx:Metadata>
        [Event(name="optionSelected", type="events.OptionSelectEvent")]
    </mx:Metadata>

    <mx:CheckBox x="132" y="10" label="Dance Floor" click="clickHandler(event)"/>
    <mx:CheckBox x="10" y="10" label="Microphone" click="clickHandler(event)"/>
    <mx:CheckBox x="132" y="40" label="Special Lighting" click="clickHandler(event)"/>
    <mx:CheckBox x="529" y="10" label="Extra Trash Receptacals" click="clickHandler(event)"/>
    <mx:CheckBox x="272" y="10" label="Food Station" click="clickHandler(event)"/>
    <mx:CheckBox x="422" y="10" label="Security" click="clickHandler(event)"/>
    <mx:CheckBox x="422" y="40" label="Waitstaff" click="clickHandler(event)"/>
    <mx:CheckBox x="10" y="40" label="Projector" click="clickHandler(event)"/>
    <mx:CheckBox x="272" y="40" label="Color Table Linens" click="clickHandler(event)"/>
    <mx:CheckBox x="529" y="40" label="Additional Electrical Outlets" click="clickHandler(event)"/>
</mx:Canvas>
optionSelected名称即是主页面调用该自定义Canvas组件时,事件的具体类型:
 View Code
<comp:Options x="0" y="26" optionSelected="optionHandler(event)"/>
作者:Flyingis
