众所周知,通过Bilstm已经可以实现分词或命名实体标注了,同样地单独的CRF也可以很好的实现。既然LSTM都已经可以预测了,为啥要搞一个LSTM+CRF的hybrid model? 因为单独LSTM预测出来的标注可能会出现(I-Organization->I-Person,B-Organization ->I-Person)这样的问题序列。
但这种错误在CRF中是不存在的,因为CRF的特征函数的存在就是为了对输入序列观察、学习各种特征,这些特征就是在限定窗口size下的各种词之间的关系。
将CRF接在LSTM网络的输出结果后,让LSTM负责在CRF的特征限定下,依照新的loss function,学习出新的模型。
基于字的模型标注:
假定我们使用Bakeoff-3评测中所采用的的BIO标注集,即B-PER、I-PER代表人名首字、人名非首字,B-ORG、I-ORG代表组织机构名首字、组织机构名非首字,O代表该字不属于命名实体的一部分
- B-Person
- I- Person
- B-Organization
- I-Organization
- O
加入CRF layer对LSTM网络输出结果的影响
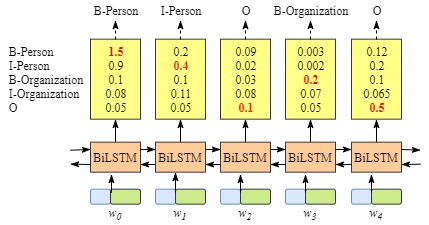
为直观的看到加入后的区别我们可以借用网络中的图来表示:其中(x)表示输入的句子,包含5个字分别用(w_1),(w_2),(w_3),(w_4),(w_5)表示
**没有CRF layer的网络示意图 **
含有CRF layer的网络输出示意图
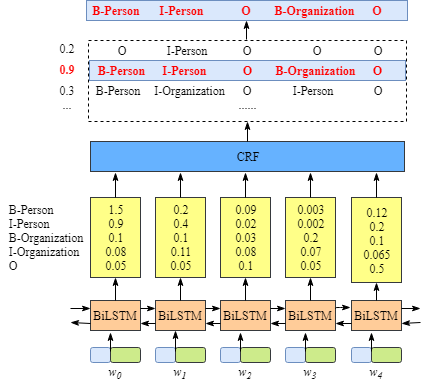
上图可以看到在没有CRF layer的情况下出现了 B-Person->I-Person 的序列,而在有CRF layer层的网络中,我们将 LSTM 的输出再次送入CRF layer中计算新的结果。而在CRF layer中会加入一些限制,以排除可能会出现上文所提及的不合法的情况
CRF loss function
CRF loss function 如下:
Loss Function = (frac{P_{RealPath}}{P_1 + P_2 + … + P_N})
主要包括两个部分Real path score 和 total path scroe
1、Real path score
(P_{RealPath}) =(e^{S_i})
因此重点在于求出:
(S_i) = EmissionScore + TransitionScore
EmissionScore=(x_{0,START}+x_{1,B-Person}+x_{2,I-Person}+x_{3,O}+x_{4,B-Organization}+x_{5,O}+x_{6,END})

因此根据转移概率和发射概率很容易求出(P_{RealPath})
2、total score
total scroe的计算相对比较复杂,可参看https://createmomo.github.io/2017/11/11/CRF-Layer-on-the-Top-of-BiLSTM-5/
实现代码(keras版本)
1、搭建网络模型
使用2.1.4版本的keras,在keras版本里面已经包含bilstm模型,但crf的loss function还没有,不过可以从keras contribute中获得,具体可参看:https://github.com/keras-team/keras-contrib
构建网络模型代码如下:
    model = Sequential()
    model.add(Embedding(len(vocab), EMBED_DIM, mask_zero=True))  # Random embedding
    model.add(Bidirectional(LSTM(BiRNN_UNITS // 2, return_sequences=True)))
    crf = CRF(len(chunk_tags), sparse_target=True)
    model.add(crf)
    model.summary()
    model.compile('adam', loss=crf.loss_function, metrics=[crf.accuracy])
2、清洗数据
清晰数据是最麻烦的一步,首先我们采用网上开源的语料库作为训练和测试数据。语料库中已经做好了标记,其格式如下:
月 O
油 O
印 O
的 O
《 O
北 B-LOC
京 I-LOC
文 O
物 O
保 O
存 O
保 O
管 O
语料库中对每一个字分别进行标记,比较包括如下几种:
'O', 'B-PER', 'I-PER', 'B-LOC', 'I-LOC', "B-ORG", "I-ORG"
分别表示,其他,人名第一个,人名非第一个,位置第一个,位置非第一个,组织第一个,非组织第一个
    train = _parse_data(open('data/train_data.data', 'rb'))
    test = _parse_data(open('data/test_data.data', 'rb'))

    word_counts = Counter(row[0].lower() for sample in train for row in sample)
    vocab = [w for w, f in iter(word_counts.items()) if f >= 2]
    chunk_tags = ['O', 'B-PER', 'I-PER', 'B-LOC', 'I-LOC', "B-ORG", "I-ORG"]

    # save initial config data
    with open('model/config.pkl', 'wb') as outp:
        pickle.dump((vocab, chunk_tags), outp)

    train = _process_data(train, vocab, chunk_tags)
    test = _process_data(test, vocab, chunk_tags)
    return train, test, (vocab, chunk_tags)
3、训练数据
在处理好数据后可以训练数据,本文中将batch-size=16获得较为高的accuracy(99%左右),进行了10个epoch的训练。
import bilsm_crf_model

EPOCHS = 10
model, (train_x, train_y), (test_x, test_y) = bilsm_crf_model.create_model()
# train model
model.fit(train_x, train_y,batch_size=16,epochs=EPOCHS, validation_data=[test_x, test_y])
model.save('model/crf.h5')
4、验证数据
import bilsm_crf_model
import process_data
import numpy as np

model, (vocab, chunk_tags) = bilsm_crf_model.create_model(train=False)
predict_text = '中华人民共和国国务院总理周恩来在外交部长陈毅的陪同下,连续访问了埃塞俄比亚等非洲10国以及阿尔巴尼亚'
str, length = process_data.process_data(predict_text, vocab)
model.load_weights('model/crf.h5')
raw = model.predict(str)[0][-length:]
result = [np.argmax(row) for row in raw]
result_tags = [chunk_tags[i] for i in result]

per, loc, org = '', '', ''

for s, t in zip(predict_text, result_tags):
    if t in ('B-PER', 'I-PER'):
        per += ' ' + s if (t == 'B-PER') else s
    if t in ('B-ORG', 'I-ORG'):
        org += ' ' + s if (t == 'B-ORG') else s
    if t in ('B-LOC', 'I-LOC'):
        loc += ' ' + s if (t == 'B-LOC') else s

print(['person:' + per, 'location:' + loc, 'organzation:' + org])
输出结果如下:
['person: 周恩来 陈毅, 王东', 'location: 埃塞俄比亚 非洲 阿尔巴尼亚', 'organzation: 中华人民共和国国务院 外交部']