我做一个例子。


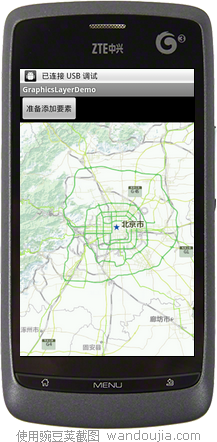
1.首先显示一个地图。
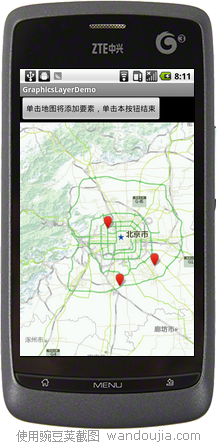
2. 点击”添加要素“按钮后再次点击地图,将会在地图上添加”红色的位置标记“。
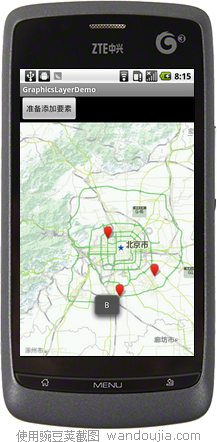
3.再次点击按钮后,这时,就可以点击刚刚添加的” 红色的位置标记“,就可以查看到”该标记关联到得属性值“
布局:
<?xml version="1.0" encoding="utf-8"?>
<LinearLayout xmlns:android="http://schemas.android.com/apk/res/android"
android:orientation="vertical"
android:layout_width="fill_parent"
android:layout_height="fill_parent"
>
<LinearLayout
android:layout_width="fill_parent"
android:layout_height="wrap_content" >
<Button
android:id="@+id/btn1"
android:layout_width="wrap_content"
android:layout_height="wrap_content"
android:text="添加一个要素" />
</LinearLayout>
<!-- MapView layout and initial extent -->
<com.esri.android.map.MapView
android:id="@+id/map"
android:layout_width="fill_parent"
android:layout_height="fill_parent"
>
</com.esri.android.map.MapView>
</LinearLayout>
代码:
package demo.GraphicsLayerLib;
import java.util.HashMap;
import java.util.Map;
import android.app.Activity;
import android.graphics.drawable.Drawable;
import android.os.Bundle;
import android.util.Log;
import android.view.View;
import android.view.View.OnClickListener;
import android.widget.Button;
import android.widget.Toast;
import com.esri.android.map.GraphicsLayer;
import com.esri.android.map.InfoTemplate;
import com.esri.android.map.Layer;
import com.esri.android.map.MapView;
import com.esri.android.map.event.OnSingleTapListener;
import com.esri.core.geometry.Envelope;
import com.esri.core.geometry.Geometry;
import com.esri.core.geometry.Point;
import com.esri.core.map.Graphic;
import com.esri.core.renderer.SimpleRenderer;
import com.esri.core.symbol.PictureMarkerSymbol;
import com.esri.core.symbol.Symbol;
public class GraphicsLayerDemoActivity extends Activity {
Button btn1;
MapView mMapView;
final String URL_STREET_COLD = "http://cache1.arcgisonline.cn/ArcGIS/rest/services/ChinaOnlineStreetCold/MapServer";
GraphicsLayer mGraphicsLayer;
final int STATE_ADD_GRAPHIC = 1; // 进入 “添加graphics状态,这时候单击地图时操作就添加graphics
final int STATE_SHOW = 2;// “选中graphics状态“,这时候单击地图时操作就
// 选择一个graphics,并显示该graphics的附加信息”
int m_State;// 状态
/** Called when the activity is first created. */
@Override
public void onCreate(Bundle savedInstanceState) {
super.onCreate(savedInstanceState);
setContentView(R.layout.main);
m_State = STATE_SHOW;
btn1 = (Button) findViewById(R.id.btn1);
btn1.setText("准备添加要素");
btn1.setOnClickListener(new OnClickListener() {
@Override
public void onClick(View arg0) {
// 切换按钮状态,第一次点击本按钮后进入 “添加graphics状态,这时候单击地图时操作就添加graphics”
// 第一次点击本按钮后进入 “选中graphics状态“,这时候单击地图时操作就
// 选择一个graphics,并显示该graphics的附加信息”
m_State = m_State == STATE_ADD_GRAPHIC ? STATE_SHOW
: STATE_ADD_GRAPHIC;
if (m_State == STATE_ADD_GRAPHIC) {
btn1.setText("单击地图将添加要素,单击本按钮结束");
} else {
btn1.setText("准备添加要素");
}
}
});
mMapView = (MapView) findViewById(R.id.map);
// Add layer to MapView
mMapView.addLayer(new com.esri.android.map.ags.ArcGISTiledMapServiceLayer(
URL_STREET_COLD));
Envelope initextext = new Envelope(12899459.4956466, 4815363.65520802,
13004178.2243971, 4882704.67712717);
mMapView.setExtent(initextext);
// 设定单击事件
mMapView.setOnSingleTapListener(m_OnSingleTapListener);
}
OnSingleTapListener m_OnSingleTapListener = new OnSingleTapListener() {
int m_Char = 65;
public void onSingleTap(float x, float y) {
if (!mMapView.isLoaded()) {
return;
}
if (m_State == STATE_ADD_GRAPHIC) {
// 获得图层
AddNewGraphic(x, y);
} else {// 选中 Graphics
SelectOneGraphic(x, y);
}// end if else
}// end method
private void SelectOneGraphic(float x, float y) {
// 获得图层
GraphicsLayer layer = GetGraphicLayer();
if (layer != null && layer.isInitialized() && layer.isVisible()) {
Graphic result = null;
// 检索当前 光标点(手指按压位置)的附近的 graphic对象
result = GetGraphicsFromLayer(x, y, layer);
if (result != null) {
// 获得附加特别的属性
String msgTag = (String) result
.getAttributeValue("tag");
// 显示提示
AlertMsg(msgTag);
}// end if
}// end if
}
private void AddNewGraphic(float x, float y) {
GraphicsLayer layer = GetGraphicLayer();
if (layer != null && layer.isInitialized() && layer.isVisible()) {
// 转换坐标
Point pt = mMapView.toMapPoint(new Point(x, y));
// 附加特别的属性
Map<String, Object> map = new HashMap<String, Object>();
map.put("tag", "" + (char) (m_Char++));
// 创建 graphic对象
Graphic gp1 = CreateGraphic(pt, map);
// 添加 Graphics 到图层
layer.addGraphic(gp1);
}
}
};
/*
* 从一个图层里里 查找获得 Graphics对象. x,y是屏幕坐标,layer
* 是GraphicsLayer目标图层(要查找的)。相差的距离是50像素。
*/
private Graphic GetGraphicsFromLayer(double xScreen, double yScreen,
GraphicsLayer layer) {
Graphic result = null;
try {
int[] idsArr = layer.getGraphicIDs();
double x = xScreen;
double y = yScreen;
for (int i = 0; i < idsArr.length; i++) {
Graphic gpVar = layer.getGraphic(idsArr[i]);
if (gpVar != null) {
Point pointVar = (Point) gpVar.getGeometry();
pointVar = mMapView.toScreenPoint(pointVar);
double x1 = pointVar.getX();
double y1 = pointVar.getY();
if (Math.sqrt((x - x1) * (x - x1) + (y - y1) * (y - y1)) < 50) {
result = gpVar;
break;
}
}
}
} catch (Exception e) {
return null;
}
return result;
}
/*
* 创建一个Graphic , 参数geometry是屏幕坐标位置,map是附加的属性参数
*/
private Graphic CreateGraphic(Point geometry, Map<String, Object> map) {
GraphicsLayer layer = GetGraphicLayer();// 获得图层
Drawable image = GraphicsLayerDemoActivity.this.getBaseContext()
.getResources().getDrawable(R.drawable.pop);
PictureMarkerSymbol symbol = new PictureMarkerSymbol(image);
// 构建graphic
// Graphic g = new Graphic(geometry, symbol);
Graphic g = new Graphic(geometry, symbol, map, null);
return g;
}
/*
* 获得 GetGraphicLayer
*/
private GraphicsLayer GetGraphicLayer() {
if (mGraphicsLayer == null) {
mGraphicsLayer = new GraphicsLayer();
mMapView.addLayer(mGraphicsLayer);
}
return mGraphicsLayer;
}
void AlertMsg(String str, Object... arg) {
String msg = String.format(str, arg);
Toast.makeText(this, msg, 2).show();
Log.i("AlertMsg", msg);
}
@Override
protected void onDestroy() {
super.onDestroy();
}
@Override
protected void onPause() {
super.onPause();
mMapView.pause();
}
@Override
protected void onResume() {
super.onResume();
mMapView.unpause();
}
}