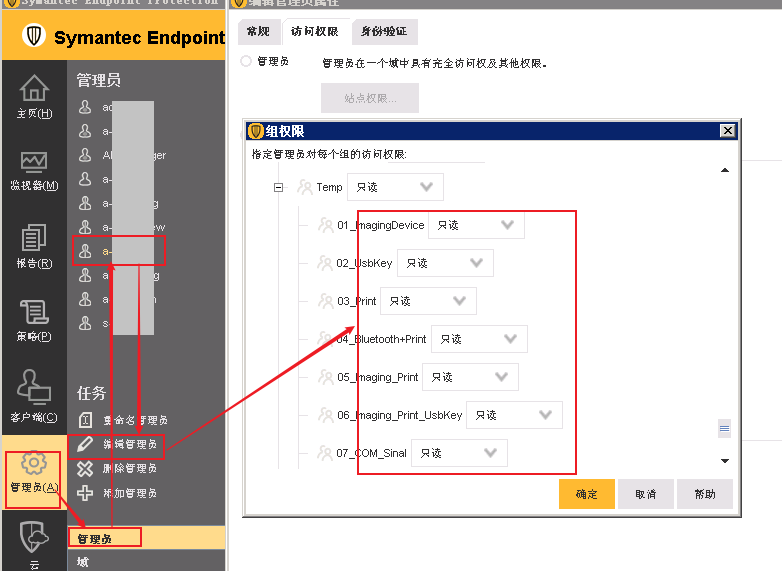
去年在相关同事的协助下,完成了USB 权限管理自动化的改善工作,实现了权限的自动开通、关闭、通知等功能,但还存在些许问题,主要是历史数据及子管理员非合规操作引起,为了修复这一历史遗留问题,准备改善,计划如下:
1、清理管理员权限,便于后期出现类似管理混乱问题。
2、导出非合规USB 权限配置(Excel 形式)。
3、提醒用户补充USB 申请。
4、到期未提交申请的,将清理USB 权限。
那步骤1、2 应用层面的操作,只显示结果,不做过多介绍。3、4则需要我们自己来写脚本。 闲言少叙 :
1、清理USB 管理员权限。
1、删除无效的管理员账号。
2、对再用管理员账号授权符合,清理不必要的权限。

2、获取非合规授予USB 权限的计算机清单,部分清单如图。

3、准备写邮件了
1、邮件模板准备。


1 <html> 2 <head> 3 <meta charset="utf-8"> 4 5 </head> 6 7 <body> 8 9 <br> 10 <h15> {username} 您好!</h15> 11 <br> 12 13 <h16> 14 <br>  审计到您的计算机:{hostname} USB 权限已过期,计划在本月30号执行关闭权限操作,届时您电脑外接设备(如打印机、扫描仪、U盾等)可能无法正常使用。<br> 15 <br>  如您需要继续使用相关外接设备。请登陆bpm.aac.com→IT管理→USB权限开通申请流程,<font color="red" ><strong>并于29日前走完USB权限申请流程</strong></font>。 16 <br>  如您不再需要使用外接设备,请忽略此邮件。<br> 17 <br>  感谢您的理解与支持。<br> 18 19 </body> 20 </html>
2、读取Excel 表格信息(Opera_Excel.py)。

 1 import xlrd
 2 import xlwt
 3
 4 def R_Excel(wb_name,ws_name):
 5     try:
 6         wb= xlrd.open_workbook(wb_name)
 7         try:
 8             ws = wb.sheet_by_name(ws_name)
 9             return ws
10         except:
11             print("Failed to locate WorkSheet %s !" %ws_name)
12     except:
13         print("Failed to locate WorkBook %s !" %wb_name)
14
15 def W_Excel(wb_name,ws_name,data):
16     WB=xlwt.Workbook()
17     WS=WB.add_sheet('Sheet1')
18     i=0
19     for each in data:
20         check_Res=check_Login(each)
21         i=i+1
22         WS.write(i, 0, check_Res)
23         if i%20==0:
24             WB.save('Excel_Workbook.xls')
25
26
27 def Get_InfoList(ws):
28     """
29     将Excel 表格的数据转化成列表供python 调用
30     """
31     for i in range(1,ws.nrows):
32         if ws.cell(i,1).value:
33             HostName=ws.cell(i,0).value
34             GroupName=ws.cell(i,1).value
35             UserAccount=ws.cell(i,2).value
36             yield [HostName,GroupName,UserAccount]

注意:受xlrd 包的影响,如果账号是纯数字形式,需要在Excel 表格前添加单引号"'"。
3、获取用户信息(get_userInfo.py)。
因为公司内提供了统一接口用于查询员工信息,此处我们仅仅查询邮箱。

import requests
import json
#集团提供查询员工信息的API 接口
def Get_email(ad):
    res = requests.get(url='http://bkpaas4.aac.com/o/dingding/get_hcm_user_by_ad_account/{}'.format(ad),
        timeout=600, verify=False)
    content = json.loads(res.content)
    # json.dumps(content, ensure_ascii=False)
    try:
        email=content['data']['Mail']
    except:
        email=None
    return(email)

此时我们已经成功获取到了邮箱信息。
4、发送邮件。
通过前面的准备,解决了发给谁,发什么的内容,下面我们来解决谁来发的问题。
1、服务器基础信息准备。(conf.yaml)

 1 Smtp_Info:
 2   # 邮件基础信息
 3   Smtp_Server: '10.xxx.xxx.118'
 4   Smtp_Uname: 'xxxx@xxx.com'
 5   Smtp_PW: 'szxxxxx'
 6   Smtp_Sender: 'xxxx@xxxx'
 7
 8
 9 SEPM_Info:
10   # SEPM 数据库相关新信息
11   SEPM_DBServer: '192.168.xxx.xxx'
12   SEPM_DB: 'SEP'
13   SEPM_DB_User: 'xxxxx'
14   SEPM_DB_PW: 'xxxxxx'
2、发送邮件的脚本书写(mail.py)

 1 # coding: utf-8
 2 import smtplib
 3 from email.mime.multipart import MIMEMultipart
 4 from email.mime.text import MIMEText
 5 from email.mime.image import MIMEImage
 6 from email.header import Header
 7 import yaml ,os
 8 config_path = os.path.join(os.getcwd(), 'configconf.yaml')
 9 with open(config_path,'rb') as f:
10     conf = f.read()
11 c_info=yaml.load(conf)
12
13 Receiver_list_cc = list()
14
15 def Send_mail(receiver_list,subject,mail,receiver_Cc_list=Receiver_list_cc):
16     msg = MIMEMultipart('mixed')
17     msg['Subject'] = subject
18     msg['From']=c_info['Smtp_Info']['Smtp_Sender']
19     text_plain = MIMEText(mail, 'html', 'utf-8')
20     msg.attach(text_plain)
21     msg['To'] = ";".join(receiver_list)
22     msg['Cc'] = ";".join(receiver_Cc_list)
23     smtp = smtplib.SMTP()
24     smtp.connect(c_info['Smtp_Info']['Smtp_Server'])
25     smtp.login(c_info['Smtp_Info']['Smtp_Uname'],c_info['Smtp_Info']['Smtp_PW'])
26     smtp.sendmail(msg['From'],msg['To'].split(';')+msg['Cc'].split(';'), msg.as_string())
27     print(str(msg['To'].split(';')+msg['Cc'].split(';')))
28     time.sleep(60)
29     smtp.quit()
30 # 根据最近14 小时的病毒攻击日志,制作需要发送的邮件。
31 def Make_Email(Info):
32     with open('TMP.html' ,'rb') as f:
33         Html_Content= f.read().decode('utf-8').format(username=Info[3][0],hostname=Info[0])
34
35     subject = '计算机:'+Info[0]+'_USB 权限到期提醒'
36     Receiver_list =list()
37     Receiver_list.append(Info[3][1])
38     Send_mail(Receiver_list,subject, Html_Content)
39     # print(subject,Html_Content)
40
41 def main():
42     Make_Email(Info)
43
44 if __name__=="__main__":
45     main()
3、主函数 调用脚本书写(main.py)

 1 import Opera_Excel as OE
 2 import get_userInfo as GU
 3 import mail
 4 def main():
 5     #1、确认Excel工作簿和工作表名称。
 6     WB_Name="SEPM.xlsx"
 7     WS_Name="Sheet1"
 8     ws=OE.R_Excel(WB_Name,WS_Name)
 9     PC_lists=OE.Get_InfoList(ws)
10     for PC_list in PC_lists:
11         email=GU.Get_email(PC_list[2])
12         PC_list.append(email)
13         mail.Make_Email(PC_list)
14         # print(PC_list)
15
16 if __name__ == '__main__':
17     main()
效果图

