mcrypt is a file encryption method using secure techniques to exchange data. It is required for some web apps for example Magento, the shopping cart software or a php framework likeLaravel. This tutorial has been tested in OSX 10.10 Yosemite.
This guide is really for users with the version of PHP that shipped with OSX Yosemite which is version 5.5.14. Other downloadable AMP stacks already have mcrypt baked in.
Command Line Tools
First up you will need the OSX 10.10 version of Command Line Tools which you can download via the Apple available updates in the App store.
Run in the Terminal
xcode-select --install
Getting it on in OS X Yosemite 10.10
This tutorial works mostly in the Terminal, launch it from /Applications/Utilities, change directory (cd) to the home account and make a directory that you will work in, call it mcrypt
cd ~ ; mkdir mcrypt ; cd mcrypt
Get libmcrypt 2.5.8 from Sourceforge, this is direct download link.
Get the php code in a tar.gz or .bz2 format- (version 5.5.14 is the one that currently ships with OSX 10.10)
Move both of these files that you downloaded into your working directory – mcrypt in this instance, and go back to Terminal
cd ~/mcrypt
Expand both files via the command line or just double click them in the Finder:
tar -zxvf libmcrypt-2.5.8.tar.gz
tar -zxvf php-5.5.9.tar.gz
Remove the compressed archives
rm *.gz
Any errors on the command line including C++ and g++ mostly are due to the command line tools missing.
Configuring libmcrypt
cd libmcrypt-2.5.8
./configure
make
sudo make install
With the libmcrypt configured and libraries now installed, time for to make the mcrypt extension.
Install Autoconf
Install autoconf – some more Terminal heavy lifting:
cd ~/mcrypt
curl -O http://ftp.gnu.org/gnu/autoconf/autoconf-latest.tar.gz
tar xvfz autoconf-latest.tar.gz
cd autoconf-2.69/
./configure
make
sudo make install
Compile mcrypt php Extension
cd ../php-5.5.9/ext/mcrypt/
/usr/bin/phpize
Output should be similar to:
Configuring for:
PHP Api Version: 20121113
Zend Module Api No: 20121212
Zend Extension Api No: 220121212
./configure
make
sudo make install
The result of this should be similar to:
Installing shared extensions: /usr/lib/php/extensions/no-debug-non-zts-20121212/
Enabling mcrypt.so php Extension
Open /etc/php.ini and add the line below at the end
extension=mcrypt.so
If there is no php.ini file, then you need to make one from php.ini.default in the same location like so:
sudo cp /etc/php.ini.default /etc/php.ini
And allow write capability
sudo chmod u+w /etc/php.ini
Then add the line as above in your favourite text editor:
sudo nano /etc/php.ini
or
sudo vi /etc/php.ini
and add in the line:
extension=mcrypt.so
Restart Apache
sudo apachectl restart
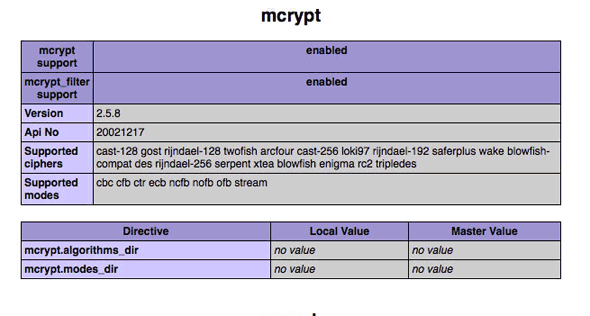
That’s it, create a php page with the function phpinfo(); to see if it loaded correctly.
If it didn’t load you may need to declare the extensions directory in /etc/php.ini
extension_dir = "/usr/lib/php/extensions/no-debug-non-zts-20100525/"

Hopefully it wasn’t too much of a nightmare…

tales-from-the-mcrypt-yosemite-osx-php
转自:http://coolestguidesontheplanet.com/install-mcrypt-php-mac-osx-10-10-yosemite-development-server/