前言
前面已经讲解了Redis的客户端Redission是怎么实现分布式锁的,大多都深入到源码级别。
在分布式系统中,常见的分布式锁实现方案还有Zookeeper,接下来会深入研究Zookeeper是如何来实现分布式锁的。
Zookeeper初识
文件系统
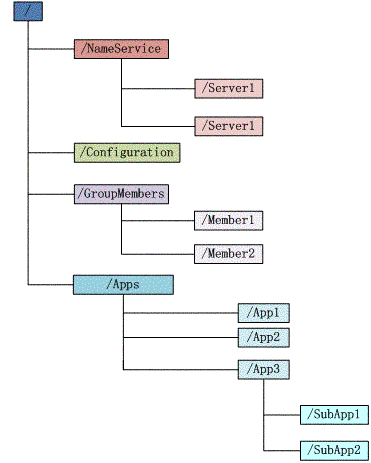
Zookeeper维护一个类似文件系统的数据结构
 image.png
每个子目录项如NameService都被称为znoed,和文件系统一样,我们能够自由的增加、删除znode,在znode下增加、删除子znode,唯一不同的在于znode是可以存储数据的。
有4种类型的znode
-
PERSISTENT--持久化目录节点客户端与zookeeper断开连接后,该节点依旧存在
-
PERSISTENT_SEQUENTIAL-持久化顺序编号目录节点客户端与zookeeper断开连接后,该节点依旧存在,只是Zookeeper给该节点名称进行顺序编号
-
EPHEMERAL-临时目录节点客户端与zookeeper断开连接后,该节点被删除
-
EPHEMERAL_SEQUENTIAL-临时顺序编号目录节点客户端与zookeeper断开连接后,该节点被删除,只是Zookeeper给该节点名称进行顺序编号
通知机制
客户端注册监听它关心的目录节点,当目录节点发生变化(数据改变、被删除、子目录节点增加删除)等,zookeeper会通知客户端。
分布式锁
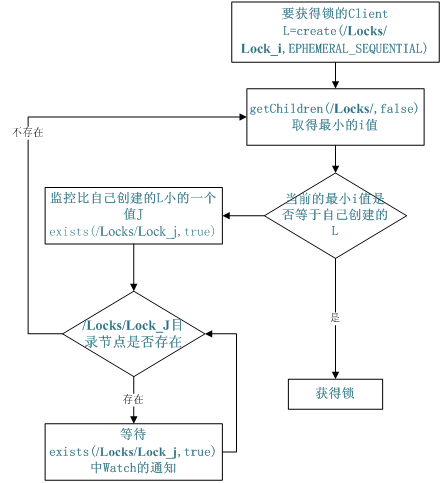
有了zookeeper的一致性文件系统,锁的问题变得容易。锁服务可以分为两类,一个是保持独占,另一个是控制时序。
-
对于第一类,我们将zookeeper上的一个znode看作是一把锁,通过create znode的方式来实现。所有客户端都去创建 /distribute_lock 节点,最终成功创建的那个客户端也即拥有了这把锁。厕所有言:来也冲冲,去也冲冲,用完删除掉自己创建的distribute_lock 节点就释放出锁。
-
对于第二类, /distribute_lock 已经预先存在,所有客户端在它下面创建临时顺序编号目录节点,和选master一样,编号最小的获得锁,用完删除自己创建的znode节点。
 image.png
注明:以上内容参考 https://www.cnblogs.com/dream-to-pku/p/9513188.html
Curator框架初识
Curator是Netflix公司开源的一套Zookeeper客户端框架。目前已经作为Apache的顶级项目出现,是最流行的Zookeeper客户端之一。
我们看下Apache Curator官网的介绍:
 image.png
接着看下quick start中关于分布式锁相关的内容
地址为:http://curator.apache.org/getting-started.html
InterProcessMutex lock = new InterProcessMutex(client, lockPath);
if ( lock.acquire(maxWait, waitUnit) )
{
    try
    {
        // do some work inside of the critical section here
    }
    finally
    {
        lock.release();
    }
}
使用很简单,使用InterProcessMutex类,使用其中的acquire()方法,就可以获取一个分布式锁了。
Curator分布式锁使用示例
启动两个线程t1和t2去争夺锁,拿到锁的线程会占用5秒。运行多次可以观察到,有时是t1先拿到锁而t2等待,有时又会反过来。Curator会用我们提供的lock路径的结点作为全局锁,这个结点的数据类似这种格式:[_c_64e0811f-9475-44ca-aa36-c1db65ae5350-lock-00000000001],每次获得锁时会生成这种串,释放锁时清空数据。
接下来看看加锁的示例:
public class Application {
    private static final String ZK_ADDRESS = "192.20.38.58:2181";
    private static final String ZK_LOCK_PATH = "/locks/lock_01";

    public static void main(String[] args) throws InterruptedException {
        CuratorFramework client = CuratorFrameworkFactory.newClient(
                ZK_ADDRESS,
                new RetryNTimes(10, 5000)
        );
        client.start();
        System.out.println("zk client start successfully!");

        Thread t1 = new Thread(() -> {
            doWithLock(client);
        }, "t1");
        Thread t2 = new Thread(() -> {
            doWithLock(client);
        }, "t2");

        t1.start();
        t2.start();
    }

    private static void doWithLock(CuratorFramework client) {
        InterProcessMutex lock = new InterProcessMutex(client, ZK_LOCK_PATH);
        try {
            if (lock.acquire(10 * 1000, TimeUnit.SECONDS)) {
                System.out.println(Thread.currentThread().getName() + " hold lock");
                Thread.sleep(5000L);
                System.out.println(Thread.currentThread().getName() + " release lock");
            }
        } catch (Exception e) {
            e.printStackTrace();
        } finally {
            try {
                lock.release();
            } catch (Exception e) {
                e.printStackTrace();
            }
        }
    }
}
运行结果:
 image.png
Curator 加锁实现原理
直接看Curator加锁的代码:
public class InterProcessMutex implements InterProcessLock, Revocable<InterProcessMutex> {

    private final ConcurrentMap<Thread, LockData>   threadData = Maps.newConcurrentMap();

     private static class LockData
    {
        final Thread        owningThread;
        final String        lockPath;
        final AtomicInteger lockCount = new AtomicInteger(1);

        private LockData(Thread owningThread, String lockPath)
        {
            this.owningThread = owningThread;
            this.lockPath = lockPath;
        }
    }

    @Override
    public boolean acquire(long time, TimeUnit unit) throws Exception
    {
        return internalLock(time, unit);
    }


     private boolean internalLock(long time, TimeUnit unit) throws Exception
    {
        /*
           Note on concurrency: a given lockData instance
           can be only acted on by a single thread so locking isn't necessary
        */

        Thread          currentThread = Thread.currentThread();

        LockData        lockData = threadData.get(currentThread);
        if ( lockData != null )
        {
            // re-entering
            lockData.lockCount.incrementAndGet();
            return true;
        }

        String lockPath = internals.attemptLock(time, unit, getLockNodeBytes());
        if ( lockPath != null )
        {
            LockData        newLockData = new LockData(currentThread, lockPath);
            threadData.put(currentThread, newLockData);
            return true;
        }

        return false;
    }
}
直接看internalLock()方法,首先是获取当前线程,然后查看当前线程是否在一个concurrentHashMap中,这里是重入锁的实现,如果当前已经已经获取了锁,那么这个线程获取锁的次数再+1
如果没有获取锁,那么就是用attemptLock()方法去尝试获取锁,如果lockPath不为空,说明获取锁成功,并将当前线程放入到map中。
接下来看看核心的加锁逻辑attemptLock()方法:
入参:time : 获取锁等待的时间unit:时间单位lockNodeBytes:默认为null
public class LockInternals {
    String attemptLock(long time, TimeUnit unit, byte[] lockNodeBytes) throws Exception
    {
        final long      startMillis = System.currentTimeMillis();
        final Long      millisToWait = (unit != null) ? unit.toMillis(time) : null;
        final byte[]    localLockNodeBytes = (revocable.get() != null) ? new byte[0] : lockNodeBytes;
        int             retryCount = 0;

        String          ourPath = null;
        boolean         hasTheLock = false;
        boolean         isDone = false;
        while ( !isDone )
        {
            isDone = true;

            try
            {
                if ( localLockNodeBytes != null )
                {
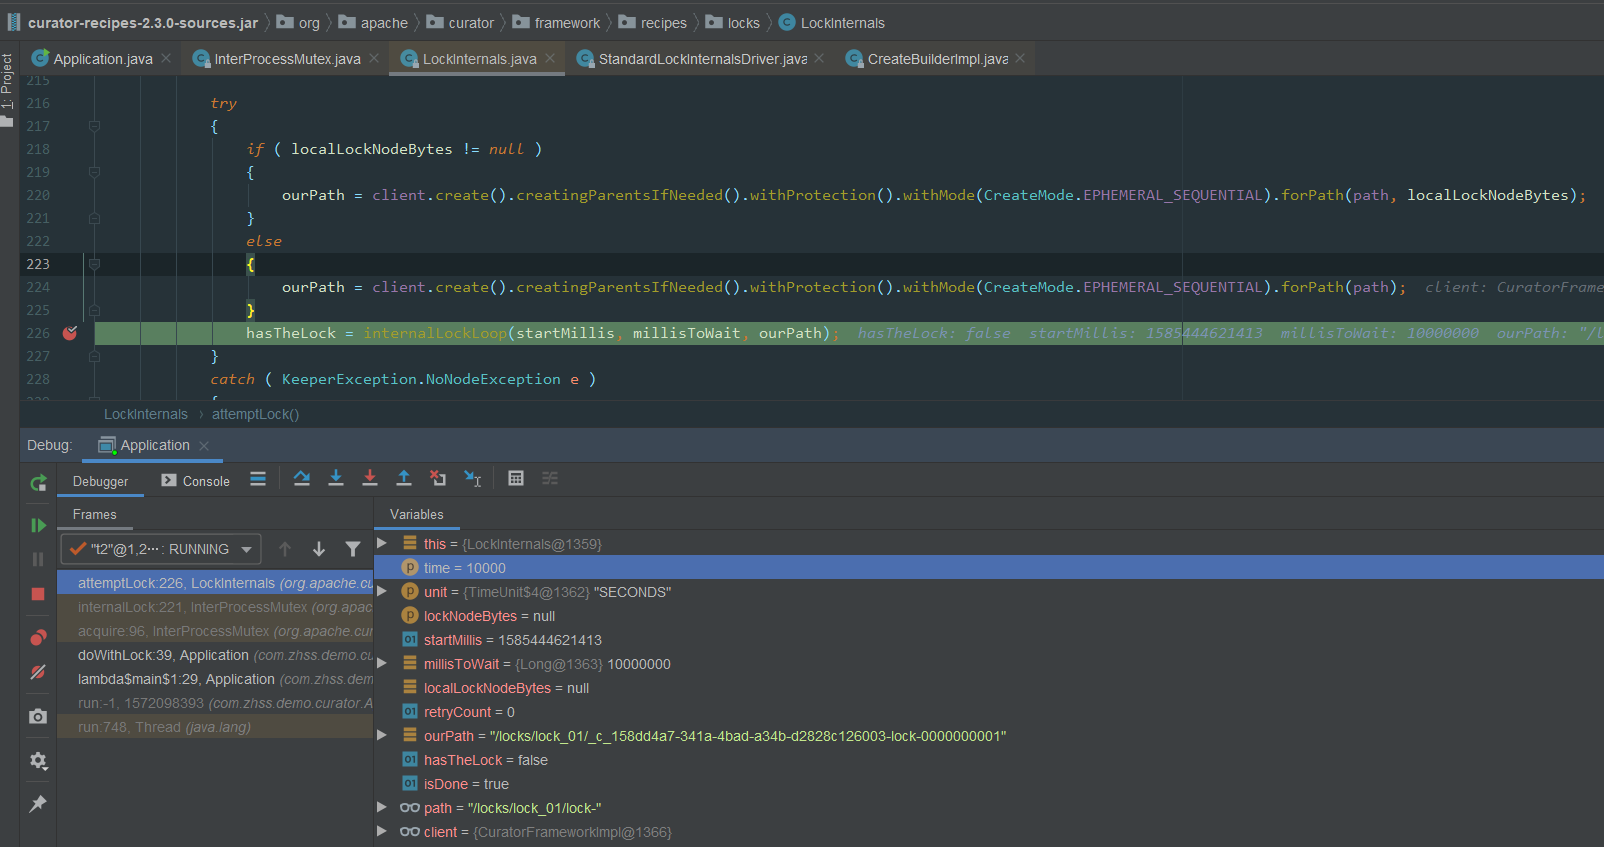
                    ourPath = client.create().creatingParentsIfNeeded().withProtection().withMode(CreateMode.EPHEMERAL_SEQUENTIAL).forPath(path, localLockNodeBytes);
                }
                else
                {
                    ourPath = client.create().creatingParentsIfNeeded().withProtection().withMode(CreateMode.EPHEMERAL_SEQUENTIAL).forPath(path);
                }
                hasTheLock = internalLockLoop(startMillis, millisToWait, ourPath);
            }
            catch ( KeeperException.NoNodeException e )
            {
                // gets thrown by StandardLockInternalsDriver when it can't find the lock node
                // this can happen when the session expires, etc. So, if the retry allows, just try it all again
                if ( client.getZookeeperClient().getRetryPolicy().allowRetry(retryCount++, System.currentTimeMillis() - startMillis, RetryLoop.getDefaultRetrySleeper()) )
                {
                    isDone = false;
                }
                else
                {
                    throw e;
                }
            }
        }

        if ( hasTheLock )
        {
            return ourPath;
        }

        return null;
    }
}
ourPath = client.create().creatingParentsIfNeeded().withProtection().withMode(CreateMode.EPHEMERAL_SEQUENTIAL).forPath(path);
使用的临时顺序节点,首先他是临时节点,如果当前这台机器如果自己宕机的话,他创建的这个临时节点就会自动消失,如果有获取锁的客户端宕机了,zk可以保证锁会自动释放的
创建的数据结构类似于:
客户端A获取锁的代码,生成的ourPath=xxxx01

客户端B获取锁的代码,生成的ourPath=xxxx02
查看Zookeeper中/locks/lock_01下所有临时节点数据:
 PS:01/02的图没有截到,这里又跑了一次截图所示 03/04 的顺序节点在ZK中的显示
接着重点看interalLockLoop()的逻辑:
public class LockInternals {
    private boolean internalLockLoop(long startMillis, Long millisToWait, String ourPath) throws Exception
    {
        boolean     haveTheLock = false;
        boolean     doDelete = false;
        try
        {
            if ( revocable.get() != null )
            {
                client.getData().usingWatcher(revocableWatcher).forPath(ourPath);
            }

            while ( (client.getState() == CuratorFrameworkState.STARTED) && !haveTheLock )
            {
                List<String>        children = getSortedChildren();
                String              sequenceNodeName = ourPath.substring(basePath.length() + 1); // +1 to include the slash

                PredicateResults    predicateResults = driver.getsTheLock(client, children, sequenceNodeName, maxLeases);
                if ( predicateResults.getsTheLock() )
                {
                    haveTheLock = true;
                }
                else
                {
                    String  previousSequencePath = basePath + "/" + predicateResults.getPathToWatch();

                    synchronized(this)
                    {
                        Stat stat = client.checkExists().usingWatcher(watcher).forPath(previousSequencePath);
                        if ( stat != null )
                        {
                            if ( millisToWait != null )
                            {
                                millisToWait -= (System.currentTimeMillis() - startMillis);
                                startMillis = System.currentTimeMillis();
                                if ( millisToWait <= 0 )
                                {
                                    doDelete = true;    // timed out - delete our node
                                    break;
                                }

                                wait(millisToWait);
                            }
                            else
                            {
                                wait();
                            }
                        }
                    }
                    // else it may have been deleted (i.e. lock released). Try to acquire again
                }
            }
        }

           // 省略部分代码
        return haveTheLock;
    }
}
重点看while循环中的逻辑
首先是获取锁的逻辑:
- 获取
/locks/lock_01下排好序的znode节点,上面看图已经知道,会有xxx01和xxx02两个节点 - 调用
getsTheLock()方法获取锁,其中maxLeases为1,默认只能一个线程获取锁 - 定位到
StandardLockInternalsDriver.getsTheLock()方法,其中代码核心如下:int ourIndex = children.indexOf(sequenceNodeName);boolean getsTheLock = ourIndex < maxLeases; - 上面
sequenceNodeName参数为xxx01的全路径名,然后查看在排好序的children列表中是否为第一个元素,如果是第一个元素,返回的ourIndex=0,此时则认为获取锁成功 - 如果为有序列表中的第一个元素,那么
predicateResults.getsTheLock()为true,获取锁的标志位havaTheLock为true,直接返回获取锁成功
然后是获取锁失败的逻辑:
获取锁失败的核心代码:
String  previousSequencePath = basePath + "/" + predicateResults.getPathToWatch();

synchronized(this)
{
    Stat stat = client.checkExists().usingWatcher(watcher).forPath(previousSequencePath);
    if ( stat != null )
    {
        if ( millisToWait != null )
        {
            millisToWait -= (System.currentTimeMillis() - startMillis);
            startMillis = System.currentTimeMillis();
            if ( millisToWait <= 0 )
            {
                doDelete = true;    // timed out - delete our node
                break;
            }

            wait(millisToWait);
        }
        else
        {
            wait();
        }
    }
}
- 针对上一个节点添加监听器
- 如果加锁有过期时间,到了过期时间后直接break退出循环
- 当前线程处于wait()状态,等待上一个线程释放锁
Curator 释放锁实现原理
释放锁其实很简单,直接删除当前临时节点,因为下一个节点监听了上一个节点信息,所以上一个节点删除后,当前节点就会被唤醒重新获取锁。
private void deleteOurPath(String ourPath) throws Exception
{
    try
    {
        client.delete().guaranteed().forPath(ourPath);
    }
    catch ( KeeperException.NoNodeException e )
    {
        // ignore - already deleted (possibly expired session, etc.)
    }
}
总结
一张图总结:

04_Zookeeper分布式锁实现原理.jpg
原图可查看我的分享:
https://www.processon.com/view/link/5e80508de4b06b85300175d2