上一篇写的 rsync 是通过手动执行命令的方式从服务端拉取文件同步
本片介绍:通过sersync监控目录中变化的数据,自动将变化的文件通过rsync推送给客户端。
sersync+rsync自动同步与rsync手动同步配置的区别:
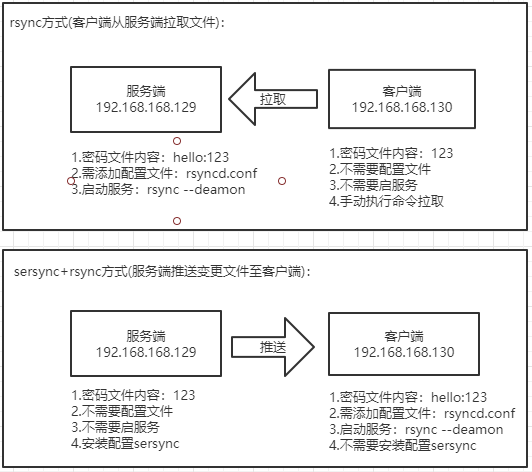
环境:Centos6
客户端:192.168.168.129
服务端:192.168.168.130
129作为服务端,130作为客户端(130从129拉取监控目录(/data/html/)下的文件)
服务端配置(文件数据源)
修改密码文件
vi /etc/rsync.password
内容: 123
授权
chmod 600 /etc/rsync.password
下载sersync
wget https://storage.googleapis.com/google-code-archive-downloads/v2/code.google.com/sersync/sersync2.5.4_64bit_binary_stable_final.tar.gz
如果上述连接下载不到,用下面的:
wget --no-check-certificate https://raw.githubusercontent.com/orangle/sersync/master/release/sersync2.5.4_64bit_binary_stable_final.tar.gz
解压
tar zxvf sersync2.5.4_64bit_binary_stable_final.tar.gz
cd GNU-Linux-x86/
创建文件
mkdir -p /opt/sersync/{logs,conf,bin}
复制文件
cp sersync2 /opt/sersync/bin
cp confxml.xml /opt/sersync/conf/
cd /opt/sersync/conf/
vi confxml.xml
<?xml version="1.0" encoding="ISO-8859-1"?>
<head version="2.5">
    <host hostip="localhost" port="8008"></host>
    <debug start="false"/>
    <fileSystem xfs="false"/>
    <filter start="false">
        <exclude expression="(.*).svn"></exclude>
        <exclude expression="(.*).gz"></exclude>
        <exclude expression="^info/*"></exclude>
        <exclude expression="^static/*"></exclude>
    </filter>
    <inotify>
        <delete start="true"/>
        <createFolder start="true"/>
        <createFile start="false"/>
        <closeWrite start="true"/>
        <moveFrom start="true"/>
        <moveTo start="true"/>
        <attrib start="false"/>
        <modify start="false"/>
    </inotify>

    <sersync>
        <localpath watch="/data/html/">
            <remote ip="192.168.168.130" name="www"/>
            <!--<remote ip="192.168.8.39" name="tongbu"/>-->
            <!--<remote ip="192.168.8.40" name="tongbu"/>-->
        </localpath>
        <rsync>
            <commonParams params="-artuz"/>
            <auth start="true" users="hello" passwordfile="/etc/rsync.password"/>
            <userDefinedPort start="false" port="874"/><!-- port=874 -->
            <timeout start="false" time="100"/><!-- timeout=100 -->
            <ssh start="false"/>
        </rsync>
        <failLog path="/tmp/rsync_fail_log.sh" timeToExecute="60"/><!--default every 60mins execute once-->
        <crontab start="false" schedule="600"><!--600mins-->
            <crontabfilter start="false">
                <exclude expression="*.php"></exclude>
                <exclude expression="info/*"></exclude>
            </crontabfilter>
        </crontab>
        <plugin start="false" name="command"/>
    </sersync>

    <plugin name="command">
        <param prefix="/bin/sh" suffix="" ignoreError="true"/>  <!--prefix /opt/tongbu/mmm.sh suffix-->
        <filter start="false">
            <include expression="(.*).php"/>
            <include expression="(.*).sh"/>
        </filter>
    </plugin>

    <plugin name="socket">
        <localpath watch="/opt/tongbu">
            <deshost ip="192.168.138.20" port="8009"/>
        </localpath>
    </plugin>
    <plugin name="refreshCDN">
        <localpath watch="/data0/htdocs/cms.xoyo.com/site/">
            <cdninfo domainname="ccms.chinacache.com" port="80" username="xxxx" passwd="xxxx"/>
            <sendurl base="http://pic.xoyo.com/cms"/>
            <regexurl regex="false" match="cms.xoyo.com/site([/a-zA-Z0-9]*).xoyo.com/images"/>
        </localpath>
    </plugin>
</head>
参数说明:
如果A服务器新建、删除目录都会触发同步到B服务器。但是A服务器删除文件,不会触发到B服务器。
localpath watch="/data/html"   #监控路径
name="www": #目标服务器rsync同步目录模块名称
users="hello": #目标服务器rsync同步用户名
passwordfile="/etc/rsyncd.password": #目标服务器rsync同步用户的密码在源服务器的存放路径
remote ip="192.168.168.130”: #被推送端服务器ip
failLog path=”/tmp/rsync_fail_log.sh” #脚本运行失败日志记录
start=”true” #设置为true,每隔600分钟执行一次全盘同步
delete start   #只做增量备份,可以吧这个设置为flase。但是如果两边要一样就设置为true
执行一次同步
../bin/sersync2 -d -r -o ./confxml.xml
客户端配置
设置密码文件内容
vi /etc/rsync.password
hello:123
配置文件vi /etc/rsyncd.conf
#/etc/rsyncd.conf
uid = root
gid = root
use chroot = no
max connections = 200
hosts allow = *
timeout = 600
log file = /var/log/rsyncd.log
pid file = /var/run/rsyncd.pid
lock file = /var/run/rsync.lock
ignore errors
read only = false
list = false
host deny = 0.0.0.0/32
auth users = hello
secrets file = /etc/rsync.password
transfer logging = yes
#Module definitions

[www]
path = /data/html/
启动客户端
rsync --daemon