项目地址:https://github.com/wanghao12345/elm
上一章节已经把该项目的基础环境搭好了,这一章节开始饿了吗登录页面的开发,如今几乎所有的网站都必不可少有登录、注册、找回密码、首页等等,所以开发登录界面还是非常有必要的。
准备
- 新建login分支,并且将该项目切换到login分支
- 将App.vue中的引入logo图片的img删除
- 去除原项目中的HelloWord.vue:将原项目src下的components文件夹删除,在src/router/index.js中与HelloWord相关的内容删除掉
此时的App.vue中的代码如下:


 1 <template>
 2   <div id="app">
 3     <router-view/>
 4   </div>
 5 </template>
 6
 7 <script>
 8 export default {
 9   name: 'App'
10 }
11 </script>
12
13 <style>
14 #app {
15   font-family: 'Avenir', Helvetica, Arial, sans-serif;
16   -webkit-font-smoothing: antialiased;
17   -moz-osx-font-smoothing: grayscale;
18   text-align: center;
19   color: #2c3e50;
20 }
21 </style>
修改过后的router/index.js中的代码如下:
1 import Vue from 'vue'
2 import Router from 'vue-router'
3
4 Vue.use(Router)
5
6 export default new Router({
7   routes: []
8 })
创建登录组件
- 在src下面建立page文件夹,page文件夹里面以后主要存放各个页面的组件,并在page文件夹下创建login文件夹,这时候在login文件夹里面创建一个Login.vue文件和components文件夹,这里的components文件夹主要用于创建一些与登录组件相关的子组件。
- 创建登录的头部,因为头部文件通用性非常强,因此,在src下面建立一个common文件夹,这里的common文件夹主要存放各个页面的公用组件。在common文件夹下创建Header.vue文件
- 登录组件中引入头部组件
- 在router/index.js中添加登录页面的路由
头部组件src/common/Header.vue初始代码:
 1 <template>
 2   <div>头部</div>
 3 </template>
 4
 5 <script>
 6 export default {
 7   name: 'Header',
 8   data () {
 9     return {
10
11     }
12   }
13 }
14 </script>
15
16 <style lang="css" scoped>
17 </style>
登录组件src/page/login/Login.vue组件引用头部组件后:
 1 <template>
 2   <div>
 3     <login-header></login-header>
 4   </div>
 5 </template>
 6 <script>
 7 import LoginHeader from '@/common/Header'
 8 export default {
 9   name: 'Login',
10   components: {
11     LoginHeader
12   },
13   data () {
14     return {
15
16     }
17   }
18 }
19 </script>
20
21 <style lang="css" scoped>
22 </style>
此时的router/index.js:
 1 import Vue from 'vue'
 2 import Router from 'vue-router'
 3 import Login from '@/page/login/Login'
 4
 5 Vue.use(Router)
 6
 7 export default new Router({
 8   routes: [
 9     {
10       path: '/',
11       name: 'Login',
12       component: Login
13     }]
14 })
引入外部资源
为了开发的遍历,所以项目需要引入以下外部资源
1、安装sass
- 使用命令行工具进入elm文件夹
- 运行:cnpm install --save-dev sass-loader
- 然后还得安装node-sass,因为sass-loader依赖于node-sass:cnpm install --save-dev node-sass
2.引入全局样式reset.scss
在assets文件夹下加入reset.scss,然后在main.js中使用 import './assets/reset.scss'即可。
此时的main.js中的代码如下:
 1 import Vue from 'vue'
 2 import App from './App'
 3 import router from './router'
 4 import './assets/reset.scss'
 5
 6 Vue.config.productionTip = false
 7
 8 /* eslint-disable no-new */
 9 new Vue({
10   el: '#app',
11   router,
12   components: { App },
13   template: '<App/>'
14 })
3.引入rem自适应js
在index.html中引入rem自适应的js,设置1rem=20px
index.html:
 1 <!DOCTYPE html>
 2 <html>
 3   <head>
 4     <meta charset="utf-8">
 5     <meta name="viewport" content="width=device-width,initial-scale=1.0">
 6     <title>elm</title>
 7   </head>
 8   <body>
 9     <div id="app"></div>
10     <!-- built files will be auto injected -->
11   </body>
12   <script type="text/javascript">
13     (function(doc, win) {
14         var docEl = doc.documentElement,
15             resizeEvt = 'orientationchange' in window ? 'orientationchange' : 'resize',
16             recalc = function() {
17                 var clientWidth = docEl.clientWidth;
18                 if (!clientWidth) return;
19                 docEl.style.fontSize = 20 * (clientWidth / 320) + 'px';
20             };
21         if (!doc.addEventListener) return;
22         win.addEventListener(resizeEvt, recalc, false);
23         doc.addEventListener('DOMContentLoaded', recalc, false);
24     })(document, window);
25   </script>
26 </html>
4.引入element-ui
使用cnpm install element-ui -save引入element-ui组件库,然后在main.js里面引入
 1 // The Vue build version to load with the `import` command
 2 // (runtime-only or standalone) has been set in webpack.base.conf with an alias.
 3 import Vue from 'vue'
 4 import App from './App'
 5 import router from './router'
 6 import ElementUI from 'element-ui'
 7 import './assets/style/reset.css'
 8 import './assets/style/iconfont.css'
 9 import 'element-ui/lib/theme-chalk/index.css'
10 import './assets/style/elementModify.css'
11
12 // 使用element
13 Vue.use(ElementUI, {size: 'small', zIndex: 3000})
14
15 Vue.config.productionTip = false
16
17 /* eslint-disable no-new */
18 new Vue({
19   el: '#app',
20   router,
21   components: { App },
22   template: '<App/>'
23 })
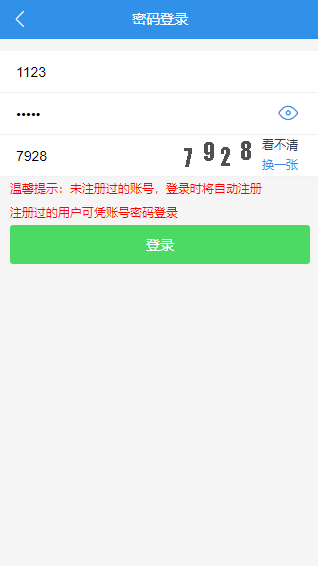
完成页面切图
完成页面切图的效果如下:
此时头部组件的代码为:
1 <template> 2 <div class="header-container"> 3 <router-link 4 to="-1" 5 tag="i" 6 > 7 <i class="iconfont back-btn"></i> 8 </router-link> 9 <div class="header-title">{{HeadTitle}}</div> 10 <i class="login-register-btn" v-show="LoginIcon">登录|注册</i> 11 </div> 12 </template> 13 14 <script> 15 export default { 16 name: 'Header', 17 data () { 18 return { 19 loginStatus: false 20 } 21 }, 22 props: { 23 HeadTitle: String, 24 LoginIcon: Boolean 25 } 26 } 27 </script> 28 29 <style lang="scss" scoped> 30 @import '~style/variable.scss'; 31 .header-container{ 32 width: 100%; 33 height: $HeaderHeight; 34 line-height: $HeaderHeight; 35 background: $BackgroundColor; 36 color: white; 37 position: relative; 38 @include wh(100%, 2rem) 39 .back-btn{ 40 float: left; 41 width: 2rem; 42 } 43 .header-title{ 44 font-size: 0.7rem; 45 width: 100%; 46 height: 100%; 47 position: absolute; 48 } 49 .login-register-btn{ 50 position: absolute; 51 right: 0.5rem; 52 font-size: 0.65rem; 53 } 54 } 55 </style>
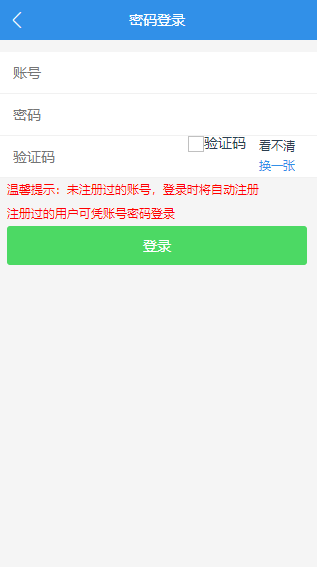
新增page/login/components/LoginForm表单组件,用于登录操作部分,LoginForm表单如下:
  1 <template>
  2   <div>
  3     <div class="FormContainer">
  4       <form>
  5         <section class="input_container">
  6           <input type="text" placeholder="账号" v-model="userAccount">
  7         </section>
  8         <section class="input_container">
  9           <input type="password" placeholder="密码" v-model="passWord">
 10         </section>
 11         <section class="input_container">
 12           <input type="text" placeholder="验证码" v-model="codeNumber">
 13           <div class="code-img">
 14             <img src="" alt="验证码">
 15             <div class="change-code-img">
 16               <p>看不清</p>
 17               <p class="change-btn">换一张</p>
 18             </div>
 19           </div>
 20         </section>
 21       </form>
 22     </div>
 23     <p class="login_tips">温馨提示:未注册过的账号,登录时将自动注册</p>
 24     <p class="login_tips">注册过的用户可凭账号密码登录</p>
 25     <button class="login-btn">登录</button>
 26   </div>
 27
 28 </template>
 29
 30 <script>
 31 export default {
 32   name: 'LoginForm',
 33   data () {
 34     return {
 35       userAccount: null,
 36       passWord: null,
 37       codeNumber: null
 38     }
 39   }
 40 }
 41 </script>
 42
 43 <style lang="scss" scoped>
 44   @import '~style/variable.scss';
 45   .FormContainer{
 46     width: 100%;
 47     height: 6.3rem;
 48     background: white;
 49     margin-top: 0.6rem;
 50     .input_container{
 51       width: 100%;
 52       height: 2.1rem;
 53       border-bottom: 1px solid #f1f1f1;
 54       padding: 0.6rem 0.8rem;
 55       box-sizing: border-box;
 56       overflow: hidden;
 57       position: relative;
 58       input{
 59         float: left;
 60         border: 0;
 61         font-size: 0.7rem;
 62       }
 63       .code-img{
 64         position: absolute;
 65         width: 6rem;
 66         height: 100%;
 67         right: 1rem;
 68         top: 0;
 69         bottom: 0;
 70         overflow: hidden
 71         img{
 72            4rem;
 73           height: 100%;
 74           display: block;
 75           float: left;
 76         }
 77         .change-code-img{
 78           float: right;
 79           width: 2rem;
 80           height: 100%;
 81           font-size: 0.6rem;
 82           line-height: 1rem;
 83           .change-btn{
 84             color: $BackgroundColor;
 85           }
 86         }
 87       }
 88     }
 89   }
 90   .login_tips{
 91     color: red;
 92     text-align: left;
 93     font-size: 0.6rem;
 94     line-height: 1.2rem;
 95     box-sizing: border-box;
 96     padding-left: 0.5rem;
 97   }
 98   .login-btn{
 99     margin: 0 .5rem 1rem;
100     font-size: 0.7rem;
101     color: #fff;
102     background-color: #4cd964;
103     padding: .5rem 0;
104     border: 1px;
105     border-radius: 0.15rem;
106     text-align: center;
107     width: 15rem;
108   }
109 </style>
将LoginForm组件引入Login组件中,并引用:
 1 <template>
 2   <div>
 3     <login-header
 4       :HeadTitle="HeadTitle"
 5     >
 6     </login-header>
 7     <login-form></login-form>
 8   </div>
 9 </template>
10 <script>
11 import LoginHeader from '@/common/Header'
12 import LoginForm from './components/LoginForm.vue'
13 export default {
14   name: 'Login',
15   components: {
16     LoginHeader,
17     LoginForm
18   },
19   data () {
20     return {
21       HeadTitle: '密码登录'
22     }
23   }
24 }
25 </script>
26
27 <style lang="scss" scoped>
28 </style>
数据交互
增加src/config/env.js进行数据交互的基本配置
 1 /**
 2  * 配置编译环境和线上环境之间的切换
 3  *
 4  * baseUrl: 域名地址
 5  * routerMode: 路由模式
 6  * imgBaseUrl: 图片所在域名地址
 7  */
 8 let baseUrl = ''
 9 let routerMode = 'hash'
10 let imgBaseUrl = ''
11
12 if (process.env.Node_ENV === 'development') {
13   imgBaseUrl = '/img/'
14 } else {
15   baseUrl = '//elm.cangdu.org'
16   imgBaseUrl = '//elm.cangdu.org/img/'
17 }
18
19 export {
20   baseUrl,
21   routerMode,
22   imgBaseUrl
23 }
在项目的开发中,我们使用了fetch的数据绑定方法,因此新建src/config/fetch.js文件,这是一个公用的数据请求文件
 1 import { baseUrl } from './env'
 2
 3 export default async (url = '', data = {}, type = 'GET', method = 'fetch') => {
 4   type = type.toUpperCase()
 5   url = baseUrl + url
 6
 7   if (type === 'GET') {
 8     // 数据拼接字符串
 9     let dataStr = ''
10     Object.keys(data).forEach(key => {
11       dataStr += key + '=' + data[key] + '&'
12     })
13     if (dataStr !== '') {
14       dataStr = dataStr.substr(0, dataStr.lastIndexOf('&'))
15       url = url + '?' + dataStr
16     }
17   }
18   if (window.fetch && method === 'fetch') {
19     let requestConfig = {
20       credentials: 'include',
21       method: type,
22       headers: {
23         'Accept': 'application/json',
24         'Content-Type': 'application/json'
25       },
26       mode: 'cors',
27       cache: 'force-cache'
28     }
29
30     if (type === 'POST') {
31       Object.defineProperty(requestConfig, 'body', {
32         value: JSON.stringify(data)
33       })
34     }
35     try {
36       const response = await fetch(url, requestConfig)
37       const responseJson = await response.json()
38       return responseJson
39     } catch (error) {
40       throw new Error(error)
41     }
42   } else {
43     return new Promise((resolve, reject) => {
44       let requestObj
45       // if (window.XMLHttpRequest) {
46       //   requestObj = new XMLHttpRequest()
47       // } else {
48       //   requestObj = new ActiveXObject
49       // }
50       requestObj = new XMLHttpRequest()
51       let sendData = ''
52       if (type === 'POST') {
53         sendData = JSON.stringify(data)
54       }
55
56       requestObj.open(type, url, true)
57       requestObj.setRequestHeader('Content-type', 'application/x-www-form-urlencoded')
58       requestObj.send(sendData)
59
60       requestObj.onreadystatechange = () => {
61         if (requestObj.readyState === 4) {
62           if (requestObj.status === 200) {
63             let obj = requestObj.response
64             if (typeof obj !== 'object') {
65               obj = JSON.parse(obj)
66             }
67             resolve(obj)
68           } else {
69             reject(requestObj)
70           }
71         }
72       }
73     })
74   }
75 }
在这个项目中,我们将所有的请求函数放到同一个文件中,因此也新增src/service/getData.js文件
 1 import fetch from '../config/fetch'
 2
 3 /**
 4  * 获取图片验证码
 5  */
 6 export const getcaptchas = () => fetch('/v1/captchas', {}, 'POST')
 7
 8 /**
 9  * 账号登录请求
10  */
11 export const accountLogin = (username, password, captchaCode) => fetch('/v2/login', {username, password, captchaCode}, 'POST')
完善登录组件的LoginForm.vue
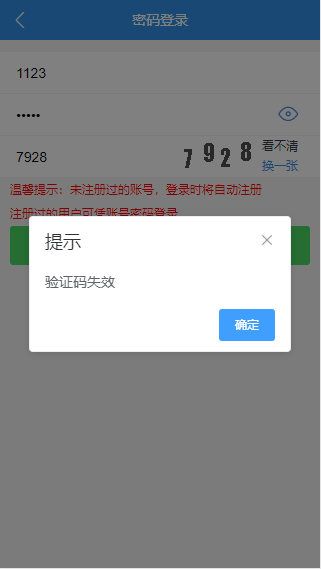
1 <template> 2 <div> 3 <div class="FormContainer"> 4 <form> 5 <section class="input_container"> 6 <input type="text" placeholder="账号" v-model="userAccount"> 7 </section> 8 <section class="input_container"> 9 <input :type="passwordType" placeholder="密码" v-model="passWord"> 10 <div class="password-see"> 11 <i class="iconfont" v-show='switchPassword' @click="openPasswordShow"></i> 12 <i class="iconfont" v-show='!switchPassword' @click="closePasswordShow"></i> 13 </div> 14 </section> 15 <section class="input_container"> 16 <input type="text" placeholder="验证码" v-model="codeNumber"> 17 <div class="code-img"> 18 <img class="img" :src="captchaCodeImg" alt="验证码"> 19 <div class="change-code-img" @click="getCaptchaCode"> 20 <p>看不清</p> 21 <p class="change-btn">换一张</p> 22 </div> 23 </div> 24 </section> 25 </form> 26 </div> 27 <p class="login_tips">温馨提示:未注册过的账号,登录时将自动注册</p> 28 <p class="login_tips">注册过的用户可凭账号密码登录</p> 29 <button class="login-btn" @click="handleLoginRequest">登录</button> 30 </div> 31 </template> 32 33 <script> 34 import {getcaptchas, accountLogin} from '../../../service/getData' 35 export default { 36 name: 'LoginForm', 37 data () { 38 return { 39 userInfo: null, // 用户信息 40 userAccount: null, // 用户名账号 41 passWord: null, // 密码 42 codeNumber: null, // 验证码 43 captchaCodeImg: null, // 验证码图片 44 passwordType: 'password', // 密码的隐藏与显示 45 switchPassword: true // 密码显示与隐藏的开关 46 } 47 }, 48 created () { 49 this.getCaptchaCode() 50 }, 51 methods: { 52 /** 53 * 获取验证码 54 */ 55 async getCaptchaCode () { 56 let res = await getcaptchas() 57 this.captchaCodeImg = res.code 58 }, 59 /** 60 * 开启密码的显示 61 */ 62 openPasswordShow () { 63 this.passwordType = 'text' 64 this.switchPassword = false 65 }, 66 /** 67 * 关闭密码的显示 68 */ 69 closePasswordShow () { 70 this.passwordType = 'password' 71 this.switchPassword = true 72 }, 73 /** 74 * 登录请求 75 */ 76 async handleLoginRequest () { 77 if (!this.userAccount) { 78 this.$alert('账号不能为空', '提示', { 79 confirmButtonText: '确定', 80 callback: action => {} 81 }) 82 } else if (!this.passWord) { 83 this.$alert('密码不能为空', '提示', { 84 confirmButtonText: '确定', 85 callback: action => {} 86 }) 87 } else if (!this.codeNumber) { 88 this.$alert('验证码不能为空', '提示', { 89 confirmButtonText: '确定', 90 callback: action => {} 91 }) 92 } else { 93 this.userInfo = await accountLogin(this.userAccount, this.passWord, this.codeNumber) 94 if (!this.userInfo.user_id) { 95 this.$alert(this.userInfo.message, '提示', { 96 confirmButtonText: '确定', 97 callback: action => {} 98 }) 99 } else { 100 101 } 102 } 103 } 104 } 105 } 106 </script> 107 108 <style lang="scss" scoped> 109 @import '~style/variable.scss'; 110 .FormContainer{ 111 width: 100%; 112 height: 6.3rem; 113 background: white; 114 margin-top: 0.6rem; 115 .input_container{ 116 width: 100%; 117 height: 2.1rem; 118 border-bottom: 1px solid #f1f1f1; 119 padding: 0.6rem 0.8rem; 120 box-sizing: border-box; 121 overflow: hidden; 122 position: relative; 123 input{ 124 float: left; 125 border: 0; 126 font-size: 0.7rem; 127 } 128 .code-img{ 129 position: absolute; 130 width: 6rem; 131 height: 100%; 132 right: 1rem; 133 top: 0; 134 bottom: 0; 135 overflow: hidden; 136 .img{ 137 width: 4rem; 138 height: 1.5rem; 139 display: block; 140 float: left; 141 margin-top: 0.25rem; 142 } 143 .change-code-img{ 144 float: right; 145 width: 2rem; 146 height: 100%; 147 font-size: 0.6rem; 148 line-height: 1rem; 149 .change-btn{ 150 color: $BackgroundColor; 151 } 152 } 153 } 154 .password-see{ 155 position: absolute; 156 right: 1rem; 157 top: 0rem; 158 line-height: 2rem; 159 .iconfont{ 160 font-size: 1.2rem; 161 color: #3190e8; 162 } 163 } 164 } 165 } 166 .login_tips{ 167 color: red; 168 text-align: left; 169 font-size: 0.6rem; 170 line-height: 1.2rem; 171 box-sizing: border-box; 172 padding-left: 0.5rem; 173 } 174 .login-btn{ 175 margin: 0 .5rem 1rem; 176 font-size: 0.7rem; 177 color: #fff; 178 background-color: #4cd964; 179 padding: .5rem 0; 180 border: 1px; 181 border-radius: 0.15rem; 182 text-align: center; 183 width: 15rem; 184 } 185 </style>
结语
此时登录部分的开发已经完成了,接下来将会进行地址列表页面的开发,登录页面效果图如下: