https://docs.docker.com/docker-for-mac/
Get started with Docker for Mac
首先像在本博客docker-1-环境安装及例子实践处将环境安装好,或者你可以查看 Install Docker for Mac
Check versions查看你安装的docker的版本
Ensure your versions of docker, docker-compose, and docker-machine are up-to-date and compatible with Docker.app. Your output may differ if you are running different versions.
保证你docker, docker-compose和docker-machine的版本是最新的,并且与Docker.app(即该docker应用程序兼容。如果你运行的是不同的版本,那么你的输出可能会有所不同。 )
)
userdeMBP:~ user$ docker --version
Docker version 18.03.1-ce, build 9ee9f40
userdeMBP:~ user$ docker-compose --version
docker-compose version 1.21.1, build 5a3f1a3
userdeMBP:~ user$ docker-machine --version
docker-machine version 0.14.0, build 89b8332
Explore the application开发应用程序
1.Open a command-line terminal and test that your installation works by running the simple Docker image,hello-world:
打开命令行终端并通过运行简单的Docker镜像-hello-world来测试你的安装:
userdeMBP:~ user$ docker run hello-world
Unable to find image 'hello-world:latest' locally
latest: Pulling from library/hello-world
d1725b59e92d: Pull complete
Digest: sha256:0add3ace90ecb4adbf7777e9aacf18357296e799f81cabc9fde470971e499788
Status: Downloaded newer image for hello-world:latest

Hello from Docker!
This message shows that your installation appears to be working correctly.

To generate this message, Docker took the following steps:
 1. The Docker client contacted the Docker daemon.
 2. The Docker daemon pulled the "hello-world" image from the Docker Hub.
    (amd64)
 3. The Docker daemon created a new container from that image which runs the
    executable that produces the output you are currently reading.
 4. The Docker daemon streamed that output to the Docker client, which sent it
    to your terminal.

To try something more ambitious, you can run an Ubuntu container with:
 $ docker run -it ubuntu bash

Share images, automate workflows, and more with a free Docker ID:
 https://hub.docker.com/

For more examples and ideas, visit:
 https://docs.docker.com/get-started/
可见之前并没有拉取该镜像,所以在运行时,它会自动去拉取该镜像,然后再运行,然后运行docker images就可以看见该镜像:
userdeMBP:~ user$ docker images
REPOSITORY                      TAG                 IMAGE ID            CREATED             SIZE
hello-world                     latest              4ab4c602aa5e        3 months ago        1.84kB
2.Start a Dockerized web server. Like the hello-world image above, if the image is not found locally, Docker pulls it from Docker Hub.
开启一个docker化的web服务器。就想上面的hello-world镜像,如果镜像在本地没有找到,Docker就会从Docker hub中拉取它:
  -d, --detach          Run container in background and print container ID在后台运行容器并打印容器ID
  -p, --publish list          Publish a container's port(s) to the host  发布容器的端口给主机,例如:-p 80:80
userdeMBP:~ user$ docker run -d -p 80:80 --name webserver nginx
Unable to find image 'nginx:latest' locally
latest: Pulling from library/nginx
a5a6f2f73cd8: Pull complete
1ba02017c4b2: Pull complete
33b176c904de: Pull complete
Digest: sha256:5d32f60db294b5deb55d078cd4feb410ad88e6fe77500c87d3970eca97f54dba
Status: Downloaded newer image for nginx:latest
134014354a4e29e0ae9382f7c3b067246a1c1d5a1a4c242b21449f9213ae2f46
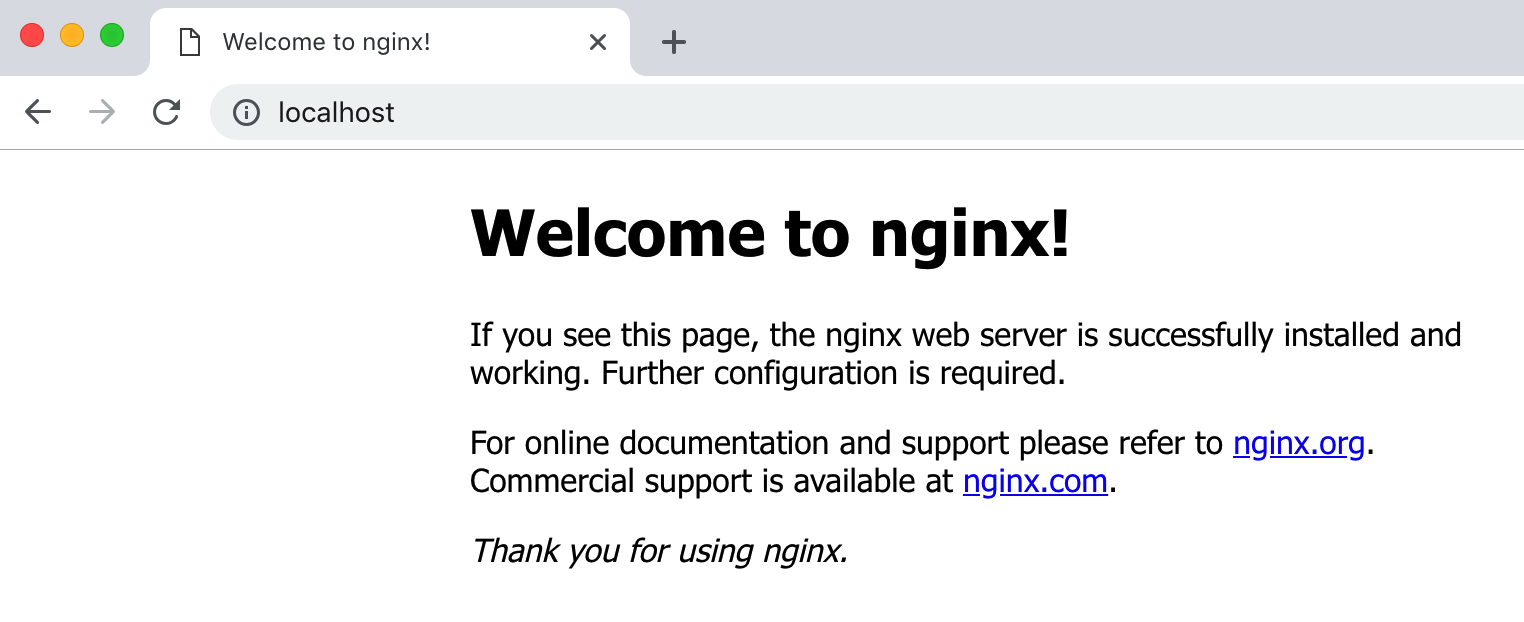
3.In a web browser, go to http://localhost/ to view the nginx homepage. Because we specified the default HTTP port, it isn’t necessary to append :80 at the end of the URL.
在浏览器中,使用http://localhost/去浏览nginx首页。因为你指定了默认的HTTP端口,所以就不需要添加:80在URL的终端
Early beta releases used docker as the hostname to build the URL. Now, ports are exposed on the private IP addresses of the VM and forwarded to localhost with no other host name set.
早先的beta版本使用docker作为主机名去构建URL。现在,端口被暴露在虚拟机的私有IP地址,并指向没有带有任何设置的主机名的localhost
4.View the details on the container while your web server is running (with docker container ls or docker ps):
当你的web服务器运行时,查看容器的详情(使用docker container ls或docker ps)
查看容器启动情况:
userdeMBP:~ user$ docker ps
CONTAINER ID        IMAGE                COMMAND                  CREATED             STATUS              PORTS                     NAMES
134014354a4e        nginx                "nginx -g 'daemon of…"   55 seconds ago      Up 55 seconds       0.0.0.0:80->80/tcp        webserver

userdeMBP:~ user$ docker container ls
CONTAINER ID        IMAGE                COMMAND                  CREATED             STATUS              PORTS                     NAMES
134014354a4e        nginx                "nginx -g 'daemon of…"   8 minutes ago       Up 8 minutes        0.0.0.0:80->80/tcp        webserver
5.Stop and remove containers and images with the following commands. Use the “all” flag (--all or -a) to view stopped containers.
使用下面饿命令停止并移除容器和镜像。使用“all”标签(--all or -a) 去查看停止的容器
$ docker container ls
$ docker container stop webserver
$ docker container ls -a
$ docker container rm webserver
$ docker image ls
$ docker image rm nginx
测试:
userdeMBP:~ user$ docker container ls //查看现在有的容器
CONTAINER ID        IMAGE                COMMAND                  CREATED             STATUS              PORTS                     NAMES
134014354a4e        nginx                "nginx -g 'daemon of…"   8 minutes ago       Up 8 minutes        0.0.0.0:80->80/tcp        webserver

userdeMBP:~ user$ docker container stop webserver
webserver
userdeMBP:~ user$ docker container ls -a //可以查看到停止的webserver
CONTAINER ID        IMAGE                COMMAND                  CREATED             STATUS                      PORTS                     NAMES
134014354a4e        nginx                "nginx -g 'daemon of…"   11 minutes ago      Exited (0) 18 seconds ago                             webserver

userdeMBP:~ user$ docker container rm webserver
webserver
userdeMBP:~ user$ docker container ls //然后这里面就没有webserver这个容器了

userdeMBP:~ user$ docker image ls //查看现在有的镜像
REPOSITORY                      TAG                 IMAGE ID            CREATED             SIZE
nginx                           latest              568c4670fa80        2 weeks ago         109MB
hello-world                     latest              4ab4c602aa5e        3 months ago        1.84kB

userdeMBP:~ user$ docker image rm nginx //然后删除nginx这个镜像
Untagged: nginx:latest
Untagged: nginx@sha256:5d32f60db294b5deb55d078cd4feb410ad88e6fe77500c87d3970eca97f54dba
Deleted: sha256:568c4670fa800978e08e4a51132b995a54f8d5ae83ca133ef5546d092b864acf
Deleted: sha256:ac0442c0fafd48e24a96fa3099ea7ad20012c8759e1dd03dd387dbfbe382984c
Deleted: sha256:6b9d35d8d75115937cd78da275f527cccef672cbd71f34062dffe2e930fd7e13
Deleted: sha256:ef68f6734aa485edf13a8509fe60e4272428deaf63f446a441b79d47fc5d17d3

userdeMBP:~ user$ docker image ls //然后再查看就看不见nginx这个镜像了
REPOSITORY                      TAG                 IMAGE ID            CREATED             SIZE
hello-world                     latest              4ab4c602aa5e        3 months ago        1.84kB
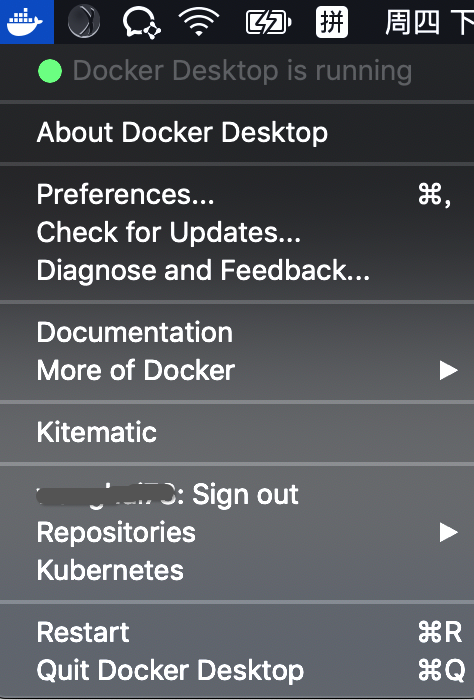
Preferences menu
Choose → Preferences from the menu bar and configure the runtime options described below.
从菜单栏中选择 → Preferences,像下面的描述一样配置运行选项
1.General
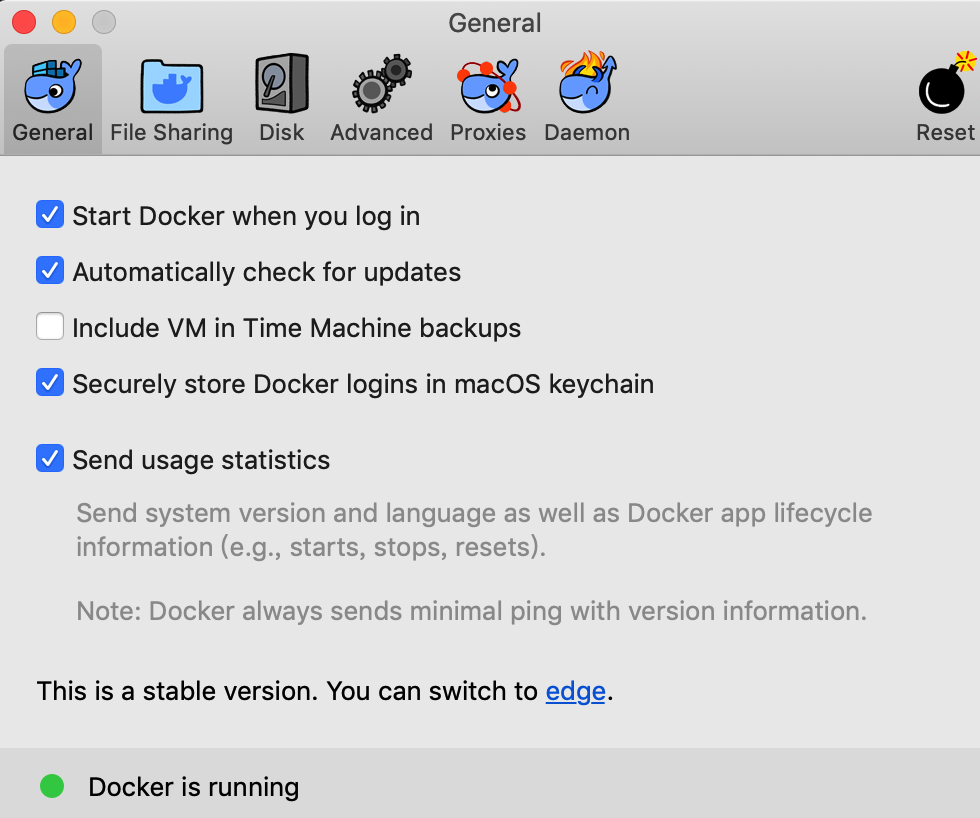
General settings are:常规设置
-
Start Docker when you log in: Uncheck this option if you don’t want Docker to start when you open your session. 登录时开启Docker:如果你不想要Docker在你打开这个会话的时候打开,就不要选择这个选项
-
Automatically check for updates notifies you when an update is available. Click OK to accept and install updates (or cancel to keep the current version). If you disable this option, you can still find out about updates manually by choosing
→ Check for Updates. 当更新可用时,自动检查更新并通知你:点击OK接收并安装更新(或者取消去保持当前的状态)。如果你不用这个选项,你仍可以通过选择 → Check for Updates去手动查找有关更新信息 -
Include VM in Time Machine backups backs up the Docker for Mac virtual machine. (Disabled by default.) 实时机器备份:为mac虚拟机备份Docker(默认不可用)
-
Securely store Docker logins in MacOS keychain stores your Docker login credentials. (Enabled by default.) 将Docker登录安全地存储在MacOS密钥链中:存储你的Docker登录凭据(默认可用)
-
Send usage statistics — Send diagnostics, crash reports, and usage data to Docker. This information helps Docker improve the application and get more context for troubleshooting problems. (Enabled by default.) 发送使用统计-向Docker发送诊断、崩溃报告和使用数据。这些信息有助于Docker改进应用程序,并为故障排除获得更多上下文。
2.File sharing文件共享
Choose which local directories to share with your containers. File sharing is required for volume mounting if the project lives outside of the /Users directory. In that case, share the drive where the Dockerfile and volume are located. Otherwise, you get file not found or cannot start service errors at runtime.
选择要与容器共享的本地目录。如果项目位于/Users目录之外,卷挂载需要文件共享。在这种情况下,共享Dockerfile和卷所在的驱动器。否则,将无法在运行时找到文件或启动服务错误。
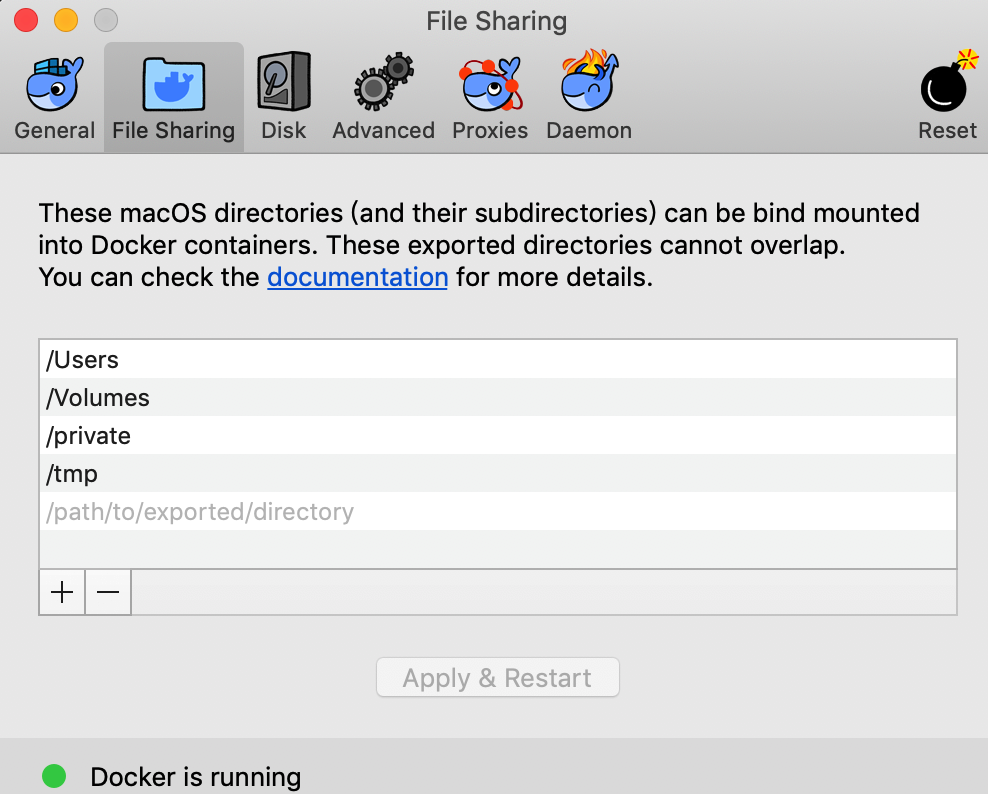
File share settings are:文件共享设置
-
Add a Directory: Click
+and navigate to the directory you want to add. 添加目录 -
Apply & Restart makes the directory available to containers using Docker’s bind mount (
-v) feature. 应用并重启There are some limitations on the directories that can be shared:对于能够被共享的目录有一些限制
- They cannot be a subdirectory of an already shared directory.不可以是已经被共享的目录的子目录
- They cannot already exist inside of Docker. 不能是已经存在于Docker中的目录
For more information, see:更多信息可见
- Namespaces in the topic on osxfs file system sharing.
- Volume mounting requires file sharing for any project directories outside of
/Users.)
3.Advanced高级
On the Advanced tab, you can limit resources available to Docker.
在Advanced选项,你可以限制对Docker有用的资源
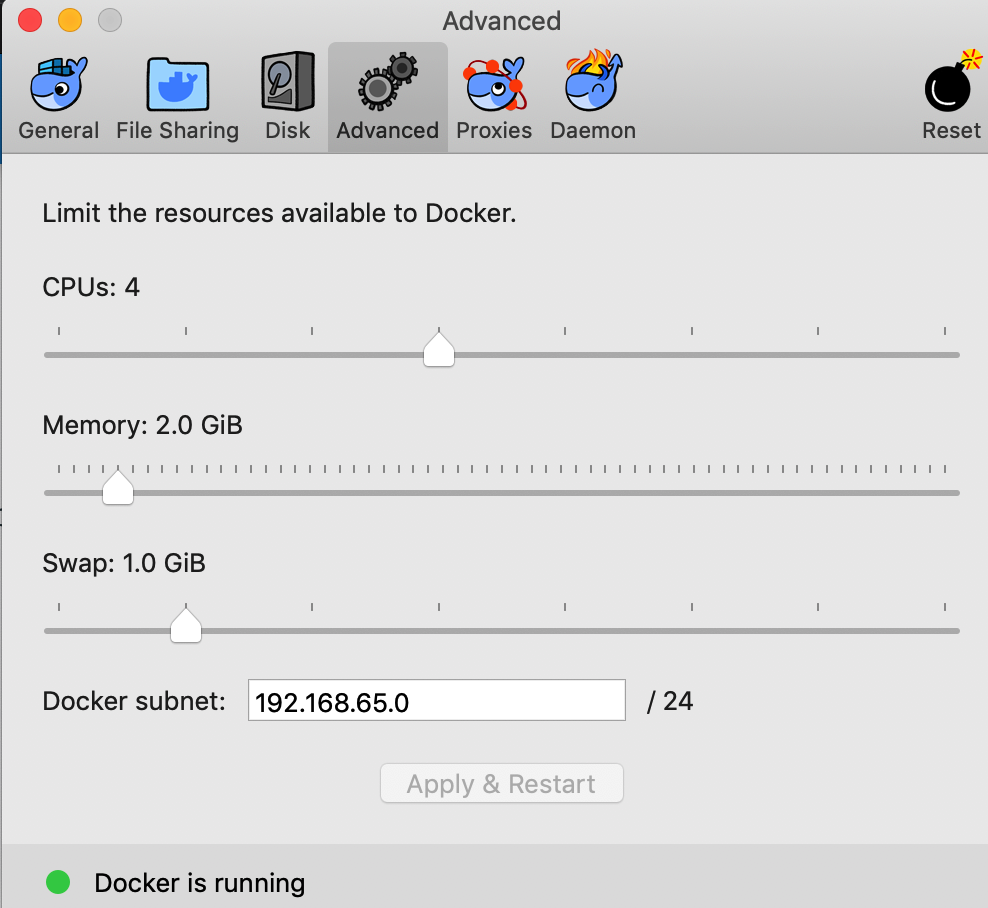
Advanced settings are:Advanced设定
CPUs: By default, Docker for Mac is set to use half the number of processors available on the host machine. To increase processing power, set this to a higher number; to decrease, lower the number. 默认,mac的Docker设置使用主机中一半数量的有效进程。为了增加处理能力,可将其设置到更高的数量;反之,为了降低,可以设置到更低的数量
Memory: By default, Docker for Mac is set to use 2 GB runtime memory, allocated from the total available memory on your Mac. To increase RAM, set this to a higher number; to decrease it, lower the number. 默认Mac的Docker设置使用2 GB运行内存,从你的mac的总可用内存中分配。为了增加RAM,设置其到更高数量;为了降低则设置到更低数量
Swap: Configure swap file size as needed. The default is 1 GB. 配置swap文件到需要大小。默认为1 GB
4.Disk磁盘
Specify the Disk image location of the Linux volume, where containers and images are stored.指定Linux卷的磁盘映像位置,容器和映像存储在其中。
You can also move the disk image location. If you attempt to move the disk image to a location that already has one, you get a prompt asking if you want to use the existing image or replace it.
还可以移动磁盘映像位置。如果试图将磁盘映像移动到已有映像的位置,则会收到一个提示,询问是否要使用现有映像或替换它。

5.Proxies代理
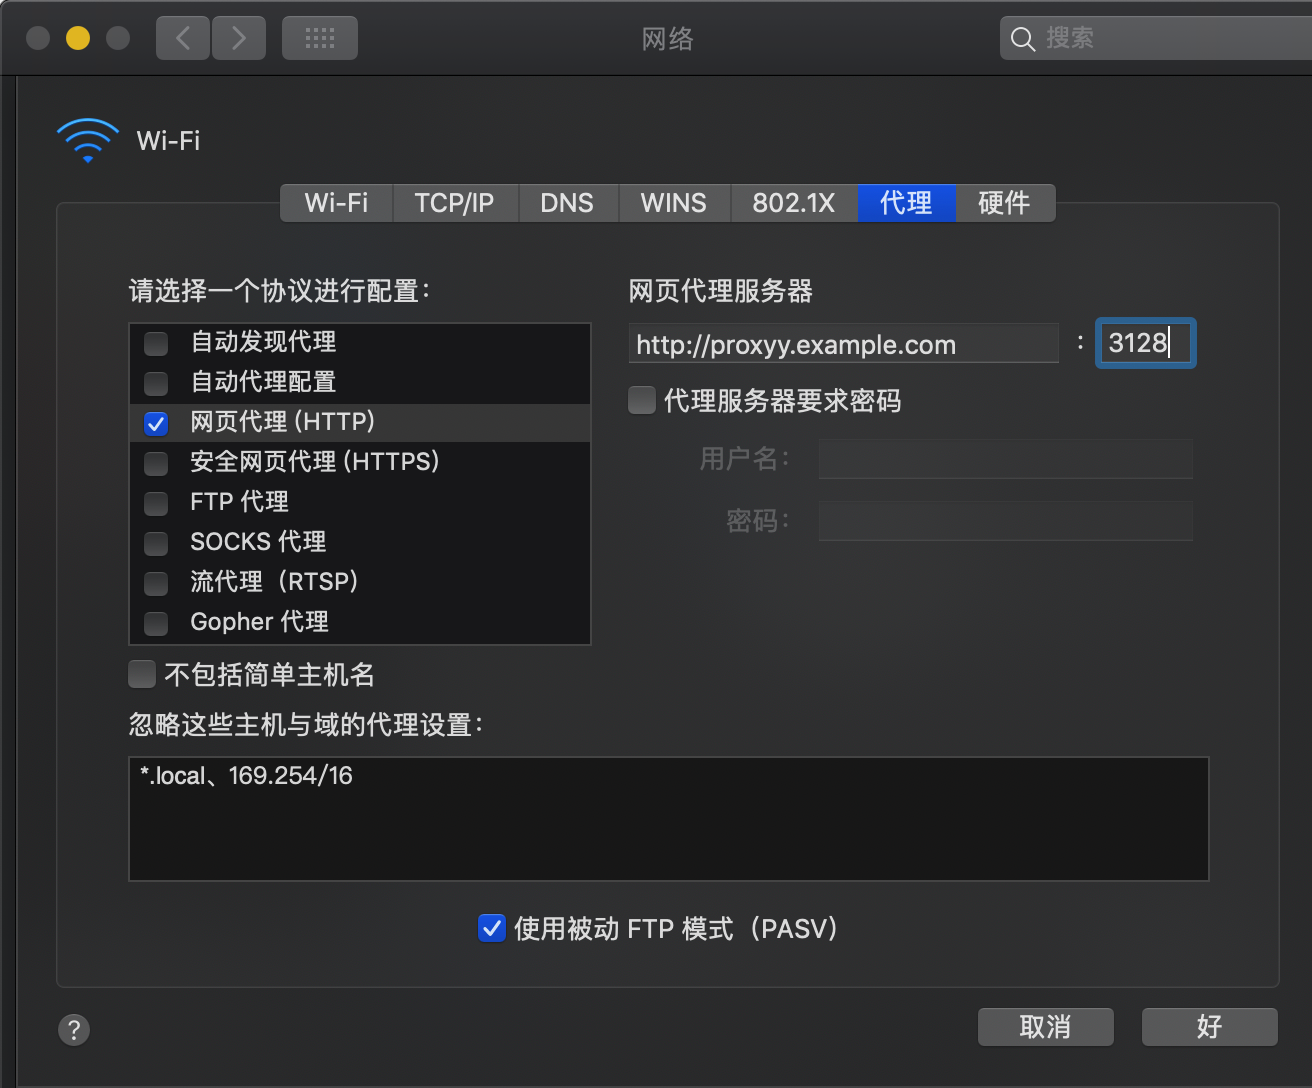
Docker for Mac detects HTTP/HTTPS Proxy Settings from macOS and automatically propagates these to Docker and to your containers. For example, if you set your proxy settings to http://proxy.example.com, Docker uses this proxy when pulling containers.
Mac的Docker检测来自macOS的HTTP/HTTPS代理设置,并自动将这些设置传播到Docker和容器。例如,如果你将代理设置设置为http://proxyy.example.com, Docker在提取容器时将使用此代理。
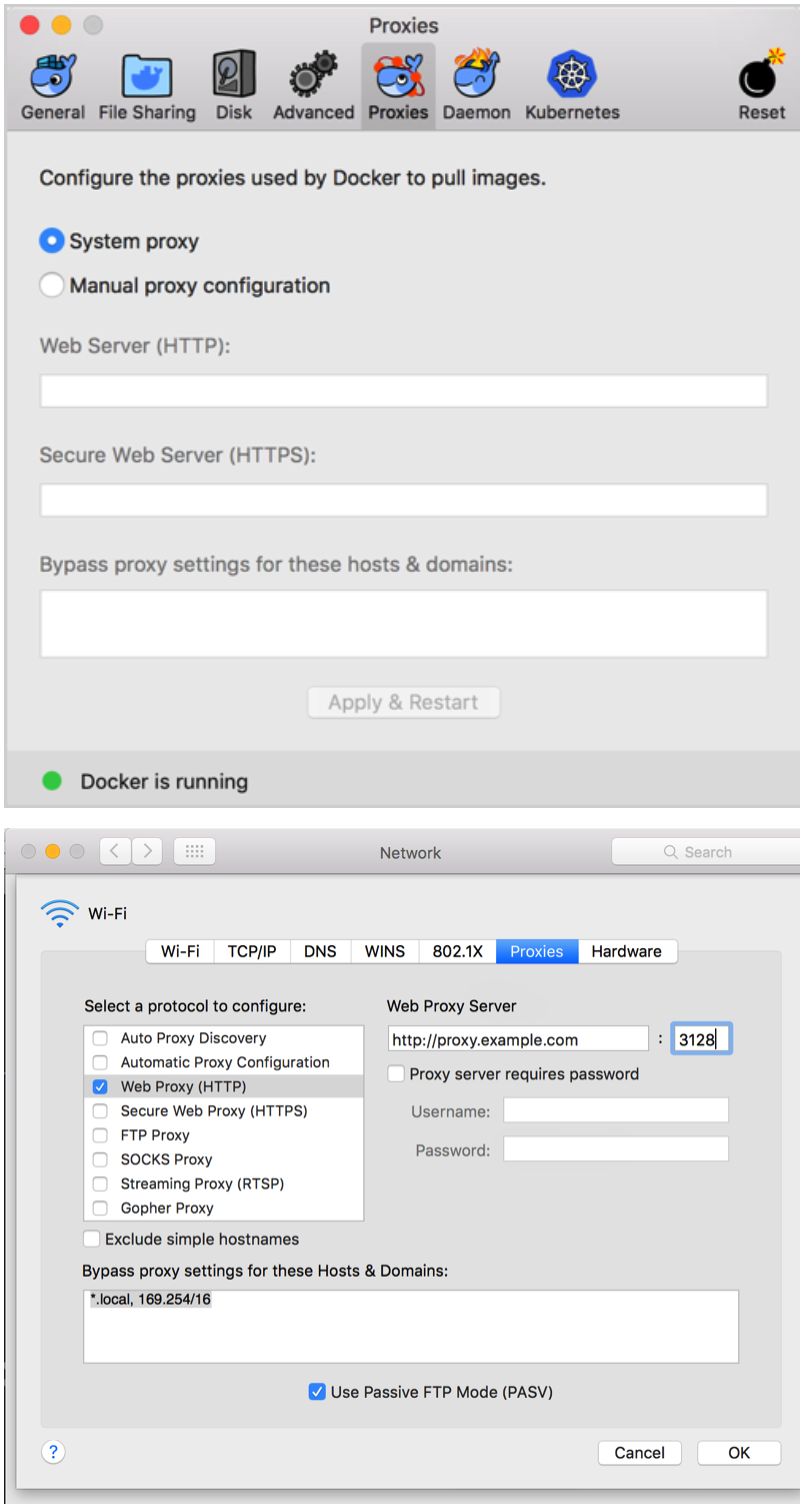
When you start a container, your proxy settings propagate into the containers. For example:
启动容器时,代理设置将传播到容器中。例如:
没有设置代理时:
userdeMBP:~ user$ docker run -it alpine env
Unable to find image 'alpine:latest' locally
latest: Pulling from library/alpine
4fe2ade4980c: Pull complete
Digest: sha256:621c2f39f8133acb8e64023a94dbdf0d5ca81896102b9e57c0dc184cadaf5528
Status: Downloaded newer image for alpine:latest
PATH=/usr/local/sbin:/usr/local/bin:/usr/sbin:/usr/bin:/sbin:/bin
HOSTNAME=b9606b2017da
TERM=xterm
HOME=/root
设置代理后:
然后点击应用,之后再运行docker run -it alpine env,应该变成:
$ docker run -it alpine env
PATH=/usr/local/sbin:/usr/local/bin:/usr/sbin:/usr/bin:/sbin:/bin
HOSTNAME=b7edf988b2b5
TERM=xterm
HOME=/root
HTTP_PROXY=http://proxy.example.com:3128
http_proxy=http://proxy.example.com:3128
no_proxy=*.local, 169.254/16
我没成功
You can see from the above output that the HTTP_PROXY, http_proxy, and no_proxy environment variables are set. When your proxy configuration changes, Docker restarts automatically to pick up the new settings. If you have containers that you wish to keep running across restarts, you should consider using restart policies.
你可以从上面的输出中看到设置了HTTP_PROXY、HTTP_PROXY和no_proxy环境变量。当你的代理配置发生更改时,Docker将自动重启以获取新的设置。 如果你希望跨重启运行容器,则应该考虑使用重启策略。
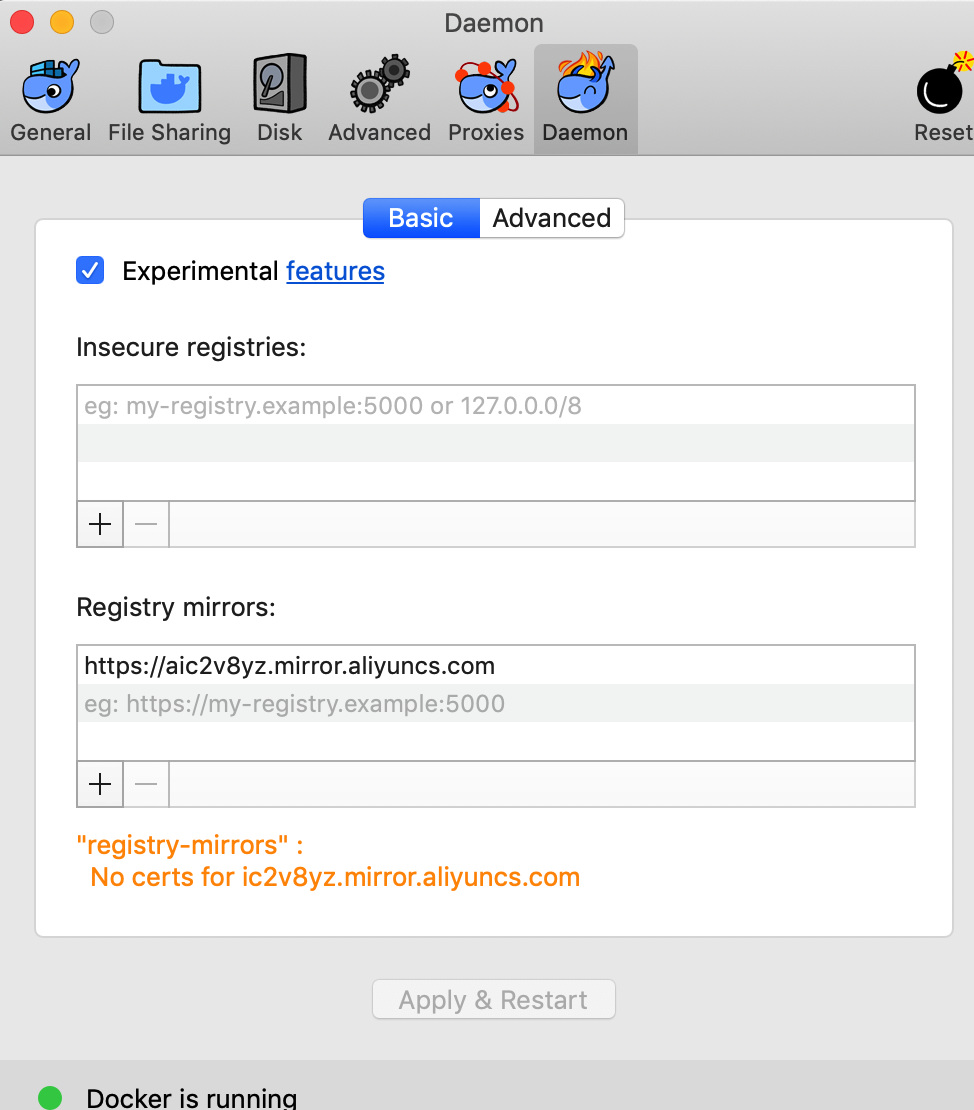
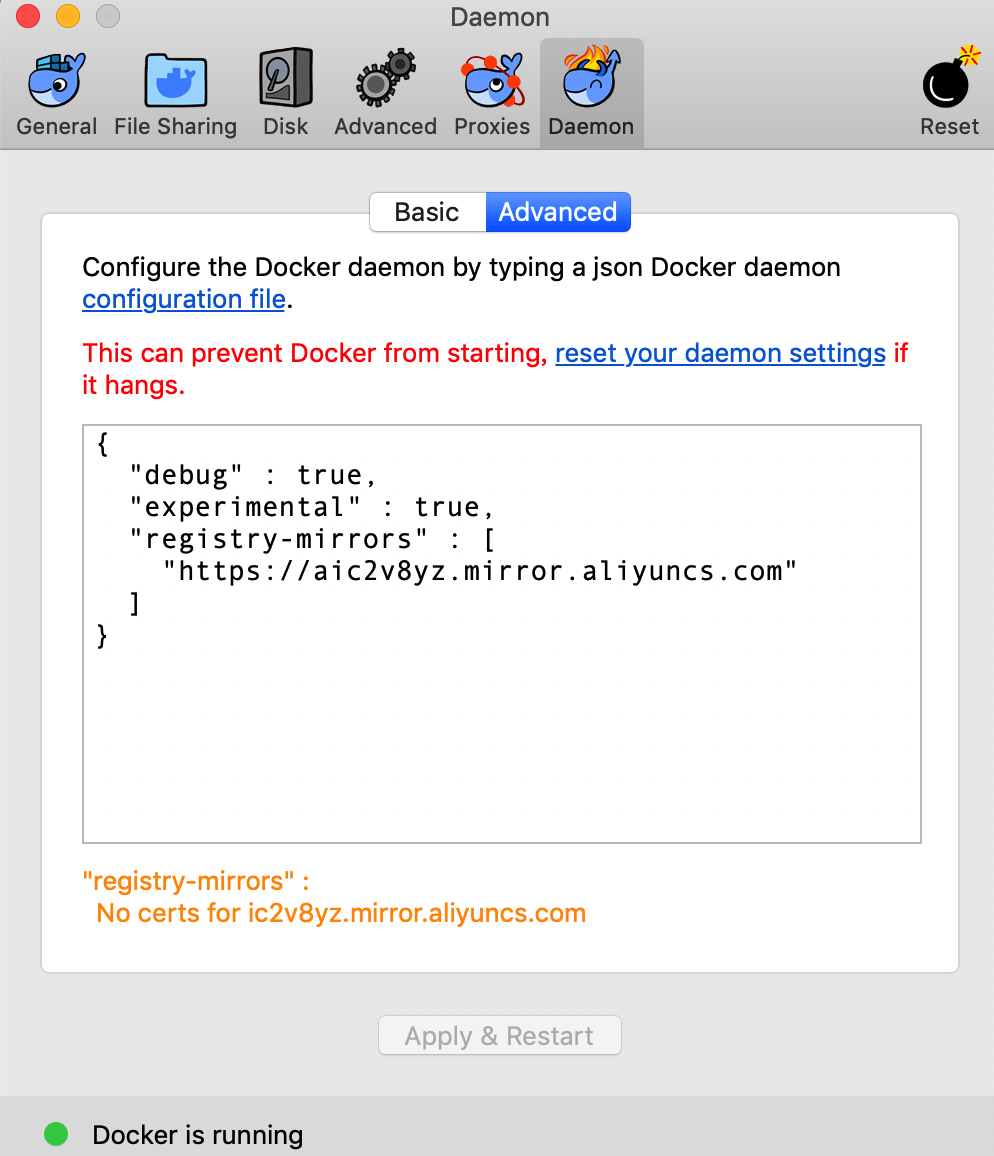
6.Daemon
You can configure options on the Docker daemon that determine how your containers run.你可以在Docker守护进程上配置决定容器如何运行的选项。
Select Basic to configure the daemon with interactive settings, or select Advanced to edit the JSON directly.选择Basic来配置具有交互设置的守护进程,或者选择Advanced来直接编辑JSON。

1)EXPERIMENTAL FEATURES 实验特性
Both Docker for Mac Stable and Edge releases have experimental features enabled on Docker Engine, as described Docker Experimental Features README. If you uncheck experimental mode, Docker for Mac uses the current generally available release of Docker Engine.
Mac稳定版和Edge版本的Docker都在Docker引擎上启用了实验特性,如描述的Docker实验特性README所述。如果你不检查实验模式,Docker for Mac将使用Docker引擎当前通常可用的版本。
⚠️Don’t enable experimental features in production不要在生产中启用实验特性
Experimental features are not appropriate for production environments or workloads. They are meant to be sandbox experiments for new ideas. Some experimental features may become incorporated into upcoming stable releases, but others may be modified or pulled from subsequent Edge releases, and never released on Stable.
实验特性不适用于生产环境或工作负载。它们是新想法的沙箱实验。一些实验性的特性可能会被合并到即将发布的稳定版本中,但是其他特性可能会被修改或从后续的边缘版本中提取,并且永远不会在稳定版本中发布。
You can see whether you are running experimental mode at the command line. If Experimental is true, then Docker is running in experimental mode, as shown here. (If false, Experimental mode is off.)你可以查看是否在命令行上运行实验模式。如果Experimental为真,那么Docker运行在Experimental mode下,如图所示。(若为假,实验模式关闭。)
userdeMacBook-Pro:~ user$ docker version -f {{.Server.Experimental}}
true
-f, --format string Format the output using the given Go template 格式字符串 使用给定的Go模板格式化输出
2)INSECURE REGISTRIES不安全登录
You can set up a custom and insecure registry to store your public or private images (instead of using Docker Hub orDocker Trusted Registry). Add URLs for your insecure registries and registry mirrors on which to host your images.你可以设置一个自定义且不安全的注册表来存储你的公共或私有映像(而不是使用Docker Hub或Docker受信任注册表)。为不安全的注册中心添加url,注册中心镜像用于承载映像。
See also:
3)DAEMON CONFIGURATION FILE守护进程配置文件
Click the Advanced tab to configure the daemon from the JSON file. For a full list of options, see the Docker Engine dockerd commandline reference.
单击Advanced选项卡从JSON文件配置守护进程。有关选项的完整列表,请参见Docker引擎dockerd命令行引用。
Click Apply & Restart to save your settings and reboot Docker. Or, to cancel changes, click another preference tab, then choose to discard or not apply changes when asked.单击Apply & Restart保存设置并重新启动Docker。或者,若要取消更改,请单击另一个首选项选项卡,然后在询问时选择放弃或不应用更改。
7.Kubernetes
额外知识,参考http://www.dockone.io/article/932:
什么是Kubernetes?
Kubernetes(k8s)是自动化容器操作的开源平台,这些操作包括部署,调度和节点集群间扩展。如果你曾经用过Docker容器技术部署容器,那么可以将Docker看成Kubernetes内部使用的低级别组件。Kubernetes不仅仅支持Docker,还支持Rocket,这是另一种容器技术。
使用Kubernetes可以:
- 自动化容器的部署和复制
- 随时扩展或收缩容器规模
- 将容器组织成组,并且提供容器间的负载均衡
- 很容易地升级应用程序容器的新版本
- 提供容器弹性,如果容器失效就替换它,等等...
实际上,使用Kubernetes只需一个部署文件,使用一条命令就可以部署多层容器(前端,后台等)的完整集群:
$ kubectl create -f single-config-file.yaml
kubectl是和Kubernetes API交互的命令行程序。
⚠️突然发现自己之前的版本太旧,没有Kubernetes项,所以进行了版本的更新,现在的版本为:
userdeMacBook-Pro:~ user$ docker --version
Docker version 18.09.0, build 4d60db4
userdeMacBook-Pro:~ user$ docker-compose --version
docker-compose version 1.23.2, build 1110ad01
userdeMacBook-Pro:~ user$ docker-machine --version
docker-machine version 0.16.0, build 702c267f
In Docker for Mac 17.12 Edge (mac45) and higher, and 18.06 Stable (mac70) and higher, a standalone Kubernetes server is included that runs on your Mac, so that you can test deploying your Docker workloads on Kubernetes.
在Mac 17.12 Edge (mac45)及以上版本、18.06 Stable (mac70)及以上版本的Docker中,包含了一个在Mac上运行的独立Kubernetes服务器,这样你就可以测试在Kubernetes上部署Docker工作负载的情况。
The Kubernetes client command, kubectl, is included and configured to connect to the local Kubernetes server. If you have kubectl already installed and pointing to some other environment, such as minikube or a GKE cluster, be sure to change context so that kubectl is pointing to docker-for-desktop:
包括Kubernetes客户机命令kubectl,并将其配置为连接到本地Kubernetes服务器。如果你已经安装了kubectl并指向其他环境,例如minikube或GKE集群,请确保更改上下文,以便kubectl指向docker-for-desktop:
userdeMacBook-Pro:~ user$ kubectl
kubectl controls the Kubernetes cluster manager.

Find more information at: https://kubernetes.io/docs/reference/kubectl/overview/

Basic Commands (Beginner):
  create         Create a res
可见已经安装了kubectl,Kubectl 是向 Kubernetes API 服务器发送请求的客户端。
If you installed kubectl with Homebrew, or by some other method, and experience conflicts, remove /usr/local/bin/kubectl.121/5000
如果你使用Homebrew安装了kubectl,或者使用其他方法安装了kubectl,但是遇到了冲突,请删除/usr/local/bin/kubectl
-
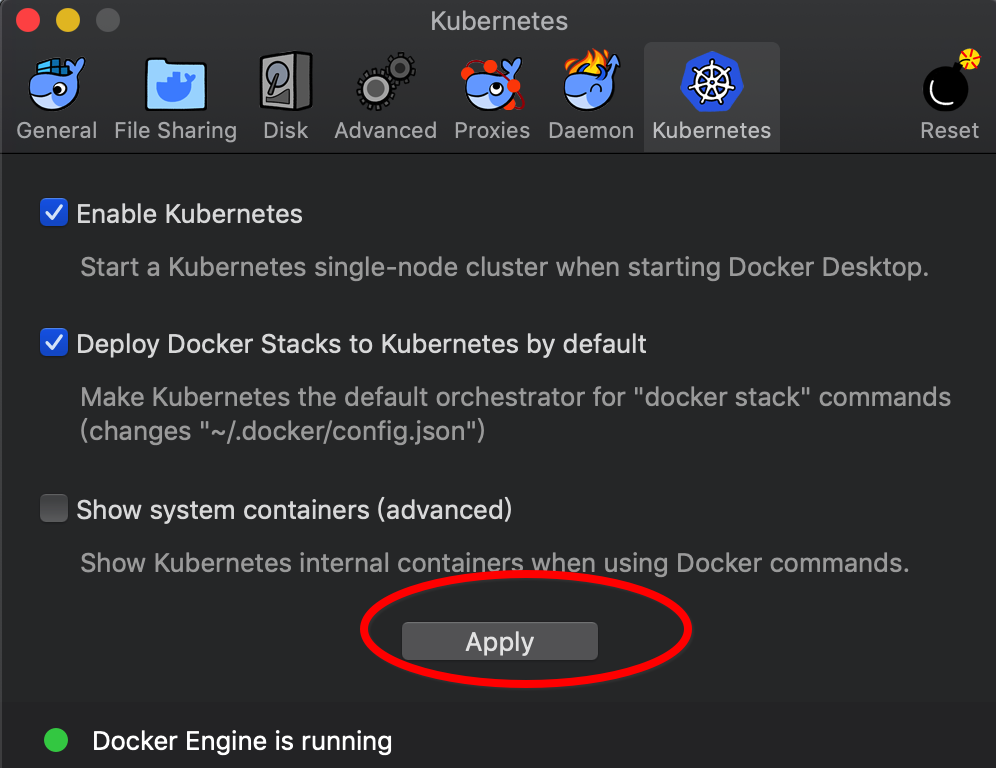
To enable Kubernetes support and install a standalone instance of Kubernetes running as a Docker container, select Enable Kubernetes, choose the default orchestrator and click the Apply button.要启用Kubernetes支持并安装作为Docker容器运行的独立Kubernetes实例,请选择enable Kubernetes,选择默认的协调器并单击Apply按钮。
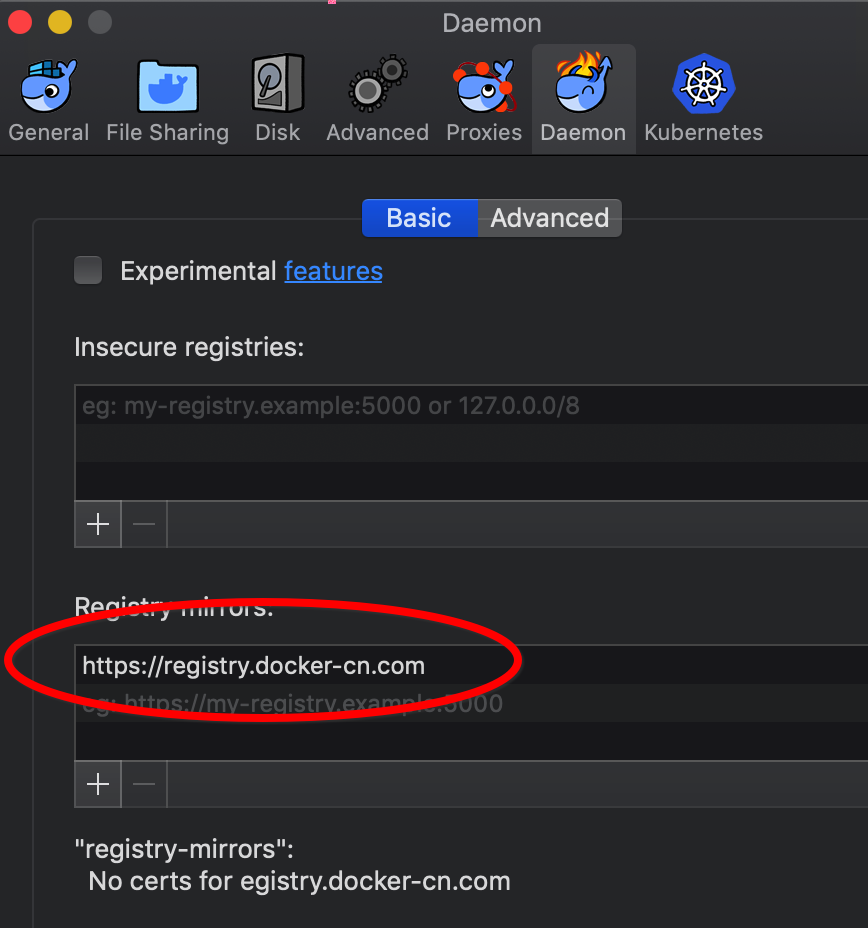
kubernetes安装特别慢,因为要爬过一道道墙,加速方法就是使用国内镜像地址:https://registry.docker-cn.com
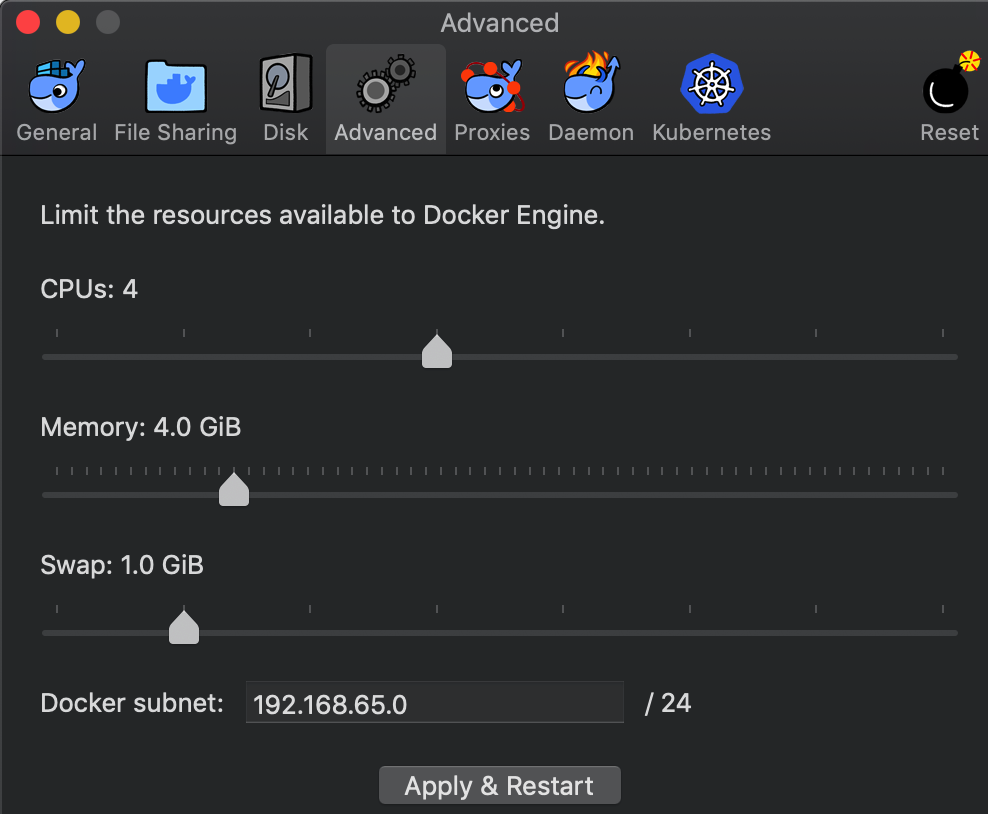
并且调整内存,最少分配4G:
然后从阿里云Docker镜像服务下载 Kubernetes 所需要的镜像:
git clone https://github.com/maguowei/k8s-docker-for-mac.git
运行脚本将镜像加载到本地:
cd k8s-docker-for-mac/
./load_images.sh
返回结果为:


wanghuideMBP:k8s-docker-for-mac wanghui$ ./load_images.sh
images found.
v1.10.3: Pulling from google_containers/kube-proxy-amd64
Digest: sha256:27648ef94bebda5414d2bcb3fb77261420f8a4dcc0a9a0b9c83a96fae6e6d367
Status: Downloaded newer image for registry.cn-hangzhou.aliyuncs.com/google_containers/kube-proxy-amd64:v1.10.3
Untagged: registry.cn-hangzhou.aliyuncs.com/google_containers/kube-proxy-amd64:v1.10.3
Untagged: registry.cn-hangzhou.aliyuncs.com/google_containers/kube-proxy-amd64@sha256:27648ef94bebda5414d2bcb3fb77261420f8a4dcc0a9a0b9c83a96fae6e6d367
v1.10.3: Pulling from google_containers/kube-controller-manager-amd64
Digest: sha256:7dd9bda76d35971701a879132247fd25b91fbb9df42eb9c69ff9509e9ea6b0c0
Status: Downloaded newer image for registry.cn-hangzhou.aliyuncs.com/google_containers/kube-controller-manager-amd64:v1.10.3
Untagged: registry.cn-hangzhou.aliyuncs.com/google_containers/kube-controller-manager-amd64:v1.10.3
Untagged: registry.cn-hangzhou.aliyuncs.com/google_containers/kube-controller-manager-amd64@sha256:7dd9bda76d35971701a879132247fd25b91fbb9df42eb9c69ff9509e9ea6b0c0
v1.10.3: Pulling from google_containers/kube-scheduler-amd64
Digest: sha256:9169d3ec1d8afad74bd9b75e6165094191fef52b47767e7879da5044972464d8
Status: Downloaded newer image for registry.cn-hangzhou.aliyuncs.com/google_containers/kube-scheduler-amd64:v1.10.3
Untagged: registry.cn-hangzhou.aliyuncs.com/google_containers/kube-scheduler-amd64:v1.10.3
Untagged: registry.cn-hangzhou.aliyuncs.com/google_containers/kube-scheduler-amd64@sha256:9169d3ec1d8afad74bd9b75e6165094191fef52b47767e7879da5044972464d8
v1.10.3: Pulling from google_containers/kube-apiserver-amd64
032c9e83eacf: Already exists
6957897068dc: Pull complete
Digest: sha256:93d43868b5fdae9d5f6839b483562e8d4522293685636b309a25c0fbfad7e8cd
Status: Downloaded newer image for registry.cn-hangzhou.aliyuncs.com/google_containers/kube-apiserver-amd64:v1.10.3
Untagged: registry.cn-hangzhou.aliyuncs.com/google_containers/kube-apiserver-amd64:v1.10.3
Untagged: registry.cn-hangzhou.aliyuncs.com/google_containers/kube-apiserver-amd64@sha256:93d43868b5fdae9d5f6839b483562e8d4522293685636b309a25c0fbfad7e8cd
1.14.8: Pulling from google_containers/k8s-dns-dnsmasq-nanny-amd64
935c89b81420: Pull complete
a7b547e960f0: Pull complete
643ab861079c: Pull complete
954e9ec699a2: Pull complete
0acbc5bb3ce1: Pull complete
Digest: sha256:195d7a05078d84c9b796d0db268e8ef45401ac0ed8aa7c275dd0613d301d5ac0
Status: Downloaded newer image for registry.cn-hangzhou.aliyuncs.com/google_containers/k8s-dns-dnsmasq-nanny-amd64:1.14.8
Untagged: registry.cn-hangzhou.aliyuncs.com/google_containers/k8s-dns-dnsmasq-nanny-amd64:1.14.8
Untagged: registry.cn-hangzhou.aliyuncs.com/google_containers/k8s-dns-dnsmasq-nanny-amd64@sha256:195d7a05078d84c9b796d0db268e8ef45401ac0ed8aa7c275dd0613d301d5ac0
1.14.8: Pulling from google_containers/k8s-dns-sidecar-amd64
fcff032aa481: Pull complete
32f866d07026: Pull complete
Digest: sha256:8b88b6489862d7fce6ec004b865ec4019e94e688ed7b4be50d7f2191587a4547
Status: Downloaded newer image for registry.cn-hangzhou.aliyuncs.com/google_containers/k8s-dns-sidecar-amd64:1.14.8
Untagged: registry.cn-hangzhou.aliyuncs.com/google_containers/k8s-dns-sidecar-amd64:1.14.8
Untagged: registry.cn-hangzhou.aliyuncs.com/google_containers/k8s-dns-sidecar-amd64@sha256:8b88b6489862d7fce6ec004b865ec4019e94e688ed7b4be50d7f2191587a4547
1.14.8: Pulling from google_containers/k8s-dns-kube-dns-amd64
fcff032aa481: Already exists
52289fe1eac2: Pull complete
Digest: sha256:30a881d597e3f234e5f4264b7bf45ca3c7eb120a789c911f2c5ad9f86263322c
Status: Downloaded newer image for registry.cn-hangzhou.aliyuncs.com/google_containers/k8s-dns-kube-dns-amd64:1.14.8
Untagged: registry.cn-hangzhou.aliyuncs.com/google_containers/k8s-dns-kube-dns-amd64:1.14.8
Untagged: registry.cn-hangzhou.aliyuncs.com/google_containers/k8s-dns-kube-dns-amd64@sha256:30a881d597e3f234e5f4264b7bf45ca3c7eb120a789c911f2c5ad9f86263322c
3.1: Pulling from google_containers/pause-amd64
Digest: sha256:759c3f0f6493093a9043cc813092290af69029699ade0e3dbe024e968fcb7cca
Status: Downloaded newer image for registry.cn-hangzhou.aliyuncs.com/google_containers/pause-amd64:3.1
Untagged: registry.cn-hangzhou.aliyuncs.com/google_containers/pause-amd64:3.1
Untagged: registry.cn-hangzhou.aliyuncs.com/google_containers/pause-amd64@sha256:759c3f0f6493093a9043cc813092290af69029699ade0e3dbe024e968fcb7cca
v1.10.1: Pulling from google_containers/kubernetes-dashboard-amd64
9518d8afb433: Pull complete
Digest: sha256:0ae6b69432e78069c5ce2bcde0fe409c5c4d6f0f4d9cd50a17974fea38898747
Status: Downloaded newer image for registry.cn-hangzhou.aliyuncs.com/google_containers/kubernetes-dashboard-amd64:v1.10.1
Untagged: registry.cn-hangzhou.aliyuncs.com/google_containers/kubernetes-dashboard-amd64:v1.10.1
Untagged: registry.cn-hangzhou.aliyuncs.com/google_containers/kubernetes-dashboard-amd64@sha256:0ae6b69432e78069c5ce2bcde0fe409c5c4d6f0f4d9cd50a17974fea38898747
3.1.12: Pulling from google_containers/etcd-amd64
17ab9c1ae71e: Pull complete
234f38785762: Pull complete
a12f76be3e63: Pull complete
Digest: sha256:a873afd0244c0029295899e3ab7ab7f474d097c42679a6d80c37f4017bc65598
Status: Downloaded newer image for registry.cn-hangzhou.aliyuncs.com/google_containers/etcd-amd64:3.1.12
Untagged: registry.cn-hangzhou.aliyuncs.com/google_containers/etcd-amd64:3.1.12
Untagged: registry.cn-hangzhou.aliyuncs.com/google_containers/etcd-amd64@sha256:a873afd0244c0029295899e3ab7ab7f474d097c42679a6d80c37f4017bc65598
可见安装了很多镜像,难怪一直下载不下来
userdeMBP:k8s-docker-for-mac user$ docker images
REPOSITORY                                 TAG                 IMAGE ID            CREATED             SIZE
k8s.gcr.io/kubernetes-dashboard-amd64      v1.10.1             f9aed6605b81        2 weeks ago         122MB
k8s.gcr.io/kube-proxy-amd64                v1.10.3             4261d315109d        7 months ago        97.1MB
k8s.gcr.io/kube-scheduler-amd64            v1.10.3             353b8f1d102e        7 months ago        50.4MB
k8s.gcr.io/kube-controller-manager-amd64   v1.10.3             40c8d10b2d11        7 months ago        148MB
k8s.gcr.io/kube-apiserver-amd64            v1.10.3             e03746fe22c3        7 months ago        225MB
k8s.gcr.io/etcd-amd64                      3.1.12              52920ad46f5b        10 months ago       193MB
k8s.gcr.io/k8s-dns-dnsmasq-nanny-amd64     1.14.8              c2ce1ffb51ed        12 months ago       41MB
k8s.gcr.io/k8s-dns-sidecar-amd64           1.14.8              6f7f2dc7fab5        12 months ago       42.2MB
k8s.gcr.io/k8s-dns-kube-dns-amd64          1.14.8              80cc5ea4b547        12 months ago       50.5MB
k8s.gcr.io/pause-amd64                     3.1                 da86e6ba6ca1        12 months ago       742kB
然后就能够开始安装它了
让其在后台运行(或者忽略),然后等待一小会就成功了
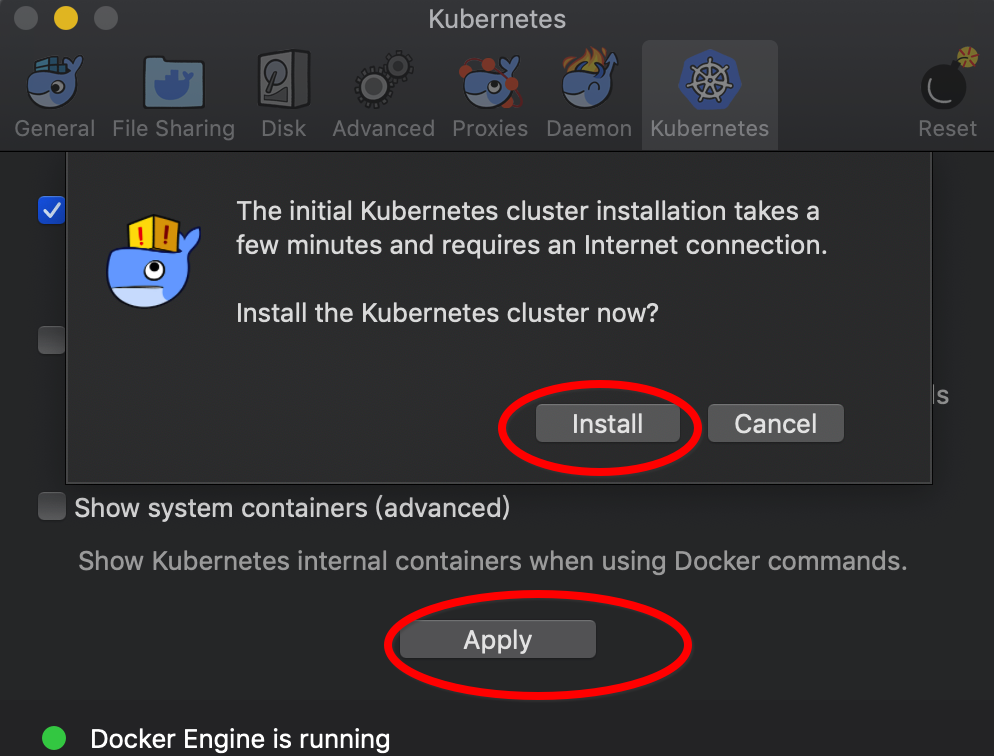
An Internet connection is required. Images required to run the Kubernetes server are downloaded and instantiated as containers, and the/usr/local/bin/kubectl command is installed on your Mac.需要网络连接。运行Kubernetes服务器所需的镜像被下载并实例化为容器,并且在Mac上安装了/usr/local/bin/kubectl命令。
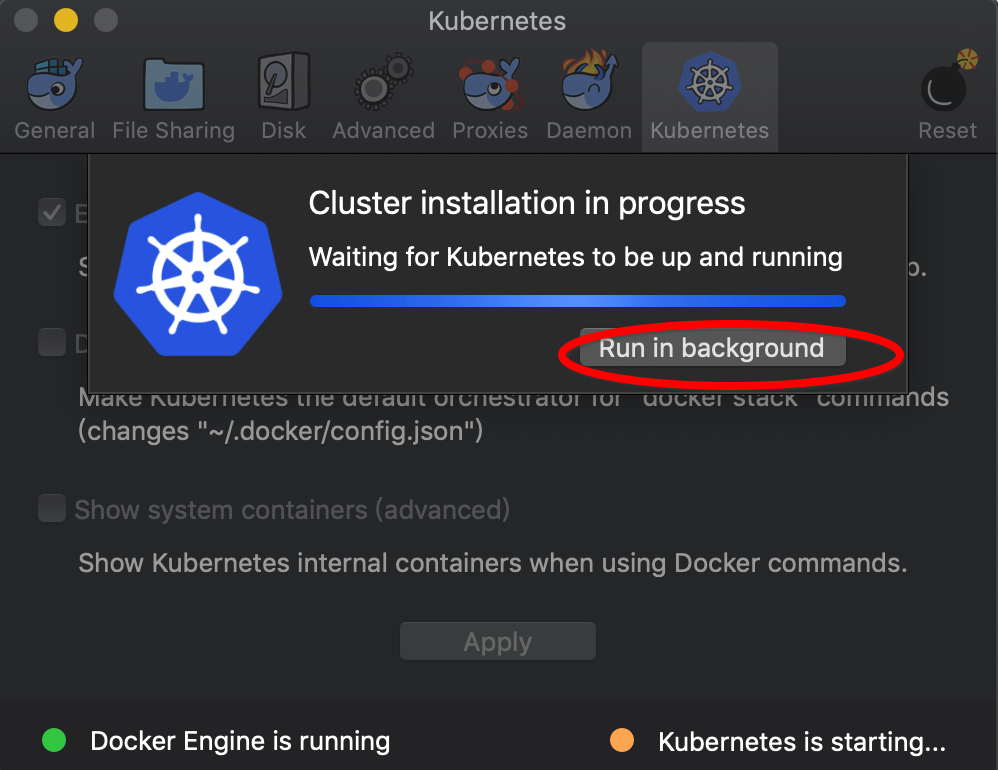
When Kubernetes is enabled and running, an additional status bar item displays at the bottom right of the Docker for Mac Preferences dialog.
当Kubernetes启用并运行时,在Mac Preferences对话框的Docker的右下角会显示一个额外的状态栏项。

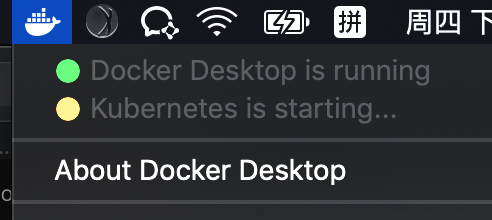
The status of Kubernetes shows in the Docker menu and the context points to docker-for-desktop.
Kubernetes的状态显示在Docker菜单中,上下文指向docker-for-desktop。

-
By default, Kubernetes containers are hidden from commands like
docker service ls, because managing them manually is not supported. To make them visible, select Show system containers (advanced) and click Apply and restart. Most users do not need this option.默认情况下,Kubernetes容器对docker service ls之类的命令是隐藏的,因为不支持手动管理它们。要使它们可见,选择Show system containers (advanced)并单击Apply和restart。大多数用户不需要这个选项。 -
To disable Kubernetes support at any time, deselect Enable Kubernetes. The Kubernetes containers are stopped and removed, and the
/usr/local/bin/kubectlcommand is removed.若要在任何时候禁用Kubernetes支持,请取消选择启用Kubernetes。停止和删除Kubernetes容器,并删除/usr/local/bin/kubectl命令。For more about using the Kubernetes integration with Docker for Mac, see Deploy on Kubernetes.
这时候查看是否安装成功:
userdeMBP:k8s-docker-for-mac user$ kubectl
kubectl controls the Kubernetes cluster manager.

Find more information at: https://kubernetes.io/docs/reference/kubectl/overview/

Basic Commands (Beginner):
  create         Create a resource from a file or from stdin.
  expose         使用 replication controller, service, deployment 或者 pod 并暴露它作为一个 新的
Kubernetes Service
  run            在集群中运行一个指定的镜像
  set            为 objects 设置一个指定的特征
  run-container  在集群中运行一个指定的镜像. This command is deprecated, use "run" instead
8.Reset
Select -> Preferences from the menu bar, then click Reset to reset factory defaults, restart the Docker daemon, or uninstall.
从菜单栏中选择 -> Preferences,然后点击Reset去重置工厂默认值、重启Docker守护进程或卸载。
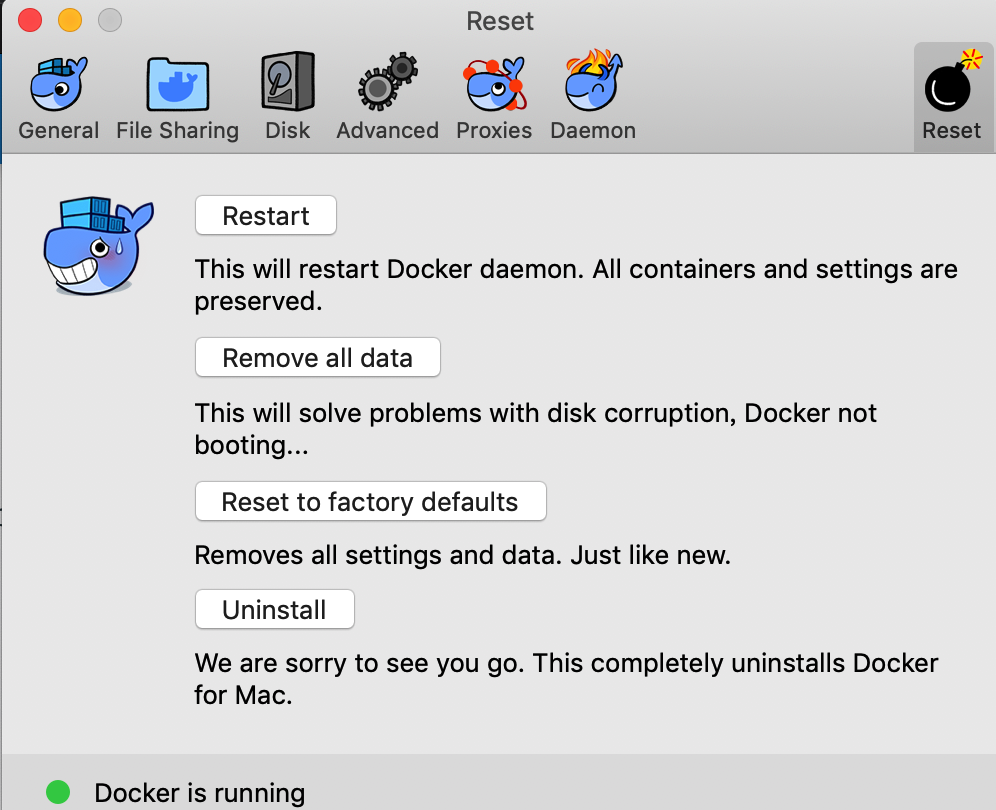
Reset settings are:
-
Restart - Select to restart the Docker daemon.重启Docker守护进程
-
Remove all data - This option removes/resets all Docker data without a reset to factory defaults (which would cause you to lose settings).此选项删除/重置所有Docker数据而不重置为出厂默认值(这会导致你丢失设置)。
-
Reset to factory defaults - Choose this option to reset all options on Docker for Mac to its initial state, the same as when it was first installed.选择此选项可将Mac Docker上的所有选项重置为其初始状态,与首次安装时相同。
- Uninstall - Choose this option to remove Docker for Mac from your system.选择此选项可从系统中删除Mac的Docker。
⚠️Uninstall Docker for Mac from the commandline 从命令行卸载mac上的Docker
To uninstall Docker from Mac from a terminal, run: <DockerforMacPath> --uninstall. If your instance is installed in the default location, this command provides a clean uninstall:
从终端卸载Mac的Docker,运行<DockerforMacPath> --uninstall。如果你的实例安装在默认位置,这个命令提供了一个干净的卸载:
$ /Applications/Docker.app/Contents/MacOS/Docker --uninstall
Docker is running, exiting...
Docker uninstalled successfully. You can move the Docker application to the trash.
You might want to use the command-line uninstall if, for example, you find that the app is non-functional, and you cannot uninstall it from the menu.
例如,如果你发现应用程序是非功能性的,并且无法从菜单中卸载,你可能希望使用命令行卸载。
9.Add TLS certificates添加TLS证书
You can add trusted Certificate Authorities (CAs) (used to verify registry server certificates) and client certificates (used to authenticate to registries) to your Docker daemon.你可以向Docker守护进程添加受信任证书颁发机构(CAs)(用于验证注册中心服务器证书)和客户端证书(用于对注册中心进行身份验证)。
1)Add custom CA certificates (server side)添加自定义CA证书(服务器端)
All trusted CAs (root or intermediate) are supported. Docker for Mac creates a certificate bundle of all user-trusted CAs based on the Mac Keychain, and appends it to Moby trusted certificates. So if an enterprise SSL certificate is trusted by the user on the host, it is trusted by Docker for Mac.
支持所有受信任CAs(根或中间)。Docker for Mac基于Mac密钥链创建一个包含所有用户信任CAs的证书包,并将其追加到Moby信任证书。因此,如果主机上的用户信任某企业的SSL证书,那么Docker就会信任它。
To manually add a custom, self-signed certificate, start by adding the certificate to the macOS keychain, which is picked up by Docker for Mac. Here is an example.
要手动添加自定义自签名证书,首先要将证书ca.crt添加到macOS密钥链,Docker为Mac选择了这个密钥链。举例说明:
userdeMBP:~ user$ sudo security add-trusted-cert -d -r trustRoot -k /Library/Keychains/System.keychain ca.crt
Password:
***Error reading file ca.crt
Error reading file ca.crt
因为我没有这个证书ca.crt,所以报错
Or, if you prefer to add the certificate to your own local keychain only (rather than for all users), run this command instead:
或者,如果你希望只将证书添加到你自己的本地密钥链(而不是针对所有用户),则运行以下命令:
$ security add-trusted-cert -d -r trustRoot -k ~/Library/Keychains/login.keychain ca.crt
See also, Directory structures for certificates.
⚠️Note: You need to restart Docker for Mac after making any changes to the keychain or to the ~/.docker/certs.d directory in order for the changes to take effect.
注意:在对密钥链或~/.docker/certs.d目录做任何更改之后,需要重新启动Mac的Docker,以便更改生效。
For a complete explanation of how to do this, see the blog post Adding Self-signed Registry Certs to Docker & Docker for Mac.
有关如何做到这一点的完整解释,请参阅Adding Self-signed Registry Certs to Docker & Docker for Mac博客文章。
2)Add client certificates
You can put your client certificates in~/.docker/certs.d/<MyRegistry>:<Port>/client.cert and ~/.docker/certs.d/<MyRegistry>:<Port>/client.key.
你可以把你的客户端证书放在~/.docker/certs.d/<MyRegistry>:<Port>/client.cert和~/.docker/certs.d/<MyRegistry>:<Port>/client.key
When the Docker for Mac application starts up, it copies the ~/.docker/certs.d folder on your Mac to the /etc/docker/certs.d directory on Moby (the Docker for Mac xhyve virtual machine).
当Mac应用程序的Docker开启了,它将复制你的Mac的~/.docker/certs.d文件夹到Moby(MacDocker的上xhyve虚拟机)的/etc/docker/certs.d目录中。
⚠️
-
You need to restart Docker for Mac after making any changes to the keychain or to the
~/.docker/certs.ddirectory in order for the changes to take effect.在对密钥链或~/.docker/certs.d目录做任何更改之后,需要重新启动Mac的Docker,以便更改生效。 -
The registry cannot be listed as an insecure registry (see Docker Daemon). Docker for Mac ignores certificates listed under insecure registries, and does not send client certificates. Commands like
docker runthat attempt to pull from the registry produce error messages on the command line, as well as on the registry.不能将注册表列为不安全注册表(请参阅Docker守护进程)。Mac的Docker忽略不安全注册中心下列出的证书,并且不发送客户端证书。docker run之类的命令试图从注册表中提取数据,在命令行和注册表上生成错误消息。
3)Directory structures for certificates证书的目录结构
If you have this directory structure, you do not need to manually add the CA certificate to your Mac OS system login:
如果你有这个目录结构,你不需要手动添加CA证书到你的Mac OS系统登录(我也有,但是certs.d目录中什么都没有):
/Users/<user>/.docker/certs.d/
└── <MyRegistry>:<Port>
   ├── ca.crt
   ├── client.cert
   └── client.key
The following further illustrates and explains a configuration with custom certificates:
下面将进一步说明和解释带有自定义证书的配置:
/etc/docker/certs.d/        <-- Certificate directory 证书目录
└── localhost:5000          <-- Hostname:port 主机名:端口
   ├── client.cert          <-- Client certificate 客户端证书
   ├── client.key           <-- Client key 客户端密钥
   └── ca.crt               <-- Certificate authority that signed the registry certificate在注册表上签名的证书颁发机构
You can also have this directory structure, as long as the CA certificate is also in your keychain.
只要CA证书也在密钥链中,就可以使用这个目录结构。
/Users/<user>/.docker/certs.d/
└── <MyRegistry>:<Port>
    ├── client.cert
    └── client.key
To learn more about how to install a CA root certificate for the registry and how to set the client TLS certificate for verification, see Verify repository client with certificates in the Docker Engine topics.
有关如何为注册中心安装CA根证书以及如何设置用于验证的客户端TLS证书的更多信息,请参见Docker引擎主题中的Verify repository client with certificates。
10.Install shell completion安装shell completion
Docker for Mac comes with scripts to enable completion for the docker, docker-machine, and docker-compose commands. The completion scripts may be found inside Docker.app, in the Contents/Resources/etc/ directory and can be installed both in Bash and Zsh.
Mac的Docker附带了一些脚本,用于支持docker、docker-machine和docker-compose命令的完成。completion脚本可以在Docker.app中找到,在Contents/Resources/etc/目录,可以安装在Bash和Zsh
1)Bash
Bash has built-in support for completion To activate completion for Docker commands, these files need to be copied or symlinked to your bash_completion.d/directory. For example, if you installed bash via Homebrew:
Bash内置了对completion的支持,可以激活Docker命令的完成,需要复制这些文件或将这些文件链接到bash_completion.d/目录。例如,如果你通过Homebrew安装bash:
etc=/Applications/Docker.app/Contents/Resources/etc
ln -s $etc/docker.bash-completion $(brew --prefix)/etc/bash_completion.d/docker
ln -s $etc/docker-machine.bash-completion $(brew --prefix)/etc/bash_completion.d/docker-machine
ln -s $etc/docker-compose.bash-completion $(brew --prefix)/etc/bash_completion.d/docker-compose
用于自动补全命令
2)Zsh
In Zsh, the completion system takes care of things. To activate completion for Docker commands, these files need to be copied or symlinked to your Zsh site-functions/directory. For example, if you installed Zsh via Homebrew:
在Zsh中,completion系统负责处理事情。要激活Docker命令的完成,需要将这些文件复制或符号链接到Zsh的site-functions/目录。例如,如果你通过Homebrew安装Zsh:
etc=/Applications/Docker.app/Contents/Resources/etc
ln -s $etc/docker.zsh-completion /usr/local/share/zsh/site-functions/_docker
ln -s $etc/docker-machine.zsh-completion /usr/local/share/zsh/site-functions/_docker-machine
ln -s $etc/docker-compose.zsh-completion /usr/local/share/zsh/site-functions/_docker-compose
11.Give feedback and get help给予反馈并获得帮助
To get help from the community, review current user topics, join or start a discussion, log on to our Docker for Mac forum.要获得社区的帮助,查看当前的用户主题,加入或开始讨论,登录到我们的Docker for Mac论坛。
To report bugs or problems, log on to Docker for Mac issues on GitHub, where you can review community reported issues, and file new ones. See Logs and Troubleshooting for more details.要报告bug或问题,请登录Docker查看GitHub上的Mac问题,在那里你可以查看社区报告的问题,并提交新的问题。有关详细信息,请参见日志和故障排除。
To give us feedback on the documentation or update it yourself, use the Feedback options at the bottom of each docs page.要对文档进行反馈或自己进行更新,请使用文档页面底部的反馈选项。
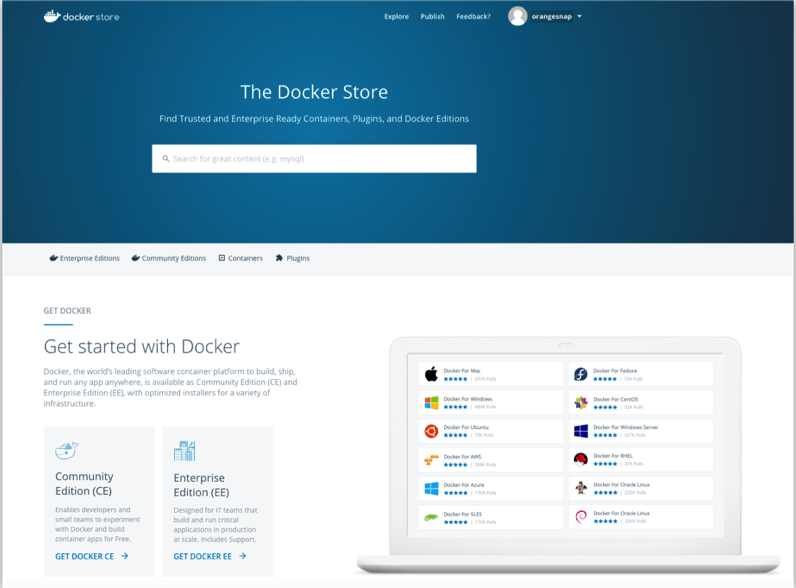
12.Docker Store Docker存储
Choose Docker Store from the Docker for Mac menu to get to the Docker app downloads site. Docker store is a component of the next-generation Docker Hub, and the best place to find compliant, trusted commercial and free software distributed as Docker Images.
从 Mac的Docker菜单中选择Docker Store进入Docker app下载站点。Docker store是下一代Docker Hub的一个组件,是找到兼容、可信的商业和免费软件的最佳场所,这些软件以Docker镜像的形式发布。
13.Docker Cloud Docker云
You can access your Docker Cloud account from within Docker for Mac.
你可以从Mac中的Docker去访问你的Docker云帐户。
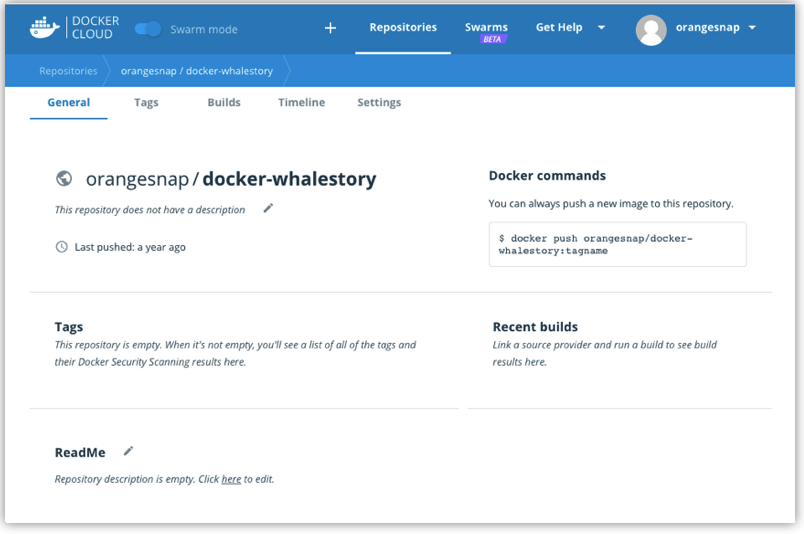
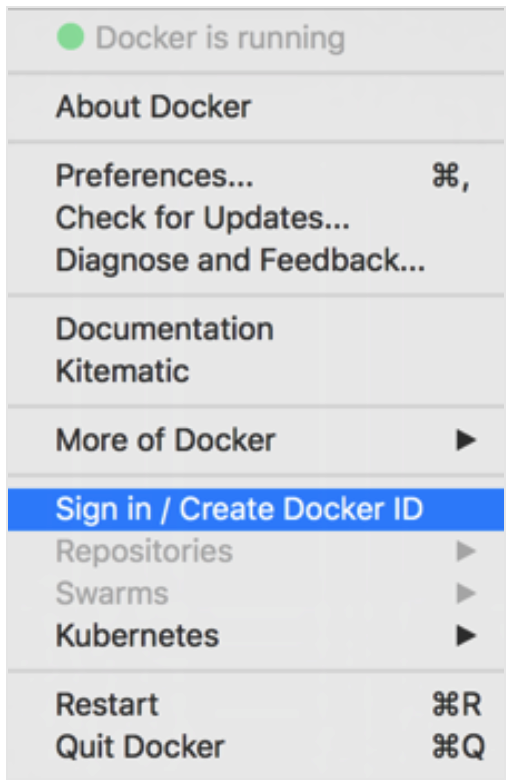
From the Docker for Mac menu, sign in to Docker Cloud with your Docker ID, or create one.
从Docker for Mac菜单,用Docker ID登录到Docker Cloud,或者创建一个。
登录后为:

Then use the Docker for Mac menu to create, view, or navigate directly to your Cloud resources, including organizations, repositories, and swarms.
然后使用Mac中的Docker菜单创建、查看或直接导航到云资源,包括组织、存储库和集群。
Check out these Docker Cloud topics to learn more:更多学习请看
Need a direct link to Cloud? Take me to Docker Cloud.
14.Where to go next接下来
-
Try out the walkthrough at Get Started.
-
Dig in deeper with Docker Labs example walkthroughs and source code.
-
For a summary of Docker command line interface (CLI) commands, see Docker CLI Reference Guide.
-
Check out the blog post, What’s New in Docker 17.06 Community Edition (CE).