作者:张华 发表于:2016-04-07
版权声明:可以任意转载,转载时请务必以超链接形式标明文章原始出处和作者信息及本版权声明
( http://blog.csdn.net/quqi99 )
硬件要求
网卡得支持DPDK,见:http://dpdk.org/doc/nics
CPU得支持DPDK, 测试命令:cat /proc/cpuinfo |grep pdpe1gb
不一定非要支持DPDK硬件的网卡才能做实验,因为DPDK也支持virtio dpdk driver.
打开大页支持
hua@node1:~$ cat /etc/default/grub |grep GRUB_CMDLINE_LINUX
GRUB_CMDLINE_LINUX_DEFAULT="quiet splash intel_iommu=on pci=assign-busses"
GRUB_CMDLINE_LINUX="transparent_hugepage=never hugepagesz=2M hugepages=64 default_hugepagesz=2M"
vi /etc/fstab
nodev /mnt/huge hugetlbfs pagesize=2MB 0 0
sudo update-grub
sudo mkdir -p /mnt/huge
sudo reboot
hua@node1:~$ cat /proc/meminfo |grep HugePages_
HugePages_Total: 64
HugePages_Free: 64
HugePages_Rsvd: 0
HugePages_Surp: 0
hua@node1:~$ grep Hugepagesize /proc/meminfo
Hugepagesize: 2048 kB
配置网卡使用uio_pci_generic驱动, #注意:实验发现,对于sr-iov网卡,此处必须是PF,PF试验成功,VF试验不成功。所以虚机可以使用PF去做DPDK port,也可以直接直通方式使用VF。
hua@node1:~$ sudo modprobe uio_pci_generic
hua@node1:~$ sudo dpdk_nic_bind --status
Network devices using DPDK-compatible driver
============================================
<none>
Network devices using kernel driver
===================================
0000:00:19.0 'Ethernet Connection I217-V' if=eth0 drv=e1000e unused=uio_pci_generic *Active*
0000:05:00.0 '82576 Gigabit Network Connection' if=eth1 drv=igb unused=uio_pci_generic *Active*
0000:05:00.1 '82576 Gigabit Network Connection' if=eth2 drv=igb unused=uio_pci_generic *Active*
Other network devices
=====================
0000:06:10.0 '82576 Virtual Function' unused=uio_pci_generic
0000:06:10.1 '82576 Virtual Function' unused=uio_pci_generic
0000:06:10.2 '82576 Virtual Function' unused=uio_pci_generic
0000:06:10.3 '82576 Virtual Function' unused=uio_pci_generic
hua@node1:~$ sudo dpdk_nic_bind -b uio_pci_generic 0000:05:00.0
Routing table indicates that interface 0000:05:00.0 is active. Not modifying
hua@node1:~$ sudo ifconfig eth1 down
hua@node1:~$ sudo dpdk_nic_bind -b uio_pci_generic 0000:05:00.0
hua@node1:~$ sudo dpdk_nic_bind --status
Network devices using DPDK-compatible driver
============================================
0000:05:00.0 '82576 Gigabit Network Connection' drv=uio_pci_generic unused=
Network devices using kernel driver
===================================
0000:00:19.0 'Ethernet Connection I217-V' if=eth0 drv=e1000e unused=uio_pci_generic *Active*
0000:05:00.1 '82576 Gigabit Network Connection' if=eth2 drv=igb unused=uio_pci_generic *Active*
Other network devices
=====================
0000:06:10.1 '82576 Virtual Function' unused=uio_pci_generic
0000:06:10.3 '82576 Virtual Function' unused=uio_pci_generic
配置OVS使用DPDK
hua@node1:~$ cat /etc/default/openvswitch-switch |grep DPDK
DPDK_OPTS='--dpdk -c 0x1 -n 2'
hua@node1:~$ sudo update-alternatives --set ovs-vswitchd /usr/lib/openvswitch-switch-dpdk/ovs-vswitchd-dpdk
update-alternatives: using /usr/lib/openvswitch-switch-dpdk/ovs-vswitchd-dpdk to provide /usr/sbin/ovs-vswitchd (ovs-vswitchd) in manual mode
hua@node1:~$ sudo stop openvswitch-switch; sudo start openvswitch-switch
hua@node1:~$ cat /var/log/openvswitch/ovs-ctl.log |grep dpdk
有一个bug设置了DPDK_OPTS不生效,见:https://bugs.launchpad.net/ubuntu/+source/openvswitch-dpdk/+bug/1547463, 做了这些改动:
vi /etc/default/openvswitch-switch
DPDK_OPTS='--dpdk -c 0x1 -n 4'
vi /etc/init/openvswitch-switch.conf
# To enable openvswitch-dpdk
if test X"$DPDK_OPTS" != X; then
set "$@" DPDK_OPTS="$DPDK_OPTS"
fi
vi /usr/share/openvswitch/scripts/ovs-ctl
set ovs-vswitchd
if test X"$DPDK_OPTS" != X; then
set "$@" $DPDK_OPTS --
fi
set "$@" unix:"$DB_SOCK"
但在/var/log/openvswitch/ovs-ctl.log中仍然发现了下列错误,估计是ovs-vswitchd (Open vSwitch) 2.4.0版本(dpkg -l openvswitch-switch-dpdk)不支持--dpdk-opts参数吧。
/usr/share/openvswitch/scripts/ovs-ctl: unknown option "--dpdk-opts=-c 0x1 -n 4" (use --help for help)
为避免上述ovs的bug,我们改用下列三个命令启动:
sudo restart openvswitch-switch
sudo killall ovs-vswitchd
sudo ovs-vswitchd --dpdk -c 0x1 -n 2 -- unix:/var/run/openvswitch/db.sock --pidfile --detach
or
sudo ovs-vswitchd --dpdk -c 0x1 -n 2 --socket-mem 128,0 -- unix:/var/run/openvswitch/db.sock -vconsole:emer -vsyslog:err -vfile:info --mlockall --no-chdir --log-file=/var/log/openvswitch/ovs-vswitchd.log --pidfile=/var/run/openvswitch/ovs-vswitchd.pid --detach --monitor
但仍然有下列错误。估计是保留的大页数目太少所致,后来将GRUB_CMDLINE_LINUX="transparent_hugepage=never hugepagesz=2M hugepages=64 default_hugepagesz=2M"中的hugepages从4改成64这个错误就翻过去了。
hua@node1:~$ sudo ovs-vswitchd --dpdk -c 0x1 -n 2 -- unix:/var/run/openvswitch/db.sock --pidfile --detach
2016-04-07T11:48:03Z|00001|dpdk|INFO|No -cuse_dev_name provided - defaulting to vhost-net
EAL: Detected lcore 0 as core 0 on socket 0
EAL: Detected lcore 1 as core 1 on socket 0
EAL: Detected lcore 2 as core 2 on socket 0
EAL: Detected lcore 3 as core 3 on socket 0
EAL: Support maximum 128 logical core(s) by configuration.
EAL: Detected 4 lcore(s)
EAL: No free hugepages reported in hugepages-1048576kB
EAL: Setting up memory...
EAL: Ask a virtual area of 0x200000 bytes
EAL: Virtual area found at 0x7f8609a00000 (size = 0x200000)
EAL: Ask a virtual area of 0x400000 bytes
EAL: Virtual area found at 0x7f8609400000 (size = 0x400000)
EAL: Ask a virtual area of 0x200000 bytes
EAL: Virtual area found at 0x7f8609000000 (size = 0x200000)
EAL: Requesting 4 pages of size 2MB from socket 0
EAL: rte_eal_common_log_init(): cannot create log_history mempool
PANIC in rte_eal_init():
Cannot init logs
7: [ovs-vswitchd() [0x40b053]]
6: [/lib/x86_64-linux-gnu/libc.so.6(__libc_start_main+0xf5) [0x7f860acc9ec5]]
5: [ovs-vswitchd() [0x40a059]]
4: [ovs-vswitchd() [0x639db1]]
3: [ovs-vswitchd() [0x43f7ad]]
2: [ovs-vswitchd() [0x407bad]]
1: [ovs-vswitchd() [0x444e58]]
hua@node1:~$ sudo ovs-vswitchd --dpdk -c 0x1 -n 2 -- unix:/var/run/openvswitch/db.sock --pidfile --detach
2016-04-07T13:57:08Z|00001|dpdk|INFO|No -cuse_dev_name provided - defaulting to vhost-net
EAL: Detected lcore 0 as core 0 on socket 0
EAL: Detected lcore 1 as core 1 on socket 0
EAL: Detected lcore 2 as core 2 on socket 0
EAL: Detected lcore 3 as core 3 on socket 0
EAL: Support maximum 128 logical core(s) by configuration.
EAL: Detected 4 lcore(s)
EAL: No free hugepages reported in hugepages-1048576kB
EAL: VFIO modules not all loaded, skip VFIO support...
EAL: Setting up memory...
EAL: Ask a virtual area of 0x200000 bytes
EAL: Virtual area found at 0x7f2f72a00000 (size = 0x200000)
EAL: Ask a virtual area of 0x200000 bytes
EAL: Virtual area found at 0x7f2f72600000 (size = 0x200000)
EAL: Ask a virtual area of 0x200000 bytes
EAL: Virtual area found at 0x7f2f72200000 (size = 0x200000)
EAL: Ask a virtual area of 0x1a00000 bytes
EAL: Virtual area found at 0x7f2f70600000 (size = 0x1a00000)
EAL: Ask a virtual area of 0x200000 bytes
EAL: Virtual area found at 0x7f2f70200000 (size = 0x200000)
EAL: Ask a virtual area of 0x5c00000 bytes
EAL: Virtual area found at 0x7f2f6a400000 (size = 0x5c00000)
EAL: Ask a virtual area of 0x200000 bytes
EAL: Virtual area found at 0x7f2f6a000000 (size = 0x200000)
EAL: Requesting 64 pages of size 2MB from socket 0
EAL: TSC frequency is ~3292375 KHz
EAL: Master lcore 0 is ready (tid=74e2bb40;cpuset=[0])
PMD: ENICPMD trace: rte_enic_pmd_init
EAL: PCI device 0000:05:00.0 on NUMA socket -1
EAL: probe driver: 8086:10c9 rte_igb_pmd
EAL: PCI memory mapped at 0x7f2f72c00000
EAL: PCI memory mapped at 0x7f2f72c20000
EAL: PCI memory mapped at 0x7f2f72c60000
PMD: eth_igb_dev_init(): port_id 0 vendorID=0x8086 deviceID=0x10c9
EAL: PCI device 0000:05:00.1 on NUMA socket -1
EAL: probe driver: 8086:10c9 rte_igb_pmd
EAL: Not managed by a supported kernel driver, skipped
EAL: PCI device 0000:06:10.1 on NUMA socket -1
EAL: probe driver: 8086:10ca rte_igbvf_pmd
EAL: Not managed by a supported kernel driver, skipped
EAL: PCI device 0000:06:10.3 on NUMA socket -1
EAL: probe driver: 8086:10ca rte_igbvf_pmd
EAL: Not managed by a supported kernel driver, skipped
Zone 0: name:<MALLOC_S0_HEAP_0>, phys:0xd6c00000, len:0xb00000, virt:0x7f2f70600000, socket_id:0, flags:0
Zone 1: name:<RG_MP_log_history>, phys:0x2200000, len:0x2080, virt:0x7f2f72a00000, socket_id:0, flags:0
Zone 2: name:<MP_log_history>, phys:0xd7700000, len:0x28a0c0, virt:0x7f2f71100000, socket_id:0, flags:0
Zone 3: name:<rte_eth_dev_data>, phys:0x2202080, len:0x1f400, virt:0x7f2f72a02080, socket_id:0, flags:0
2016-04-07T13:57:09Z|00002|ovs_numa|INFO|Discovered 4 CPU cores on NUMA node 0
2016-04-07T13:57:09Z|00003|ovs_numa|INFO|Discovered 1 NUMA nodes and 4 CPU cores
2016-04-07T13:57:09Z|00004|reconnect|INFO|unix:/var/run/openvswitch/db.sock: connecting...
VHOST_CONFIG: socket created, fd:17
VHOST_CONFIG: bind to vhost-net
2016-04-07T13:57:09Z|00005|reconnect|INFO|unix:/var/run/openvswitch/db.sock: connected
2016-04-07T13:57:09Z|00006|ofproto_dpif|INFO|system@ovs-system: Datapath supports recirculation
2016-04-07T13:57:09Z|00007|ofproto_dpif|INFO|system@ovs-system: MPLS label stack length probed as 1
2016-04-07T13:57:09Z|00008|ofproto_dpif|INFO|system@ovs-system: Datapath supports unique flow ids
2016-04-07T13:57:09Z|00009|bridge|INFO|bridge br-ex: added interface br-ex on port 65534
2016-04-07T13:57:09Z|00010|bridge|INFO|bridge br-ex: added interface qg-5786befb-c3 on port 1
2016-04-07T13:57:09Z|00011|bridge|INFO|bridge br-tun: added interface patch-int on port 1
2016-04-07T13:57:09Z|00012|bridge|INFO|bridge br-tun: added interface br-tun on port 65534
2016-04-07T13:57:09Z|00013|bridge|INFO|bridge br-int: added interface tap140d04f3-58 on port 22
2016-04-07T13:57:09Z|00014|bridge|INFO|bridge br-int: added interface tap6a12dfe3-40 on port 20
2016-04-07T13:57:09Z|00015|bridge|INFO|bridge br-int: added interface tap1ea7e391-73 on port 21
2016-04-07T13:57:09Z|00016|bridge|INFO|bridge br-int: added interface tapdc1b7683-4e on port 14
2016-04-07T13:57:09Z|00017|bridge|INFO|bridge br-int: added interface patch-tun on port 182
2016-04-07T13:57:09Z|00018|bridge|INFO|bridge br-int: added interface tap23e3a388-68 on port 11
2016-04-07T13:57:09Z|00019|bridge|INFO|bridge br-int: added interface int-br-phy on port 1
2016-04-07T13:57:09Z|00020|bridge|INFO|bridge br-int: added interface tap935ec68a-1a on port 12
2016-04-07T13:57:09Z|00021|bridge|INFO|bridge br-int: added interface tap2ca9e4a0-67 on port 7
2016-04-07T13:57:09Z|00022|bridge|INFO|bridge br-int: added interface tapcc6c6a9e-f2 on port 13
2016-04-07T13:57:09Z|00023|bridge|INFO|bridge br-int: added interface tap4751f42a-65 on port 10
2016-04-07T13:57:09Z|00024|bridge|INFO|bridge br-int: added interface br-int on port 65534
2016-04-07T13:57:09Z|00025|bridge|INFO|bridge br-int: added interface tapdde9820f-58 on port 9
2016-04-07T13:57:09Z|00026|bridge|WARN|could not open network device br100 (No such device)
2016-04-07T13:57:09Z|00027|bridge|INFO|bridge br-phy: added interface phy-br-phy on port 3
2016-04-07T13:57:09Z|00028|bridge|INFO|bridge br-phy: added interface br-phy on port 65534
2016-04-07T13:57:09Z|00029|bridge|INFO|bridge br-ex: using datapath ID 0000de7e48588f4c
2016-04-07T13:57:09Z|00030|connmgr|INFO|br-ex: added service controller "punix:/var/run/openvswitch/br-ex.mgmt"
2016-04-07T13:57:09Z|00031|bridge|INFO|bridge br-tun: using datapath ID 00007a84c20ae149
2016-04-07T13:57:09Z|00032|connmgr|INFO|br-tun: added service controller "punix:/var/run/openvswitch/br-tun.mgmt"
2016-04-07T13:57:09Z|00033|bridge|INFO|bridge br-int: using datapath ID 00008e56b225c748
2016-04-07T13:57:09Z|00034|connmgr|INFO|br-int: added service controller "punix:/var/run/openvswitch/br-int.mgmt"
2016-04-07T13:57:09Z|00035|bridge|INFO|bridge br-phy: using datapath ID 00000255fc61864b
2016-04-07T13:57:09Z|00036|connmgr|INFO|br-phy: added service controller "punix:/var/run/openvswitch/br-phy.mgmt"
2016-04-07T13:57:09Z|00001|ofproto_dpif_upcall(handler15)|INFO|received packet on unassociated datapath port 0
测试
sudo ovs-vsctl ovsbr0 br-int
sudo ovs-vsctl set bridge ovsbr0 datapath_type=netdev
sudo ovs-vsctl add-port ovsbr0 dpdk0 -- set Interface dpdk0 type=dpdk #Port name shoud begin with dpdk
给虚机创建普通ovs port:
sudo ovs-vsctl add-port ovsbr0 intP1 -- set Interface intP1 type=internal
sudo ip addr add 192.168.10.129/24 dev intP1
sudo ip link set dev intP1 up
sudo tcpdump -i intP1
或给虚机创建vhost-user port:
sudo ovs-vsctl add-port ovsbr0 vhost-user2 -- set Interface vhost-user2 type=dpdkvhostuser
虚机使用vhost-user port
sudo qemu-system-x86_64 -enable-kvm -m 128 -smp 2
-chardev socket,id=char0,path=/var/run/openvswitch/vhost-user1
-netdev type=vhost-user,id=mynet1,chardev=char0,vhostforce
-device virtio-net-pci,netdev=mynet1,mac=52:54:00:02:d9:01
-object memory-backend-file,id=mem,size=128M,mem-path=/mnt/huge,share=on
-numa node,memdev=mem -mem-prealloc
-net user,hostfwd=tcp::10021-:22 -net nic
/bak/images/openstack_demo.img
Inside VM: sudo ifconfig eth0 192.168.9.108/24
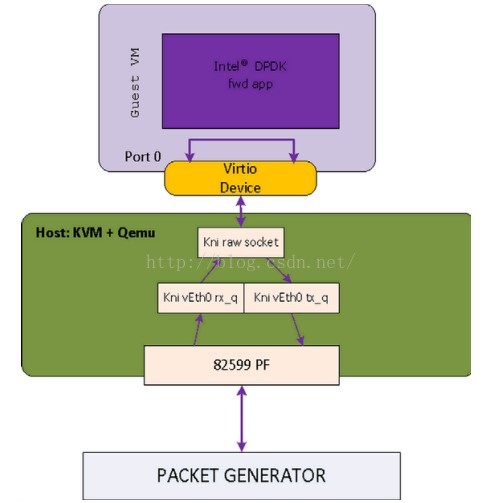
使用vhost-user方式可如下图所示:
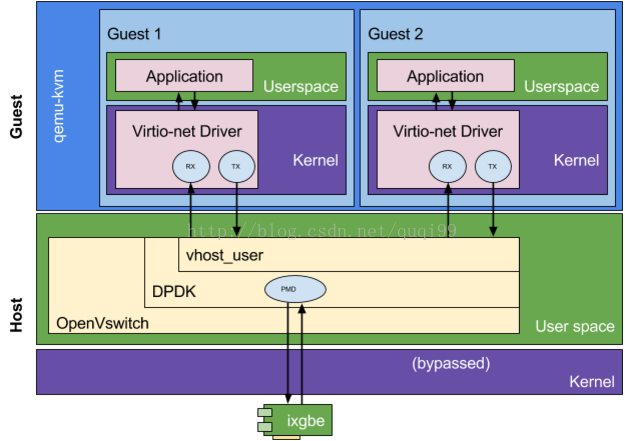
dpdk-virtio-net
与Neutron的集成
nova已经支持vhost-user与hugepages特性,显然在nova.conf应该打开。
[DEFAULT]
ovs_use_usvhost = True
[libvirt]
use_hugepages = True
另外,应该手工创建上述的ovsbr0,然后在/etc/neutron/plugins/ml2/ml2_conf.ini指定使用ovsbr0作为provider network.
[ovs]
bridge_mappings = default:ovsbr0
dpdk与neutron集成的工程叫networking-ovs-dpdk,在devstack加下列一行可使用devstack创建ovs dpdk环境。
enable_plugin networking-ovs-dpdk https://github.com/openstack/networking-ovs-dpdk master
整个运行命令
sudo add-apt-repository cloud-archive:mitaka
sudo apt-get install openvswitch-switch-dpdk
sudo modprobe vfio-pci
sudo chmod a+x /dev/vfio
sudo chmod 0666 /dev/vfio/*
sudo ifconfig eth1 down
sudo dpdk_nic_bind -b vfio-pci eth1 #注意:实验发现,对于sr-iov网卡,此处必须是PF,PF试验成功,VF试验不成功。
find /sys/kernel/iommu_groups/ -type l
sudo sysctl -w vm.nr_hugepages=256
cat /proc/meminfo |grep HugePages_
sudo restart openvswitch-switch
sudo update-alternatives --set ovs-vswitchd /usr/lib/openvswitch-switch-dpdk/ovs-vswitchd-dpdk
sudo killall ovs-vswitchd
sudo ovs-vswitchd --dpdk -c 0x1 -n 2 --socket-mem 128,0 -- unix:/var/run/openvswitch/db.sock -vconsole:emer -vsyslog:err -vfile:info --mlockall --no-chdir --log-file=/var/log/openvswitch/ovs-vswitchd.log --pidfile=/var/run/openvswitch/ovs-vswitchd.pid --detach --monitor
ps -ef|grep dpdk
sudo qemu-system-x86_64 -enable-kvm -m 128 -smp 2
-chardev socket,id=char0,path=/var/run/openvswitch/vhost-user1
-netdev type=vhost-user,id=mynet1,chardev=char0,vhostforce
-device virtio-net-pci,netdev=mynet1,mac=52:54:00:02:d9:01
-object memory-backend-file,id=mem,size=128M,mem-path=/mnt/huge,share=on
-numa node,memdev=mem -mem-prealloc
-net user,hostfwd=tcp::10021-:22 -net nic
/bak/images/openstack_demo.img
Inside VM: sudo ifconfig eth0 192.168.9.108/24
附录1,编译DPDK源码并运行单个应用
git clone git://dpdk.org/dpdk
export DPDK_DIR=/bak/linux/dpdk
export DPDK_BUILD=$DPDK_DIR/x86_64-ivshmem-linuxapp-gcc/
export RTE_TARGET=x86_64-ivshmem-linuxapp-gcc
export EXTRA_CFLAGS="-ggdb -ffunction-sections -O0" #设置调试选项
echo 'CONFIG_RTE_BUILD_COMBINE_LIBS=y' >> ./config/common_linuxapp #编译成单个文件
echo 'CONFIG_RTE_LIBRTE_VHOST=y' >> ./config/common_linuxapp
sudo make config T=x86_64-ivshmem-linuxapp-gcc
sudo make install T=x86_64-ivshmem-linuxapp-gcc #使用共享内存ivshmem模式
cd x86_64-ivshmem-linuxapp-gcc/
EXTRA_CFLAGS="-g -O0" make -j4
sudo modprobe uio
sudo insmod x86_64-ivshmem-linuxapp-gcc/kmod/igb_uio.ko #DPDK只能使用igb_uio和vfio-pci两种驱动
cd lib/librte_vhost/eventfd_link/
make
sudo insmod eventfd_link.ko
sudo python tools/dpdk_nic_bind.py --status
sudo python tools/dpdk_nic_bind.py -b igb_uio 0000:05:00.0
#sudo python tools/dpdk_nic_bind.py -b uio_pci_generic 0000:05:00.0
cd examples/helloworld/
make
sudo ./build/helloworld -c 0xf -n 4 --socket-mem=32
gdb ./build/helloworld
(gdb) run -c 0xf -n 4 --socket-mem=32
#integrate ovs with dpdk
git clone https://github.com/openvswitch/ovs.git
cd /bak/linux/ovs
export OVS_DIR=`pwd`
./boot.sh
./configure --with-dpdk="$DPDK_DIR/x86_64-ivshmem-linuxapp-gcc/" --enable-ssl CFLAGS="-g -O0"
make 'CFLAGS=-g -O0 -march=native' -j4
参考
[1] https://software.intel.com/en-us/blogs/2015/06/09/building-vhost-user-for-ovs-today-using-dpdk-200
[2] http://dpdk.readthedocs.org/en/v2.2.0/linux_gsg/index.html
[3] http://blog.csdn.net/xy010902100449/article/details/47282937
[4] http://openvswitch.org/support/dist-docs/INSTALL.DPDK.md.txt
[5] https://software.intel.com/en-us/articles/using-open-vswitch-with-dpdk-for-inter-vm-nfv-applications
[6] https://raw.githubusercontent.com/xsited/ssg/master/scripts/build_ovs_dpdk.sh
[7] http://www.ran-lifshitz.com/2015/06/17/open-vswitch-netdev-dpdk-with-vhost-user-support/
[8] DPDK编程指南