开始之前,我就喜欢先看一下效果:
 张娜拉,韩国的
  My Digital Story
  不知道是什么图来的
  我的Logo,Studio拼错了都不知道,汗一个。
 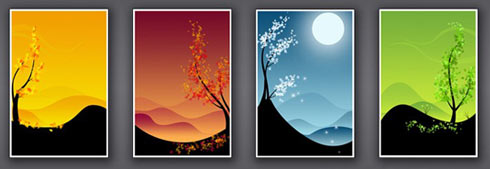 四季图吧这是,但我分不清夏和秋
http://www.lanrentuku.com/lanren/jscode/js-0115/
上面的链接是群上一位兄弟发的一个图片展示效果,并叹息道:jQuery什么时候才有这么cool的例子啊?
我想说jQuery写这样的例子不难吧,于是就尝试着写一下.
先看Html:

然后我们写一个CSS来控制一下这个HTML的样式,CSS比较菜,将就吧,达到效果就好:


 }
} border
 overflow
完成上面的准备工作后,我们下面开始jQuery代码。
首先就是做一些初始化的工作:
$(document).ready(function(){
	var imgDivs = $("#photoShow>div");
	var imgNums = imgDivs.length; //图片数量
	var divWidth = parseInt($("#photoShow").css("width")); //显示宽度
	var imgWidth = parseInt($(".photo>img").css("width")); //图片宽度
	var minWidth = (divWidth - imgWidth)/(imgNums-1); //显示其中一张图片时其他图片的显示宽度
	var spanHeight = parseInt($("#photoShow>.photo:first>span").css("height")); //图片介绍信息的高度
	imgDivs.each(function(i){
		$(imgDivs[i]).css({"z-index": i, "left": i*(divWidth/imgNums)});
		$(imgDivs[i]).hover(function(){
			//处理鼠标进入的时候
		},function(){
			//处理鼠标离开的时候
		});
	});
});
首先我们定义了一些变量,方便我们后面使用。

然后就是使用了一个 each() 的函数在每一个匹配的元素进行事件处理。这里是每一个<div class="photo"> 元素分别进行事件的处理。

然后看一下下面这一句:
$(imgDivs[i]).css({"z-index": i, "left": i*(divWidth/imgNums), "top":"0px"});这句是通过CSS来控制每一个图片的层次和显示位置。
然后就是用一个 hover() 函数来处理鼠标的hover事件。

首先看一下鼠标进入图片的时候该怎么处理:
$(imgDivs[i]).hover(function(){
	//$(this).find("img").css("opacity","1");
	$(this).find("span").stop().animate({bottom: 0}, "slow");
	imgDivs.each(function(j){
		if(j<=i){
			$(imgDivs[j]).stop().animate({left: j*minWidth}, "slow");
		}else{
			$(imgDivs[j]).stop().animate({left: (j-1)*minWidth+imgWidth}, "slow");
		}
	});
},function(){
	//处理鼠标离开时候的事件
});
在这里所有的动画效果都是通过 animate() 函数修改CSS来控制元素的显示位置来实现的。

这里注意一下就是在调用 animate() 函数前都调用了 stop() 函数。stop() 函数是用来停止当前元素的所有执行中的事件。

j<=i 的判断就是判断鼠标hover的当前图片和该图片前面的图片与该图片后面的图片的分割线。

鼠标离开的处理也差不多,下面之完整的代码:
$(document).ready(function(){
	var imgDivs = $("#photoShow>div");
	var imgNums = imgDivs.length; //图片数量
	var divWidth = parseInt($("#photoShow").css("width")); //显示宽度
	var imgWidth = parseInt($(".photo>img").css("width")); //图片宽度
	var minWidth = (divWidth - imgWidth)/(imgNums-1); //显示其中一张图片时其他图片的显示宽度
	var spanHeight = parseInt($("#photoShow>.photo:first>span").css("height")); //图片介绍信息的高度
	imgDivs.each(function(i){
		$(imgDivs[i]).css({"z-index": i, "left": i*(divWidth/imgNums)});
		$(imgDivs[i]).hover(function(){
			//$(this).find("img").css("opacity","1");
			$(this).find("span").stop().animate({bottom: 0}, "slow");
			imgDivs.each(function(j){
				if(j<=i){
					$(imgDivs[j]).stop().animate({left: j*minWidth}, "slow");
				}else{
					$(imgDivs[j]).stop().animate({left: (j-1)*minWidth+imgWidth}, "slow");
				}
			});
		},function(){
			imgDivs.each(function(k){
				//$(this).find("img").css("opacity","0.7");
				$(this).find("span").stop().animate({bottom: -spanHeight}, "slow");
				$(imgDivs[k]).stop().animate({left: k*(divWidth/imgNums)}, "slow");
			});
		});
	});
});
本人水平一般,代码还有待改善。

自己觉得吧用JS来写这种效果不大实际,因为占用的CPU比较高,还是用Flash实现的好。偶写这个完全是为了学习.

或者哪位大大用silverlight也写个这样的效果的教程给偶学习下silverlight。