一、背景
在我之前的博客 git学习——> Gitlab如何进行备份恢复与迁移? (地址:http://blog.csdn.net/ouyang_peng/article/details/77070977) 里面已经写清楚了如何使用Gitlab自动备份功能。
但是之前的备份功能只是备份到Gitlab服务运行的那台服务器上,如果哪一天那台服务器的磁盘损坏了的话,数据无法取出,那么对于公司来说是一匹无法想象的损失,因为
代码是公司的重要资产,需要以防万一。
代码是公司的重要资产,需要以防万一。
代码是公司的重要资产,需要以防万一。
因此我们得做好代码的备份工作,因此除了每天在Gitlab那台服务器上自动备份之外,还需要将每天的备份文件copy到另外一台文件备份服务器上,已达到双保险的要求。
二、服务器密钥配对,取消scp传输密码限制
远程手动备份数据费时费力且不及时。最好的方法就是通过脚本实现远程自动互备。但远程无论是通过SSH登陆,还是通过scp拷贝文件都需要输入密码。为了克服这个问题,首先需要实现不需要密码的SSH登陆,这样就可以使用 rsync,scp,rexec等命令来做的远程备份了。
前提:本地服务器:A, 远程服务器:B
2.1 生成密钥对
假设A,B两服务器,现在需要在A机上用root登陆B机,而不需要输入密码。那我们可按照下面的步骤来做:
2.1.1 在本地服务器A上生成rsa证书
在本地服务器A上生成rsa证书,运行命令:
ssh-keygen -t rsa完整运行如下所示:
root@ubuntu4146:/data/gitlabData/backups# ssh-keygen -t rsa
Generating public/private rsa key pair.
Enter file in which to save the key (/root/.ssh/id_rsa):
/root/.ssh/id_rsa already exists.
Overwrite (y/n)? y
Enter passphrase (empty for no passphrase):
Enter same passphrase again:
Your identification has been saved in /root/.ssh/id_rsa.
Your public key has been saved in /root/.ssh/id_rsa.pub.
The key fingerprint is:
50:75:d3:53:d7:d8:98:1f:e7:9f:43:19:31:0d:e1:c4 root@ubuntu4146
The key's randomart image is:
+--[ RSA 2048]----+
|        ... oo+@*|
|       .   . +EoB|
|      .       .+=|
|       .       oo|
|        S     . o|
|               o.|
|                .|
|                 |
|                 |
+-----------------+
root@ubuntu4146:/data/gitlabData/backups# 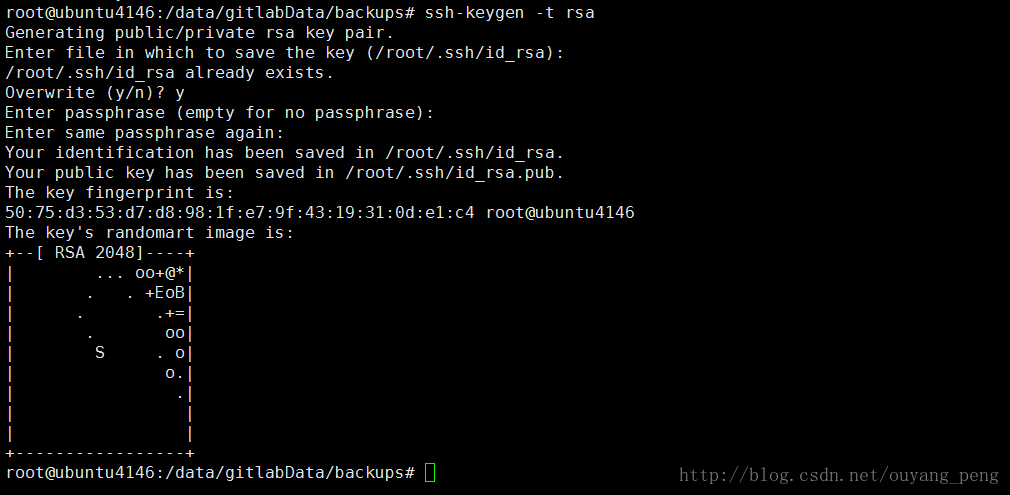
1、生成的过程中提示输入密钥对保存位置,直接回车,接受默认值就行了。
2、因为之前已经有/root/.ssh/id_rsa 文件存在,因此提示你是否覆盖,输入y表示覆盖
3、接着会提示输入一个密码,直接回车,让它空着。当然,也可以输入一个密码。
4、接着输入确认密码,输入完之后,回车密钥对就生成完了。
在/root/.ssh下生成id_rsa 和 id_rsa.pub 两个文件,
其中公共密钥保存在 /root/.ssh/id_rsa.pub,私有密钥保存在/root/.ssh/id_rsa。

2.1.2 在本地服务器A上cp生成rsa公钥证书
然后在/root/.ssh下复制备份一份id_rsa.pub 命名为 id_rsa.pub.A,以便拷贝到远程服务器B。
执行cp命令复制
cp id_rsa.pub id_rsa.pub.A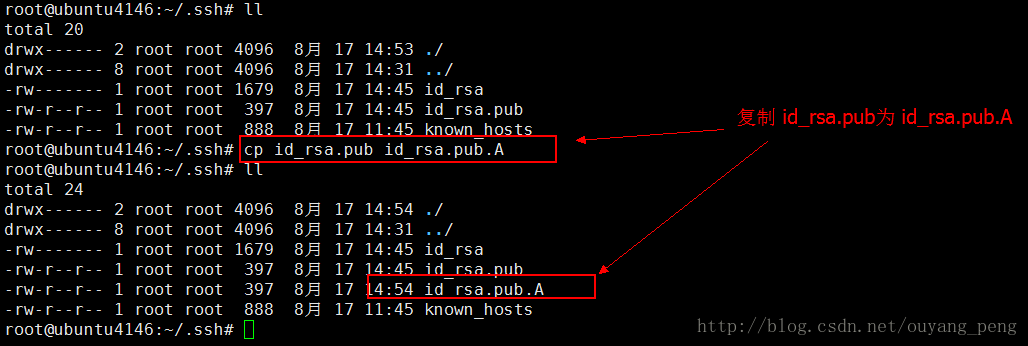
2.2 cp生成rsa公钥证书到远程服务器B
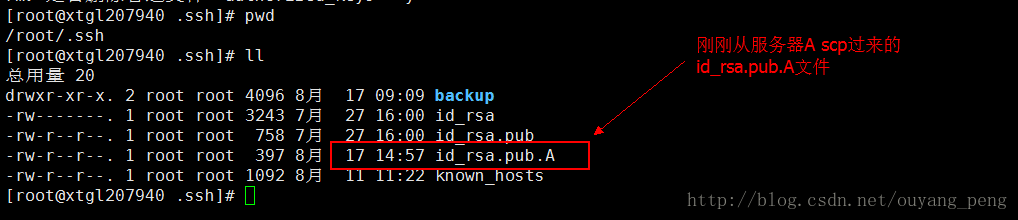
使用scp命令进行远程复制,将A机生成的id_rsa.pub.A拷贝到远程服务器B的/root/.ssh目录下
root@ubuntu4146:~/.ssh# scp /root/.ssh/id_rsa.pub.A root@远程服务器ip:/root/.ssh/
root@远程服务器ip's password:
id_rsa.pub.A 
这里使用scp命令需要输入密码,当我们把下面的第三步执行完毕之后,以后本地服务器A使用scp命令复制文件到远程服务器B的话,就不需要再次输入密码。
三、密钥配对
3.1 创建authorized_keys文件
当第二步将服务器A上的id_rsa.pub.A 文件copy到了服务器B的目录/root/.ssh下之后截图如下:
现在我们在 B 的/root/.ssh下创建authorized_keys文件,使用如下命令
touch authorized_keys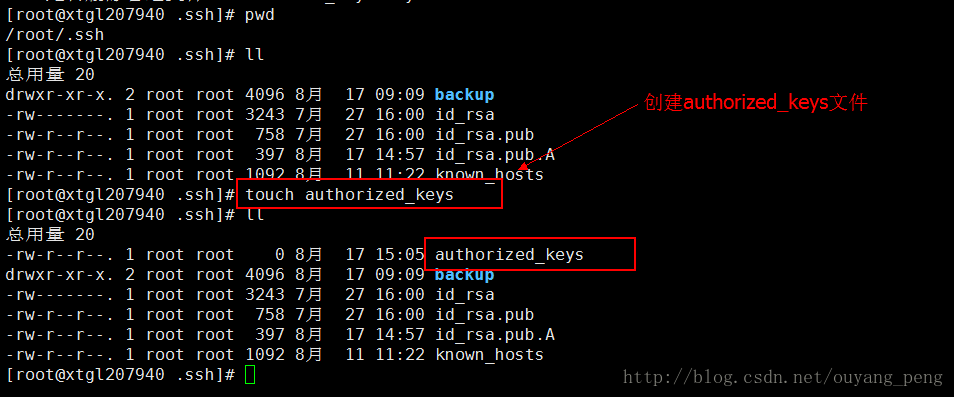
3.2 将id_rsa.pub.A文件内容追加到authorized_keys 文件中
通过 cat 命令 把id_rsa.pub.A 追写到 authorized_keys 文件中,命令依次如下:
cat id_rsa.pub.A >> authorized_keys
3.3 修改authorized_keys文件的权限
执行如下命令,修改authorized_keys文件的权限
chmod 400 authorized_keys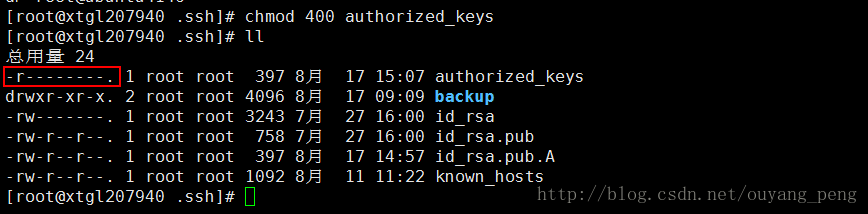
authorized_keys文件的权限很重要,如果设置为777,那么登录的时候,还是需要提供密码的。
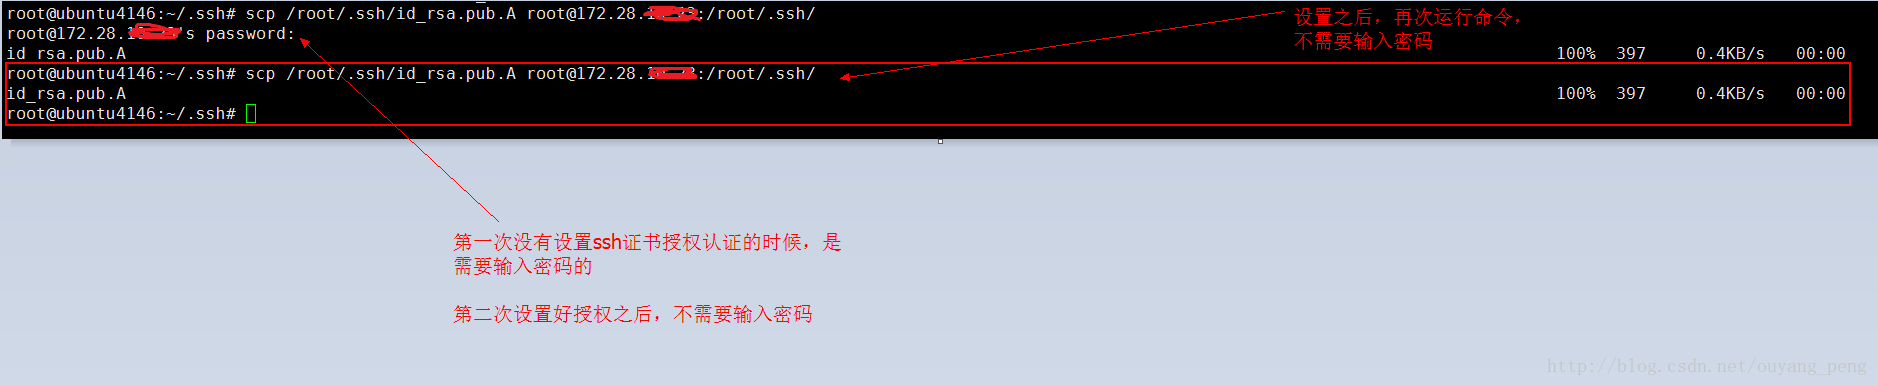
3.4 测试
测试服务器A使用scp命令复制文件到服务器B是否还需要密码
在服务A上,再次使用刚才的命令,发现已经可以不需要输入密码,如下所示:
四、创建Shell定时远程备份脚本
4.1 在本地服务器A上创建定时远程备份脚本
本地服务器A上创建定期备份脚本auto_backup_to_remote.sh,脚本内容如下
#!/bin/bash

# gitlab 机房备份路径
LocalBackDir=/data/gitlabData/backups

# 远程备份服务器 gitlab备份文件存放路径
RemoteBackDir=/root/gitlabDataBackup

# 远程备份服务器 登录账户
RemoteUser=root

# 远程备份服务器 IP地址
RemoteIP=(你的远程服务器地址)请自己修改

#当前系统日期
DATE=`date +"%Y-%m-%d"`

#Log存放路径
LogFile=$LocalBackDir/log/$DATE.log

# 查找 本地备份目录下 时间为60分钟之内的,并且后缀为.tar的gitlab备份文件
BACKUPFILE_SEND_TO_REMOTE=$(find /data/gitlabData/backups -type f -mmin -60  -name '*.tar*')

#新建日志文件
touch $LogFile

#追加日志到日志文件
echo "Gitlab auto backup to remote server, start at  $(date +"%Y-%m-%d %H:%M:%S")" >>  $LogFile
echo "---------------------------------------------------------------------------" >> $LogFile

# 输出日志,打印出每次scp的文件名
echo "---------------------The file to scp to remote server is: $BACKUPFILE_SEND_TO_REMOTE-------------------------------" >> $LogFile


#备份到远程服务器
scp $BACKUPFILE_SEND_TO_REMOTE $RemoteUser@$RemoteIP:$RemoteBackDir

#追加日志到日志文件
echo "---------------------------------------------------------------------------" >> $LogFile
因为到时候,我们会将该定时远程备份脚本auto_backup_to_remote.sh执行的时间,放到Gitlab自动备份脚本auto_backup.sh之后的一小时之内,因此我们只需要每次执行远程备份脚本auto_backup_to_remote.sh的时候,只需要cp一个小时之内的生成的新的Gitlab备份文件。
4.2 修改定时远程备份脚本auto_backup_to_remote.sh的权限
要执行脚本文件,需要修改定时远程备份脚本auto_backup_to_remote.sh的权限
chmod 777 auto_backup_to_remote.sh4.3 手动执行脚本
现在为了验证脚本是否可以正常运行,我们需要手动执行脚本。
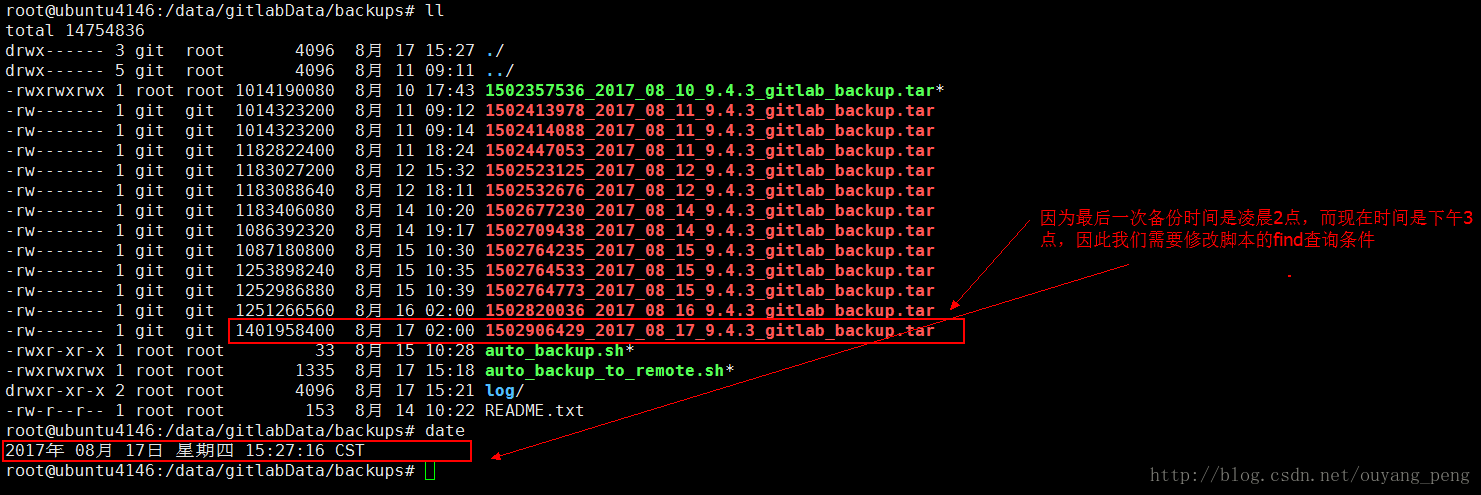
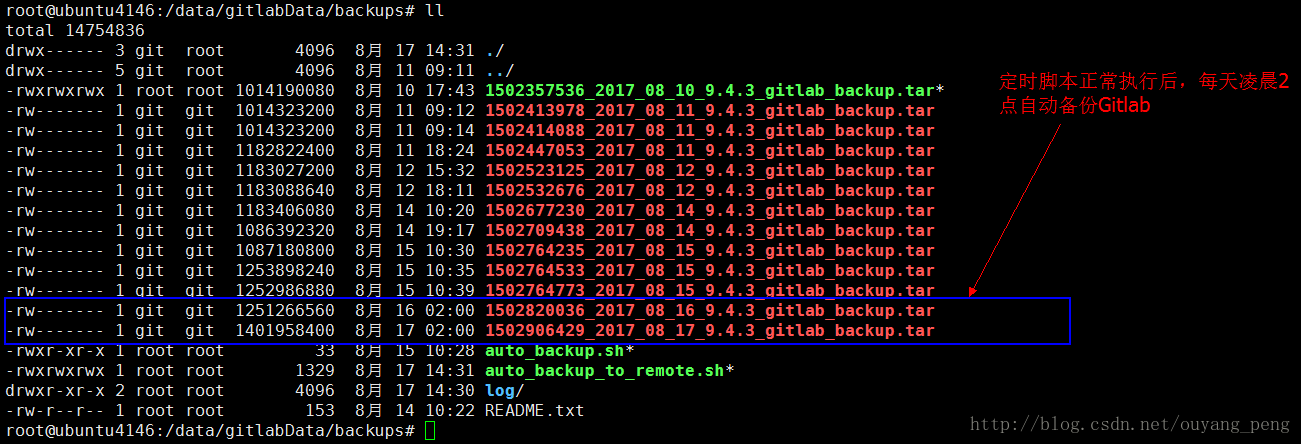
如上图所示,因为最后一次Gitlab备份时间为凌晨2点,而现在已经是下午3点半左右,因此我们需要修改脚本的查询条件。
将查询条件从 本地备份目录下 时间为60分钟之内的,并且后缀为.tar的gitlab备份文件
# 查找 本地备份目录下 时间为60分钟之内的,并且后缀为.tar的gitlab备份文件
BACKUPFILE_SEND_TO_REMOTE=$(find /data/gitlabData/backups -type f -mmin -1000  -name '*.tar*')
修改为 本地备份目录下 时间为1000分钟之内的,并且后缀为.tar的gitlab备份文件
# 查找 本地备份目录下 时间为1000分钟之内的,并且后缀为.tar的gitlab备份文件
BACKUPFILE_SEND_TO_REMOTE=$(find /data/gitlabData/backups -type f -mmin -1000  -name '*.tar*')
先在终端执行find命令,看是否能够正常查找出我们要scp到远程服务器的Gitlab备份文件
root@ubuntu4146:/data/gitlabData/backups# find /data/gitlabData/backups -type f -mmin -1000  -name '*.tar*'
/data/gitlabData/backups/1502906429_2017_08_17_9.4.3_gitlab_backup.tar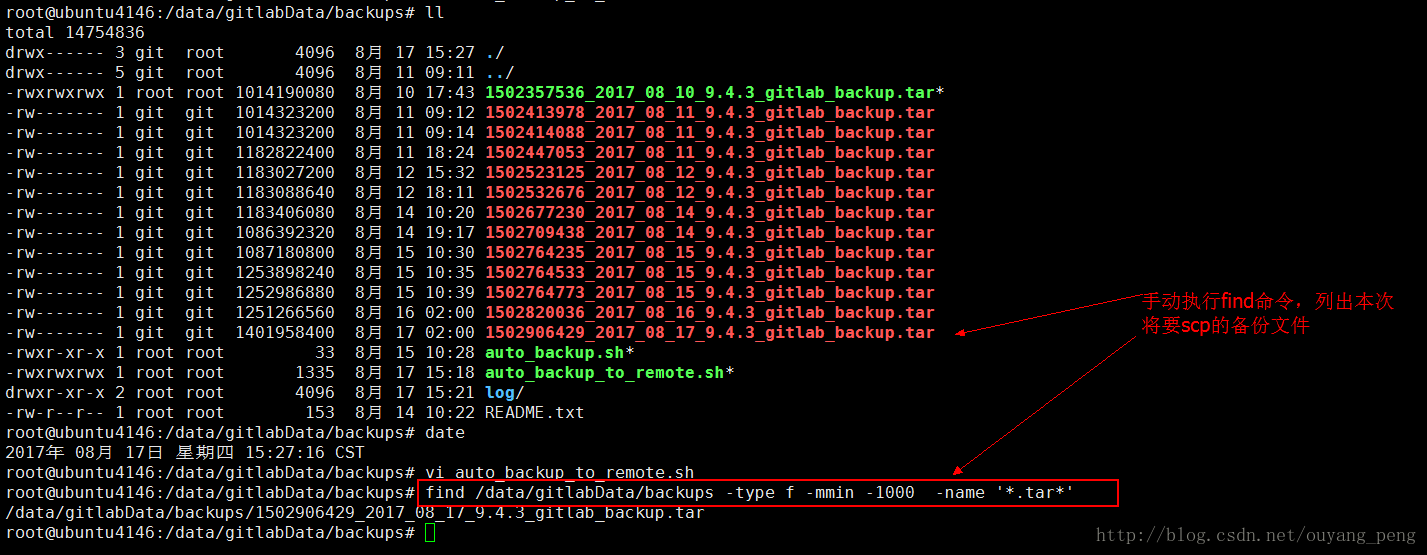
将定时远程备份脚本auto_backup_to_remote.sh修改完毕之后,我们试着手动执行该脚本,看是否能够正常运行。
执行命令
root@ubuntu4146:/data/gitlabData/backups# ./auto_backup_to_remote.sh
执行该脚本文件,在2分钟之内就将最后一次的Gitlab备份文件scp到了远程服务器B
root@ubuntu4146:/data/gitlabData/backups# ./auto_backup_to_remote.sh
1502906429_2017_08_17_9.4.3_gitlab_backup.tar 100% 1337MB 11.2MB/s 01:59 
我们切换到远程服务器B,查看刚才从服务器A 通过scp命令复制过来的Gitlab备份文件,如下所示:

[root@xtgl207940 .ssh]# cd /root/gitlabDataBackup/
[root@xtgl207940 gitlabDataBackup]# ll
总用量 1369100
-rw-------. 1 root root 1401958400 8月  17 15:36 1502906429_2017_08_17_9.4.3_gitlab_backup.tar
[root@xtgl207940 gitlabDataBackup]#
至此,从服务器A复制备份文件到服务器B的脚本正常运行,但是如果每次都这样来手动触发脚本的话,太麻烦,因此我们需要定时执行脚本。
五、定时执行脚本
5.1 编辑/etc/crontab 文件
即vi /etc/crontab,然后添加相应的任务。
#编辑 /etc/crontab
vi /etc/crontab
可以看到,这里有我们之前写好的定期凌晨2点执行Gitlab本机备份的定时任务
# /etc/crontab: system-wide crontab
# Unlike any other crontab you don't have to run the `crontab'
# command to install the new version when you edit this file
# and files in /etc/cron.d. These files also have username fields,
# that none of the other crontabs do.

SHELL=/bin/sh
PATH=/usr/local/sbin:/usr/local/bin:/sbin:/bin:/usr/sbin:/usr/bin

# m h dom mon dow user  command
17 *    * * *   root    cd / && run-parts --report /etc/cron.hourly
25 6    * * *   root    test -x /usr/sbin/anacron || ( cd / && run-parts --report /etc/cron.daily )
47 6    * * 7   root    test -x /usr/sbin/anacron || ( cd / && run-parts --report /etc/cron.weekly )
52 6    1 * *   root    test -x /usr/sbin/anacron || ( cd / && run-parts --report /etc/cron.monthly )
#

# edited by ouyang 2017-8-11 添加定时任务,每天凌晨两点,执行gitlab备份
0  2    * * *   root    /opt/gitlab/bin/gitlab-rake gitlab:backup:create CRON=1

#也可以按照如下所示的方法,定时执行 auto_backup.sh脚本,脚本内容就填写: /opt/gitlab/bin/gitlab-rake gitlab:backup:create CRON=1
#0 2 * * * root /data/gitlabData/backups/auto_backup.sh -D 1 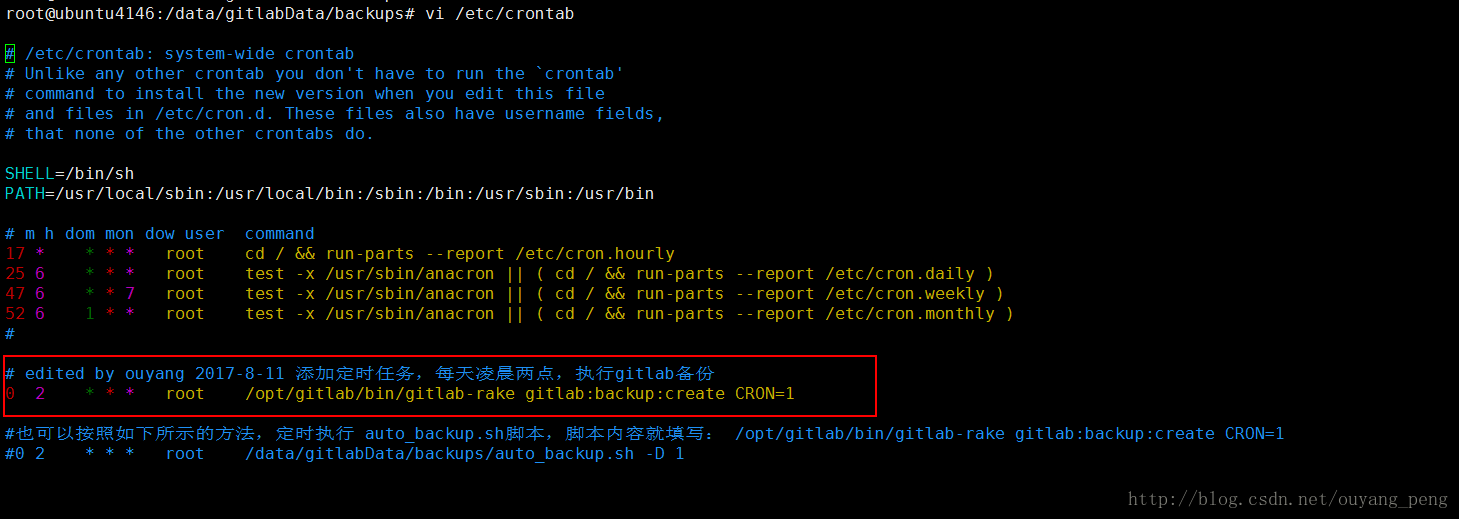
现在我们在上面的定时任务后面,再添加一个执行复制刚备份好的Gitlab备份文件到服务器B的脚本任务。如下所示:
# edited by ouyang 2017-8-17 添加定时任务,每天凌晨三点,执行gitlab备份到远程服务器
0 3 * * * root /data/gitlabData/backups/auto_backup_to_remote.sh 
5.2 重启cron服务
编写完 /etc/crontab 文件之后,需要重新启动cron服务
#重新加载cron配置文件
sudo /usr/sbin/service cron reload
#重启cron服务
sudo /usr/sbin/service cron restart
实际运行如下:
root@ubuntu4146:/data/gitlabData/backups# sudo /usr/sbin/service cron reload
root@ubuntu4146:/data/gitlabData/backups# sudo /usr/sbin/service cron restart
cron stop/waiting
cron start/running, process 47631
5.3 测试自动化脚本
为了能够测试,该脚本是否能够在指定时间的时候,真的能够自动执行,我们将时间修改为15:55分。修改如下:
# edited by ouyang 2017-8-17 添加定时任务,每天凌晨三点,执行gitlab备份到远程服务器
55 15 * * * root /data/gitlabData/backups/auto_backup_to_remote.sh 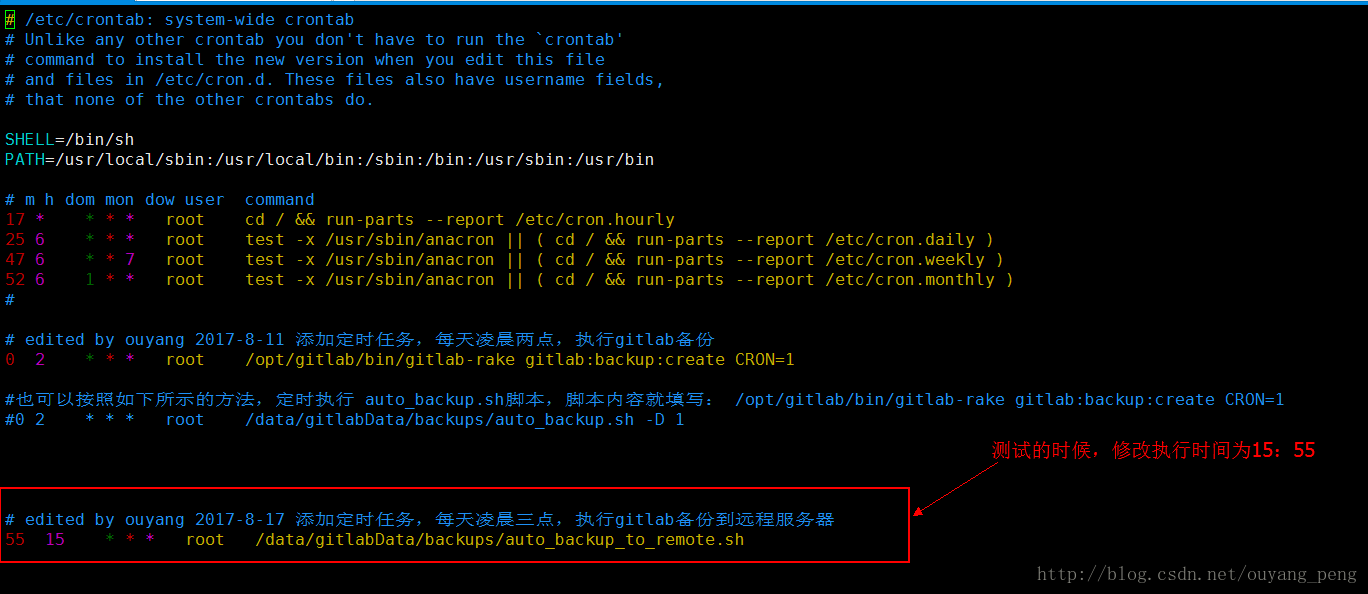
然后重启cron服务
#重新加载cron配置文件
sudo /usr/sbin/service cron reload
#重启cron服务
sudo /usr/sbin/service cron restart
现在时间是15:58分,我们去查看生成的log文件,可以看到在15:55分的时候,脚本正常定时执行了
Gitlab auto backup to remote server, start at  2017-08-17 15:55:01
---------------------------------------------------------------------------
---------------------The file to scp to remote server is: /data/gitlabData/backups/1502906429_2017_08_17_9.4.3_gitlab_backup.tar-------------------------------
---------------------------------------------------------------------------
Gitlab auto backup to remote server, end at  2017-08-17 15:57:00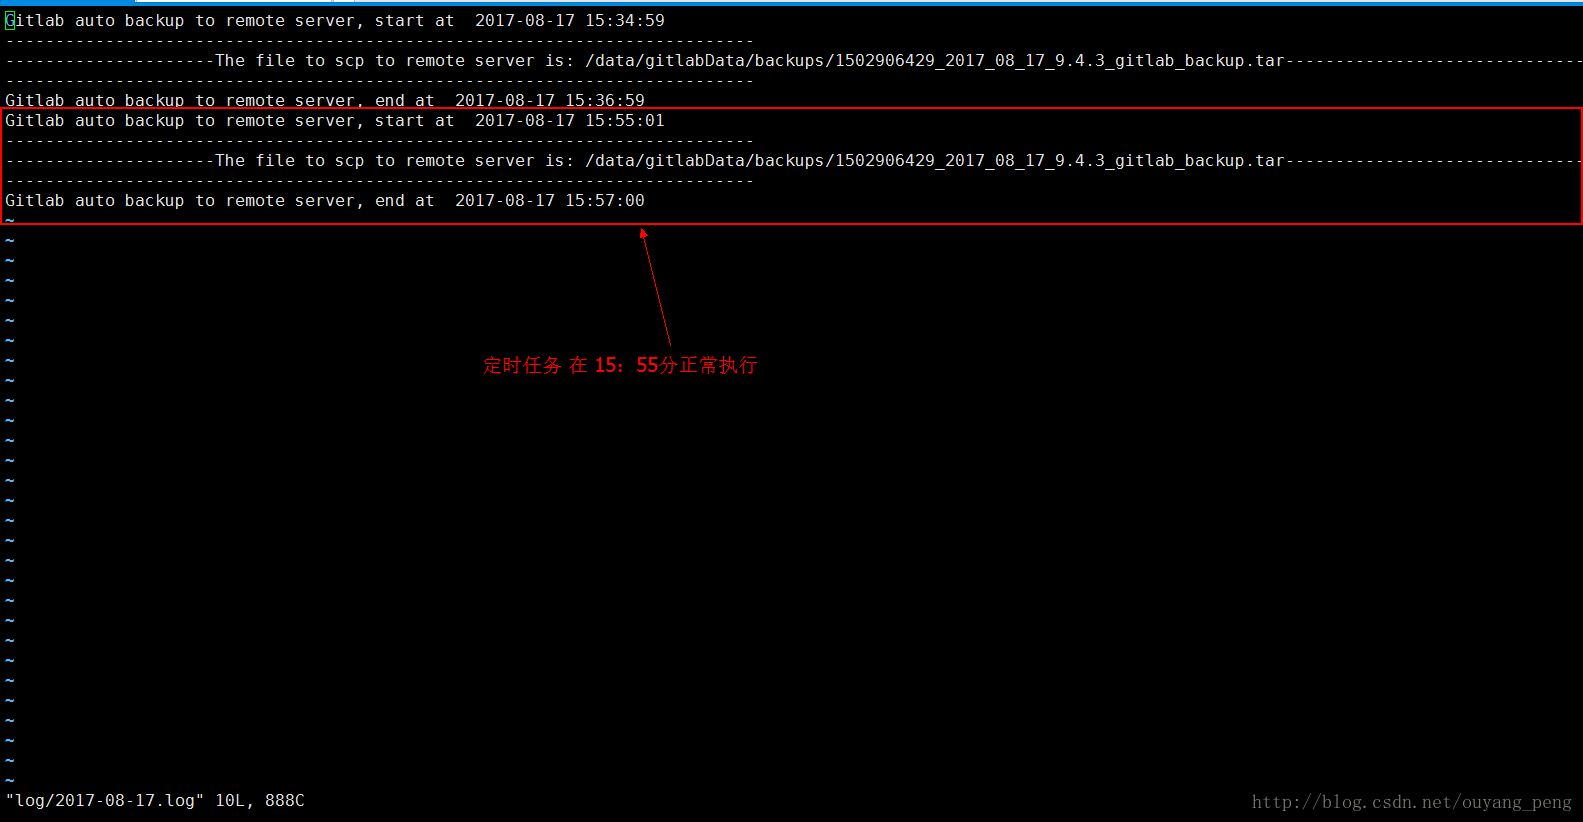
切换到远程服务器B,查看从服务器Acopy过来的Gitlab备份文件

通过测试,可以发现定时任务也正常执行了,因此我们可以将时间改为凌晨3点来复制Gitlab备份文件到远程服务器B。
# edited by ouyang 2017-8-17 添加定时任务,每天凌晨三点,执行gitlab备份到远程服务器
0 3    * * *   root   /data/gitlabData/backups/auto_backup_to_remote.sh
六、定时删除远程服务器上的备份文件
通过如上图所示,每个Gitlab备份文件都很大,都有1G左右的大小。因此每天备份一次,过不了多久的话,备份服务器B上的磁盘空间可能就会被Gitlab备份文件占用完。
因此我们需要定期清理备份文件,清理的时候我们可以自己定义,这里我们规定:
备份文件超过30天的都自动删除掉。
为了实现这个功能,我们需要在远程服务器B上编写脚本来清理过期的备份文件。
6.1 创建定期删除过期的备份文件的脚本
创建定期删除过期的备份文件的脚本auto_remove_old_backup.sh
[root@xtgl207940 gitlabDataBackup]# touch auto_remove_old_backup.sh
6.2 编写脚本auto_remove_old_backup.sh
vi auto_remove_old_backup.sh脚本内容如下 :
#!/bin/bash

# 远程备份服务器 gitlab备份文件存放路径
GitlabBackDir=/root/gitlabDataBackup

# 查找远程备份路径下,超过30天 且文件后缀为.tar 的 Gitlab备份文件 然后删除
find $GitlabBackDir -type f -mtime +30 -name '*.tar*' -exec rm {} ;
6.3 手动执行auto_remove_old_backup.sh脚本
修改auto_remove_old_backup.sh脚本权限为777
chmod 777 auto_remove_old_backup.sh- 1

如上图所示,目前备份服务器上,只有一个8月17日15:56分copy过来的Gitlab备份文件,为了能够测试我们的脚本是否正常运行,我们新建几个7月份的文件,如下所示:
使用touch命令,创建指定时间的 test.tar 文件
[root@xtgl207940 gitlabDataBackup]# touch -t 201707011230 test1.tar
[root@xtgl207940 gitlabDataBackup]# touch -t 201707021230 test2.tar
[root@xtgl207940 gitlabDataBackup]# touch -t 201707031230 test3.tar
[root@xtgl207940 gitlabDataBackup]# touch -t 201707041230 test4.tar
[root@xtgl207940 gitlabDataBackup]# ll
总用量 1369104
-rw-------. 1 root root 1401958400 8月  17 15:56 1502906429_2017_08_17_9.4.3_gitlab_backup.tar
-rwxrwxrwx. 1 root root        279 8月  17 16:24 auto_remove_old_backup.sh
-rw-r--r--. 1 root root          0 7月   1 12:30 test1.tar
-rw-r--r--. 1 root root          0 7月   2 12:30 test2.tar
-rw-r--r--. 1 root root          0 7月   3 12:30 test3.tar
-rw-r--r--. 1 root root          0 7月   4 12:30 test4.tar
[root@xtgl207940 gitlabDataBackup]# 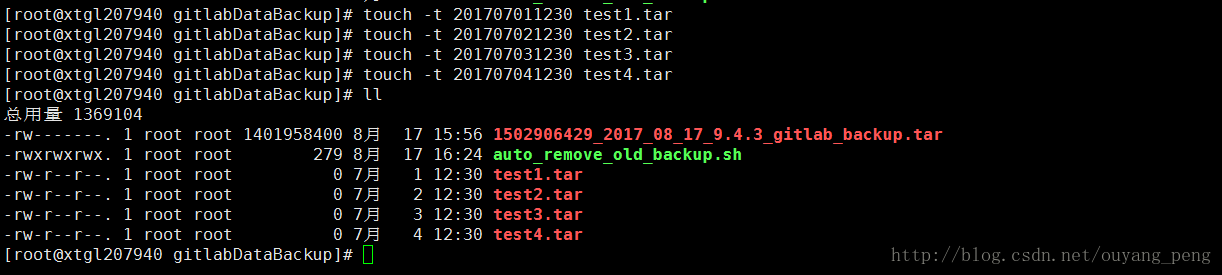
这样我们就创建了4个7月1日到7月4日的的test1.tar、test2.tar、test3.tar、test4.tar
现在我们手动来执行我们的auto_remove_old_backup.sh脚本
[root@xtgl207940 gitlabDataBackup]# ./auto_remove_old_backup.sh
[root@xtgl207940 gitlabDataBackup]# ll
总用量 1369104
-rw-------. 1 root root 1401958400 8月  17 15:56 1502906429_2017_08_17_9.4.3_gitlab_backup.tar
-rwxrwxrwx. 1 root root        279 8月  17 16:24 auto_remove_old_backup.sh
[root@xtgl207940 gitlabDataBackup]# 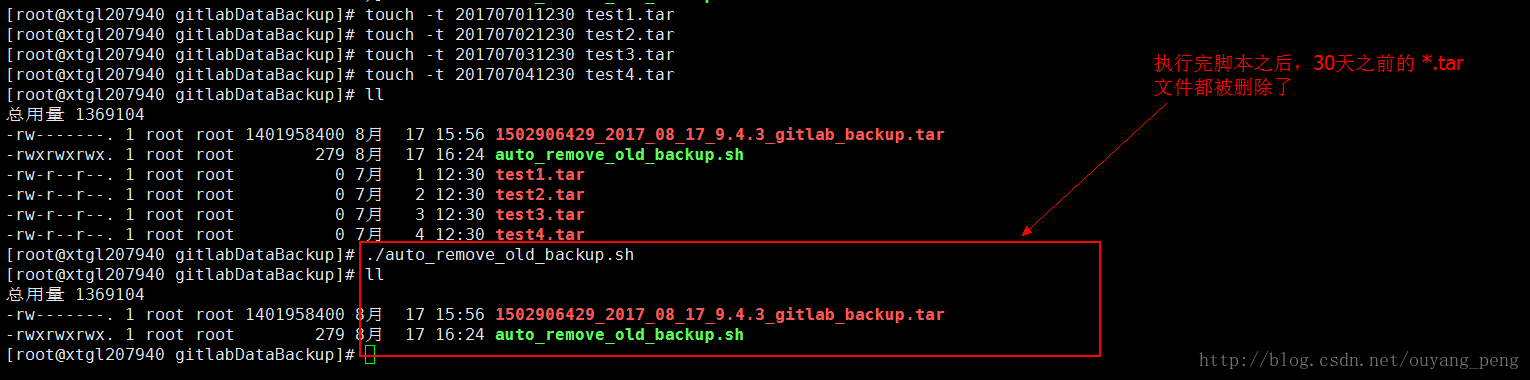
对比执行auto_remove_old_backup.sh脚本前后,我们发现超过30天的,并且以.tar后缀结尾的文件都被删除了,脚本正常。
七、定时执行删除脚本
7.1 编辑/etc/crontab 文件
即vi /etc/crontab,然后添加相应的任务。
#编辑 /etc/crontab
vi /etc/crontab
然后编写定时任务
SHELL=/bin/bash
PATH=/sbin:/bin:/usr/sbin:/usr/bin
MAILTO=root

# For details see man 4 crontabs

# Example of job definition:
# .---------------- minute (0 - 59)
# |  .------------- hour (0 - 23)
# |  |  .---------- day of month (1 - 31)
# |  |  |  .------- month (1 - 12) OR jan,feb,mar,apr ...
# |  |  |  |  .---- day of week (0 - 6) (Sunday=0 or 7) OR sun,mon,tue,wed,thu,fri,sat
# |  |  |  |  |
# *  *  *  *  * user-name  command to be executed


# edited by ouyang 2017-8-17 添加定时任务,每天凌晨4点,执行删除过期的Gitlab备份文件
0  4    * * *   root  /root/gitlabDataBackup/auto_remove_old_backup.sh
7.2 重启crond服务
写完 /etc/crontab 文件之后,需要重新启动cron服务,因为远程备份服务器是Center OS 和之前的Gitlab服务器 Ubuntu 有点不一样,所以重启cron命令有所不同。
#重新加载cron配置文件
sudo service crond reload
#重启cron服务
sudo service crond restart
7.3 测试定期删除任务
为了测试定期删除任务,现在时间是16:35,我们将脚本执行时间设置为16:40分,如下所示
# edited by ouyang 2017-8-17 添加定时任务,每天凌晨4点,执行删除过期的Gitlab备份文件
40 16    * * *   root  /root/gitlabDataBackup/auto_remove_old_backup.sh
然后重启cron服务,超过16点40分之后我们再查看过期的.tar文件是否被删除
[root@xtgl207940 gitlabDataBackup]# touch -t 201707011230 test1.tar
[root@xtgl207940 gitlabDataBackup]# touch -t 201707021230 test2.tar
[root@xtgl207940 gitlabDataBackup]# touch -t 201707031230 test3.tar
[root@xtgl207940 gitlabDataBackup]# touch -t 201707041230 test4.tar
[root@xtgl207940 gitlabDataBackup]# ll
总用量 1369104
-rw-------. 1 root root 1401958400 8月 17 15:56 1502906429_2017_08_17_9.4.3_gitlab_backup.tar
-rwxrwxrwx. 1 root root 279 8月 17 16:24 auto_remove_old_backup.sh
-rw-r--r--. 1 root root 0 7月 1 12:30 test1.tar
-rw-r--r--. 1 root root 0 7月 2 12:30 test2.tar
-rw-r--r--. 1 root root 0 7月 3 12:30 test3.tar
-rw-r--r--. 1 root root 0 7月 4 12:30 test4.tar
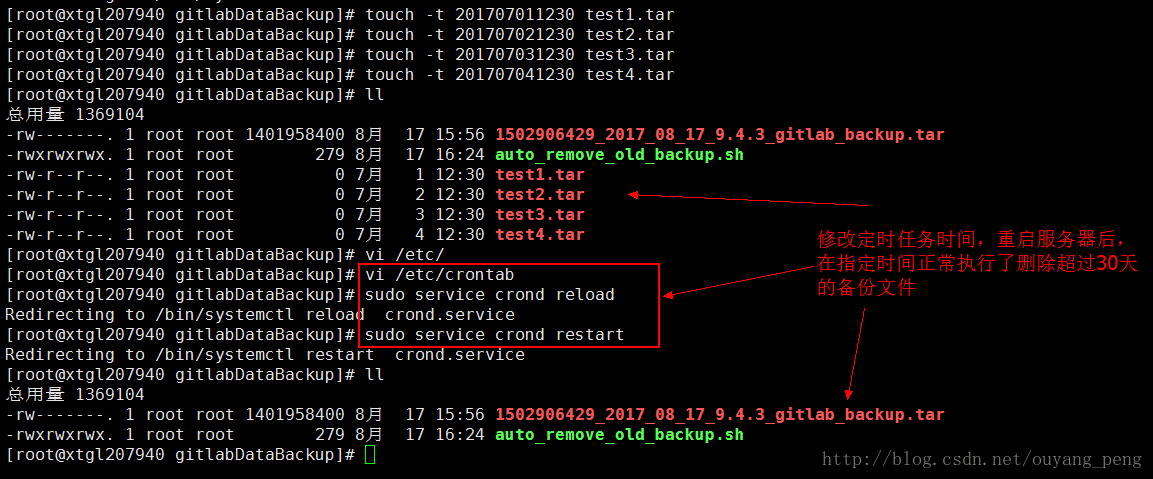
[root@xtgl207940 gitlabDataBackup]# vi /etc/
[root@xtgl207940 gitlabDataBackup]# vi /etc/crontab
[root@xtgl207940 gitlabDataBackup]# sudo service crond reload
Redirecting to /bin/systemctl reload crond.service
[root@xtgl207940 gitlabDataBackup]# sudo service crond restart
Redirecting to /bin/systemctl restart crond.service
[root@xtgl207940 gitlabDataBackup]# ll
总用量 1369104
-rw-------. 1 root root 1401958400 8月 17 15:56 1502906429_2017_08_17_9.4.3_gitlab_backup.tar
-rwxrwxrwx. 1 root root 279 8月 17 16:24 auto_remove_old_backup.sh
[root@xtgl207940 gitlabDataBackup]# 如上所示,我们修改定时执行任务的时间后,删除任务正常执行,因此我们时间修改回凌晨4点删除过期备份文件。
# edited by ouyang 2017-8-17 添加定时任务,每天凌晨4点,执行删除过期的Gitlab备份文件
0 4    * * *   root  /root/gitlabDataBackup/auto_remove_old_backup.sh