本文使用的数据库版本为oracle 10.0.3.1703。
1. 分区表概述
▶ 分区表就是通过分区技术,将一张大表,拆分成多个表分区(独立的segment),从而提升数据的访问性能,以及日常的可维护性。
▶ 分区表中,每个分区的逻辑结构必须相同。如:列名、数据类型。
▶ 分区表中,每个分区的物理存储参数可以不同。如:各个分区所在的表空间。
▶ 对于应用而言,完全透明,分区前后没有变化、不需要进行修改。
需要注意:虽然各个分区可以存在不同的表空间中,但这些表空间使用的块大小(block_size)必须一致。
需要注意:除了包含long和long raw的字段的表无法使用分区之外,其它表均可以使用分区,包括含有lob字段的表。
2. 分区表的优点
▶ 在维护性方面,可以在分区级别,针对单独的分区,进行索引的维护、数据的加载以及备份恢复等操作。大大降低了维护时长。
▶ 在可用性方面,由于各个分区相对独立,当一个分区处于维护或者出现故障时,不会影响到其他分区的正常使用。
▶ 在性能方面,oralce对于用户的请求,只检索需要的分区,从而提升性能。
▶ 在其它方面,由于分区表对用户是透明的,因此,不需要在分区后,对代码进行修改。
3. 分区键简介
▶ 分区键就是决定表中的数据行,属于哪一个分区的一组数据列。在执行DML操作时,Oracle会根据分区键选择分区。
4. 常用分区表及使用方法
4.1 范围分区(range partition)
范围分区的特点:
范围分区主要根据分区键定义时给出的键值范围,根据实际的取值,进行分区的选择。进而在相应分区中存储数据,
范围分区比较合适存在以数据为导向,方便数字范围划分的数字列。如:员工表的雇用日期列,工资列等。
范围分区的数据可能分布不均匀。
范围分区定义的规则:
① 在定义范围分区时,每个分区定义必须使用values less than (value),其中,value表示该分区的上限值。
② 在定义范围分区时,最后一个分区可以是values less than (maxvalue),其中maxvalue表示改分区存储高于其他分区上限值的数据行,否则不满足分区的数据会无法插入。
示例:
示例数据如下:
insert into student (stu_id, stu_name, sex, credit) values ('0001', '大王', '2', '83');
insert into student (stu_id, stu_name, sex, credit) values ('0002', '刘一', '1', '85');
insert into student (stu_id, stu_name, sex, credit) values ('0003', '陈二', '2', '86');
insert into student (stu_id, stu_name, sex, credit) values ('0004', '张三', '0', '77');
insert into student (stu_id, stu_name, sex, credit) values ('0005', '李四', '1', '74');
insert into student (stu_id, stu_name, sex, credit) values ('0006', '王五', '0', '73');
insert into student (stu_id, stu_name, sex, credit) values ('0007', '赵六', '1', '65');
insert into student (stu_id, stu_name, sex, credit) values ('0008', '孙七', '2', '69');
insert into student (stu_id, stu_name, sex, credit) values ('0009', '周八', '2', '79');
insert into student (stu_id, stu_name, sex, credit) values ('0010', '吴九', '1', '55');
insert into student (stu_id, stu_name, sex, credit) values ('0011', '郑十', '1', '76');
commit;
① 采用范围分区的方法创建创建分区,并将上面数据导入分区表,
这里采用credit列作为分区键进行分区操作。
--创建表
create table student_range_part(
stu_id varchar2(4),
stu_name varchar2(100), --姓名
sex varchar2(1), --性别 1 男 2 女 0 未知
credit integer default 0
)
partition by range (credit)
(
partition student_part1 values less than (60) tablespace kdhist_data,
partition student_part2 values less than (70) tablespace kdhist_data,
partition student_part3 values less than (80) tablespace kdhist_data,
partition student_part4 values less than (maxvalue) tablespace kdhist_data
);
--执行数据插入语句并提交
insert into student_range_part select * from student;
commit;
② 查看此时分区表的状态。
注意,新建的数据表,统计信息未必收集,可通过analyze table tablename compute statistics进行收集。
select table_name, partitioning_type, partition_count, status
from user_part_tables
where table_name = 'STUDENT_RANGE_PART';

③ 查看表的数据在分区表中的分布状态
select partition_name, num_rows, tablespace_name, segment_created
from user_tab_partitions
where table_name = 'STUDENT_RANGE_PART';

④ 查看单独分区的数据信息
select * from student_range_part partition(student_part3);

4.2 列表分区(list partition)
列表分区的特点
列表分区主要依据分区键定义时给出的分区了列表,根据实际的取值,进行分区的选择,进而在相应分区中存储数据。
列表分区比较适合唯一取值有限,且较为固定的数据列,如:学生表的sex列。
列表分区的数据分布可能不均匀。
列表分区定义规则
① 在定义列表分区时,每个分区定义必须使用,values('value01','value02'....)子句。表示该分区存储包含相关value值的数据行。
② 在定义列表分区时,最后一个分区可以是values(DEFAULT)。表示该分区存储未在其他分区定义的数据行,否则不满足分区条件的数据将无法插入。
示例
本示例数据源,与上一节相同,均为student表
本示例中,将使用sex列作为分区键进行分区操作。
① 查看目前的性别中涉及的数据
select sex, count(*) from student group by sex;

目前,涉及三种数据,1男,2女,0未知
② 下面使用list的方式进行分区表的创建,sex作为分区键
涉及到1男的数据,放在分区一
涉及到2女的数据,放在分区二
涉及到0未知的数据,放在分区三,同时,将default的数据也放在分区三
--创建表
create table student_list_part(
stu_id varchar2(4),
stu_name varchar2(100), --姓名
sex varchar2(1), --性别 1 男 2 女 0 未知
credit integer default 0
)
partition by list (sex)
(
partition student_part1 values ('1') tablespace kdhist_data,
partition student_part2 values ('2') tablespace kdhist_data,
partition student_part3 values (default) tablespace kdhist_data
);
--执行数据插入语句并提交
insert into student_list_part select * from student;
commit;
③ 首先观察STUDENT_PART2分区的表数据
select SEGMENT_NAME, PARTITION_NAME, BLOCKS
from user_segments
where PARTITION_NAME = 'STUDENT_PART2'
ORDER BY SEGMENT_NAME;

从上面的查询结果可以看到,前面创建的两张分区表,都采用相同的STUDENT_PART2名字,进行了分区的命名。虽然分区均处于相同的表空间下,但相互之前并未受到影响。
由此可以得出结论:
★ 对于普通分区表,只要不是同一张的分区表,分区的命名可以相同;
★ 对于组合分区表,同一张表的子分区命名,不能够相同。(创建时会有提示,此处只给出结论,不再进行演示)
④ 查看此时分区表的状态
select table_name, partitioning_type, partition_count, status
from user_part_tables
where table_name = 'STUDENT_LIST_PART';

⑤ 查看表的数据在分区表中的分布状态
select partition_name, num_rows, tablespace_name, segment_created
from user_tab_partitions
where table_name = 'STUDENT_LIST_PART';

⑥ 查看单个分区中的表数据
select * from student_list_part partition(student_part3);

4.3 哈希分区(hash partition)
Hash分区的特点
Hash分区主要通过hash算法确定相应数据行应该被放到哪个分区内衣。
Hash分区比较适用于列差异很多的数据列。
Hash分区的注意事项
对于hash分区,无法控制一条数据在分区间的具体分布。具体分布由hash函数确定。
对于HASH分区,如果更改分区的数量,将导致所有数据在分区间的重新分布。
HASH分区定义规则
在定义HASH分区时,其分区数量应为2的N次方,如:2,4,8,16等
示例说明:
此示例的数据源依然来源于student表。
关于HASH分区的创建,有标准写法以及简易写法。
① hash分区的标准写法
--hash分区
--建表
create table student_hash_part(
stu_id varchar2(4),
stu_name varchar2(100), --姓名
sex varchar2(1), --性别 1 男 2 女 0 未知
credit integer default 0
)
partition by hash (stu_name)
(
partition student_part1 tablespace kdhist_data,
partition student_part2 tablespace kdhist_data
);
--执行数据插入语句并提交
insert into student_hash_part select * from student;
commit;
② 查看分区表的状态
select table_name, partitioning_type, partition_count, status
from user_part_tables
where table_name = 'STUDENT_HASH_PART';

③ 查看分区表的数据分布情况
select partition_name, num_rows, tablespace_name, segment_created
from user_tab_partitions
where table_name = 'STUDENT_HASH_PART';

④ hash分区简单写法
--hash分区简单写法
--建表
create table student_hash_part_sample(
stu_id varchar2(4),
stu_name varchar2(100), --姓名
sex varchar2(1), --性别 1 男 2 女 0 未知
credit integer default 0
)
partition by hash (stu_name) partitions 2
store in (kdhist_data,kdhist_data); --在同一个分区可写一个分区名称
--执行数据插入语句并提交
insert into student_hash_part_sample select * from student;
commit;
⑤ 查看分区表数据的分布情况
elect partition_name, num_rows, tablespace_name, segment_created
from user_tab_partitions
where table_name = 'STUDENT_HASH_PART_SAMPLE';

从上图可以看到,相较于标准写法,简单写法创建的分区名字,由oracle自动指定。
4.4 组合分区(composite partition)
组合分区的特点
组合分区中,主要通过在不同列上,使用“范围分区”、“列表分区”以及“HASH分区”不同组合方式,进而实现组合分区。
组合分区中,分区本身没有相应的segment,可以认为是一个逻辑容器,只有子分区拥有实际的segment,用于存放数据。
组合分区的注意事项
在11g以前,组合分区主要有两种组合方式:“RANGE-HASH”以及“RANGE-LIST”。
在11g以后,组合分区新增了四种组合方式:“RANGE-RANGE”、“LIST-RANGE”、“LIST-HASH”以及“LIST-LIST”。
示例说明
关于本示例的数据源依然选择student表为参考。
关于本示例的演示,将采用RANGE-LIST的组合方式,创建组合分区。
关于其他组合方式效仿即可。
示例
① 首先按照部门(credit)进行分区,针对相同部门,再按照性别(SEX)再次进行子分区。具体如下:
--范围分区
--创建表
create table student_range_list_part(
stu_id varchar2(4),
stu_name varchar2(100), --姓名
sex varchar2(1), --性别 1 男 2 女 0 未知
credit integer default 0
)
partition by range (credit)
subpartition by list (sex)
(
partition student_part1 values less than (60) tablespace kdhist_data
(subpartition student_part1_m values ('1'),
subpartition student_part1_f values ('2'),
subpartition student_part1_d values (default)),
partition student_part2 values less than (70) tablespace kdhist_data
(subpartition student_part2_m values ('1'),
subpartition student_part2_f values ('2'),
subpartition student_part2_d values (default)),
partition student_part3 values less than (80) tablespace kdhist_data
(subpartition student_part3_m values ('1'),
subpartition student_part3_f values ('2'),
subpartition student_part3_d values (default)),
partition student_part4 values less than (maxvalue) tablespace kdhist_data
(subpartition student_part4_m values ('1'),
subpartition student_part4_f values ('2'),
subpartition student_part4_d values (default))
);
--执行数据插入语句并提交
insert into student_range_list_part select * from student;
commit;
需要注意:关于表空间(tablespace)的指定,可以放在分区一级指定,也可以放在子分区一级指定。
本示例中,表空间的指定,放在了分区一级指定。对于子分区直接套用分区指定。
② 查看分区创建情况
select table_name, partitioning_type, partition_count, subpartitioning_type,status
from user_part_tables
where table_name = 'STUDENT_RANGE_LIST_PART';

③ 查看表的数据在分区表中的分布状态
select partition_name, num_rows, tablespace_name, segment_created
from user_tab_partitions
where table_name = 'STUDENT_RANGE_LIST_PART';

从上图可以看到,对于组合分区,虽然成功创建了分区,但oracle并未对分区一级,分配实际的segment。
④ 再观察下子分区的创建情况:
select partition_name,
subpartition_name,
tablespace_name,
num_rows,
segment_created
from user_tab_subpartitions
where table_name = 'STUDENT_RANGE_LIST_PART';

从上图可以明显看到,针对子分区一级,oracle确实分配了实际的segment用于数据的存储,在数据为0的情况下,segment未创建。
5. 分区表日常维护
分区表涉及的日常维护内容包括:
增加分区(add)
移动分区(move)
截断分区(truncate)
删除分区(drop)
拆分分区(split)
合并分区(merge) --hash分区不适用
交换分区(exchange)
收缩分区(coalesce) --仅适用于hash分区
5.1 测试表准备
使用 4.1 中创建的student_range_part表作为测试。
了解该分区表的各个分区
select a.table_name,
partitioning_type,
partition_name,
high_value,
num_rows
from user_part_tables a, user_tab_partitions b
where a.table_name = b.table_name
and a.table_name = 'STUDENT_RANGE_PART';

5.2 增加分区(ADD)
① 对当前分区表进行添加新分区的操作
alter table STUDENT_RANGE_PART add partition STUDENT_PART5 values less than(90);

可以看到,针对存在默认条件的分区表,无法执行增加分区操作。
解决办法
Ⅰ 删除默认分区条件,待增加分区后,再重新添加默认分区条件。
Ⅱ 使用拆分分区的方式,后面介绍
② 我们尝试用解决方法 Ⅰ 解决该问题,删除存在默认条件maxvalue的分区,然后再查看分区情况。
alter table STUDENT_RANGE_PART drop partition student_part4;

观察分区表的信息,可以看到此时默认条件MAXVALUE的分区已经不存在。
③ 重现对当前分区表进行添加新分区的操作,然后查看该分区表额各个分区。
--增加分区
alter table STUDENT_RANGE_PART add partition STUDENT_PART5 values less than(90);
--重新增加默认条件MAXVALUE分区
alter table STUDENT_RANGE_PART add partition STUDENT_PARTMAX values less than(maxvalue);
analyze table STUDENT_RANGE_PART compute statistics;

需要注意:对于默认条件的分区进行删除,其数据不会重分布到其他分区,而是删除数据。因此在生产环境使用需慎重。
5.3 移动分区(MOVE)
移动分区维护操作,主要是将分区从一个表空间迁移至另一个表空间中。
① 查看当前测试分区表分区所在的表空间
select table_name, partition_name, tablespace_name
from user_tab_partitions
where table_name = 'STUDENT_RANGE_PART';

② 执行移动分区操作,查看测试表分区所在表空间。
alter table STUDENT_RANGE_PART move partition STUDENT_PART1 tablespace KDETL_DATA;

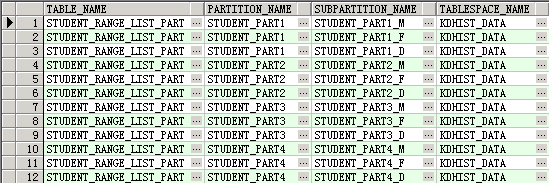
③ 使用4.4组合分区创建的组合分区表STUDENT_RANGE_LIST_PART作为测试表,验证组合分区的移动操作,先查看该分区表的表空间使用情况
select table_name, partition_name, subpartition_name, tablespace_name
from user_tab_subpartitions
where table_name = 'STUDENT_RANGE_LIST_PART';

④ 移动该表的分区
--移动组合分区表的分区
alter table STUDENT_RANGE_LIST_PART move partition STUDENT_PART1 tablespace KDETL_DATA;

可以清楚的看到,对于组合分区,无法直接移动分区至新的表空间。
解决办法:
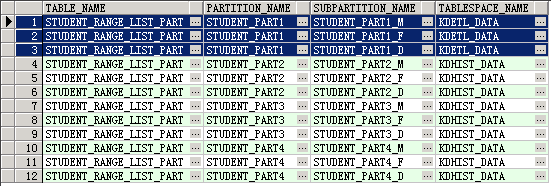
⑤ 移动分区表的子分区,然后修改当前所在分区的属性即可。
--移动子分区
alter table STUDENT_RANGE_LIST_PART move subpartition STUDENT_PART1_M tablespace KDETL_DATA;
alter table STUDENT_RANGE_LIST_PART move subpartition STUDENT_PART1_F tablespace KDETL_DATA;
alter table STUDENT_RANGE_LIST_PART move subpartition STUDENT_PART1_D tablespace KDETL_DATA;
--修改分区的默认属性
alter table STUDENT_RANGE_LIST_PART modify default attributes for partition STUDENT_PART1
tablespace KDETL_DATA;
⑥ 查看该组合分区表的表空间使用情况

5.4 截断分区(TRTNCATE)
截断分区维护操作,相对于传统的delete操作,删除数据的效率会更高。而且会降低高水位线。
① 查看当前测试表分区情况及分区中的记录数
select table_name, partition_name, tablespace_name,num_rows
from user_tab_partitions
where table_name = 'STUDENT_RANGE_PART';

② 执行截断分区操作,然后查看测试表分区中的记录数。
--执行截断分区操作
alter table STUDENT_RANGE_PART truncate partition STUDENT_PART2;
--重新收集最新的测试表的统计信息
analyze table STUDENT_RANGE_PART compute statistics;

可以看到,通过truncate操作,测试表的STUDENT_PART2分区数据被清空。
5.5 删除分区(DROP)
对于分区的删除操作,需要注意,在删除分区后,分区所记录的数据,不会重分布至其他分区中,而是被一并删除。分区的删除操作不会影响数据的分布情况。
例:5.2 增加分区,② 步骤就是删除操作。
5.6 拆分分区(SPLIT)
在“5.2 增加分区”部分,提到了对于存在默认条件的分区表增加分区的的两种办法,这里将介绍通过拆分分区的办法来增加分区。
需要注意:在目标分区拆分后,被拆分的分区会按照拆分规则,将数据进行重分布。
演示实例:
① 首先,将测试表的数据分布还原至初建时的数据分布态。查看数据在分区间得分分布情况。
select table_name, partition_name, tablespace_name,num_rows
from user_tab_partitions
where table_name = 'STUDENT_RANGE_PART';

② 针对上面的最大分区STUDENT_PART4进行拆分处理
将 credit > 90 的数据拆分到新的分区STUDENT_PART5
将 credit > 100 的数据保留到分区STUDENT_PART4
查看数据在分区间的分布情况。
alter table STUDENT_RANGE_PART split partition STUDENT_PART4 at (90) into
(partition STUDENT_PART5,partition STUDENT_PART4);
analyze table STUDENT_RANGE_PART compute statistics;

可以看到,经过拆分,数据已按之前的需求,分别存储在两个分区中。
5.7 合并分区(MERGE)
合并分区操作,主要是将不同的分区,通过分区的合并,进行整合。
需要注意:
对于list分区,合并的分区无限制要求。
对于range分区,合并的分区必须相邻,否则无法进行合并操作。
对于hash分区,无法进行合并分区操作。
此外,对于range分区,下限值由边界值较低的分区决定,上限值由边界值较高的分区决定。
示例
① 对于5.6拆分分区的结果中STUDENT_PART1,STUDENT_PART2进行合并分区操作,查看数据在分区中的分布情况
--合并分区
alter table STUDENT_RANGE_PART merge partitions
STUDENT_PART1,STUDENT_PART2
into partition STUDENT_PART0;
analyze table STUDENT_RANGE_PART compute statistics;

5.8 交换分区(EXCHANGE)
交换分区技术,主要是将一个非分区表的数据同“一个分区表的一个分区”进行数据交换。支持双向交换,既可以从分区表的分区中迁移到非分区表,也可以从非分区表迁移至分区表的分区中。
原则上,非分区表的结构、数据分布等,要符合分区表的目标分区的定义规则。
示例
① 首先,清空测试分区表的数据
--清空测试分区表数据
truncate table STUDENT_RANGE_PART;
commit;
② 查询student表小于70的表数据有多少条(3条)。
select count(*) from student where credit<70;
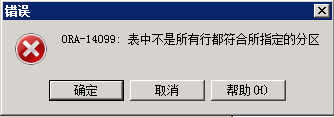
③执行交换分区操作,观察分区表的记录变化,以及非分区表的记录变化
alter table STUDENT_RANGE_PART exchange partition STUDENT_PART0 with table STUDENT;

执行失败,数据并没有转化成功,可见,非分区表数据要完全满足所交换的这个分区的限制条件。
④ 删掉不满足条件的数据,执行数据交换操作
delete from student where credit>70;
commit;
alter table STUDENT_RANGE_PART exchange partition STUDENT_PART0 with table STUDENT;
analyze table STUDENT_RANGE_PART compute statistics;
⑤ 查看结果
select partition_name, num_rows, tablespace_name, segment_created
from user_tab_partitions
where table_name = 'STUDENT_RANGE_PART';

select * from student;--查询结果为空
⑤ 再次执行数据交换操作,查看结果
alter table STUDENT_RANGE_PART exchange partition STUDENT_PART0 with table STUDENT;
analyze table STUDENT_RANGE_PART compute statistics;
select partition_name, num_rows, tablespace_name, segment_created
from user_tab_partitions
where table_name = 'STUDENT_RANGE_PART';

5.9 收缩分区(COALESCE)
收缩分区维护操作,仅仅可以在hash分区以及组合分区的hash子分区上进行使用。
通过使用收缩分区技术,可以收缩当前hash分区的分区数量。
对于hash分区的数据,在收缩过程中,oracle会自动完成数据在分区间的重分布。
示例数据使用4.3哈希分区的结果数据
① 查看分区表的数据分布情况
select partition_name, num_rows, tablespace_name, segment_created
from user_tab_partitions
where table_name = 'STUDENT_HASH_PART';

② 执行收缩分区操作,并查看结果
alter table STUDENT_HASH_PART coalesce partition;
analyze table STUDENT_HASH_PART compute statistics;

可以看到,通过收缩分区,原本两个分区整合到一个,而且数据也同时被整合。
需要注意:
当hash分区中只有一个分区时,此时无法进行收缩操作。